
Guides
19 Oct 2026

Can’t Reach the Faucet Nut? Choose the Right Tool Before You Buy
Not sure which tool fits your faucet nut? Identify the fixing, see how it lets go and check your clearance first. Then choose a tool, or use one you own.
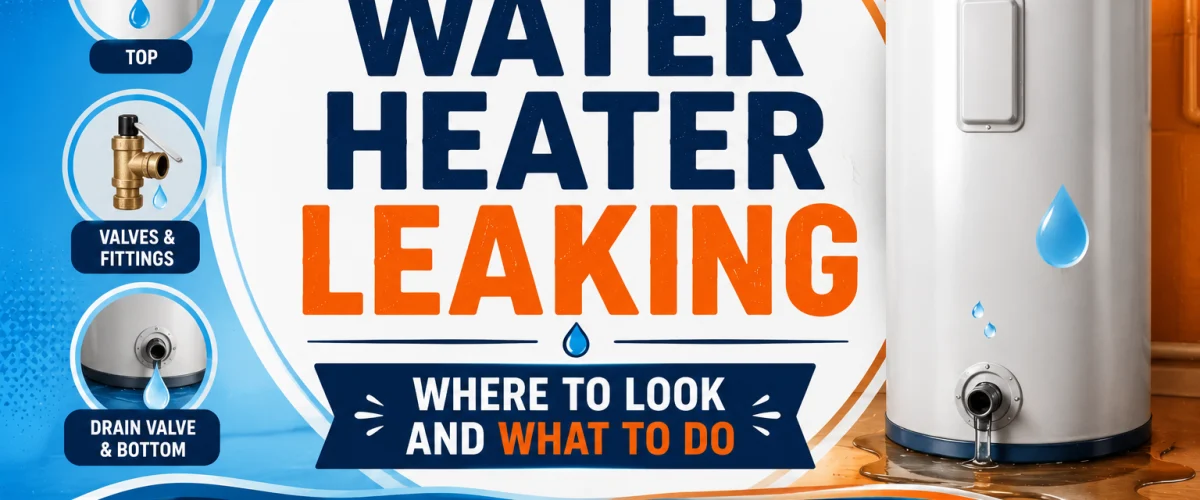
Water heater leaking? Find the exact leak location — top fitting, T&P valve, drain valve, or tank corrosion — and learn if it's a fix or replace.
Please note: Information in this guide is based on our research at time of writing and is subject to change. Always consult a licensed plumber for diagnosis of serious plumbing issues before attempting repairs.
Finding water around your water heater can mean almost anything — a loose fitting that’s a five-minute fix, or a tank that has corroded through and needs replacing before it fails completely. The difference between those two outcomes isn’t guesswork: it’s determined entirely by where on the unit the leak is actually coming from. A drip at the top of the tank, moisture on the side near the relief valve, dampness at the drain valve near the base, and water pooling directly underneath the tank are four distinct problems with four different levels of urgency and cost.
This guide walks through each possible leak location in order, what it typically means, and whether it’s a repair you can do yourself or a sign the tank has reached the end of its life. It’s deliberately focused on active leaks specifically — for the broader long-term warning signs that a unit is deteriorating, see our guide to the signs your water heater is failing, and if your problem is a lack of hot water rather than a leak, see our guide to a water heater with no hot water instead. If you’re standing in front of an actively leaking unit right now, start with Step 1 below.
At a Glance
| Difficulty | Easy to Moderate |
| Time | 15–30 Minutes to diagnose |
| Cost | Free to diagnose — repairs vary widely |
| Tools Needed | Dry cloth or paper towel, flashlight, bucket |
| Skill Level | Beginner to Intermediate |
✏️ Our Take
A leaking water heater is not always an emergency — but it does always need diagnosing immediately, because where the leak is coming from tells you whether it’s a cheap 10-minute fix or a sign the tank itself has failed and needs replacing. A loose inlet connection leaking at the top is very different from water pooling under the tank from a corroded bottom — one you can fix yourself for nothing, the other means the tank is done. Find the source before calling a plumber or buying anything.
IN THIS GUIDE
Before touching anything, make the unit safe. On an electric water heater, go to your main electrical panel and switch off the dedicated breaker for the water heater — it’s typically a labeled double-pole breaker. On a gas water heater, turn the gas control valve on the unit itself to the “Pilot” or “Off” position, which stops the burner from firing while you work. In both cases, also turn off the cold water inlet supply valve — usually located on the pipe entering the top of the tank — to stop more water from flowing into the unit while you diagnose the leak.
These three actions take under a minute combined and eliminate the two most serious risks in this situation: electrical shock from water contacting live components, and a gas unit continuing to fire while you’re working near it. Do this before the drying and inspection step below, even if the leak looks minor.
With power and water isolated, wipe the entire exterior of the tank dry using a cloth or paper towels — the top fittings, the sides, the drain valve near the base, and the floor underneath. Once everything is dry, wait a few minutes and observe carefully where moisture reappears first. Use a flashlight to check all connection points systematically, working from the top of the tank down to the base, rather than scanning randomly.
Don’t assume the lowest wet point on the floor is where the leak is actually coming from. Water follows gravity down the outside of the tank before it ever pools, so a puddle at the base can just as easily be the result of a leak at the top fitting running all the way down the tank’s exterior. Working through the sections below in order, from top to bottom, will help you correctly identify the true source rather than the point where the water simply ended up.
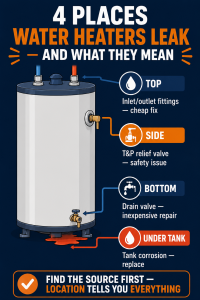
The cold water inlet — usually marked with a blue color-coded fitting or tag — and the hot water outlet — usually marked in red — connect to the tank at the top. These are the two fittings that see the most physical stress over the life of a water heater from installation, thermal expansion, and periodic servicing, which makes them a genuinely common source of small leaks. Fortunately, a leak here is also one of the least expensive problems to fix on this entire list.
Start by hand-tightening the fitting in question — a surprising number of top-connection leaks are simply a nut that has loosened slightly over time. If tightening by hand doesn’t stop the drip, the fitting likely needs to be disassembled, wrapped with PTFE (Teflon) tape on the threads, and reseated properly. This is a straightforward job with basic hand tools once the water supply is off. If you haven’t flushed your unit recently as part of routine maintenance, this is also a good moment to review our guide to flushing your water heater, since sediment and mineral buildup at fittings can contribute to corrosion over time.
The temperature and pressure (T&P) relief valve is a critical safety device mounted on the side or top of the tank, usually with a small discharge pipe that runs down toward the floor. Its job is to automatically open and release water if the tank’s internal pressure or temperature rises above a safe threshold, preventing a far more dangerous outcome. Because of this, some moisture at the T&P valve isn’t automatically a fault.
Occasional small drips from the T&P valve, particularly right after the tank has been heating heavily, can be normal pressure cycling and nothing to worry about. Continuous dripping, or a steady flow of water rather than an intermittent drip, is a different situation entirely — it means either the valve itself has failed and needs replacing, or the tank’s internal pressure is genuinely too high and the valve is doing exactly what it’s designed to do. Either way, a valve that keeps leaking after the tank has fully cooled down needs professional attention.
The drain valve sits near the base of the tank and exists specifically for flushing sediment out during routine maintenance. A drip from this valve, outside of when you’re actively using it, is a common and usually inexpensive problem to resolve. In many cases it’s simply a worn or slightly loose valve that can be hand-tightened, and if that doesn’t fully stop the drip, the valve itself is inexpensive to replace.
If you inspect the valve body and find a visible crack rather than just a loose connection, replacement is the correct path — and it’s a straightforward job with the water supply isolated, well within reach of most homeowners comfortable with basic hand tools. If it’s been a while since your last flush, a leaking drain valve is often the first sign that it’s overdue; our guide to flushing your water heater covers the full process step by step.
If you’ve dried and inspected every fitting, the T&P valve, and the drain valve, and water is still pooling directly under the tank with no visible source higher up, the cause is almost always internal — the tank itself has corroded through from the inside, and water is seeping out through the compromised steel wall. This is the one leak location on this list that doesn’t have a repair option.
Once a tank has corroded through, no patch, sealant, or external fix can reliably hold against normal household water pressure. In hard water states like Arizona, Texas, Nevada and parts of California, sediment buildup accelerates corrosion inside the tank and at fittings — water heaters in these regions often develop leaks years earlier than in soft water areas. Homeowners in hard water states should flush their water heater annually and inspect fittings every year, since early detection of a minor fitting leak can prevent a full tank failure that floods a utility room or basement.
Most fitting and drain valve leaks are well within reach of a confident DIYer, but three specific situations call for a licensed plumber rather than continued self-diagnosis. First, the T&P valve is leaking continuously and doesn’t stop after the tank has had time to fully cool. Second, water is pooling under the tank and you’ve confirmed there’s no source higher up — this points to internal corrosion, which is a professional assessment and likely a replacement, not a repair. Third, you’ve worked through the dry-and-observe process carefully but still cannot pin down where the water is actually coming from.
If any of these describe your situation, or if the leak is accompanied by other signs of a unit in decline — reduced hot water, unusual noises, rusty water — it’s worth reviewing our guide to the signs your water heater is failing alongside the leak itself before deciding on next steps.
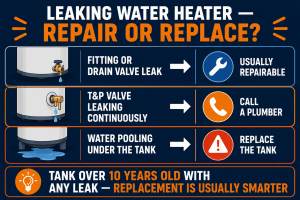
With the leak location identified, the repair-or-replace decision usually resolves itself quickly. Fitting leaks and drain valve leaks are repair situations — hand-tighten, re-tape, or replace the specific inexpensive part, and you’re done, whether you do it yourself or bring in a plumber for a quick job. T&P valve replacement is manageable for an experienced DIYer comfortable working with plumbing fittings, though a plumber is a reasonable and often preferred choice given the valve’s safety function. Tank corrosion leaking from the inside has no repair option at all — replacement is the only path forward once this is confirmed.
One additional factor matters regardless of which location is leaking: the age of the tank. A water heater over 10 years old with any active leak — even a seemingly minor fitting leak — is a candidate for replacement rather than repair, simply because a unit at that age is statistically close to the end of its service life regardless of which specific part fails first. If you’re facing a repair decision on an aging unit, our guide to a water heater with no hot water covers related failure patterns that often show up around the same age.
If your leak turns out to be a continuously running T&P valve, water pooling under the tank from internal corrosion, or you simply can’t pin down the source after a thorough inspection, a licensed plumber is the right next call. A professional can confirm the diagnosis, advise honestly on repair vs replacement cost, and carry out any gas or electrical work safely and to code.
Find a licensed plumber in your area at PlumberArchive.com — the US plumber directory with 12,000+ verified local plumbers across all 50 states.
Get weekly plumbing tips, honest tool reviews and DIY maintenance guides delivered straight to your Facebook feed. We cover water heater repairs, gas and electric troubleshooting, seasonal plumbing checks and everything in between — written for US homeowners who want to handle more themselves.
It depends entirely on the source. A small drip from a fitting or the drain valve isn’t dangerous in itself, though it can cause water damage if left unaddressed for weeks. A continuously leaking T&P valve is a genuine safety signal — it means the tank may be experiencing excess pressure, and the valve should never be capped or blocked. Water pooling under the tank from internal corrosion isn’t an immediate safety hazard in most cases, but the tank could fail completely and release its full contents without further warning, so it should be treated with urgency. In every case, turning off power or gas and the water supply while you diagnose is the correct first move.
For fitting leaks and drain valve leaks, yes — hand-tightening the connection, or re-taping and reseating the fitting with PTFE tape, will often stop the leak entirely rather than just temporarily. For a T&P valve leaking continuously, do not attempt to cap, plug, or otherwise block the discharge — that removes a critical safety mechanism and can make the situation genuinely dangerous. For a leak from tank corrosion, there is no reliable temporary fix; the correct action is to shut off the water supply to the tank and plan for replacement rather than attempt a patch that won’t hold under pressure.
The leak location is the main indicator: fitting leaks and drain valve leaks are repairable at low cost, while water pooling under the tank from internal corrosion means the tank itself has failed and cannot be reliably patched. Age is the second factor — a unit over 10 years old with any active leak is generally a better replacement candidate than a repair candidate, since a first repair on an older tank is often followed by a second failure within months. If the leak is one of several signs pointing toward decline, compare what you’re seeing against our full guide to the signs your water heater is failing before making the final call.
The most common causes, from least to most serious, are: a loose or corroded fitting at the top inlet or outlet connections; a worn drain valve washer or a cracked valve body near the base; a T&P relief valve responding to excess tank pressure or a failed valve itself; and, most seriously, internal tank corrosion that has eaten through the steel wall from the inside, typically accelerated by sediment buildup and hard water minerals over years of use. Hard water regions see this last cause develop earlier than soft water areas, which is why annual flushing and fitting inspection matters more in states like Arizona, Texas, and Nevada.
Finding the exact source of a water heater leak is the single most important step before doing anything else — it’s what separates a five-minute, no-cost fix from a tank that needs replacing before it fails outright. Work through the process in order: power and water off first, then a systematic dry-and-observe check from the top of the tank down to the floor.
Leaks at the top fittings or the bottom drain valve are, in most cases, cheap and straightforward DIY fixes with basic hand tools and some PTFE tape. A T&P valve that won’t stop leaking after the tank has cooled, or water pooling directly under the tank with no source higher up, are different situations entirely — both call for a plumber, and the pooling scenario in particular usually means the tank itself is done.
For the broader picture of whether your unit is approaching the end of its service life, see our guide to the signs your water heater is failing. For routine sediment maintenance that helps prevent leaks in the first place, see our step-by-step guide to flushing your water heater. And if this leak turns out to be part of a unit that’s also lost hot water output entirely, our guide to a water heater with no hot water covers that related failure pattern.
✍️ About This Guide
PTR Editorial Team — Plumbing Guides. We compare manufacturer specifications, installation requirements, compatibility and available product documentation to help homeowners choose suitable tools and parts. How we review →
Not sure which tool fits your faucet nut? Identify the fixing, see how it lets go and check your clearance first. Then choose a tool, or use one you own.
Check your manual and the drain route first: gravity hose, built-in pump or external pump. Then see whether you need a dehumidifier hose at all.
Explore portable bidets that need no water-line connection, from bottle caps and squeeze bottles to battery-powered handhelds.

