Please note: Information in this guide is based on our research at time of writing and is subject to change. Always consult a licensed plumber for diagnosis of serious plumbing issues before attempting repairs.
Introduction
Waking up to no hot water at all is one of the most stressful plumbing problems a homeowner can face — but in most cases the cause is simpler than it looks. A tripped breaker, an extinguished pilot light, or a safety switch that has cut power to the heating element can all produce the same result as a catastrophically failed tank, and the diagnostic steps that separate a five-minute fix from a genuine replacement are easy to work through in order. This guide is specifically for the acute situation: no hot water right now, with steps organized by heater type because gas, electric, and tankless units fail in completely different ways.
This article is deliberately distinct from two related guides already on this site: it does not cover the long-term warning signs of a deteriorating unit — that’s our guide to the signs your water heater is failing — and it does not cover routine sediment maintenance, which is covered fully in the step-by-step guide to flushing your water heater. If those articles describe your situation more accurately, follow those links. If the problem is acute — no hot water right now — work through the relevant section below in order before calling a plumber.
At a Glance
| Difficulty |
Easy to Moderate |
| Time |
15–30 Minutes to diagnose |
| Cost |
Free to diagnose — repairs vary |
| Tools Needed |
Flashlight, multimeter (optional, electric units only), basic hand tools |
| Skill Level |
Beginner to Intermediate |
✏️ Our Take
No hot water at all is usually one of a handful of common causes, and most can be diagnosed in under 15 minutes before you call a plumber. Gas water heaters most often lose hot water because the pilot light went out or the thermocouple has failed; electric water heaters most often lose hot water because a breaker tripped or a heating element burned out. Work through the checks in order — starting with the simplest, most common causes — before assuming the tank itself has failed.
Is It Gas or Electric? Start Here
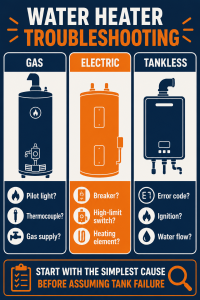
The most important step before any troubleshooting is confirming whether your water heater runs on gas or electricity — the diagnostic steps for each are completely different, and following the wrong set wastes time and potentially creates safety risks. Look at the unit itself: a gas water heater has a gas supply line entering at the bottom or side, a small access panel near the base covering the pilot light and burner assembly, and a draft hood or flue pipe at the top. An electric water heater has no gas line, no pilot assembly, and typically two rectangular access panels on the side of the tank body — one upper, one lower — covering the heating elements and thermostats.
Tankless water heaters — both gas and electric — look distinctly different from either tank type. They are wall-mounted, significantly smaller than a tank unit, and either have a gas line with venting to the outside or an electrical connection panel. Tankless units have their own section below, as their failure modes differ from tank heaters of either fuel type. Once you have confirmed your tank type, proceed directly to the relevant section and work through the checks from most common to least common cause.
💡 Tip: If you’re not sure which fuel type your water heater uses, check your utility bills — if you have gas service to the home, the water heater is almost certainly gas. A home with no gas service at all has an electric unit. Alternatively, look at the unit: a gas line and a flue pipe at the top confirms gas; two side access panels and an electrical conduit confirms electric.
Gas Water Heater — Pilot Light Is Out
An extinguished pilot light is the single most common cause of sudden no-hot-water on a gas water heater, and it is the first thing to check before any other diagnostic step. The pilot light is a small continuous flame that ignites the main burner when the thermostat calls for heat — if it goes out for any reason, the main burner cannot fire and the water stops heating entirely. This is usually a straightforward fix that requires no tools and takes under five minutes.
To check, locate the access panel at the base of the tank — a small removable door or panel — and look for a small blue flame near the burner assembly. If there is no flame visible, the pilot is out. Relighting instructions are printed directly on a label on the tank itself; the standard process involves turning the gas control knob to the “Pilot” position, pressing and holding the red or black reset button to purge air and flow gas to the pilot tube, pressing the ignitor button repeatedly, and then continuing to hold the reset button for 30 to 60 seconds after the pilot lights. Holding the button for the full duration is critical — it allows the thermocouple sensor to heat up enough to generate the current that holds the gas valve open. Releasing it too early causes the pilot to go out again immediately. Our dedicated guide to relighting a water heater pilot light walks through the full process with photos if you want a more detailed reference.
💡 Tip: A pilot light that blows out once is usually a one-off event — a draft through the utility room, a brief gas supply interruption, or the pilot simply going out after extended inactivity. A pilot that goes out again within minutes of relighting, especially repeatedly, points to a failing thermocouple rather than a one-off event. If the pilot doesn’t hold after three relighting attempts, move on to the next section.
Gas Water Heater — Pilot Light Won’t Stay Lit
When the pilot lights but extinguishes within a few seconds of releasing the reset button — consistently, on every relighting attempt — the thermocouple is almost always the cause. The thermocouple is a small sensor rod that sits directly in the pilot flame. As long as the flame heats its tip, it generates a small electrical current that holds the gas valve open. When the thermocouple wears out or fails, it no longer generates sufficient current to keep the valve open, and gas flow stops the moment the manual reset button is released.
Thermocouples are among the least expensive and most commonly replaced water heater parts — widely stocked at US hardware stores and a standard DIY repair for most homeowners. Before purchasing a replacement, check one thing first: the connection between the thermocouple tip and the gas valve body. A loose nut at that connection point can mimic a failed thermocouple entirely. Tighten the connection nut firmly by hand, attempt relighting again, and hold the reset for the full 60 seconds. If the pilot still won’t hold, thermocouple replacement is the correct next step.
⚠️ Warning: If you smell gas at any point during this process — at the access panel, near the gas valve, or anywhere around the water heater — stop immediately. Do not attempt to relight the pilot. Leave the immediate area, leave exterior doors open as you exit, and call your gas utility’s emergency line from outside the building. A gas smell indicates a leak that must be professionally assessed before any further work on the unit is attempted.
Gas Water Heater — Gas Valve or Supply Issue
If the pilot won’t ignite at all — no click, no spark, no response from the ignitor button, and no flame on manual ignition attempts either — the cause may be a gas supply issue rather than a thermocouple problem. Start with the simplest check: locate the manual shut-off valve on the gas supply line running to the water heater. This valve is typically within a few feet of the unit on the dedicated gas supply line. The valve should be parallel to the pipe to be fully open; perpendicular means it is closed. A valve accidentally bumped or closed during recent work nearby is a common and easily overlooked cause.
If the gas supply valve is confirmed fully open and the pilot still won’t ignite, check other gas appliances in the home — the range, furnace, or gas dryer if present. If none of these are working either, the issue is not with the water heater at all: it is upstream at the gas meter or the supply line from the street, and troubleshooting the water heater further won’t resolve it. If other gas appliances are working normally but the water heater still produces no gas flow to the pilot, the internal gas control valve on the unit itself has likely failed and requires professional replacement — this is not a DIY component on most residential units.
💡 Tip: If every gas appliance in the house has stopped working simultaneously, call your gas utility before troubleshooting the water heater at all — this is a supply-side issue at the meter or main line, not a unit fault. Your utility’s emergency line can dispatch someone to check the meter and restore supply, often within hours and at no charge to you.
Electric Water Heater — Check the Breaker First
A tripped circuit breaker is the single most common cause of an electric water heater producing no hot water at all, and it takes about 30 seconds to check. Go to your electrical panel and locate the water heater circuit — it should be labeled, and it is typically a double-pole breaker (two adjacent breakers connected by a shared handle) rated at 30 or 50 amps. A tripped breaker will have moved to the middle position between “on” and “off,” or may appear to be in the off position on some panel types. To reset it, move the breaker handle firmly to the full “off” position first — this is a required step on most breaker designs before it can be reset — and then flip it back firmly to “on.” A functioning breaker will click solidly into position and stay there.
If the breaker trips again immediately or within a few minutes of resetting, there is an underlying fault — a short in the wiring, a heating element drawing excessive current, or a failing breaker. Do not reset a breaker repeatedly if it keeps tripping: a breaker that continues to trip is doing its job by protecting the circuit, and forcing it back on repeats the conditions that caused it to trip. A persistently tripping breaker requires professional electrical diagnosis before the water heater is operated further. After a successful reset that holds, allow 30 to 60 minutes for the tank to reheat before determining whether the issue is resolved.
💡 Tip: If the breaker resets and holds but there is still no hot water after an hour, the high-limit switch may have tripped independently — a separate safety cutout that kills power to the heating elements without affecting the breaker. The reset button for it is inside the upper access panel and is covered in the next section. For broader water heater maintenance context, our guide to
flushing your water heater covers the routine care that complements this troubleshooting.
Electric Water Heater — Reset the High-Limit Switch
Electric water heaters contain a safety device called the high-limit switch — sometimes labeled the energy cut-off (ECO) or thermal cutoff — that independently cuts power to both heating elements if the water temperature inside the tank exceeds roughly 170°F. This is a thermal protection device designed to prevent scalding or tank damage if the thermostat malfunctions and allows the water to overheat. A tripped high-limit switch produces the same symptom as a failed heating element — no hot water, with the breaker apparently fine — and is one of the most commonly overlooked causes in electric water heater troubleshooting.
The high-limit reset button is a small red button located on the thermostat assembly behind the upper access panel on the side of the tank. To access it: switch off the breaker at the main electrical panel first, remove the upper access panel cover (typically held by two screws), and fold back any insulation covering the thermostat. If the high-limit switch has tripped, the red button will be visibly popped out from its normal flush position. Press it firmly until you feel a click, replace the insulation, reinstall the access panel cover, restore power at the breaker, and allow 30 to 60 minutes for the elements to reheat the tank. A high-limit switch that trips repeatedly without the water being set above safe temperatures indicates a faulty thermostat or a deeper wiring issue and warrants professional diagnosis.
⚠️ Warning: Never open an electric water heater’s access panel without first switching off the breaker at the main electrical panel. The wiring inside the access panel area carries the full circuit voltage and presents a genuine shock risk if contacted while live. This step cannot be skipped or deferred — cut power at the breaker before opening any access panel on an electric water heater, every single time without exception.
Electric Water Heater — Failed Heating Element
Most standard US residential electric water heaters contain two heating elements — an upper element near the top of the tank and a lower element near the base — designed to operate in sequence. The upper element activates first when the thermostat calls for heat, bringing the upper portion of the tank to temperature quickly. The lower element then handles the sustained heating of the larger water volume below. Because of this sequence, which element has failed determines the symptom pattern: a failed upper element typically means no hot water at all from the moment any tap is opened; a failed lower element usually still allows some hot water at the start of use but the supply runs cold faster than normal and recovery time after use is much longer than usual.
Confirming a failed element requires a multimeter set to resistance (ohms) mode. With the breaker switched off and the element wiring terminals disconnected, place the multimeter probes on the two element terminal screws. A functional element reads a resistance value — typically 10 to 30 ohms depending on the element’s wattage rating. A failed element shows infinite resistance, indicating an open internal circuit. Element replacement is a standard plumbing repair — the element threads directly into the tank wall — but if testing electrical components in a wet environment is outside your comfort zone, calling a plumber for confirmed element replacement is entirely reasonable.
💡 Tip: If you have some lukewarm water at the very start of a shower but it turns cold much faster than usual, suspect the lower element specifically — the upper element has heated the upper portion of the tank normally, but the lower element is failing to maintain heat for the bulk of the stored volume. Complete absence of hot water from the very first second points to the upper element instead.
Tankless Water Heater — No Hot Water Causes
Tankless water heaters behave differently from tank units and have their own failure modes. The most important first step with any modern tankless unit is reading the display panel for an error code — Rinnai, Navien, Rheem, Noritz, and other major manufacturers all display a specific code when the unit detects a fault, and that code names the exact problem directly rather than requiring you to work through possibilities by elimination. Look up the displayed code in the unit’s manual or on the manufacturer’s online code reference before any other troubleshooting step.
Common causes of no hot water on gas tankless units include: ignition failure (the unit attempts to fire when a tap opens but cannot establish a flame), a blocked or incorrectly sized flue causing the unit to trip a safety lockout, a clogged inlet filter screen reducing water flow below the activation threshold, or a frozen condensate line in cold weather on condensing models. On electric tankless units, a tripped breaker is again the most common single cause — electric tankless units draw very high amperage and require a dedicated large-gauge circuit; if multiple fixtures run simultaneously and push the unit past its rated flow capacity, the breaker may trip. One cause specific to all tankless units that tank heaters don’t share is minimum flow rate: most tankless models require a minimum incoming flow of around 0.5 to 0.75 gallons per minute before they activate at all — a partially closed inlet valve or clogged inlet screen can prevent ignition even with a fully functional unit. For a full comparison of how tankless units differ from tank heaters in everyday operation, our guide to tankless vs tank water heaters covers the operational differences in depth.
💡 Tip: Read the error code on your tankless unit’s display panel before any other diagnostic step — Rinnai, Rheem, and Navien all publish code lookup charts online that name the exact fault in plain language. A 30-second code lookup eliminates the need to work through causes by elimination and is the single fastest path to diagnosis on a modern tankless unit.
When Sediment Buildup Is the Cause
Sediment buildup is more commonly a cause of reduced hot water output or slow recovery than a cause of complete no-hot-water — but in severe cases, a dense layer of mineral deposits at the base of the tank can insulate the lower heating element or burner so thoroughly from the water above it that effective heat transfer essentially stops. This condition develops gradually, but homeowners who have never flushed their tank may experience what feels like a sudden failure when the accumulation finally crosses the threshold where it visibly impacts performance.
The indicators that sediment is the likely cause rather than a mechanical or electrical failure: the unit is several years old and has never been flushed; there is a pronounced rumbling, popping, or banging sound during heating cycles — water boiling through sediment trapped at the base of the tank; hot water output has been declining gradually over weeks or months rather than cutting off abruptly; and you are in a hard water region where mineral deposits accumulate faster than average. If this combination describes your situation, flushing the tank is the correct first step before replacing any components — it is free if you already have a garden hose, and confirming that a flush restores full hot water eliminates any component cost entirely. Our complete step-by-step guide to flushing your water heater covers the process from start to finish.
💡 Tip: If your tank is several years old and has never been flushed, rule out sediment before ordering any parts. A flush costs nothing except 30 to 60 minutes of time, and discovering it restores full hot water saves the cost of every component you would otherwise have replaced. Always start with the simplest, cheapest intervention before moving to parts and repairs.
When to Call a Plumber
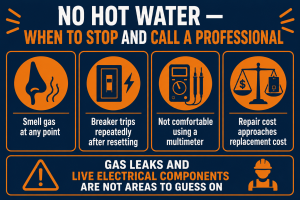
Most no-hot-water diagnoses are completable by a homeowner in under 30 minutes, but there are specific situations where stopping and calling a licensed professional is the correct and safer choice. The clearest signal is any smell of gas near the water heater at any point — before, during, or after relighting attempts. A gas smell is not a troubleshooting situation. Leave the area, leave gas-side controls alone, and call your gas utility’s emergency line or a licensed plumber from outside the building before anything else.
Other situations that warrant professional involvement: a circuit breaker that trips again immediately after resetting, indicating a wiring fault or short that the reset itself won’t resolve; genuine discomfort testing or working around live electrical components inside the heater access panels; a gas control valve replacement, which involves gas line disconnection work and is beyond standard DIY territory; and a unit old enough that the repair cost approaches or exceeds the cost of a new water heater. Even when the diagnosis above points clearly to a specific cause, a homeowner who is not comfortable executing the repair should call a plumber — correctly identifying the cause is useful; attempting a repair you’re not comfortable with can make the outcome worse.
US regional context: In states with frequent winter storms or grid instability — parts of Texas, the Gulf Coast and the Northeast — a tripped breaker or a pilot light blown out by a draft are by far the most common causes of sudden no-hot-water complaints, not an actual tank failure. Check these simple causes first before assuming you need a replacement, especially right after a storm or power outage.
⚠️ Warning: Gas leaks and live electrical components are not areas to guess on. If any step in this guide makes you uncomfortable — working near a gas line with any smell present, handling the gas control valve assembly, or testing components inside a water heater enclosure — stop and call a licensed professional. The cost of a service call is always less than the cost of an injury or a repair that has been made harder by an incomplete attempt.
Need a Professional Plumber?
If your diagnosis points to a failed gas control valve, a persistently tripping breaker, a gas smell anywhere during the process, or a unit old enough that the repair-versus-replacement question is genuinely open, a licensed plumber is the right next call. A professional can confirm the diagnosis, advise on repair vs replacement cost honestly, and carry out gas and high-voltage electrical work safely and to code.
Find a licensed plumber in your area at PlumberArchive.com — the US plumber directory with 12,000+ verified local plumbers across all 50 states.
Find a trusted plumber near you → PlumberArchive.com
Follow Us on Facebook
Get weekly plumbing tips, honest tool reviews and DIY maintenance guides delivered straight to your Facebook feed. We cover water heater repairs, gas and electric troubleshooting, seasonal plumbing checks and everything in between — written for US homeowners who want to handle more themselves.
Follow PlumbingToolsReview on Facebook →
Frequently Asked Questions
Q: Why did my water heater suddenly stop producing hot water?
The most common causes of sudden no hot water depend on heater type. On a gas water heater, the pilot light going out is the most frequent culprit — check the access panel at the base for a small blue flame and relight following the label instructions if it’s out. A thermocouple failure (pilot lights but won’t stay lit) is the second most common gas cause. On an electric water heater, a tripped circuit breaker at the main electrical panel is the single most common cause and takes about 30 seconds to check. A tripped high-limit switch — the red reset button inside the upper access panel — is the second most common electric cause. In both cases, working through the checks in order from simplest to most involved resolves the problem without a service call in the majority of cases.
Q: Is it safe to relight my own gas water heater pilot light?
Yes — relighting a gas water heater pilot is safe to do yourself, provided there is no smell of gas anywhere near the unit before or during the process. The relighting instructions printed on the tank label are designed specifically for homeowner use. The standard process is: turn the gas control knob to “Pilot,” press and hold the reset button to flow gas to the pilot assembly, press the ignitor repeatedly until the pilot lights, then continue holding the reset button for a full 30 to 60 seconds to allow the thermocouple to heat and hold the gas valve open. If you smell gas at any point — even faintly — stop immediately, leave the building, and call your gas utility’s emergency line. Never attempt to relight a pilot on a unit that smells of gas.
Q: How do I know if it’s the upper or lower heating element that failed?
The symptom pattern is the most reliable indicator. A failed upper element typically means no hot water at all from the moment a tap is opened — the thermostat activates the upper element first, and without it neither element heats effectively. A failed lower element usually still allows some hot water initially (because the upper element has heated the upper tank portion), but the supply runs cold much faster than normal and recovery time after use is noticeably longer. To confirm definitively, a multimeter test with the power off at the breaker will show an open circuit — infinite resistance — on a failed element versus a normal 10 to 30 ohm reading on a functional one. Always switch off the breaker completely before touching any element terminals or wiring.
Q: Should I repair or replace an old water heater with no hot water?
The standard industry guidance is: if the unit is under 8 years old and the repair cost is well under half the cost of replacement, repair. If it is over 10 to 12 years old and facing a significant repair, replacement is usually the better long-term value — both because modern units are more energy-efficient than older ones and because a first major repair on an older unit is commonly followed by a second within a year or two. A thermocouple on a gas unit or a heating element on an electric unit is inexpensive and worth repairing at any reasonable age. A failed gas control valve, a tank with visible corrosion, or any evidence of water pooling at the base of the unit is a replacement situation regardless of age. If this no-hot-water event accompanies longer-term signs of decline, review those indicators against our guide to the signs your water heater is failing before committing to a repair cost.
Conclusion
No hot water is diagnosable in under 30 minutes in most cases — and often fixable in the same window without a service call. The key is working through the checks in order by heater type rather than guessing: gas units fail at the pilot light and thermocouple first; electric units fail at the breaker and high-limit switch first; tankless units communicate through their own error codes and should be read directly before any other troubleshooting step. Starting with the simplest possible cause saves significant time and avoids the cost of parts that turn out not to be the problem.
Two situations override the DIY approach entirely: any smell of gas, and a circuit breaker that trips again immediately after resetting. Both require a licensed professional, and attempting to work through either independently carries genuine safety risk that no amount of hot water inconvenience justifies. For everything else in this guide, careful step-by-step diagnosis is well within the reach of a homeowner with a flashlight and 15 minutes.
If today’s no-hot-water event turns out to be part of a longer pattern of decline, our guide to the signs your water heater is failing covers the broader indicators for assessing whether a replacement is the right next step. If sediment is confirmed as the cause, our step-by-step guide to flushing your water heater covers the full maintenance process from start to finish. And if the unit is producing water but it’s showing up around the base of the tank, that’s a different problem than what this guide covers — our guide to diagnosing a leaking water heater walks through those causes separately. If you’re weighing a tankless unit as a replacement option, our comparison of tankless vs tank water heaters covers every practical factor for US homeowners.
✍️ About This Guide
PTR Editorial Team — Plumbing Guides. We compare manufacturer specifications, installation requirements, compatibility and available product documentation to help homeowners choose suitable tools and parts. How we review →