Please note: Product availability and information are based on our research at time of writing and are subject to change. Always check Amazon for the latest details before purchasing.
Introduction
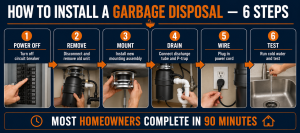
Installing a garbage disposal yourself can save you $150 to $300 in plumber call-out fees — and it’s one of the most accessible DIY plumbing tasks a homeowner can tackle. Whether you’re fitting a brand-new unit in an existing kitchen sink or replacing an old disposal that’s finally given up, the core process is the same: disconnect the old unit, set up the mounting assembly, connect the drain, and wire the power.
Most homeowners complete the job in 60 to 90 minutes. You’ll need a handful of basic tools you likely already own, and the most technically demanding part — the electrical connection — is straightforward when you choose a model with a power cord already attached (which we strongly recommend for beginners).
This guide covers both new installations and direct replacements, walks you through every step in plain language, and flags the moments where first-timers most commonly run into trouble. Before you start, check our guide to the best garbage disposals to make sure you’ve chosen the right unit for your kitchen — and if you’re also updating your sink at the same time, our best kitchen faucets guide is worth a read.
Our Take
Installing a garbage disposal is one of those jobs that looks intimidating but is genuinely manageable for a first-timer. The hardest part is usually disconnecting the old unit — new installations are actually easier. Budget 60–90 minutes and have a bucket ready for the water that will spill when you disconnect the drain.
Gather everything before you start — running back and forth to the hardware store mid-install is frustrating. Here’s what you need on hand:
Tools
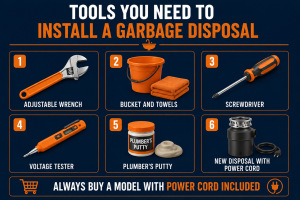
- Adjustable wrench — for tightening drain connections and mounting hardware
- Flathead and Phillips screwdrivers — for mounting screws, knockout plug, and electrical cover plate
- Non-contact voltage tester — essential safety check before touching any wiring
- Bucket and old towels — water will spill when you disconnect the drain; plan for it
- Plumber’s putty — to seal the new sink flange
- Wire connectors (wire nuts) — for hardwired models; not needed if your disposal has a cord
What You’re Installing
- Garbage disposal unit — ideally one with a power cord already attached (see tip below)
- Discharge tube — usually included with the disposal
- Mounting assembly — included with the disposal; most brands use a standard three-bolt pattern
Not sure which unit to buy? Our best garbage disposals guide covers the most popular models by horsepower, noise level, and price tier — worth reading before you commit.
💡 Tip: Always buy a disposal with the power cord already attached — hardwiring requires a licensed electrician in most US states and adds significant cost and complexity to what should be a straightforward DIY job.
Step 1 — Turn Off Power and Water
Safety first. Before you touch anything under the sink, cut power to the disposal circuit and shut off the water supply. These two steps are not optional.
- Locate the disposal circuit breaker in your main panel — it may be labeled, or flip breakers one at a time until the wall switch above the sink goes dead.
- Confirm power is off using a non-contact voltage tester held near the outlet under the sink or any exposed wiring. The tester should read no voltage before you proceed any further.
- Turn off the cold-water supply valve under the sink — the oval handle on the line feeding the faucet. Turn clockwise until it stops.
- Place a bucket under the P-trap (the curved drain pipe section beneath the sink basin). Even with the water shut off, there will be standing water in the trap that spills the moment you loosen the connections.
⚠️ Warning: Never work on a garbage disposal with power connected — even with the wall switch in the off position. Always turn off the circuit breaker at the panel and verify with a voltage tester before touching any wiring or the disposal unit itself.
Step 2 — Remove the Old Disposal
If you’re doing a completely new installation where no disposal has existed before, skip ahead to Step 3. For a replacement, follow these steps to remove the existing unit cleanly.
- Disconnect the dishwasher drain hose if one is attached to the side of the disposal. Use pliers to slide back the hose clamp, pull the hose free, and plug the open end with a rag to stop residual water draining out onto your cabinet floor.
- Unscrew the drain connection where the disposal’s discharge tube meets the P-trap. Loosen the slip nut by hand or with pliers and pull the connection apart. Water will spill into your bucket — have the towels ready.
- Support the disposal weight with one hand while you twist the mounting ring counterclockwise with the other. The unit releases from the mounting assembly once the ring clears the locking tabs. Keep a firm grip — disposals are heavier than they look.
- Lower the disposal and disconnect the power cord from the outlet beneath the sink. Set the old unit aside.
💡 Tip: Garbage disposals are heavier than they look — a standard 3/4 HP unit can weigh 10–15 lbs. Have a second person hold the unit while you twist the mounting ring, or brace it with your knee if you’re working solo to avoid a sudden drop.
Step 3 — Install the Mounting Assembly
The mounting assembly is the hardware that attaches permanently to the underside of your sink drain hole. Most disposals use a three-bolt mounting system — InSinkErator’s Quick Lock design is the industry standard, and many brands use a compatible pattern.
- Remove the old sink flange from the drain hole (for replacements). Use a flathead screwdriver to pry it up from above, then scrape away all old plumber’s putty from around the drain opening with a putty knife until the surface is clean and dry.
- Roll a rope of plumber’s putty approximately 3/4 inch thick and press it evenly around the perimeter of the new sink flange before inserting it. This creates the watertight seal between flange and sink.
- Insert the flange through the drain hole from above. Press it down firmly so the putty seats evenly all the way around the rim.
- From underneath the sink, slide the fiber gasket, backup ring, and mounting ring up over the neck of the flange in that order. Push the snap ring into the groove on the flange neck — you’ll feel it click into place. This holds the assembly up while you tighten.
- Tighten the three mounting screws evenly, alternating between each one to draw the mounting ring up flat and square against the sink underside. Stop tightening once excess putty squeezes out from under the flange rim above — that’s the seal confirming.
💡 Tip: Use just enough putty to create a complete seal — the excess that squeezes out can be trimmed cleanly with a putty knife once the flange is tightened down. Don’t under-apply; a thin seal will eventually let water creep under the flange rim and leak into the cabinet.
Step 4 — Connect the Drain
With the mounting assembly secure, connect the disposal’s drain outlet to the P-trap and set up the dishwasher connection if your kitchen has one.
- Attach the discharge tube to the disposal’s outlet port on the side of the unit. Secure it with the provided rubber gasket and mounting screws. Angle the tube toward the P-trap — cut it to length with a hacksaw if needed.
- Connect the discharge tube to the P-trap using a slip nut and nylon washer. Hand-tighten first, then snug with slip-joint pliers. Do not overtighten plastic fittings — firm is enough.
- If you have a dishwasher: Use a flathead screwdriver and a hammer to knock out the dishwasher inlet plug inside the disposal body — accessible through the side port. Remove the knocked-out plug piece from inside the disposal (shake it out), then connect your dishwasher drain hose to the inlet port and secure with a hose clamp.
US regional note: In older homes in the Northeast and Midwest built before 1970, kitchen drain pipes are sometimes narrower than the modern 1.5-inch standard — worth checking your drain pipe size before buying a high-output 3/4 HP or 1 HP model. A larger motor pushing more ground waste through a narrower drain pipe can lead to backups at the P-trap.
⚠️ Warning: If connecting a dishwasher drain — always knock out the dishwasher plug inside the disposal first. If you skip this step and connect the dishwasher hose without removing the internal plug, dirty disposal water will back up directly into your dishwasher every time the unit runs.
Step 5 — Wire the Disposal
Electrical connections are where most beginners feel the most apprehension — but with a cord-equipped model, it’s genuinely as simple as plugging in a toaster.
For cord-included models (recommended for DIY)
Locate the standard three-prong outlet beneath the sink — most kitchens have one installed specifically for this purpose. Plug the disposal’s power cord into the outlet. That’s all the wiring required. If there is no outlet under the sink, stop here and have an electrician install a dedicated switched outlet before proceeding.
For hardwired models
Remove the electrical cover plate on the base of the disposal unit. Inside you’ll find three wires: black (hot), white (neutral), and green or bare copper (ground). Connect matching colors using wire connectors — black to black, white to white — and attach the ground wire to the green ground screw. Tuck the connections neatly inside the wiring compartment and replace the cover plate securely.
💡 Tip: Most modern garbage disposals come with a power cord already attached. If yours does not include one, hire a licensed electrician for the wiring — hardwiring without a permit can void your homeowner’s insurance and create a genuine safety hazard.
Step 6 — Mount and Test
You’re in the home stretch. Time to hang the unit and verify everything works correctly before putting the sink back into daily use.
- Lift the disposal and align the three mounting tabs on the disposal’s collar with the three slots on the mounting assembly beneath the sink drain hole.
- Twist the disposal clockwise until the tabs lock into the mounting ring. You’ll feel the unit seat firmly and stop rotating. Most units include a small mounting wrench for extra leverage if needed.
- Turn the water back on at the supply valve and run water down the sink. Inspect every drain connection — the discharge tube, P-trap slip nuts, and flange — for any drips. Tighten any fitting that shows moisture.
- Restore power at the circuit breaker.
- Run cold water from the tap, then flip the wall switch to test the disposal. Let it run for 30 seconds, listen for smooth operation, and check underneath once more for any leaks that only appear under load.
⚠️ Warning: Always run cold water when operating your garbage disposal — never hot water. Cold water keeps fats and grease solidified so the grinding plate can process them properly and flush them cleanly through the drain. Hot water melts grease, which then re-solidifies further down the pipe and causes blockages.
Common Problems and Fixes
If your test run turns up an issue, here are the most common problems new installations produce and how to resolve them:
Disposal hums but doesn’t spin
The motor is running but the grinding plate is jammed or stuck. Turn the switch off immediately — running a jammed motor will trip the thermal overload or burn out the motor. Find the red reset button on the underside of the disposal and press it firmly until you feel it click. Use the hex key wrench (usually included with the unit; fits the center hex port on the base) to manually rotate the grinding plate and free the jam. Run cold water and try the switch again.
Leaking from the bottom of the disposal
A leak from the very bottom of the unit — not from a drain connection — typically means the internal seal has failed and the unit needs replacing. Leaking where the disposal meets the mounting assembly points to either mounting screws that need tightening or a failed plumber’s putty seal at the sink flange. Re-seat the flange with fresh putty if needed.
Disposal won’t turn on at all
Check three things in sequence: (1) confirm the circuit breaker hasn’t tripped and reset it if it has; (2) press the red reset button on the base of the unit; (3) verify the wall switch is correctly wired to the outlet. If all three check out and the unit still won’t run, the motor may have failed on arrival — contact the manufacturer.
Water backs up into the dishwasher
The almost certain cause is the dishwasher knockout plug inside the disposal was never removed before the drain hose was connected. Turn off the power, disconnect the dishwasher drain hose from the disposal inlet port, reach in and remove any remaining plug material, then reconnect and test. If you’re also seeing water backing up into the sink basin itself, see our guide to how to unclog a kitchen sink for the next steps.
Need a Professional Plumber?
Sometimes a job turns out to be more complicated than expected — older plumbing, non-standard drain configurations, or no outlet under the sink can all push a project beyond comfortable DIY territory. If you need a licensed plumber in your area, search PlumberArchive.com — the US plumber directory with 12,151+ verified plumbers across all 50 states.
Find a trusted plumber near you →
Frequently Asked Questions
Q: How long does it take to install a garbage disposal?
Most homeowners complete a garbage disposal installation in 60 to 90 minutes. A direct replacement — where you’re swapping a new unit onto an existing mounting assembly of the same brand — can take as little as 30 minutes. A new installation with no previous disposal involves more steps (mounting assembly setup, new drain run, outlet verification) and is more likely to take the full 90 minutes, or slightly longer if any complications arise such as old putty buildup or tight drain clearances.
Q: Do I need a plumber to install a garbage disposal?
No — garbage disposal installation is a standard DIY task that most homeowners can complete without a plumber. The drain connections and mounting assembly work are firmly within DIY territory. However, if your kitchen has no existing outlet under the sink, you’ll need a licensed electrician to install one before you start. Running power to a new dedicated circuit is electrical work that requires a permit in most US states — but once that outlet is in place, the rest of the installation is straightforward DIY.
Q: Can I install a garbage disposal myself?
Yes — and garbage disposal installation is one of the more beginner-friendly plumbing tasks there is. The steps are sequential and logical, the required tools are basic, and the only variable that adds real complexity is the electrical connection. Choose a model that includes a power cord already attached and you eliminate the electrical concern entirely. Follow this guide step by step, take your time at each stage, and have a bucket under the P-trap before you touch anything — that’s genuinely all it takes for most standard US kitchen setups.
Q: What size garbage disposal do I need?
For a standard household, a 1/2 HP disposal handles everyday food waste without issue. A 3/4 HP model is a better choice for households that cook frequently, have larger families, or want quieter operation and a longer service life. 1 HP models are built for heavy-duty use — fibrous vegetables, harder food scraps, commercial-style cooking volumes. One important caveat: if your kitchen drain pipe is narrower than the modern 1.5-inch standard (common in pre-1970 homes in the Northeast and Midwest), stick to a 1/2 HP model to avoid overwhelming the drain. See our best garbage disposals guide for model-by-model recommendations by horsepower and price tier.
Conclusion
Installing a garbage disposal is a genuinely manageable DIY project for any homeowner willing to follow the steps carefully. Most people complete it comfortably in under 90 minutes — and the second time you do it, you’ll be done in half that. The job gets easier once you realize there’s no complex judgment involved: it’s sequential, the parts fit together logically, and the tolerances are forgiving.
The single best decision you can make before you start is choosing a disposal model with the power cord already attached. It removes the electrical complexity entirely and means the only skill you need is the confidence to turn off a breaker and work under a sink. Check our best garbage disposals guide for the models we recommend by size and budget — and if you’re updating other kitchen fixtures at the same time, our best kitchen faucets guide covers the top options for every setup and price point. Still choosing a unit? Our continuous feed vs batch feed guide covers the main decision, and once it is running, how to clean a garbage disposal keeps it fresh.
Happy fixing.
✏️ About This Guide
PTR Editorial Team — Plumbing Guides. We compare manufacturer specifications, installation requirements, compatibility and available product documentation to help homeowners choose suitable tools and parts. How we review →