
Guides
19 Oct 2026

Can’t Reach the Faucet Nut? Choose the Right Tool Before You Buy
Not sure which tool fits your faucet nut? Identify the fixing, see how it lets go and check your clearance first. Then choose a tool, or use one you own.
Learn how to safely test your water heater's pressure relief valve (T&P valve) — a simple 5-minute check that prevents a genuinely dangerous failure.
Please note: Information in this guide is subject to change. If your water heater’s pressure relief valve fails to reseal, won’t discharge water at all, or you’re uncomfortable working near your tank, consult a licensed plumber before proceeding.
The temperature and pressure relief valve — usually called the T&P valve or simply the pressure relief valve — is one of the few components on a water heater that exists purely as a safety device rather than a functional part. Its job is straightforward: if the tank ever overheats or builds up excess internal pressure beyond a safe threshold, the valve opens automatically and releases that pressure before it becomes a genuine hazard. Without a working relief valve, a malfunctioning tank has nowhere for that built-up pressure to safely go.
Testing the valve takes about five minutes and requires no specialized tools, yet it’s one of the most frequently skipped items on a home maintenance checklist. That’s rarely because the test itself is difficult — it’s usually because homeowners simply don’t realize the valve needs testing at all, or don’t know one exists on their tank in the first place. This guide walks through exactly how to test yours safely, what a normal test looks like, and the warning signs that mean the valve needs replacing rather than just monitoring.
At a Glance
| Location | Top or upper side of the tank, with a discharge pipe running down toward the floor or an exterior wall |
| Frequency | Test every 6 months |
| Time Needed | 5 Minutes |
| Warning Sign | No water discharge when tested, or a valve that won’t stop dripping afterward — replace it |
✏️ Our Take
The pressure relief valve is one of the few parts on a water heater that exists purely for safety — it has one job, and that’s releasing pressure before a malfunctioning tank becomes genuinely dangerous. Testing it takes about five minutes twice a year, yet it’s one of the most commonly skipped items on a home maintenance checklist, usually because homeowners don’t realize it needs testing at all rather than because the test itself is difficult. If you’ve never tested yours, or can’t remember the last time you did, that’s reason enough to check it today.
IN THIS GUIDE
Every water heater tank is a sealed vessel holding gallons of water that’s actively being heated, and that combination of heat and confinement means pressure builds inside the tank as a normal part of operation. Under regular conditions, that pressure stays within a safe range. But if a thermostat fails, a heating element malfunctions, or the tank overheats for any other reason, pressure can climb well past what the tank is rated to safely hold — and without somewhere for that pressure to go, the result is a tank with genuinely nowhere to release it.
The pressure relief valve is that release point. It’s engineered to open automatically once temperature or pressure inside the tank crosses a preset threshold, venting water and pressure through the discharge pipe before the tank itself is stressed to a dangerous degree. In the rare worst-case scenario where a tank overheats with no way to relieve pressure, the failure mode isn’t a small leak — it’s the kind of catastrophic tank failure that makes headlines. That’s the entire reason this valve exists.
Testing the valve periodically confirms it isn’t stuck, corroded shut, or otherwise unable to do its job when it’s actually needed. A valve can sit unused for years without ever being called on, and mineral deposits or corrosion can quietly seize it in that time — which is exactly why a valve that’s never been tested is not a safe assumption to make, even on a newer tank.
This is a genuinely short list, and there’s a good chance you already have everything on hand. No specialized tools or plumbing experience are required to test the valve itself.
That’s the entire list. There’s no wrench, no replacement part, and no disassembly involved in the test itself — just the lever on the valve and a few minutes of your time. If your testing does reveal a valve that needs replacing, our guide on how to flush a water heater covers another routine maintenance task worth doing at the same time, since both jobs involve working around the same area of the tank.
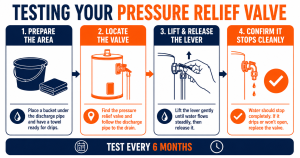
Step 1: Prepare the Area
A few minutes of setup before you touch the valve makes the actual test cleaner and safer, especially since you won’t know exactly how much water will discharge until the valve is open.
If the water heater has been in active use within the last hour or so, it’s worth giving it some time to cool before testing. A brief test on a moderately warm tank is fine, but there’s no need to test immediately after a long, hot shower when the water near the valve is at its hottest.
Before testing, take a moment to positively identify both the valve itself and the pipe it discharges through — you’ll want to know exactly where water is going to come out before you lift the lever.
Most tanks manufactured for the US market have the valve and discharge pipe in a fairly predictable, standardized location, but older installations or tanks in tight utility closets can be less obvious at a glance. If you’re at all unsure whether what you’re looking at is the pressure relief valve, it’s worth confirming against your water heater’s manual before proceeding rather than guessing.
With the area prepared and the valve located, the actual test is quick — a single deliberate motion, followed by watching how the valve responds.
A properly functioning valve behaves the same way both times: a short burst of water, then a clean, complete stop. There’s no need to hold the lever open longer to get a “better” test — a valve that’s working correctly demonstrates that in the first couple of seconds, and holding it open longer only increases the amount of hot water you’re managing for no added benefit. If nothing happens when you lift the lever, or the valve won’t fully reseat afterward, move on to the next step to understand what that means.
The last part of the test is simply confirming what you observed and deciding whether the valve passed. This step doesn’t require touching anything further in most cases — just watching closely and letting the water settle.
If the valve stopped discharging cleanly both times, the test is complete and the valve is doing its job. If it keeps dripping after testing — even a slow, occasional drip rather than a steady stream — that’s not something to leave and monitor. A valve that won’t fully reseat has already told you it needs to be replaced, and the section below covers exactly why that’s the right call rather than waiting to see if it resolves on its own.
A handful of specific outcomes from testing — or from simply observing the valve over time — mean it’s time to replace it rather than continue relying on it. None of these are things to wait out.
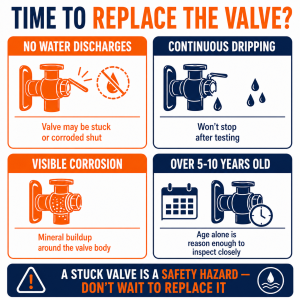
No water discharges at all when tested. If lifting the lever produces no flow whatsoever, the valve is likely stuck or corroded shut internally. This is the most serious version of a failed test, since it means the valve would not open if the tank actually needed it to — a genuine hazard rather than a minor inconvenience, and reason enough to replace the valve promptly.
Continuous dripping after testing that won’t stop. A valve that discharges properly during the test but then keeps dripping afterward has failed to reseat correctly. Sometimes this resolves after a second or third lift-and-release as debris clears from the seat, but a drip that persists after several attempts means the valve’s internal seal is worn and needs replacing.
Visible corrosion or mineral buildup around the valve body. Rust, scale, or heavy mineral crust on the outside of the valve or at its connection to the tank is a sign the valve has been exposed to moisture or hard water deposits over time, both of which can compromise how reliably it will open when actually needed — even if it happened to pass a manual test.
The valve is more than 5 to 10 years old. Even a valve that still passes a manual test can be approaching the end of its reliable service life. Manufacturers generally don’t expect these valves to last indefinitely, and proactively replacing an aging valve is inexpensive insurance against the version of failure that only shows up when the tank is already in trouble.
Water heater pressure relief valves are required by plumbing code in virtually every US jurisdiction, and manufacturers typically recommend testing every six months regardless of where you live. Homes in hard water regions of the US should pay particular attention to mineral buildup around the valve, since scale deposits can interfere with a clean, complete reseal after testing.
If any of these signs show up, replacing the valve is a manageable repair, though it does involve briefly draining water from the tank down below the valve’s threaded connection. If you haven’t checked your water heater over more broadly, our guide on signs your water heater is failing covers the wider set of warning signs worth knowing, and knowing how to shut off water to the tank is useful context to have on hand before starting any water heater repair.
If your valve fails to discharge water at all, won’t stop dripping after testing, or you’re not comfortable working near your water heater, search PlumberArchive.com — the US plumber directory with 12,000+ verified local plumbers across all 50 states.
Get weekly plumbing tips and DIY guides delivered straight to your Facebook feed.
Most manufacturers recommend testing every six months, and it’s a reasonable habit to pair with another regular task, like checking smoke detector batteries or flushing the water heater, so it doesn’t get forgotten. A valve that’s tested regularly is far less likely to be seized or corroded when you actually need it, since periodic operation is part of what keeps it moving freely.
A brief drip or two immediately after the lever snaps back can happen as residual water clears from the seat, and it usually stops within a few seconds on its own. What’s not normal is a drip that continues steadily well after testing — that indicates the valve isn’t reseating fully and needs to be replaced, not simply monitored to see if it resolves.
Replacing the valve is within reach for a confident DIYer, but it’s a more involved job than testing one — it requires draining the tank down below the valve’s connection point and threading in a new valve rated for your tank’s pressure and temperature specifications. If you’re not fully comfortable with that process, or your tank is older and other fittings nearby look corroded, this is a reasonable job to hand off to a licensed plumber.
No discharge at all almost always means the valve is stuck or corroded shut internally, which is the most serious outcome a test can reveal. It means the valve would not function if the tank actually needed it to relieve pressure, so this isn’t a wait-and-see situation — replace the valve promptly rather than continuing to rely on a tank with no working pressure relief.
Testing your water heater’s pressure relief valve is a five-minute task with an outsized safety payoff — lift the lever, confirm water discharges and then stops cleanly, and repeat once to be sure. Do this every six months and you’ll catch a stuck, corroded, or worn-out valve long before it matters, rather than discovering the hard way that it wasn’t working when the tank actually needed it.
If your valve fails the test in any way — no discharge, a persistent drip, or visible corrosion — treat that as a repair to make promptly, not a detail to monitor. For a broader look at your water heater’s overall condition, see our guide on signs your water heater is failing, and if it’s also been a while since your last tank maintenance, our how to flush a water heater guide is a natural next step.
Prices and ratings may change. Always check Amazon for current prices.
✍️ About This Guide
PTR Editorial Team — Plumbing Guides. We compare manufacturer specifications, installation requirements, compatibility and available product documentation to help homeowners choose suitable tools and parts. How we review →
Not sure which tool fits your faucet nut? Identify the fixing, see how it lets go and check your clearance first. Then choose a tool, or use one you own.
Check your manual and the drain route first: gravity hose, built-in pump or external pump. Then see whether you need a dehumidifier hose at all.
Explore portable bidets that need no water-line connection, from bottle caps and squeeze bottles to battery-powered handhelds.

