Please note: Information in this guide is based on our research at time of writing and is subject to change. Always check product labels for the manufacturer’s specific care and safety instructions before applying any cleaner to glass, fixtures, or finishes.
Introduction
Hard water mineral buildup is one of the most common bathroom complaints in the US, and one of the most visible. It shows up as a cloudy or etched-looking film across shower glass, and as a chalky white residue that clings to faucets, showerheads, and handles no matter how often you wipe them down. It’s not dirt in the usual sense — it’s mineral residue, mainly calcium and magnesium, left behind after water evaporates.
The good news is that most of this buildup is fully removable with the right cleaning approach and a bit of patience. This guide is specifically about removing what’s already accumulated on your glass and fixtures — it’s a companion to, not a replacement for, addressing water hardness at the source. If you’re curious whether your water is hard enough to be the underlying cause, our how to test your water for hardness guide covers that testing process; softening the water prevents future buildup, while this guide focuses on removing what’s already there. One caveat worth setting expectations around early: severely etched glass may have sustained permanent micro-damage that cleaning alone can’t reverse.
At a Glance
| What Causes It |
Mineral deposits from hard water, primarily calcium and magnesium |
| Best General Approach |
Acidic cleaners dissolve mineral deposits most effectively |
| Tools Needed |
An acidic cleaning solution, a non-abrasive scrubbing tool, a squeegee for prevention |
| Time Needed |
Varies with buildup severity — light buildup can clear in minutes, heavy buildup may need multiple treatments |
✏️ Our Take
Hard water buildup responds well to a simple, patient approach: an acidic cleaning solution to dissolve the mineral deposits, time for it to work, and gentle non-abrasive scrubbing rather than aggressive scouring. The most common mistake is reaching for an abrasive pad to speed things up — that can scratch glass and fixture finishes, which actually makes future buildup adhere faster and more visibly. If a cleaning approach doesn’t fully clear the glass after a couple of honest attempts, that’s usually a sign of genuine etching (permanent micro-damage to the glass surface) rather than buildup that just needs more scrubbing — at that point, no cleaner will fully restore clarity, though the buildup on top of the etching can still be kept managed.
Why Hard Water Leaves Stains and Buildup
“Hard water” refers to water carrying a higher-than-average dissolved mineral content, primarily calcium and magnesium picked up as it passes through soil and rock before reaching your home’s supply. Those minerals are invisible while the water is still liquid — they don’t cloud the water or change how it looks coming out of the tap. The problem shows up after the water is gone.
When water sits on a surface and evaporates, whatever was dissolved in it doesn’t evaporate along with it. The calcium and magnesium stay behind as a thin mineral residue exactly where the water used to be. On shower glass, that residue creates the hazy, cloudy film that makes clear glass look permanently foggy. On chrome or nickel fixtures, the same residue dries into the white, chalky spots and crusty rings that build up around faucet bases, showerhead necks, and handle joints.
A single evaporation cycle leaves behind a residue too thin to notice. The real issue is repetition. Every shower leaves another thin mineral layer behind, and without regular cleaning to remove each layer before the next one forms, those layers stack on top of each other. Over weeks and months, what started as an invisible film becomes a visible haze, and eventually a hardened crust that no longer wipes away with a quick pass of a cloth. That progression is also why the right cleaning approach depends on how long the buildup has been allowed to accumulate, which the next section walks through.
Light Buildup vs Heavy Buildup vs Etching
Not every cloudy shower door has the same problem, and treating all three the same way is a common source of frustration. Understanding which one you’re dealing with sets realistic expectations before you start.
Light buildup is a thin, hazy film that hasn’t had time to harden — it typically wipes away fairly easily with a basic acidic cleaner and minimal scrubbing. This is the stage most regularly-cleaned bathrooms stay at, and it responds quickly to the process outlined in this guide. Heavy buildup is the next stage: a visible white or chalky crust, thick enough to feel textured under a fingertip, that has typically been accumulating for months without a deep clean. It’s still fully removable in the vast majority of cases, but it requires a proper soak and scrub rather than a quick wipe, often across more than one treatment cycle.
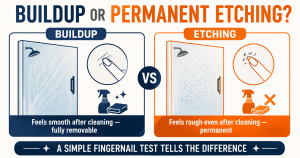
Etching is a different category entirely, and it’s the one situation this guide can’t fully solve. Etching is a cloudy, textured appearance in the glass itself — not a residue sitting on top, but microscopic damage that persists even after a thorough, correctly-executed clean. It typically develops when heavy buildup is left untreated for a very long time, or when the surface has been repeatedly scrubbed with abrasive tools that wear into the glass over time. Recognizing the difference before you get frustrated with a cleaner that “isn’t working” saves a lot of wasted effort — the tip below offers a simple way to tell them apart.
💡 Tip: A simple test: after cleaning, run a fingernail gently across the cloudy area. If it feels smooth, you’re likely dealing with buildup that can still be fully removed. If it feels slightly rough or pitted even after cleaning, that’s more likely etching — permanent micro-damage to the glass surface itself.
Step 1: Choose the Right Cleaning Solution
Because hard water deposits are mineral in nature, they respond specifically to acidic cleaners, which chemically dissolve calcium and magnesium in a way general-purpose soap or degreaser can’t. Picking the right solution is the foundation the rest of this process builds on.
- Reach for an acidic cleaner as your default choice. Acidic solutions are the most effective category for dissolving mineral deposits, covering two broad options: commercial hard-water-specific cleaners and common household acidic options.
- White vinegar is the most widely used household option. It’s inexpensive, readily available, mildly acidic, and effective against light-to-moderate buildup without needing to be diluted for most shower glass and standard fixture finishes.
- Consider a commercial hard-water cleaner for heavier buildup. Products formulated specifically for mineral deposits are often more concentrated than household vinegar and can cut cleaning time meaningfully on heavier, longer-neglected buildup.
- Always check that your chosen cleaner is safe for the specific surface you’re treating. Standard glass and chrome tolerate acidic cleaners well, but natural stone and some specialty coated or matte metal finishes have different care requirements — check the manufacturer’s guidance before applying an acidic cleaner broadly.
- Test on a small, inconspicuous area first if you’re unsure. A small test patch confirms compatibility before you commit to the entire surface.
⚠️ Warning: Never mix an acidic cleaner with a bleach-based product — combining the two can produce dangerous fumes. Use one type of cleaner at a time and rinse the surface thoroughly before switching products.
Step 2: Apply and Let It Sit
Once you’ve picked a cleaning solution, giving it time to work on the mineral deposits matters more than how hard you scrub afterward. This is where most of the real dissolving happens, before a single pass of a cloth.
- Apply the cleaning solution generously to the affected area. Don’t spot-treat sparingly — a generous, even coating gives the acid full contact with the mineral deposits across the whole surface.
- For vertical glass, use a soaked cloth or paper towel pressed against the surface. Sprayed solution tends to slide down before it has time to work; a cloth or paper towel soaked in solution and pressed flat against the glass holds it in contact far longer than a spray alone.
- Let it sit for the time recommended on the product label. For a household acidic solution like white vinegar on moderate buildup, roughly 10 to 15 minutes is a reasonable starting point; commercial products may specify a different window.
- For heavier buildup, extend the sit time rather than scrubbing harder. Heavier deposits benefit from a longer soak, giving the acid more time to fully break down the mineral layer, rather than compensating with more aggressive scrubbing once you move to the next step.
Step 3: Scrub with a Non-Abrasive Tool
With the solution given time to dissolve the mineral layer, scrubbing finishes lifting it off the surface. Tool choice matters as much as technique, since the wrong tool can damage the surface you’re trying to restore.
- Use a soft microfiber cloth, a non-abrasive scrub sponge, or a soft-bristle brush. These lift dissolved mineral residue effectively without putting the surface itself at risk.
- Avoid steel wool, scouring pads, or abrasive powders entirely. These can scratch glass and fixture finishes even when the surface looks like it can handle it, and those scratches make future buildup adhere faster and more visibly.
- Work in small sections rather than the whole surface at once. This lets you focus scrubbing effort and reapply solution precisely where it’s needed.
- Reapply solution to stubborn spots as needed. If a section isn’t lifting, more solution and another short sit beats pushing harder with the tool you’re already using.
- Favor patience and repeated light passes over pressing hard on one pass. Several light passes, reapplying solution between them, consistently outperform one aggressive session — and they’re safer for the surface.
💡 Tip: For textured or hard-to-reach areas like fixture crevices or handle bases, an old soft-bristle toothbrush dipped in the cleaning solution reaches into gaps a cloth can’t.
Step 4: Rinse and Dry Completely
This last step is easy to rush, but it’s arguably the most important in the entire process — both for finishing the current clean and for how quickly buildup returns afterward.
- Rinse thoroughly with clean water. Make sure every trace of the cleaning solution is fully rinsed away, since leftover residue can dull glass clarity or leave its own film behind.
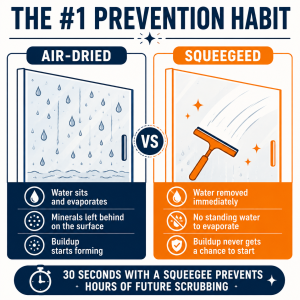
- Dry the surface completely with a microfiber cloth or squeegee. Don’t let the surface air-dry.
- Treat this drying step as prevention, not just cleanup. Air-drying is exactly what causes new mineral deposits to form in the first place — the water evaporates on its own and leaves fresh residue behind. Manually drying the surface right after your final rinse means there’s no standing water left to evaporate and restart the buildup cycle.
What to Do About Fixture Buildup Specifically
Everything covered so far works well for glass and the visible exterior of faucets, handles, and showerhead housings. But showerheads and faucet aerators have a separate problem surface scrubbing doesn’t solve: buildup that accumulates inside the fixture, not just on it.
Spray holes on a showerhead and the mesh screen inside a faucet aerator are narrow enough that mineral deposits can partially or fully clog them from the inside, well before buildup becomes visible on the exterior. Scrubbing the outside of a showerhead does nothing for deposits inside the spray holes — a genuinely separate problem needing a different approach.
A submersion soak is the more effective method for internal buildup. If the fixture removes easily, unscrew it and submerge it fully in an acidic solution for the time recommended on the product, then use a soft brush or toothbrush on the spray holes to dislodge any remaining loosened deposits. If removal isn’t practical, filling a plastic bag with the solution and securing it around the fixture with a rubber band achieves a similar effect without disconnecting anything. This matters beyond appearance: internal buildup directly affects water flow and pressure, not just how the fixture looks, so it’s worth addressing even on fixtures that look clean from the outside.
Preventing Buildup from Coming Back
Once glass and fixtures are clean, keeping them that way takes far less effort than the original clean did, provided the right habits are in place.
A daily squeegee pass on shower glass immediately after showering is the single most effective prevention habit available, and it takes under a minute. Since buildup forms when standing water evaporates and leaves minerals behind, removing that water before it evaporates breaks the cycle before it starts. Pair that daily habit with a weekly light-maintenance clean — a quick wipe with an acidic cleaner — and buildup never gets the chance to progress from a light film into the heavy, hardened crust that takes real effort to remove.
For households with genuinely hard water, these habits manage the symptom but don’t touch the underlying cause. Addressing the water itself with a water softener reduces mineral content at the source, meaning less residue forms in the first place regardless of how diligent your squeegee habit is. A whole-house treatment approach is a bigger investment than a squeegee, but for households fighting heavy buildup on a weekly basis despite good cleaning habits, it’s worth weighing — our whole-house water filter reviews cover the equipment options if source-level treatment is something you’re considering. And if you’re tackling other bathroom maintenance at the same time, checking the caulk seal around your tub is a natural next task — see our how to caulk a bathtub guide for that process.
US Regional Context: Hard water is especially common across large parts of the US, particularly in regions with limestone-heavy groundwater, making mineral buildup on glass and fixtures a near-universal bathroom maintenance task rather than an isolated problem. Homeowners dealing with especially fast or heavy buildup may want to test their water’s hardness level to understand whether a whole-home treatment approach would meaningfully reduce the day-to-day cleaning burden.
Frequently Asked Questions
Q: Does vinegar actually work on hard water stains?
Yes — white vinegar is mildly acidic, exactly the property that makes a cleaner effective against mineral deposits, and it’s the most widely used household option for that reason. It works well on light to moderate buildup, especially when given time to sit against the surface rather than being wiped off immediately. For heavier, longer-neglected buildup, a commercial hard-water-specific cleaner is often more concentrated and may cut down on treatment cycles needed, but vinegar remains a genuinely effective, low-cost first option for most shower glass and standard fixture finishes.
Q: How often should I clean shower glass to prevent heavy buildup?
A daily squeegee pass right after showering, paired with a weekly light clean using an acidic cleaner, is enough to prevent buildup from ever progressing past a light, easily-managed film. The daily squeegee habit matters most, since it removes standing water before it can evaporate and leave new deposits behind — that single habit does more to prevent heavy buildup than any cleaning product. Skipping both habits for weeks or months is typically what allows buildup to progress to the heavy, hardened stage requiring a proper soak-and-scrub treatment.
Q: Can hard water buildup permanently damage glass?
The mineral buildup itself doesn’t permanently damage glass — it sits on the surface and, in the vast majority of cases, can be fully removed with an acidic cleaner and patient, non-abrasive scrubbing. Permanent damage, known as etching, is a separate issue: it typically develops when heavy buildup is left untreated for a long time, or when the surface has been repeatedly cleaned with abrasive tools that wear into the glass itself. The fingernail test described earlier is a simple way to tell genuine buildup from true etching after a cleaning attempt.
Q: Will a water softener stop hard water stains from forming at all?
A water softener significantly reduces the calcium and magnesium content in your water at the source, meaning meaningfully less mineral residue forms on glass and fixtures in the first place — but it doesn’t eliminate basic maintenance entirely, since softened water still carries some mineral content and everyday buildup like soap scum. Think of a softener as reducing the size and frequency of the problem rather than eliminating cleaning altogether. For households with genuinely hard water and heavy, fast-forming buildup, a softener can be the difference between a quick weekly wipe and a recurring deep-clean chore.
Conclusion
Removing hard water buildup from shower glass and fixtures comes down to a straightforward, repeatable process: an acidic cleaner to dissolve the mineral deposits, enough sit time for it to work, gentle non-abrasive scrubbing rather than aggressive scouring, and a thorough rinse and dry to finish. For fixtures specifically, don’t forget the internal buildup surface cleaning can’t reach — a submersion soak handles what scrubbing alone won’t. Once everything is clean, a daily squeegee habit and a weekly light wipe-down keep buildup from ever reaching the heavy stage again. And if buildup keeps returning fast despite good habits, that’s less a cleaning problem than a water hardness problem — one a softener addresses at the source rather than something any cleaner can fully solve on its own.
Prices and ratings may change. Always check Amazon for current prices.
✍️ About This Guide
Written by Mike Reynolds, DIY Home Improvement Writer at PlumbingToolsReview — former residential contractor helping US homeowners tackle plumbing repairs with confidence. Learn how we test →


