Introduction
Old or cracked bathtub caulk is one of the most common bathroom maintenance issues in American homes — and one of the most overlooked. That thin line of caulk running along the joint between your tub and the wall is not just cosmetic. It is a critical seal that prevents water from getting behind your tiles and walls where it can cause mold, rot, and structural damage that costs thousands of dollars to repair.
The good news is that learning how to caulk a bathtub is one of the most accessible DIY jobs you can tackle. You do not need any specialist plumbing knowledge, and the whole process — including full removal of old caulk — takes under two hours. A fresh, clean caulk line also makes a significant difference to how a bathroom looks and feels. If you are already refreshing your bathroom, check out our guides to the best shower heads and shower valves for further upgrades, or see our guide on how to replace a bathtub faucet if the spout or handles are due for an update while the tub area is already being worked on. This guide walks you through every step from start to finish.
✏️ Our Take
Recaulking a bathtub is one of the most satisfying DIY jobs you can do — it takes under two hours, costs very little and makes a bathroom look significantly better. The key is patience with the removal step. Rushed removal leaves old caulk behind which prevents the new caulk bonding properly, and that is the number one reason recaulk jobs fail within months.
Before you start, gather everything below so you are not searching mid-job. Most of these items are available at any hardware store or online:
- Caulk remover tool or utility knife — to score and lift old caulk
- Chemical caulk softener/remover spray — speeds up removal significantly on stubborn silicone
- Rubbing alcohol or bathroom cleaner — to degrease the joint before applying new caulk
- Painter’s tape — for crisp, straight lines along both edges
- 100% silicone or siliconized latex caulk — white or clear depending on your bathroom finish
- Caulk gun — for controlled, even application
- Wet finger or caulk smoothing tool — to press and shape the bead
- Paper towels and old cloths — for cleanup during and after application
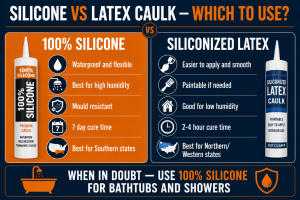
Which caulk type should you buy? In humid Southern states like Florida, Georgia and Louisiana where bathroom moisture levels are consistently high, use a 100% silicone caulk rather than latex — silicone resists mold significantly better in high humidity environments. In drier Western states standard siliconized latex caulk performs well and is easier to work with for beginners.
💡 Tip: Buy more caulk than you think you need — running out mid-bead means a visible join in the finished line. For a standard bathtub, one tube is usually sufficient, but pick up a spare to be safe.
Step 1 — Remove Old Caulk
This is the most important step in the entire process — and the one most beginners rush. Do not skip it or try to caulk over the existing line. Take your time here and the rest of the job will be straightforward.
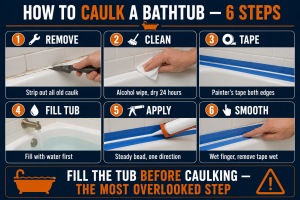
If you have access to a chemical caulk softener spray, apply it generously along the entire length of the old caulk line and leave it to work for at least two hours. This significantly reduces the effort required to remove silicone caulk, which grips the surface tightly. After the softener has had time to penetrate, hold your caulk remover tool or utility knife at a 45-degree angle to the joint and work steadily along the full length in one direction, lifting the caulk away in as large sections as possible. Work from one end of the tub to the other without switching direction mid-run.
Once the main bead is removed, go back and remove every trace of old caulk from both surfaces — the tub edge and the wall or tile surface. Even small remnants left behind will prevent proper adhesion of the new caulk. Use the corner of your utility knife or a plastic scraper to get into any residual patches. Take your time. The removal step done right is what separates a caulk job that lasts five years from one that peels within months.
⚠️ Warning: Never skip full removal and caulk over old caulk — new caulk will not bond to old silicone and will peel within weeks. The surface beneath must be completely bare before you apply anything new.
Step 2 — Clean and Dry the Surface
With the old caulk fully removed, clean both surfaces of the joint thoroughly. Wipe the entire area down with rubbing alcohol or a dedicated bathroom cleaner, removing all soap scum, mineral deposits, mold residue, and grease. Rubbing alcohol is particularly effective here because it cleans, disinfects, and evaporates cleanly without leaving any residue that could compromise adhesion.
Pay close attention to the corner of the joint. Soap scum and calcium buildup tend to accumulate here, and any contamination left on the surface will cause the new caulk to fail at that point. Use a cotton pad or folded paper towel to get into the corner and wipe firmly along its full length.
Once clean, allow the surfaces to dry completely. This is non-negotiable — a minimum of 24 hours is required for the joint to be fully dry before you apply new caulk. Caulk applied to damp or even slightly moist surfaces will not bond correctly and will begin to lift and separate prematurely. If the bathroom has been recently used, wait longer. You can speed this up with a fan or dehumidifier, but do not attempt to shortcut the drying time.
While the surface is drying, take a close look at the substrate. If you see any signs of mold in the grout or behind the tile edges, treat the area with a mold-killing spray before proceeding.
💡 Tip: The surface must be completely dry before applying new caulk — even slight moisture prevents proper adhesion. Wait the full 24 hours. Running a fan across the open joint overnight is a reliable way to confirm it is ready.
Step 3 — Tape the Lines
Apply painter’s tape along both edges of the joint — one strip along the tub surface and one along the wall or tile surface. Leave a gap between the two strips that matches the width of caulk bead you want to apply. For a standard bathtub joint, a gap of approximately 1/4 inch produces a clean, professional-looking line.
Press the tape down firmly along its entire length, paying particular attention to the edge closest to the joint. Any gap between the tape edge and the surface will allow caulk to bleed underneath, which creates an uneven line. A plastic card or your fingernail run firmly along the tape edge will help create a tight seal.
Work in sections if the tape is difficult to keep straight — the goal is two perfectly parallel lines with a consistent gap between them from one end of the tub to the other.
💡 Tip: Tape creates perfectly straight lines — this step separates professional-looking results from amateur ones. It takes five extra minutes and makes a visible difference in the finished result. Do not skip it.
Step 4 — Apply New Caulk
Before you open the caulk, fill the bathtub with water. This is the most overlooked step in bathtub caulking, and skipping it is why many recaulk jobs crack within months. A filled tub pushes down on the tub base and expands the joint to its maximum width. When you apply caulk in this expanded state and the tub drains, the caulk flexes slightly rather than being forced to stretch from a starting position that is already too narrow. This built-in flexibility is what gives a properly applied caulk bead its longevity.
With the tub full and the surfaces taped, load your caulk tube into the caulk gun. Cut the nozzle tip at a 45-degree angle — the size of the opening should match the width of the gap you are filling. A slightly smaller cut is better than a larger one; you can always apply more pressure to widen the bead, but you cannot take caulk back once applied.
Starting at one corner, hold the caulk gun at a consistent angle and apply steady, even pressure as you draw the gun smoothly along the joint in one continuous motion. Maintain the same speed throughout — inconsistent speed is what creates thin spots and thick lumps. Work from one end of the tub to the other without stopping if possible. If you do need to stop and restart, feather the join carefully.
⚠️ Warning: Fill the bathtub with water BEFORE applying caulk — when you drain it the tub contracts and the caulk flexes rather than cracking. This single step is responsible for the difference between a caulk job that lasts years and one that cracks within months.
Step 5 — Smooth and Finish
Immediately after applying the caulk bead, wet your index finger with clean water and draw it along the bead in one smooth, continuous motion from one end to the other. Apply gentle, even pressure as you go — enough to press the caulk into the joint and create a slightly concave profile, but not so much that you thin the bead out significantly. The goal is a smooth, uniform surface that is slightly recessed from the tape edges.
Do this in a single pass if possible. Going back over the same section repeatedly pushes caulk out of the joint and makes the finish less even. If there are any obvious high spots after the first pass, wet your finger again and make a second light pass over that section only.
Immediately after smoothing — while the caulk is still fully wet — remove the painter’s tape. Pull each strip back slowly at a 45-degree angle away from the caulk line, keeping the motion smooth and controlled. Pulling at the wrong angle or too quickly can tear the caulk edge or pull the bead out of the joint.
Once the tape is off, check the edges of the caulk line. If there are any small smears or bleed-through spots on the tub or tile surface, clean them now with a damp cloth while the caulk is still workable.
💡 Tip: Remove painter’s tape while caulk is still wet — waiting until it has dried tears the caulk edge and leaves a ragged line. The tape must come off immediately after smoothing, before any skin forms on the surface.
Step 6 — Cure Time and Final Check
With the caulk applied and the tape removed, drain the bathtub and allow the caulk to cure undisturbed. Cure times vary by caulk type:
- 100% silicone caulk: surface dry in 30–60 minutes, but do not expose to water for 24–48 hours
- Siliconized latex caulk: surface dry in 30 minutes, light use after 2–4 hours
- Full cure for both types: 7 days before heavy or sustained water exposure
Once the initial cure period has passed (24–48 hours depending on type), inspect the entire length of the caulk line carefully. Look for any gaps, thin spots, or sections where the caulk has pulled away from one surface. Small gaps are common at the corners where two runs of caulk meet. These should be filled before the caulk reaches full cure, as the new material will bond more readily to partially cured caulk than to a fully set bead.
To touch up a gap, apply a small amount of fresh caulk directly into the void, smooth with a wet finger, and allow to cure for the standard time before use.
⚠️ Warning: Do not use the shower or bath until caulk is fully cured — water exposure before curing causes the caulk to fail, even if the surface appears dry to the touch. Wait the full recommended time.
Common Caulking Mistakes to Avoid
Even straightforward DIY jobs have common pitfalls. Here are the mistakes that cause the majority of failed bathtub caulk jobs:
- Not removing all old caulk. Even a small patch of old caulk left on the surface creates a weak point where the new bead will eventually separate. Remove everything.
- Applying caulk over a damp surface. Moisture is the enemy of adhesion. Wait the full 24 hours after cleaning before you apply anything.
- Not filling the tub before caulking. This is the single most common and damaging mistake. An empty tub joint is at its narrowest — caulk applied in this state will crack as the tub flexes under load.
- Removing the tape after the caulk has dried. Dry caulk tears when the tape is pulled. Always remove tape while the bead is still fully wet.
- Using too thin a bead. A very thin bead lacks the flexibility to absorb the movement of the joint. Aim for a bead that fills the joint fully and sits slightly proud of the surface before smoothing.
- Rushing the smoothing step. Going back over the bead multiple times or pressing too hard removes caulk from the joint and thins the seal. One smooth, confident pass is what you are aiming for.
If you find that water is still getting behind your walls despite fresh caulk, you may have a deeper issue. Read our guide on how to fix a leaking pipe to diagnose and address water ingress behind bathroom walls.
Need a Professional Plumber?
Sometimes a job is too big for DIY. If your bathroom has underlying water damage, compromised tiles, or structural issues behind the wall, a licensed plumber or contractor is the right call. Search PlumberArchive.com — the US plumber directory with 12,151+ verified plumbers across all 50 states.
Find a trusted plumber near you →
Frequently Asked Questions
Q: How long does bathtub caulk last?
With proper preparation and application, a bathtub caulk job should last anywhere from five to ten years. The lifespan depends heavily on the quality of the removal and surface preparation — caulk applied to a perfectly clean, dry, bare surface will outlast caulk applied over any residue by a wide margin. High humidity bathrooms in warm, wet climates benefit from 100% silicone caulk rather than latex, as silicone resists mold and moisture breakdown significantly better over time. Regular inspection of the caulk line once a year will catch any early separation before it leads to water ingress.
Q: Should I use silicone or latex caulk for a bathtub?
For bathtub joints, both 100% silicone and siliconized latex caulk are appropriate choices, but they suit different situations. Silicone caulk offers superior mold resistance and flexibility, making it the better choice for bathrooms with high humidity or heavy daily use — particularly in warm, humid states where condensation and moisture levels are consistently elevated. Siliconized latex caulk is easier to apply and tool, cleans up with water, and is a reliable performer in drier climates or lower-use bathrooms. Avoid plain acrylic latex caulk in wet areas — it lacks the flexibility and moisture resistance required for a bathtub joint.
Q: How long after caulking can I shower?
With silicone caulk, wait a minimum of 24–48 hours before allowing water contact. Siliconized latex caulk typically allows light use after 2–4 hours, though waiting 24 hours is always the safer choice. Both types require a full 7 days to reach complete cure before sustained or heavy water exposure. Rushing this step is a common cause of caulk failure — even if the surface feels dry, the caulk may not have fully bonded to the substrate beneath. When in doubt, wait longer rather than risk having to redo the entire job.
Q: Can I caulk over old bathtub caulk?
No — caulking over old caulk is one of the most common mistakes in bathtub maintenance and almost always leads to failure within weeks. New caulk will not bond to old silicone because silicone does not adhere to itself once cured. Even if the existing caulk appears to be in reasonable condition, the new layer will have no mechanical grip on the old surface and will peel away quickly. The correct approach is always full removal of the old caulk before applying anything new. It takes more time upfront, but it is the only way to get a caulk job that actually lasts.
Conclusion
Recaulking a bathtub is a job that rewards patience above all else. The two steps that make the biggest difference to a long-lasting result are ones that cost nothing extra: taking the time to remove every trace of old caulk before you start, and filling the tub with water before you apply the new bead. Get those two things right and the rest of the process is straightforward.
Most caulk failures come down to preparation shortcuts — a surface that was not fully dry, a patch of old caulk left in a corner, or a tub that was empty when the new bead was applied. Follow the steps in this guide and your caulk line should stay clean, flexible, and fully bonded for years rather than months.
If you are refreshing your bathroom more broadly while the tub is out of use, it is a good time to check the condition of your shower heads and shower valves — small upgrades in these areas can make a significant difference to the daily experience of the bathroom without requiring any major work.
✍️ About This Guide
PTR Editorial Team — Plumbing Guides. We compare manufacturer specifications, installation requirements, compatibility and available product documentation to help homeowners choose suitable tools and parts. How we review →