Introduction
A bathroom exhaust fan that rattles, barely moves air, or has simply worn out after years of service is one of the most rewarding DIY replacement jobs in home maintenance — and one that most homeowners can complete in two to three hours with basic tools and no specialist experience. The noise difference alone makes it worthwhile: replacing an older 2.0 sone fan with a modern 0.8 sone unit is a change you notice every single time you use the bathroom.
The step most people worry about is the wiring — and with good reason. But connecting three color-coded wires with wire connectors, with the circuit breaker confirmed off and a voltage tester in hand, is genuinely manageable for a first-timer. This guide walks through every step from turning off the power to testing the finished installation. If you have not yet chosen a replacement unit, see our guide to the best bathroom exhaust fans before starting — matching the CFM rating to your bathroom size is the key specification to get right. For a broader bathroom upgrade, our guides to the best shower heads and best shower valves cover the other fixtures worth upgrading at the same time.
Please note: Product availability and information are based on our research at time of writing and are subject to change. Always check retailer listings for the latest details before purchasing.
⚡ AT A GLANCE
| Difficulty |
Moderate |
| Time |
2–3 Hours |
| Cost |
$$ |
| Tools Needed |
See guide below |
| Skill Level |
Beginner to Intermediate |
✏️ Our Take
Replacing a bathroom exhaust fan is one of those jobs that sounds more intimidating than it actually is. The trickiest part is the wiring — but with the circuit breaker off and a voltage tester to confirm no live current, it is very manageable for a first-timer. The biggest upgrade most homeowners make is going from a loud 2.0 sone old fan to a near-silent 0.8 sone modern unit — the difference is immediately noticeable.
Gather everything before you start — you do not want to be searching for tools with the circuit off and the old fan half-removed. Most of these are standard items found in any basic home toolkit, with the voltage tester being the one purchase that is truly non-negotiable.
- Flathead and Phillips screwdrivers — for removing the grille, fan motor screws, and housing mounting screws. A magnetic tip is helpful in the tight ceiling space.
- Voltage tester — essential for confirming the circuit is dead before touching any wiring. A non-contact voltage tester is the easiest type to use for this job and costs very little.
- Wire stripper — for preparing wire ends if the existing wires are too short or the insulation is damaged and needs trimming back.
- Drill and drill bits — for securing the new housing to the ceiling joist if the existing screw holes do not align, or if you are using a mounting brace bar between joists.
- New bathroom exhaust fan — see our guide to the best bathroom exhaust fans for recommended models across all CFM ratings and noise levels.
- Electrical tape — for additional insulation over wire connections, especially useful if you are working in an area with any moisture risk.
- Wire connectors (wire nuts) — most replacement fans include these in the box, but have a few spares on hand in case of any issues.
- Foil tape — for sealing the duct connection at the new housing collar. Standard duct tape degrades quickly in attic heat and is not the right material for permanent duct sealing.
💡 Tip: Buy a fan rated for the same CFM or higher than your existing unit — never downgrade ventilation capacity. The CFM rating is printed on a label inside the existing housing once you open it up. A higher CFM fan removes moisture faster and reduces the risk of mold forming in the bathroom and ceiling cavity.
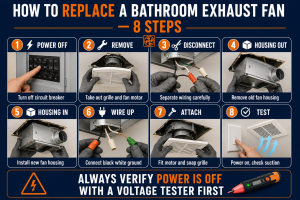
Step 1 — Turn Off Power
Before touching anything, you must confirm the power is off at the circuit level — not just at the wall switch. The housing box in the ceiling remains live even when the bathroom switch is in the off position. Killing the circuit at the breaker panel is the only safe starting point for this job.
- Locate your main electrical panel — typically in a hallway, garage, basement, or utility closet. Open the panel door and identify the bathroom circuit. It is commonly labeled “Bathroom,” “Bath Fan,” or “Bath.” If the labeling is unclear, turn the fan on and switch breakers one at a time until the fan stops running — this identifies the correct circuit without guessing.
- Switch the breaker firmly to the OFF position — a breaker should click decisively into the off position. Some older panels have fuses rather than breakers; in that case, unscrew the correct fuse instead of flipping a switch.
- Return to the bathroom and test the wall switch — flip the fan switch to on. The fan should not run. This is a basic check, but it is not a safety confirmation on its own.
- Use your voltage tester at the fan housing or switch — with the switch in the on position, touch the non-contact tester near the wiring terminals or the switch wires. The tester must show zero voltage before you proceed. If it shows voltage, the wrong breaker was switched off — go back to the panel.
⚠️ Warning: Never work on electrical wiring without confirming power is off with a voltage tester — the switch being off is not sufficient confirmation. The circuit must be confirmed dead at the breaker and then verified with a tester at the housing before you touch any wires. This is the most important safety step in the entire job and must not be skipped.
Step 2 — Remove the Old Grille and Fan
With the power confirmed off, you can safely begin removing the existing fan assembly from below. On most standard installations the grille and motor unit come out without any attic access needed — everything is accessible from the bathroom side.
- Pull the grille cover straight down from the ceiling — it is held in place by friction and spring clips, not screws on most modern fans. Apply gentle downward pressure to pull it free from the housing frame.
- Locate the metal spring clips on either side of the grille. Squeeze both clips together simultaneously and pull the grille further down to release it completely from the housing slots. Some older units use small screws instead of clips — inspect before forcing.
- Locate the power plug or terminal connector where the fan motor connects to the housing. This is a small plug or clip connector that becomes visible once the grille is down and removed. Unplug it by pressing the release tab and pulling straight out.
- Remove the screws holding the fan motor in the housing — typically two screws accessible from below once the grille is out of the way.
- Lift the fan motor unit out of the housing by tilting it slightly and pulling it down through the ceiling opening. The motor unit is the assembly with the fan blade and the plug connector attached.
💡 Tip: Take a photo of the existing wiring inside the housing before disconnecting anything — it is an invaluable reference when connecting the new fan. Even experienced DIYers appreciate having a clear photo of which wire connects where, especially when working in the confined space of a ceiling opening.
Step 3 — Disconnect the Wiring
With the fan motor removed, the housing is now accessible from below and you can disconnect the house wiring from the fan’s internal wiring. Take your time here — correctly identifying each wire before disconnecting is important for safe and accurate reconnection to the new fan.
- Locate the wire connectors (wire nuts) inside the housing — these are the plastic twist-on caps joining the house wiring to the fan’s internal wires. There are typically two or three connector joints visible once the motor is out.
- Unscrew each wire connector carefully by turning it counterclockwise. Pull the connector off to expose the bare wire ends joined beneath it.
- Separate the wires and identify each one — you will have a black wire (hot), a white wire (neutral), and a bare copper or green wire (ground). In some installations the ground wire connects directly to a green screw on the housing body rather than through a wire connector.
- Note which house wire connects to which fan wire before fully separating — your Step 2 photo is the reference here. The connections should be straightforward: black to black, white to white, ground to ground.
- Let the house wires rest loosely in the ceiling opening — they need to remain accessible for reconnecting to the new housing in Step 6. Do not push them back up into the ceiling cavity.
Step 4 — Remove the Old Housing
Once the wiring is disconnected, the housing is ready to come out. In most installations it is secured to a ceiling joist with two or three screws accessible from below — the whole removal takes only a few minutes once the wiring is free.
- Remove the screws securing the housing to the ceiling joist — they are accessible from below and typically visible once the fan motor is out. A Phillips screwdriver or drill removes them quickly. In some installations, metal tabs bent against the joist hold the housing — use pliers to straighten these before pulling the housing free.
- Disconnect the duct from the housing exhaust collar — the duct attaches to a round collar on the top of the housing (most commonly 4 inches in diameter). It is typically held by a layer of duct tape or foil tape, or a simple friction fit. Pull the duct free from the collar.
- Slide the housing out through the ceiling opening — tilt the housing as needed to clear the drywall edges and lower it down out of the ceiling cavity. Set it aside.
In older homes in the Northeast and Midwest built before 1980, bathroom exhaust fans often vent directly into the attic rather than through the roof or soffit — this is against modern building codes in most US states and causes moisture damage to attic insulation and roof decking over time. If your existing fan vents into the attic, this replacement is a good opportunity to reroute the duct correctly through the roof or soffit before installing the new housing. This may require attic access to complete.
💡 Tip: If the existing duct is rigid metal rather than flexible duct hose, use foil tape for the reconnection to the new housing collar — standard duct tape degrades quickly in attic heat and will fail within a few years, allowing the duct to separate and vent moisture directly into the ceiling cavity.
Step 5 — Install the New Housing
With the old housing removed and the ceiling opening clear, you can install the new fan housing. If you have chosen a direct replacement unit of the same or similar size, the new housing should fit cleanly into the existing ceiling opening with minimal adjustment needed.
- Feed the house wiring through the knockout on the new housing — this is a pre-scored removable section on the side of the housing box. Knock it out with a screwdriver handle and thread the house wires through it before positioning the housing in the ceiling opening.
- Position the new housing in the ceiling opening — slide it up between the joists so the housing frame sits flush with the drywall surface below. The housing should sit stably in the opening before you secure it.
- Secure the housing to the ceiling joist with screws — drive two or three screws through the mounting tabs on the housing sides into the adjacent joist. If the housing does not align with an existing joist, use a metal hanger bar or brace kit (usually sold separately, often available bundled with new fan kits) spanning between two joists for a solid mount.
- Connect the duct to the new housing exhaust collar — push the flexible duct or rigid duct firmly onto the collar on top of the housing until it seats fully. Most standard bathroom fan collars are 4 inches in diameter.
- Seal the duct-to-collar connection with foil tape — wrap a complete band of foil tape around the joint and press it firmly in place. This seal prevents warm, moist bathroom air from escaping into the ceiling cavity rather than being exhausted outside.
⚠️ Warning: Make sure the duct connects all the way through to an exterior vent — never vent a bathroom exhaust fan into attic space. Venting into the attic deposits warm, moisture-laden air directly into the attic structure, causing condensation, mold growth, and long-term damage to roof decking and insulation. Check your local building code if you are unsure of the correct venting requirement in your area.
Step 6 — Connect the Wiring
With the new housing secured and the duct sealed, you can now connect the house wiring to the fan’s internal wiring. This is the step most first-timers approach with the most caution — and with good reason, since it involves electrical connections. With the circuit confirmed off, it is a straightforward three-wire match-up.
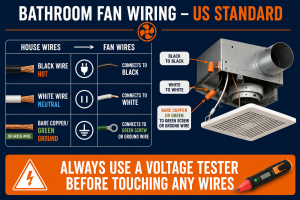
- Connect the black wire to the black wire — hold the bare wire ends parallel and together, then twist a wire connector clockwise until it seats firmly and will not rotate further. Tug the connection firmly to confirm it does not pull apart.
- Connect the white wire to the white wire — same process as above. White is the neutral wire in standard US residential wiring and must connect only to white.
- Connect the ground wire — the bare copper or green wire from the house circuit connects to the green grounding screw on the housing, or to the green or bare copper wire from the fan’s internal wiring using a wire connector. Some fan housing units have a dedicated ground terminal rather than a wire.
- Tug each connection firmly to confirm it is secure before pushing the wiring into the housing. A loose wire connection is a safety hazard and the most common wiring mistake on this type of job.
- Fold the wires neatly into the housing wiring compartment — tuck them away so they do not obstruct the fan motor when you install it in the next step.
💡 Tip: Hot is black, neutral is white, ground is bare copper or green — standard US residential wiring colors throughout. If you encounter wires that do not match these colors (for example, cloth-wrapped wiring in a very old home), stop and consult a licensed electrician before proceeding. Non-standard wiring is a sign the electrical system may need professional evaluation.
Step 7 — Attach the Fan Unit and Grille
The hardest work is done. Installing the fan motor and fitting the grille are the final two assembly steps before testing — and both are straightforward once the housing is correctly mounted and wired.
- Plug the fan motor into the housing socket — locate the power plug on the fan motor and the matching socket inside the housing. Push the plug in firmly until it clicks or seats fully. This connection powers the motor from the house wiring you connected in Step 6.
- Slide the motor unit into the housing — position it so it aligns with the mounting holes and sits flush inside the housing frame. Secure it with the mounting screws provided. Hand-thread first, then tighten with a screwdriver — do not overtighten.
- Snap the grille onto the mounting clips — hold the grille directly below the housing opening, align the spring clips with their corresponding slots in the housing, and press upward firmly until both clips engage. You should feel or hear the clips lock in position.
- Press the grille flush against the ceiling — the grille frame should sit flat with no gaps between it and the ceiling surface. If there is a visible gap on one side, that clip has not fully engaged — push up more firmly at that location until it locks.
Step 8 — Test and Final Check
Before calling the job complete, restore power and run a proper functional test. A new fan should run smoothly and quietly from the very first switch-on — any unusual sounds, vibrations, or suction issues are far easier to diagnose and fix now than after cleaning up and moving on.
- Return to the breaker panel and restore power — flip the bathroom circuit breaker firmly back to ON.
- Switch the fan on at the wall switch and listen for smooth, quiet operation. A quality modern fan should be noticeably and immediately quieter than the old unit it replaced.
- Hold a tissue or a small piece of toilet paper near the grille — it should draw toward the grille and be held flat against it by suction. This confirms the fan is moving air through the duct and exhausting it correctly to the outside. No draw means a duct problem — see Common Problems below.
- Check for unusual noise or vibration — a low operational hum is normal. Rattling, grinding, or vibration transferring into the ceiling suggests the motor is not fully seated in its housing or a mounting screw is loose.
- Let the fan run for five minutes and check the grille remains flush and stable against the ceiling with no movement or vibration working the clips loose.
⚠️ Warning: If the fan makes a grinding or rattling noise when running — turn it off immediately and check that the motor is correctly seated in the housing with all mounting screws secure. Running a fan with a rattling motor causes premature bearing wear. A motor that is not firmly mounted can also contact the housing walls during operation, creating both noise and a potential long-term safety issue.
Common Problems and Fixes
Even a careful installation can produce a minor issue on the first test run. Here are the most common problems homeowners encounter and how to resolve them without starting the job over from scratch. If your existing fan was already acting up before you started — rather than simply worn out or noisy — our bathroom fan not working troubleshooting guide covers diagnosing problems on the old unit before you commit to a full replacement.
- Fan runs but there is no suction at the grille. Hold a tissue near the grille and nothing moves — the duct has disconnected at the housing collar or at the exterior vent cap. Switch the fan off, remove the grille and motor, and inspect the duct connection at the top of the new housing. Re-seat the duct on the collar and re-seal with foil tape before re-testing.
- Loud rattling during operation. The motor unit is not fully seated in the housing, or the grille spring clips are not fully engaged. Turn off the fan, remove the grille, and recheck that the motor is flush in its mounting position with all screws tightened. A rattling grille on its own means the spring clips need to be pressed more firmly into their slots — push up at each clip location until you feel them lock.
- Fan trips the breaker when switched on. This indicates a wiring fault — most likely a short caused by reversed connections, a wire touching the housing metal, or a loose wire not properly secured by its connector. Turn the breaker off, remove the motor and grille, and carefully inspect each wire connection. If you cannot identify the fault, call a licensed electrician. Do not repeatedly reset a tripping breaker.
- Condensation dripping through the grille in winter. Warm, moist bathroom air is condensing inside a cold duct run through an uninsulated attic before it reaches the exterior vent. The duct needs insulation — wrap it with insulated duct sleeve or replace the bare duct run with pre-insulated flexible duct hose. This issue is particularly common in homes across the Upper Midwest and Northeast in winter months.
If you are still encountering issues after working through these fixes, our guide to the best bathroom exhaust fans covers models with strong installation reviews and responsive manufacturer support — sometimes the simplest solution is a unit designed for straightforward installation from the outset.
Need a Professional Electrician or Plumber?
If you discover aluminum wiring, a corroded junction box, a duct that vents into the attic and needs full rerouting, or any other issue that goes beyond a straightforward fan swap, bringing in a licensed professional is the right call. Search PlumberArchive.com — the US plumber directory with 12,151+ verified plumbers and contractors across all 50 states.
Find a trusted professional near you →
Looking for our top recommended tools in one place? Browse our curated Amazon Storefront →
Frequently Asked Questions
Q: Can I replace a bathroom exhaust fan myself?
Yes, replacing a bathroom exhaust fan is a job most homeowners can complete without a licensed electrician. The electrical work involved — connecting three color-coded wires with wire connectors — is straightforward when the circuit is confirmed off with a voltage tester and the wire colors are followed correctly. The main exceptions are if your home has aluminum wiring (common in homes built between the mid-1960s and mid-1970s), if you find a corroded or damaged junction box during removal, or if the duct needs to be rerouted from an attic-venting setup to a proper exterior vent. In any of those scenarios, consult a licensed electrician or contractor before proceeding.
Q: Do I need to turn off the main breaker to replace a bathroom fan?
No — you only need to turn off the specific circuit that powers the bathroom fan at your breaker panel. Locate the bathroom circuit (often labeled “Bath Fan” or “Bathroom”) and switch it off. Then use a non-contact voltage tester at the existing fan housing to confirm the circuit is dead before touching any wiring. Turning off the main breaker would work but is unnecessary — it cuts power to the entire home when you only need to isolate one circuit. The key rule is: always confirm with a voltage tester. Never rely solely on the breaker position as confirmation that a circuit is safe to work on.
Q: Can I replace a bathroom fan without going into the attic?
In most cases, yes. A like-for-like replacement — where the new housing is the same or similar size as the old one — can be completed entirely from below through the ceiling opening without any attic access. You disconnect the duct at the housing collar from below, remove the old housing through the ceiling opening, install the new housing the same way, and reconnect the duct — all without going above the ceiling. The exception is if the duct needs rerouting — for example, if your existing fan currently vents directly into the attic rather than through the roof or soffit (which is against current building codes in most US states). Correcting an attic-venting setup requires attic access to run the duct through to an exterior termination point.
Q: How do I know what size fan to buy as a replacement?
The key specification to match is CFM — cubic feet per minute, the fan’s airflow capacity. The standard guideline is 1 CFM per square foot of bathroom floor area, with a minimum of 50 CFM for any bathroom. You can find your existing fan’s CFM rating on a label inside the housing once the grille and motor are removed. Always match or exceed this rating with the replacement — never downgrade. Also check the housing dimensions to confirm the new unit fits your ceiling opening without major modification, and the duct collar diameter (most standard bathroom fans use a 4-inch collar). For noise, the sone rating tells you how loud the fan will be — modern fans in the 0.5–1.0 sone range are dramatically quieter than older 2.0 sone units. Our bathroom exhaust fan sizing guide walks through the full CFM calculation, and our guide to the best bathroom exhaust fans covers recommended models with CFM and sone ratings clearly listed for each bathroom size.
Conclusion — Replacing a Bathroom Exhaust Fan Is Well Within DIY Reach
Replacing a bathroom exhaust fan is a manageable two-to-three hour job for any homeowner comfortable with basic tools and a clear step-by-step process. The two habits that make the biggest difference are both simple: turn off the circuit at the breaker and confirm it is dead with a voltage tester before touching any wires, and take a photo of the existing wiring before disconnecting anything. Those two steps remove the two main sources of uncertainty from the job entirely.
The practical reward beyond the job itself is the noise difference. Modern bathroom exhaust fans are dramatically quieter than units from ten or fifteen years ago — going from a 2.0 sone unit to a 0.8 sone replacement is a change you notice every single time you use the bathroom. Better airflow also means less condensation on mirrors and walls, less risk of mold developing in the ceiling cavity, and a bathroom that clears steam in a fraction of the time.
If you have not yet chosen a replacement fan, see our full guide to the best bathroom exhaust fans, which compares options across all bathroom sizes, CFM ratings, and noise levels. For further bathroom upgrades that are equally achievable as DIY projects, our guide to the best shower heads covers an equally straightforward replacement that makes an immediate, noticeable difference to your daily routine.
✍️ About This Guide
PTR Editorial Team — Plumbing Guides. We compare manufacturer specifications, installation requirements, compatibility and available product documentation to help homeowners choose suitable tools and parts. How we review →