Please note: Information in this guide is based on our research at time of writing and is subject to change. Always consult a licensed electrician or plumber for diagnosis of serious electrical or ventilation issues before attempting repairs.
Introduction
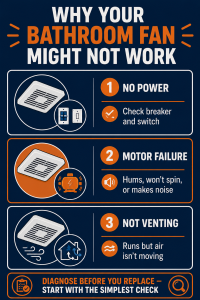
A bathroom fan that stops working almost always has a diagnosable cause — and in the majority of cases it falls into one of three categories: no power reaching the unit at all, a motor that has seized or burned out, or a fan that runs but isn’t actually moving air through the duct system. Each category has a completely different fix, and they’re easy to tell apart once you know what to look for. Working through them in order, starting with the simplest electrical checks, avoids the mistake of assuming a full unit replacement is needed when a tripped breaker or a disconnected duct is the actual culprit.
This guide walks through every major failure mode in diagnostic order — from power supply and switch problems through to motor failure and duct obstructions — so you can identify what’s wrong and decide whether it’s a simple DIY fix or a replacement job. Once you’ve identified the cause, our guide to the best bathroom exhaust fans covers replacement options, and our step-by-step guide to replacing a bathroom exhaust fan walks through the installation process from start to finish.
At a Glance
| Difficulty |
Easy to Moderate |
| Time |
15–30 Minutes to diagnose |
| Cost |
Free to diagnose — repairs vary |
| Tools Needed |
Flashlight, voltage tester (optional), screwdriver |
| Skill Level |
Beginner to Intermediate |
✏️ Our Take
A bathroom fan that’s stopped working almost always falls into one of three categories: no power reaching it at all, a motor that’s seized or burned out, or a fan that runs but isn’t actually venting air anywhere useful. Each has a completely different fix, and working through them in order — starting with the simplest electrical checks — saves you from assuming the whole unit needs replacing when the real problem is often a tripped breaker or a clogged vent duct.
Is It Getting Power at All?
Before assuming anything is mechanically wrong with the fan itself, confirm that power is actually reaching it. The wall switch is the first thing to check — it sounds obvious, but a switch that feels like it’s in the on position can sometimes not be making proper contact internally, particularly in older toggle-style switches that have been used heavily over many years. Try switching it off completely and back on firmly, and listen for any response from the fan housing.
Next, check the breaker panel for the circuit the bathroom fan is on. A tripped breaker sits in a middle position between fully on and fully off — not quite flush with the other breakers — and resetting it is a matter of pushing it fully to the off position first, then back to on. If the breaker is not obviously tripped but you’re still not sure whether the circuit is live, test another fixture on the same circuit — a light switch or outlet in the same bathroom — to confirm whether the loss of power is limited to the fan or affects the circuit as a whole.
💡 Tip: If multiple things on the same circuit have also stopped working, the breaker is almost certainly your answer before you touch the fan itself.
Fan Doesn’t Turn On — Check the Breaker and Switch
If the breaker has tripped, resetting it will often restore power to the fan immediately. Push the breaker fully to the off position first — you should feel it click — then push it back to on. Test the fan switch again. A breaker that trips repeatedly after being reset points to a sustained overload or a fault on the circuit, which warrants an electrician rather than further DIY investigation.
If the breaker is fine but the fan still doesn’t respond, the wall switch itself is the next suspect. A switch that feels loose, doesn’t click firmly when toggled, or has any visible discoloration or scorch marks around the faceplate has likely failed internally. Switch failures are more common than most homeowners expect — the mechanical components inside a toggle or rocker switch do wear out over time, particularly in bathrooms where humidity causes accelerated corrosion of the contacts. If you’re replacing a failed switch anyway, our guide to wiring a bathroom fan timer switch covers upgrading to a timer at the same time.
Bathroom fans on circuits protected by a GFCI outlet or breaker are another consideration. GFCI protection can trip from humidity exposure over time — sometimes without any obvious visible sign at the outlet itself. Check whether there is a GFCI outlet in the bathroom or hallway serving this circuit and press the test and reset buttons to confirm it hasn’t tripped silently.
⚠️ Warning: Always switch off the breaker before opening any switch plate or fan housing — never assume a switch in the off position means the circuit is dead. Verify at the breaker panel before working on any wiring.
Fan Hums But Won’t Spin
A humming sound with no blade movement is one of the clearest diagnostic signals a bathroom fan gives: the motor is receiving power, but something is preventing the rotor from turning. The two most common causes are a seized motor bearing and a failed run capacitor. In either case, the motor is energized but mechanically unable to move — and unlike a simple power problem, this one points directly at the motor itself.
Dust and lint accumulation around the motor bearing is a contributing factor in many cases, particularly in fans that haven’t been cleaned in several years. The buildup increases friction on the bearing over time until the motor can no longer overcome it, even at full power. Removing the grille and cleaning around the motor assembly with a soft brush and compressed air is worth trying if the fan is otherwise relatively new, though in practice a seized bearing on an older unit rarely responds to cleaning alone.
A failed capacitor — the small cylindrical component that provides the initial starting torque for the motor — is a less obvious cause but equally common in fans over five years old. Capacitor failures cause exactly this symptom: the motor hums at line frequency but has no torque to initiate rotation. Replacement capacitors are inexpensive and available for many common fan models, but sourcing the correct value requires knowing the motor’s specifications, and the repair is only practical if the rest of the motor is in good condition.
💡 Tip: A humming fan that won’t spin is drawing power and generating heat with nowhere for it to go — turn it off at the breaker rather than leaving it running in this state.
Fan Spins But Makes Loud Noise
Noise from a running bathroom fan almost always falls into one of two categories — rattling or vibration on one hand, and grinding or squealing on the other — and they point to different root causes. Rattling typically comes from a loose component rather than the motor itself: a mounting bracket that has worked loose, housing screws that have vibrated free over time, or a grille cover that isn’t seated firmly. These are easy to check and fix without touching any wiring.
Grinding or high-pitched squealing, by contrast, almost always indicates a worn motor bearing. As the bearing surface degrades, the rotor develops increasing friction and play — which produces that characteristic grinding sound during rotation. A squealing bearing that is caught early may respond temporarily to a small amount of lightweight machine oil applied to the bearing point, but this is rarely a lasting fix. A grinding motor in an older fan is generally approaching the end of its service life. Our step-by-step guide to replacing a bathroom exhaust fan covers the full process when the motor reaches that point.
💡 Tip: Tighten visible mounting screws first — a loose housing vibrating against the ceiling is a far simpler fix than a motor bearing replacement, and takes about two minutes to check.
Fan Runs But Doesn’t Seem to Vent Air
A fan motor spinning normally does not guarantee that air is actually leaving the bathroom and reaching the exterior of the house. The motor and the duct are two separate systems, and a failure in the duct — a blockage, a disconnected joint, or a damper that won’t open — will prevent ventilation even with a perfectly functioning fan. This is one of the most commonly misdiagnosed bathroom fan problems because the fan appears to be working normally in every way that’s visible from inside the room.
The classic symptom is a bathroom that still fogs up and takes a long time to clear after a shower despite the fan running throughout. Steam condensing on mirrors and walls shortly after a shower is normal when the door is closed, but if it’s still condensing heavily after several minutes of the fan running, the duct is the first place to investigate rather than the motor.
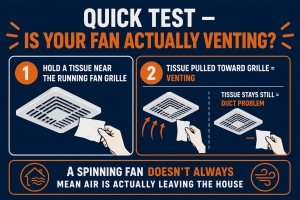
💡 Tip: Hold a tissue near the fan grille while it’s running — if it isn’t pulled toward the fan, air isn’t moving through the system properly even though the motor is spinning.
Checking for a Blocked or Disconnected Duct
Lint, dust and debris accumulate inside bathroom duct runs over years of use, particularly in the sections of flexible duct closest to the fan housing where turbulence slows the airflow. A partial blockage reduces airflow gradually enough that most homeowners don’t notice until the ventilation has declined significantly. A complete blockage — usually caused by a debris accumulation meeting a collapsed or kinked section of flexible duct — stops useful airflow entirely while the motor continues running normally.
Flexible duct is also prone to disconnecting at joints in attic spaces or wall cavities, particularly if the original installation used only tape rather than proper duct connectors. A disconnected joint means the fan is exhausting air directly into the attic or wall cavity rather than to the exterior — which clears the bathroom but creates a separate problem in the building structure. Checking this requires attic or wall access, which not every homeowner can do, but the exterior vent cap provides an indirect test: if the damper flap on the exterior cap doesn’t open when the fan runs, the air isn’t making it through.
A crushed or tightly kinked section of flexible ductwork also severely restricts airflow even when no actual blockage exists. Flexible duct should run as straight and direct as possible — long runs, tight bends and sagging sections all reduce the effective CFM the fan can move. If the sizing and duct run of your existing system are contributing to the problem, our bathroom exhaust fan sizing guide covers the CFM calculations and duct length considerations in full.
US regional note: In humid climate regions like Florida, the Gulf Coast and the Pacific Northwest, bathroom fan motors and duct systems accumulate moisture-related corrosion and mold buildup faster than in drier inland states. Homeowners in these regions should expect motor replacement and duct cleaning more frequently as part of normal maintenance, not as a sign something was installed incorrectly.
⚠️ Warning: A disconnected duct in an attic doesn’t just reduce ventilation — it vents moist bathroom air directly into the attic space, which can cause mold and insulation damage over time. This is worth checking even if the fan seems to be working fine.
When the Motor Itself Has Failed
If the power supply, switch, GFCI and duct are all confirmed to be fine and the fan still doesn’t function properly, the motor itself is the likely failure point. Bathroom fan motors are not designed for individual repair in the field — they’re manufactured as sealed units with no serviceable internal components beyond the capacitor in some models. The practical choice when a motor fails is between a replacement motor assembly and a full unit replacement.
Replacement motor kits are available for a number of common fan models and brands, and they’re designed to drop into the existing housing without requiring new wiring or ceiling work. The challenge is that the replacement motor must match the original housing exactly — same mounting pattern, same blade diameter, same voltage and power rating. For newer fans still within their expected service life, finding a matching motor kit can be a cost-effective repair. For older or less common models, sourcing the correct replacement is often more difficult than replacing the entire unit.
For most homeowners, replacing the full fan unit is the simpler and more reliable outcome. It eliminates the sourcing problem, delivers current performance and noise specifications rather than restoring an aging motor, and the installation process is nearly identical to fitting a replacement motor anyway. Our guide to the best bathroom exhaust fans covers our current picks at different price tiers and CFM ratings.
💡 Tip: Check the fan’s age before deciding — most bathroom fans last around 10 years, so a motor failure on an older unit is a reasonable time to replace the whole fixture rather than search for a matching replacement motor.
Repair vs Replace — Making the Call
Simple fixes — a loose housing screw, a tripped breaker, a GFCI reset, a disconnected duct joint — are always worth doing yourself before spending anything on the fan unit. These take 15 to 30 minutes, cost nothing or next to nothing, and resolve a significant percentage of bathroom fan complaints without any parts at all. Working through the diagnostic steps in this guide in order keeps you from spending money unnecessarily.
Motor failure is where the repair-vs-replace decision becomes a genuine judgment call. For a fan under five years old, a replacement motor kit — if the correct one is available — can extend the unit’s service life at lower cost than a full replacement. For a fan over 10 years old, full replacement is almost always the more practical outcome: the motor has already run most of its expected service life, the housing and other components have aged alongside it, and a new unit typically delivers meaningfully better performance in terms of CFM and noise level than the original spec.
Our step-by-step guide to replacing a bathroom exhaust fan walks through the full removal and installation process, including wiring and duct reconnection, for homeowners who are comfortable with a straightforward electrical task.
💡 Tip: A new fan unit with better CFM and a lower sone rating than your old one is often a genuine upgrade, not just a like-for-like replacement — worth checking current sizing recommendations while you’re already replacing it.
Need a Professional Plumber or Electrician?
If the breaker keeps tripping after a reset, if you find any wiring that looks burned or damaged, or if the duct run requires attic access you’re not comfortable with, bringing in a licensed professional is the right call. A qualified electrician can diagnose circuit faults safely, and a plumbing or HVAC contractor can inspect and re-route ductwork where needed.
Find a licensed contractor in your area at PlumberArchive.com — the US plumber directory with 12,000+ verified local professionals across all 50 states.
Find a trusted professional near you → PlumberArchive.com
Follow Us on Facebook
Get weekly plumbing tips, honest tool reviews and DIY maintenance guides delivered straight to your Facebook feed. We cover bathroom ventilation, electrical basics, drain maintenance and everything in between — written for US homeowners who want to handle more themselves.
Follow PlumbingToolsReview on Facebook →
Frequently Asked Questions
Q: Why did my bathroom fan suddenly stop working?
Most sudden fan failures trace to one of three causes: a tripped breaker or GFCI cutting power to the circuit, a switch that has failed internally, or a motor that has burned out or seized after extended use. The fastest way to determine which is to check the breaker first — reset if tripped and test the switch again — before assuming anything mechanical has failed inside the fan housing. A fan that stopped working immediately after a shower in a humid bathroom is particularly likely to be a GFCI trip rather than a motor failure.
Q: Is it safe to use a bathroom with a fan that hums but doesn’t spin?
No — a motor that is energized but not spinning is generating heat with nowhere to go. Running the fan in this state risks overheating the motor windings and, in some cases, the motor housing can become hot enough to pose a fire risk inside the ceiling cavity. Switch the fan off at the breaker rather than the wall switch and do not use it again until the motor has been inspected or replaced. The bathroom can still be used normally in the meantime — just don’t operate the fan switch until the fault is resolved.
Q: How do I know if my bathroom fan duct is blocked?
The most practical field test is to hold a tissue near the grille opening while the fan is running — if the tissue isn’t drawn toward the fan, air is not moving through the duct even though the motor is spinning. You can also check the exterior vent cap on the outside wall or soffit and confirm the damper flap opens when the fan runs. A damper that stays closed or barely moves while the fan is on indicates a blocked or disconnected duct run. Steam that takes longer than five to ten minutes to clear after a shower is a softer indicator that the duct is not venting efficiently.
Q: How long do bathroom exhaust fan motors typically last?
Most bathroom exhaust fan motors last between 10 and 15 years under normal residential use. Humidity, dust accumulation around the motor bearings, and frequency of use all affect service life. Fans in heavily used bathrooms in humid climates — Florida, the Gulf Coast, the Pacific Northwest — tend to reach the lower end of that range. A motor failure on a fan that is already over 10 years old is generally a sound reason to replace the entire unit rather than search for a matching replacement motor, particularly since newer fan models typically offer meaningfully better CFM performance and quieter operation than units from that era.
Conclusion
The most important step in diagnosing a bathroom fan that’s stopped working is not to assume the motor is the problem before confirming that power is actually reaching it. A tripped breaker, a failed GFCI, or a worn switch accounts for a substantial proportion of bathroom fan “failures” that never required any work on the fan itself. Start with the simplest electrical checks and work outward from there.
A running motor that isn’t venting is equally important to diagnose correctly — a fan that hums along without actually moving air through the duct provides none of the moisture removal that bathroom ventilation is designed for, and a disconnected duct can cause structural mold damage in the attic over time. The tissue test and exterior damper check take under two minutes and confirm whether the duct system is the problem before any ceiling work is considered.
When replacement becomes the right call — whether due to motor failure on an older unit or a duct system that is simply the wrong size for the bathroom — our guide to the best bathroom exhaust fans covers our current picks, our bathroom exhaust fan sizing guide walks through the CFM calculations to get the right capacity, and our step-by-step guide to replacing a bathroom exhaust fan covers the full installation from start to finish.
✍️ About This Guide
PTR Editorial Team — Plumbing Guides. We compare manufacturer specifications, installation requirements, compatibility and available product documentation to help homeowners choose suitable tools and parts. How we review →