Please note: Information in this guide is based on our research at time of writing and is subject to change. This guide explains the general process — it does not substitute for a licensed electrician’s assessment of your specific home’s wiring.
Introduction
Installing a timer switch for your bathroom exhaust fan is one of the more approachable electrical upgrades available to a confident DIYer. In most homes it’s a simple single-pole switch swap: the existing wall switch controlling your fan comes out, and a new timer switch that automatically shuts the fan off after a set number of minutes goes in its place. The physical wiring connections themselves are usually just a handful of wire nuts, and the project typically takes somewhere between 20 and 30 minutes once the power is safely off and you can see exactly what you’re working with inside the box.
What actually trips up more installations than the wiring steps themselves is a single question: does your switch box have a neutral wire, and does the timer switch you’ve chosen require one? Some timer switches are built to work without a neutral connection at all, using only the existing hot and load wires, while others need that neutral wire present to power their internal electronics. Working out which situation applies to your home before you buy a switch — not after you’ve already opened the box — is the difference between a smooth, confident project and a frustrating second trip to the hardware store.
This guide walks through the full process — safety, wiring identification, connection, testing, and knowing when to call a professional instead. If you haven’t picked a switch yet, our bathroom exhaust fan timer switch reviews compare neutral and no-neutral models, and our humidity sensor switch reviews cover an alternative that automates run time based on moisture instead of a fixed countdown. If you’re trying to decide between the two approaches rather than just picking a model, our timer switch vs humidity sensor switch comparison breaks down that decision. This article picks up where those buying guides leave off, focused on the step-by-step wiring process itself.
At a Glance
| Skill Level |
Beginner to Intermediate DIY electrical |
| Tools Needed |
Non-contact voltage tester, screwdriver, wire strippers (if needed), wire nuts |
| Time Needed |
Roughly 20–30 minutes for a straightforward single-pole swap |
| Critical First Step |
Always turn off power at the breaker, not just the wall switch, before touching any wires |
✏️ Our Take
Wiring a bathroom fan timer switch is genuinely approachable for most single-pole installations — the actual connections are straightforward once the power is off and you can see what you’re working with. The part that trips people up isn’t the wiring itself, it’s figuring out ahead of time whether your switch box has a neutral wire, since that determines which type of timer switch will actually work in your home. Take the time to check this before you buy a switch, not after, and the rest of the installation is a quick, confident project.
Safety First — Turning Off Power Correctly
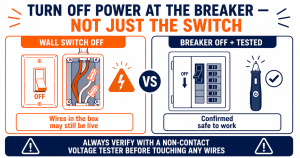
Before you touch a single wire, the power to that switch needs to be off at the breaker panel — not just switched off at the wall. This distinction matters more than it might seem. A standard single-pole wall switch only interrupts one side of the circuit; depending on how the circuit is wired, the switch itself and the wires feeding it can still be carrying live current even while the switch is in the “off” position. Flipping the wall switch off gives you a false sense of security, not an actually safe working environment.
Go to your home’s breaker panel and identify the circuit that controls the bathroom fan and switch. If your panel is labeled clearly, this is quick; if it isn’t, flip breakers one at a time while checking whether the fan and any connected lights lose power, ideally with a helper watching from the bathroom. Once you believe you’ve found the right breaker, switch it off.
Don’t stop there, though. Before touching any wires, confirm the power is actually off using a non-contact voltage tester held near the wires inside the box. This small, inexpensive tool beeps or lights up when it detects live current, and it’s the only reliable way to confirm — rather than assume — you’re working on a dead circuit. If the tester indicates any voltage is present, stop, double-check the breaker, and test again.
⚠️ Warning: Never work on a switch with only the wall switch turned off — always shut off power at the breaker panel and verify with a non-contact voltage tester before touching any wires. A switch being “off” does not guarantee the wires in the box are safe to touch.
Step 1: Remove the Old Switch and Identify Your Wiring
With the power confirmed off and verified with your voltage tester, you’re ready to open the switch box and see what you’re working with. This step is as much about documentation as removal — the goal is a clear, reliable record of how the existing switch is wired before anything gets disconnected.
- Remove the wall plate. Unscrew the small screws holding the cover plate in place and set the plate and screws aside somewhere they won’t get lost.
- Unscrew the switch from the box. Remove the two mounting screws at the top and bottom of the switch that hold it to the electrical box.
- Gently pull the switch out without disconnecting any wires yet. You just need enough clearance to see the wires and their connections clearly — there’s no need to detach anything at this point.
- Take a clear photo of the existing wire connections before disconnecting anything. This single step saves more headaches than almost anything else in this process — if you get partway through the new installation and can’t remember which wire went where, a reference photo settles it instantly.
- Note how many wires are present and their colors. Count the total number of wires entering the box and note each one’s color, including any that are capped off with a wire nut and not connected to the switch at all — those capped-off wires matter for the next step.
Step 2: Determine If You Have a Neutral Wire
This is the step that determines which timer switches will actually work in your home, so it’s worth slowing down here rather than rushing through it. A neutral wire is typically white, and its defining feature isn’t its color alone — it’s how it’s connected. A true neutral, if present, is usually bundled together with other neutral wires and capped off with a wire nut at the back of the box, separate from the switch itself, rather than landed on one of the switch’s terminals.
- Look for a bundle of white wires capped together at the back of the box, not connected to the switch. If you find one, that bundle is almost certainly your neutral, and it means a neutral-required timer switch is an option for this installation.
- Check whether a white wire is instead connected directly to one of the switch’s terminals. If so, that wire is very likely being used as a hot wire rather than a true neutral — a common practice in switch loop wiring — and is sometimes marked with black or red tape at the terminal to flag exactly this.
- Count the total wires in the box against what a neutral-required switch expects. A neutral-required timer switch typically needs line (hot), load, neutral, and ground — four functional connections. If your box only has line, load, and ground with no separate neutral bundle, a no-neutral-required model is what you need instead.
- When in doubt, treat the wiring as ambiguous rather than guessing. If you genuinely can’t tell whether a wire is a neutral or a hot wire in disguise, that’s a reasonable point to pause — see the “When to Call an Electrician Instead” section below.
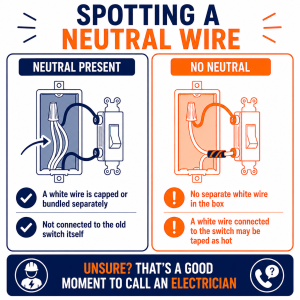
💡 Tip: If you’re replacing a switch and there’s no separate white wire capped off in the box at all, you likely don’t have a neutral wire available — this means you’ll need a timer switch specifically designed for no-neutral installations, not a model that requires one.
Step 3: Connect the New Timer Switch
With your wiring situation identified and a compatible timer switch in hand, it’s time to make the actual connections. Every timer switch ships with its own wiring diagram, and because wiring varies by model — and significantly by whether a neutral is required — that manufacturer diagram is your primary reference here, not a generic set of instructions.
- Follow the wiring diagram included with your specific timer switch. Match each labeled terminal on the new switch to the corresponding wire in your box, using your reference photo from Step 1 to confirm you’re matching connections correctly.
- Connect the line (hot) wire to the switch’s line terminal. This is the wire bringing power into the box from the breaker panel.
- Connect the load wire to the switch’s load terminal. This is the wire running out to the fan itself — the connection the timer switch actually controls.
- Connect the neutral wire (if your switch requires one) and the ground wire to their labeled terminals. Use wire nuts to secure any spliced connections firmly, twisting them until the connection feels solid and no bare copper is exposed.
- Tuck all connections neatly into the box once they’re secure. Fold the wires so they sit compactly without straining any connection, leaving room for the switch body itself.
Step 4: Secure and Test the Switch
With the wiring complete, the last real task is getting the switch physically back into the box without disturbing any of those connections, then confirming everything actually works before you consider the job finished.
- Carefully push the switch and its wiring back into the box. Fold the wires in gradually as you go, watching to make sure nothing gets pinched between the switch body and the edge of the box.
- Secure the switch to the box with its mounting screws. Tighten until the switch sits flush and stable, without overtightening to the point of cracking the switch housing.
- Restore power at the breaker panel. Head back to the panel and switch the breaker you turned off in the Safety First section back on.
- Test the timer function before considering the installation complete. Set the timer, confirm the fan turns on, and confirm it shuts off on its own once the set duration elapses. Don’t skip this step — it’s the only way to confirm the wiring is actually correct, not just physically in place.
Step 5: Attach the Wall Plate
Once testing confirms the timer switch is working correctly, the last step is a purely cosmetic one that completes the installation.
- Position the wall plate over the switch. Most timer switches use a standard wall plate, either the one you removed in Step 1 or a new one included with your switch if the design differs from a standard toggle.
- Secure it with the mounting screws. Tighten until snug against the wall, without overtightening enough to crack the plate.
- Do a final visual check. Confirm the plate sits flush and level, and that no wiring is visible or pinched around the edges before considering the project complete.
When to Call an Electrician Instead
Most single-pole timer switch installations go smoothly, but there are a handful of situations where the right move is to stop and bring in a licensed electrician rather than push forward on your own. None of these are signs you’ve done anything wrong — they’re simply points where the wiring configuration or risk involved goes beyond what a general walkthrough can responsibly cover.
If you’re unsure whether a neutral wire is present and can’t confidently identify it after carefully checking, that uncertainty alone is reason enough to call for help rather than guess. Similarly, if the switch box wiring looks more complex than a simple single-pole configuration — multiple switches controlling the same fixture from different locations, an unusual number of wires, or wire colors that don’t match what’s described here — that’s a more involved job, and worth having a professional confirm.
Finally, if testing in Step 4 doesn’t produce the expected result — the fan doesn’t turn on, doesn’t shut off, or behaves unpredictably — and the cause isn’t obvious after rechecking your connections against the manufacturer’s diagram, stop troubleshooting and call an electrician rather than continuing to experiment with a live circuit. This guide informs and explains the general process; it isn’t a substitute for an electrician’s in-person assessment of your specific home’s wiring.
US Regional Context: Electrical code requirements and inspection practices vary by US state and municipality, and some areas require a permit or licensed electrician for any switch replacement involving new wiring configurations, even straightforward ones. If you’re unsure what your local code requires, checking with your municipality before starting is worth the few minutes it takes.
If it turns out the issue is with the fan unit itself rather than the switch — for example, a fan that doesn’t run at all no matter how it’s wired — our how to replace a bathroom exhaust fan guide walks through that separate, larger project.
Need a Professional Plumber?
While this project is electrical rather than plumbing work, many home upgrades touch both trades. If you need a licensed professional in your area for a plumbing project, search PlumberArchive.com — the US plumber directory with 12,000+ verified local plumbers across all 50 states.
Find a trusted plumber near you → PlumberArchive.com
Frequently Asked Questions
Q: Can I install a timer switch if I’m not sure whether my box has a neutral wire?
Resolve the uncertainty before you buy a switch, not during installation. Check the box for a bundle of white wires capped together and separate from the switch itself — that’s the sign of a true neutral. If you don’t find one, or find a white wire landed directly on the switch (often marked with tape to flag it as a hot wire instead), assume you don’t have a neutral available and choose a no-neutral-required timer switch. If you’re still genuinely unsure after a careful look, have a licensed electrician confirm it rather than guessing and buying the wrong switch.
Q: Is it safe to do this wiring myself, or should I always hire an electrician?
For most homes, a straightforward single-pole switch swap like the one described here is manageable for someone comfortable with basic household electrical work, provided you follow the safety steps closely — power off at the breaker, confirmed with a non-contact voltage tester, every time. That said, “safe to do yourself” depends on your comfort level and on what you actually find inside the box. If the wiring looks more complicated than a simple single-pole setup, or you’re not confident identifying a neutral wire, hiring a licensed electrician is always a reasonable choice for a job this size.
Q: What happens if I wire the switch incorrectly?
The most common result is simply that the switch or fan doesn’t work as expected — the fan doesn’t turn on, doesn’t shut off automatically, or the timer function doesn’t behave correctly. An incorrect connection can also trip a breaker, which is a useful safety response rather than something to work around. Never try to “test” a suspected wiring mistake with the power on, or repeatedly reconnect wires while the circuit is live. If something doesn’t work, turn the power back off at the breaker, recheck your connections against the manufacturer’s diagram and your reference photo, and only restore power once you’re confident the wiring matches. If it still doesn’t work after a careful recheck, that’s the point to call an electrician.
Q: Do I need a permit to replace a light switch with a timer switch?
In many jurisdictions, a straightforward like-for-like switch replacement doesn’t require a permit, but this varies by state, county, and municipality, and some areas do require one for certain electrical work regardless of how simple it seems. Because this varies so much by location, check with your local building or permitting office before starting, particularly if your installation involves any wiring beyond a simple single-pole swap. A few minutes confirming local requirements is a lot cheaper than a permitting issue after the fact.
Conclusion
Wiring a bathroom fan timer switch is a genuinely approachable project for most homes, and the actual connections rarely turn out to be the hard part. What matters most is doing the safety steps in order every time — power off at the breaker, confirmed with a non-contact voltage tester, before you touch anything — and taking the time to correctly identify whether your switch box has a neutral wire before you ever buy a switch. Get those two things right, and the rest of the installation, from removing the old switch to testing the new one, is a quick and confident afternoon project. If anything about your wiring looks unusual or you’re not fully confident in what you’re looking at, calling a licensed electrician is always the right call over guessing.
Prices and ratings may change. Always check Amazon for current prices.
✍️ About This Guide
PTR Editorial Team — Plumbing Guides. We compare manufacturer specifications, installation requirements, compatibility and available product documentation to help homeowners choose suitable tools and parts. How we review →