Please note: Information in this guide is based on our research at time of writing and is subject to change. Always consult a licensed plumber for diagnosis of serious plumbing issues before attempting repairs.
Introduction
A frozen outdoor faucet is one of the most preventable causes of water damage in US homes, and yet it happens every winter to homeowners who assume a cold snap a few days long isn’t enough to cause real damage. It doesn’t take much: water trapped in the pipe behind the faucet freezes, expands, and cracks the pipe — often inside a wall where the damage isn’t discovered until the spring thaw, when the crack finally leaks. The fix takes under 15 minutes per faucet and costs next to nothing.
This guide walks through the complete winterization procedure in five steps, from disconnecting hoses through to fitting an insulating cover, plus how to tell whether your faucet is a frost-free sillcock that changes part of the process. For broader protection of the pipes inside your home, our guide to how to prevent frozen pipes covers indoor insulation and heat strategies, and if you’re due for a faucet upgrade at the same time, our guide to the best outdoor faucets covers current frost-free and standard sillcock options.
At a Glance
| Difficulty |
Easy |
| Time |
15–30 Minutes per faucet |
| Cost |
Free to $ — faucet covers cost very little |
| Tools Needed |
Flathead screwdriver, bucket (optional), outdoor faucet cover (recommended) |
| Skill Level |
Beginner |
✏️ Our Take
Winterizing an outdoor faucet takes under 15 minutes and costs nothing beyond a cheap insulating cover, but skipping it is one of the most common causes of burst pipes in US homes each winter. The process has four steps: disconnect the hose, shut off the interior valve, open the outdoor faucet to drain any remaining water, then fit an insulating cover. The interior shutoff valve is the critical step most homeowners miss — without it, water sitting in the pipe between the valve and the faucet will freeze and expand regardless of whether a cover is on the outside.
Why Outdoor Faucets Freeze and Burst
Water is one of the few common substances that expands as it freezes, rather than contracting — and that expansion is what cracks pipes, not the cold itself. Any water trapped in the section of pipe between the interior shutoff valve and the outdoor faucet spout has nowhere to go when it freezes and expands, and the pipe wall gives way under that pressure. The crack itself often doesn’t leak until the ice thaws in spring, which is why so much of this damage goes unnoticed until months after the actual freeze event.
A connected garden hose is the single most common cause of outdoor faucet freeze damage, and it’s also the easiest mistake to fix. Even with the faucet handle turned to off, a hose left attached traps water inside the faucet body itself, preventing it from draining out through the spout the way it’s designed to. That trapped water freezes exactly like water trapped in the pipe, and the faucet body cracks from the inside — often without any visible sign until the following spring.
💡 Tip: Leaving a garden hose connected all winter is the most common mistake — the hose traps water inside the faucet body and prevents proper drainage even when the faucet is turned off.
What You’ll Need
The winterization procedure requires almost nothing in the way of tools. A flathead screwdriver handles some shutoff valve types that use a screw-slot stem rather than a lever handle. An outdoor faucet insulating cover — the foam dome style sold at any hardware store — is inexpensive and reusable year after year, making it worth buying one for every outdoor faucet on the property rather than treating it as a one-time expense. A bucket is worth having on hand if the faucet drains into a tight space where water would otherwise pool against the foundation.
If you’re shopping for a faucet upgrade at the same time — particularly if you’re switching to a frost-free sillcock — our guide to the best outdoor faucets covers current options and what to look for.
💡 Tip: Foam faucet covers cost very little and are reusable for years — worth buying one for each outdoor faucet as a one-time purchase rather than improvising with rags or plastic bags each year.
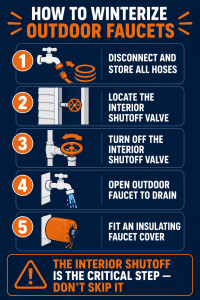
Step 1 — Disconnect and Store All Hoses
Disconnect every garden hose from every outdoor faucet on the property before the first hard freeze of the season. This is the step that’s easy to forget once the weather turns cold and the hose hasn’t been touched in weeks, but it’s also the one that causes the most damage when skipped, since a connected hose traps water inside the faucet body regardless of anything else you do.
Drain each hose fully and store it indoors, in a garage, or in a shed rather than leaving it coiled outside. A hose left connected and full of water will freeze solid, and the resulting expansion can damage both the hose itself and the faucet threads it’s attached to. While you’re at it, check for any soaker hoses, drip irrigation lines, or hose splitters that might still be attached out of sight — these are frequently overlooked because they’re not the primary hose most people think to disconnect.
💡 Tip: Check every outdoor faucet on the property, not just the main one — a side-yard hose bib is easy to forget and just as likely to freeze.
Step 2 — Locate the Interior Shutoff Valve
Every outdoor faucet should have its own dedicated shutoff valve located inside the house — typically in the basement, crawl space, or utility room, on the wall closest to where the faucet penetrates the exterior. This valve is what allows you to isolate and drain just that one faucet line without shutting off water to the rest of the house, and it’s the single most important element of the entire winterization procedure.
If you trace the pipe from the outdoor faucet inward and can’t find a dedicated valve anywhere along its run, the main water shutoff for the house is the fallback option — though that means shutting off water to the entire home temporarily rather than just the one faucet, which is far less convenient for a routine seasonal task.
⚠️ Warning: If you cannot locate a dedicated shutoff valve for an outdoor faucet, that’s a plumbing gap worth addressing before winter — a plumber can add one relatively easily, and it’s the only reliable way to fully protect that faucet from freezing.
Step 3 — Turn Off the Interior Shutoff Valve
Turn the valve clockwise to close — right to close is the standard direction for both gate and ball valves used in residential shutoffs. On a ball valve, the handle should end up perpendicular to the pipe when the valve is fully closed; if the handle is still parallel to the pipe, it isn’t shut all the way. On a gate valve, turn the wheel until it stops naturally, but avoid overtightening once it reaches that point, since forcing it further can damage the valve stem.
A valve that hasn’t been operated in a year or more can be stiffer than expected the first time you turn it, particularly older gate valves. Apply steady, firm pressure rather than forcing it suddenly, and if it feels seized rather than just stiff, stop and treat that as a sign the valve may need professional attention before it can be relied on.
💡 Tip: Test the shutoff valve works before relying on it — turn it off and check whether the outdoor faucet stops flowing when opened. A valve that was never used may be stiff or partially seized.
Step 4 — Open the Outdoor Faucet to Drain
With the interior valve closed, go back outside to the faucet itself and open it fully. This is the step that actually removes the water that would otherwise freeze and expand — closing the interior valve alone isn’t enough if the section of pipe between the valve and the faucet is still full of standing water. Have a bucket ready underneath if the faucet drains into a tight space against the foundation where pooling water could be a problem.
Leave the faucet open until no more water drips out — this can take a few minutes depending on the length and slope of the pipe run — then close it again. If you notice the pipe is still leaking or dripping well after you expected it to stop, our guide to how to fix a leaking pipe covers diagnosing and repairing that separately before winter arrives.
💡 Tip: If water continues dripping from the outdoor faucet for more than a few minutes after shutting the interior valve, suspect the interior shutoff valve isn’t fully closing — this needs attention before winter.
Step 5 — Fit an Insulating Faucet Cover
Fit a foam insulating cover over the closed outdoor faucet as the final step. Most covers use a simple hook-and-loop strap that wraps around the faucet body and cinches tight, taking only a few seconds to install. This cover adds a layer of protection against brief temperature dips and shields the exposed faucet hardware itself, working alongside — not instead of — the drained line from the previous steps. For the exposed supply line feeding the faucet, particularly in an unheated crawl space or garage, our roundup of the best heat tape and pipe heating cables covers an additional layer of protection for the pipe itself, not just the faucet.
In cold-climate states like Minnesota, Wisconsin, Michigan and across the Northeast, outdoor faucet winterization is essential annual maintenance — the first hard freeze typically arrives before most homeowners have thought about it. In transitional climate states like Tennessee, the Carolinas and parts of Texas, the risk is more occasional but the damage from a single freeze event can be just as severe. Even in states that rarely freeze, an unexpected cold snap in January is worth preparing for — the 15-minute procedure costs nothing to do as a precaution.
💡 Tip: A faucet cover is backup protection, not a substitute for the shutoff valve and draining steps — a properly drained line doesn’t need a cover to survive the winter, but a cover on a drained line is the most thorough approach.
Do You Have a Frost-Free Sillcock?
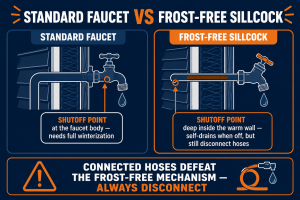
Many homes built after the 1970s have frost-free sillcocks rather than a standard outdoor faucet. A frost-free design uses a long stem that positions the actual shutoff valve deep inside the wall cavity, where interior heat keeps it well above freezing even when the exterior faucet body itself is exposed to the cold. Because the shutoff point is warm, these faucets self-drain automatically once the handle is turned off — no separate interior shutoff valve or draining step is needed for routine use.
That self-draining mechanism only works, however, if water can actually flow back out of the faucet body when it’s shut off — and a connected garden hose blocks exactly that path, the same way it does on a standard faucet. A frost-free sillcock with a hose still attached is just as vulnerable to freeze damage as a standard faucet with no shutoff at all. Always disconnect hoses before winter regardless of which faucet type you have.
💡 Tip: Check the length of the faucet stem — a frost-free sillcock typically extends 4–12 inches into the wall. If you can see only a short faucet body flush with the exterior wall, it’s likely a standard faucet requiring the full winterization procedure.
When to Call a Plumber
A few situations in this process are worth handing to a professional rather than working around yourself. No dedicated interior shutoff valve for the outdoor faucet is the most common one — without it, there’s no reliable way to fully drain that line, and a plumber can typically add a valve without extensive work. A shutoff valve that’s seized and won’t turn at all is another: forcing a stuck valve risks snapping the stem, which turns a simple seasonal task into an emergency repair.
A faucet that already froze in a previous winter also deserves a closer look before you use it again. Check for any visible signs of cracking or leaking around the faucet body and the pipe behind it before turning the water back on in spring — our guide to how to prevent frozen pipes covers what to do if a pipe has already frozen elsewhere in the house.
⚠️ Warning: If an outdoor faucet froze last winter and you’re not sure whether the pipe cracked, have a plumber inspect it before turning the water back on in spring — a hairline crack in a frozen pipe may not show obvious signs until water pressure is restored.
Need a Professional Plumber?
If you can’t locate a shutoff valve, the valve is seized and won’t turn, or you suspect a faucet or pipe cracked in a previous freeze, bringing in a licensed plumber is the safer call before winter arrives. A quick inspection now is far less costly than an emergency repair after a burst pipe.
Find a licensed plumber in your area at PlumberArchive.com — the US plumber directory with 12,000+ verified local plumbers across all 50 states.
Find a trusted plumber near you → PlumberArchive.com
Follow Us on Facebook
Get weekly plumbing tips, honest tool reviews and DIY maintenance guides delivered straight to your Facebook feed. We cover seasonal maintenance, pipe protection, drain care and everything in between — written for US homeowners who want to handle more themselves.
Follow PlumbingToolsReview on Facebook →
Frequently Asked Questions
Q: When should I winterize my outdoor faucets?
Winterize before the first hard freeze of the season — typically in fall, well before overnight temperatures start dipping below freezing in your area. In cold-climate states like Minnesota, Wisconsin and Michigan, that often means completing the process by early-to-mid autumn. In transitional climate states like Tennessee, the Carolinas or parts of Texas, an occasional cold snap can still arrive with little warning, so it’s worth doing the procedure once in fall rather than waiting to see whether a freeze is actually forecast. It costs nothing to do it as a precaution even if the freeze never materializes.
Q: What happens if I leave a hose connected to an outdoor faucet in winter?
A connected hose traps water inside the faucet body, preventing it from draining out the way it’s designed to even when the faucet handle is turned off. That trapped water freezes and expands exactly like water trapped in a pipe, and it can crack the faucet body from the inside — often without any visible sign of damage until the ice thaws the following spring, at which point the crack starts leaking. This is true for both standard faucets and frost-free sillcocks, since a hose defeats the self-draining mechanism on both types equally.
Q: Do I need to winterize a frost-free sillcock?
A frost-free sillcock self-drains once the handle is turned off, because its actual shutoff point sits deep inside the warm wall cavity rather than at the exposed exterior faucet body. That means you don’t need to locate and close a separate interior shutoff valve or manually drain the line the way you would with a standard faucet. You do still need to disconnect any garden hose, though — a connected hose blocks the self-draining path on a frost-free sillcock just as effectively as it does on a standard faucet, and defeats the entire design.
Q: How do I know if my outdoor faucet froze last winter?
A faucet that froze doesn’t always show damage immediately — a hairline crack in the pipe or faucet body often stays dry until water pressure is fully restored in spring, at which point it starts leaking or spraying. Signs to check for include any visible cracking on the faucet body itself, water stains or dampness on the interior wall near where the pipe enters the house, and unusually low water pressure at that specific faucet compared to others. If you have any doubt after a hard freeze, have a plumber inspect the faucet before you turn the water back on and use it normally.
Conclusion
Winterizing an outdoor faucet comes down to four steps: disconnect every hose, shut off the interior valve, drain any remaining water from the line, and fit an insulating cover as backup protection. Skipping any single step — particularly the interior shutoff — leaves the faucet vulnerable regardless of how well you handle the others, since a cover alone can’t protect a line that’s still full of water.
Frost-free sillcocks simplify the process by removing the need for a separate interior shutoff, but they still require hoses disconnected before winter — the self-draining design only works if nothing is blocking the water’s path back out of the faucet body. Whichever faucet type you have, the entire procedure takes well under 15 minutes and costs nothing beyond an inexpensive foam cover.
For broader protection of the pipes inside your home over winter, our guide to how to prevent frozen pipes covers insulation and heat strategies room by room. If you’re due for a faucet replacement, our guide to the best outdoor faucets covers current frost-free and standard options, and if winterizing reveals a drip or leak that needs fixing first, our guide to how to fix a leaking pipe walks through the repair.
✍️ About This Guide
PTR Editorial Team — Plumbing Guides. We compare manufacturer specifications, installation requirements, compatibility and available product documentation to help homeowners choose suitable tools and parts. How we review →