Comparisons
2 Oct 2026

Pop-Up Drain vs Grid Drain: Which Should You Choose?
Pop-up drains seal to hold water; grid drains never close but resist clogs better and cost less. Here's how to choose between them for your bathroom sink.
Foam pipe insulation vs heat tape — how each works, which handles extreme cold better, and when to combine both for maximum protection against frozen pipes.
Please note: Information in this guide is based on our research at time of writing and is subject to change. Always consult a licensed plumber for diagnosis of serious plumbing issues before attempting repairs.
Foam pipe insulation and heat tape both protect pipes from freezing, but they solve the problem in fundamentally different ways — and choosing the wrong one for your situation means either overspending on protection you don’t need or under-protecting the pipes most likely to freeze. Foam sleeves are passive: they slow the rate at which a pipe loses heat to the surrounding cold air, which buys time in moderate freezes. Heat tape is active: it generates its own heat along the pipe, which means it keeps working even when ambient temperatures drop to levels that would eventually defeat foam alone. This guide compares both products across every practical factor — how each works, how each installs, what each costs, and how each performs when temperatures drop well below freezing — so you can make the right call for your specific pipes and climate. Our roundup of the best pipe insulation covers product options once you’ve decided which approach fits your situation.
The starting point for both decisions is the vulnerability of the specific pipe you’re protecting: where it runs, what surrounds it, what temperatures it’s exposed to, and whether it has a documented history of freezing. A pipe running through a heated interior wall in a mild climate has fundamentally different needs than a pipe exposed in an unheated crawl space in a cold-climate state. Our step-by-step guide to insulating pipes for winter covers the practical installation process for both foam and heat tape once you know which to use.
✏️ Our Take
Foam pipe insulation and heat tape solve the same underlying problem — protecting pipes from freezing — but they work in completely different ways. Foam insulation is passive: it slows heat loss from the pipe, buying time before the surrounding temperature catches up. Heat tape is active: it generates its own heat along the length of the pipe, which means it keeps working even in genuinely extreme cold where foam alone eventually loses the battle. Most homes do fine with foam alone. Homes with pipes in unheated crawl spaces, exterior walls in cold-climate states, or a documented history of freezing need heat tape as well, not instead of foam.
IN THIS GUIDE
Foam pipe insulation works by surrounding the pipe with a layer of low-conductivity material — typically closed-cell polyethylene or rubber foam — that slows the rate at which heat transfers from the warm pipe to the cold surrounding air. The pipe retains heat from any flowing water inside it and from the ambient temperature of the space it runs through; the foam sleeve keeps that heat from escaping quickly. In moderate cold, the result is a pipe that stays above freezing for longer than it would bare, which is often all that’s needed to bridge a brief cold spell without the pipe temperature ever reaching the danger point.
The critical word is “slows.” Foam insulation is a time-buying measure rather than an absolute barrier. The sleeve’s effectiveness depends on its wall thickness — thicker foam slows heat loss more dramatically than thin foam — and on the sleeve’s fit: a sleeve that matches the pipe’s outer diameter maintains full contact around the circumference, while an oversized sleeve with air gaps inside is significantly less effective. In sustained extreme cold, even well-fitted, thick foam eventually yields to the continued extraction of heat by the surrounding air, which is where its fundamental limitation lies. Foam is passive protection; once the surrounding air temperature has stayed below freezing long enough, the pipe’s stored heat runs out. Our roundup of the best pipe insulation covers the specific products worth buying, including the thickness ratings that matter most for colder climates.
Heat tape — more accurately called heat cable or pipe heating cable — is an electrical resistance cable that runs along the length of a pipe and generates heat when plugged into a power outlet. Unlike foam insulation, heat tape doesn’t slow heat loss from the pipe; it adds heat to the pipe directly. As long as the cable is receiving power and functioning correctly, the pipe temperature at the cable contact point will be maintained above freezing regardless of how cold the surrounding air becomes. This is what makes heat tape the appropriate tool for the situations where foam insulation alone eventually falls short: genuinely extreme cold sustained for long periods, pipes in completely unheated spaces, and any pipe run with a history of freezing despite insulation.
The most important distinction within the heat tape category is between fixed-wattage cables and self-regulating cables. A fixed-wattage cable outputs the same level of heat at all times whenever it’s plugged in, regardless of whether the surrounding temperature is 30°F or -20°F — which wastes electricity during mild conditions and generates more heat than is necessary. A self-regulating cable uses a conductive polymer that automatically increases output as temperatures drop and reduces it as temperatures rise. Self-regulating cables are more energy-efficient and inherently safer: they cannot overheat during warm conditions, which is a genuine risk with fixed-wattage cables if they’re accidentally left plugged in outside their rated temperature range.
Foam pipe insulation installation is one of the most accessible DIY tasks in home maintenance. Pre-slit foam sleeves are pressed onto the pipe by parting the slit and snapping the sleeve around the pipe, then sealed along the slit edge with manufacturer’s tape or compatible foam tape. Sections butt end-to-end along straight runs; elbows, tees, and valves require pre-formed fitting covers or mitre cuts from straight sleeve sections. No tools are required for standard straight runs, and a full crawl space or basement installation covering dozens of pipe feet can typically be completed in a few hours by a single person with no plumbing experience. Our step-by-step guide to insulating pipes for winter covers the installation process in full detail, including how to handle fittings and corners cleanly.
Heat tape installation is still within DIY range for most homeowners, but requires more attention to manufacturer instructions. The cable must be wrapped around or laid alongside the pipe at the specific spacing the manufacturer specifies — typically a defined number of wraps per foot of pipe based on the cable’s wattage and the pipe’s diameter. Overlapping the cable with itself is not permitted on most products, as heat can build up at contact points and damage both the cable and the pipe beneath it. The free end of the cable connects to a standard power outlet, which must be GFCI-protected — a code requirement in wet and cold environments and a practical safety necessity for an electrical product installed in a crawl space or on an exterior wall. If no GFCI outlet is available near the pipe run, one will need to be installed before the heat tape can be used.
Foam pipe insulation is among the lowest-cost materials in home maintenance — standard polyethylene sleeves are sold by the linear foot at the $ price tier, and a project covering 50 to 100 feet of pipe in a basement or crawl space can be completed with a modest materials outlay. The total cost is almost entirely materials and installation time; there are no ongoing operating costs once the foam is fitted, no electricity drawn, and nothing to replace unless the foam physically degrades over many years or is disturbed by rodents or moisture. Foam’s cost-per-protected-foot is as low as it gets in any pipe protection solution.
Heat tape carries a higher upfront cost per linear foot than foam, and that upfront cost is only the beginning. Every hour the cable is active draws electricity — a real, ongoing operating cost across an entire winter heating season. Self-regulating cables reduce this cost significantly by throttling back output during milder conditions rather than running at full wattage continuously, but the ongoing electricity consumption remains a genuine factor when comparing the two approaches over a multi-year horizon. When evaluating cost, add the estimated seasonal electricity cost to the purchase price and compare that total against the cost of foam alone — in many mild-climate situations, that comparison makes a strong case for foam.
This is the central practical divide between the two options. Foam insulation performs reliably in moderate cold — temperatures in the 10°F to 32°F range where a pipe loses heat slowly enough that its retained warmth can carry it through a brief cold period without dropping below freezing. In sustained extreme cold — temperatures below 0°F maintained for multiple hours or days — foam insulation’s passive heat retention becomes insufficient. The surrounding air is extracting heat from the pipe faster than the foam can preserve it, and without a compensating heat source, the pipe temperature will eventually reach freezing regardless of how well it’s insulated. The pipe may take longer to freeze than a bare pipe, but it will freeze.
Heat tape continues protecting the pipe regardless of how cold the ambient temperature drops, as long as power supply is uninterrupted. In cold-climate states like Minnesota, Wisconsin, Michigan, and across the Northeast, sustained sub-zero temperatures can overwhelm foam insulation alone on vulnerable pipe runs — heat tape becomes a genuine necessity rather than a nice-to-have in these regions. In milder climate states, foam insulation paired with basic prevention habits is usually sufficient, since extended deep freezes are rare. The regional picture genuinely matters here: what is adequate protection in North Carolina is insufficient for a crawl space pipe in northern Minnesota during a January cold snap.
Foam pipe insulation carries essentially no safety risk. It is an inert, passive material that simply sits on the pipe — no electrical component, no fire risk, and no maintenance requirement beyond a periodic visual check to confirm the foam hasn’t physically deteriorated, separated at the slit seams, or been disturbed by pests over the years. In any situation where electrical safety is a concern — older homes with outdated wiring, damp crawl spaces with uncertain outlet conditions, or properties where heat tape access for annual inspection would be difficult — foam insulation is the inherently lower-risk baseline. Our guide to preventing frozen pipes covers the complete layered protection approach, including where each product fits within a multi-measure strategy.
Heat tape safety depends entirely on using the right product, installing it correctly, and inspecting it before each winter season. Only use heat tape rated specifically for the pipe material it will contact — cables approved for metal pipe are a different product from cables approved for plastic or PEX, and using the wrong type can damage the pipe or create a fire risk at the contact point. Inspect the full length of cable each autumn before plugging it in: look for cracks, fraying, pinching, or any visible damage to the outer insulation jacket. A damaged cable should be replaced entirely, not repaired with electrical tape. Never overlap heat tape with itself — heat concentration at the overlap can damage both the cable insulation and the pipe beneath it.
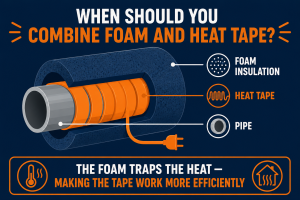
Yes — and for the most vulnerable pipe runs, combining both is standard professional practice. The typical installation sequence is to apply the heat tape to the pipe first, securing it per the manufacturer’s wrapping instructions, and then slide foam insulation sleeves over the outside of the cable. This combination outperforms either product alone for two distinct reasons. First, the foam sleeve traps the heat generated by the cable rather than allowing it to dissipate into the surrounding cold air — which means the cable needs to output less heat to maintain the same pipe temperature, directly reducing the cable’s electricity consumption. Second, the foam provides passive protection during brief power interruptions: a foam-wrapped, heat-taped pipe retains warmth for longer than a bare heat-taped pipe when the power briefly drops out.
The combination is particularly appropriate for pipes in unheated crawl spaces or exterior wall cavities in cold-climate states, and for any pipe that has previously frozen despite individual protection measures. The upfront cost of installing both is higher than either alone, but the operating efficiency gain — the foam recovering some of the cable’s heat that would otherwise be lost — means the ongoing electricity cost of the combined installation is lower than running the same cable on a bare pipe. Over a full winter of operation in a genuinely cold climate, the combination both performs better and runs cheaper than heat tape alone.
The right choice depends on your climate, your pipe locations, and whether you have a documented freezing history. Here is a direct scenario-by-scenario comparison:
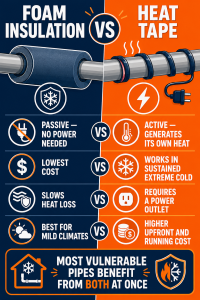
| Scenario | Best Choice |
|---|---|
| Mild climate — brief, moderate cold spells | Foam wins |
| Cold-climate state with sustained sub-zero temperatures | Heat tape wins |
| No nearby power outlet available | Foam wins |
| Power outage risk during severe winter storms | Neither fully reliable alone |
| Lowest upfront and ongoing cost | Foam wins |
| Pipes in unheated crawl space or exterior wall in cold climate | Both together wins |
| No installation skill or tools available | Foam wins |
Your climate sees brief, moderate cold spells rather than sustained multi-day deep freezes; your pipes run through spaces with some ambient heat from the home rather than completely unheated voids; you want the simplest, lowest-cost option with no electricity dependency and no annual inspection requirement. Our roundup of the best pipe insulation covers the specific products worth buying for every pipe diameter and temperature range.
You are in a cold-climate state with documented sustained sub-zero winter temperatures; your pipes are in a completely unheated space where no ambient building heat reaches them; or specific pipes in your home have frozen previously despite foam insulation — which is the clearest possible signal that passive protection alone isn’t enough for that specific pipe location. Our roundup of the best heat tape and pipe heating cables covers the specific products worth buying, including the fixed-wattage versus self-regulating distinction covered above.
You have pipes in an unheated crawl space or exterior wall cavity in a cold-climate region, or any pipe that has frozen previously despite individual protection measures. The combination delivers both active heat generation and passive heat retention, and the foam’s insulating effect makes the heat tape more efficient — reducing its electricity consumption compared to running the same cable on a bare pipe. Our guide to preventing frozen pipes covers the complete winter protection strategy, including where combining both products fits within a layered approach.
Foam insulation and most heat tape installations are well within DIY range — no specialist skills or tools are required. But if your pipes are in difficult-access locations like inside finished walls or under a concrete slab, if you need a GFCI outlet installed before heat tape can be used, or if you’re dealing with the aftermath of a frozen or burst pipe, a licensed plumber can assess the full situation and recommend the right protection approach for your specific home layout and climate.
Find a licensed plumber in your area at PlumberArchive.com — the US plumber directory with 12,000+ verified local plumbers across all 50 states.
Get weekly plumbing tips, honest tool reviews and DIY maintenance guides delivered straight to your Facebook feed. We cover pipe protection, winter maintenance, freeze prevention and everything in between — written for US homeowners who want to handle more themselves.
For most US homes in moderate climates — where freezing temperatures occur for brief periods rather than sustained multi-day events — foam insulation is entirely sufficient as the primary protection measure, particularly for pipes that run through interior spaces with some ambient heat from the building. The situation where foam alone becomes insufficient is when pipes are in genuinely unheated spaces in cold-climate states where sub-zero temperatures are sustained for days at a time. In those conditions, foam slows heat loss but can’t compensate for continued heat extraction from the pipe over a prolonged freeze event. The clearest practical guide is the pipe’s history: a pipe that has previously frozen despite foam insulation is a direct signal that passive heat retention alone isn’t enough for that specific location, and active heat input is what the situation requires.
Self-regulating heat tape is designed to remain plugged in throughout the winter season — it automatically reduces output when temperatures moderate and increases it when they drop, so continuous connection doesn’t mean it’s running at full draw continuously. Fixed-wattage heat tape draws constant power regardless of the ambient temperature, which increases both operating cost and heat output even when conditions don’t require it; check the manufacturer’s instructions for the specific product you own. Both types should be unplugged and stored at the end of the heating season rather than left plugged in year-round — the cables are not designed for summer conditions, and leaving electrical equipment in damp, warm crawl spaces over summer accelerates the degradation of the outer insulation jacket, shortening the cable’s service life.
Only if the heat tape is specifically rated for use on plastic pipe. Heat tape approved for metal pipe only can generate enough heat at the contact point to soften or deform plastic pipe — particularly PVC and CPVC, which have a lower heat tolerance than copper or galvanized steel. PEX pipe is more tolerant of heat than rigid plastic but still requires a cable rated for plastic or PEX use. Product packaging and manufacturer specifications will clearly state which pipe materials the cable is approved for — if the specification isn’t stated, treat the cable as metal-only and don’t use it on plastic. This isn’t a minor technicality: an incompatible cable running against a plastic pipe can cause permanent deformation or fitting failure at the contact point, which can cause a leak in the very pipe you were trying to protect.
It depends on your climate and the specific pipe location. If your foam-insulated pipes have never frozen and your climate doesn’t produce sustained sub-zero temperatures, you likely don’t need to add heat tape — the foam is doing its job and adding an active cable introduces cost and electrical complexity that the situation doesn’t require. If you’re in a cold-climate state with documented prolonged deep freezes, or if specific pipes have frozen previously despite foam insulation, heat tape is the appropriate addition. The pipe’s history is the clearest guide: foam that has consistently worked through your winters is working. Foam that has failed — a pipe that froze and burst despite the sleeve — is telling you the location needs active heat input, and adding heat tape beneath a new foam sleeve is the right response.
For the majority of US homes in moderate climates, foam pipe insulation is the right baseline choice — inexpensive, installs in minutes, carries no electrical risk, and provides reliable protection through the brief cold spells that most American winters produce. Our roundup of the best pipe insulation covers the specific products worth buying, and our step-by-step guide to insulating pipes for winter walks through the installation process from foam sizing to fitting covers.
Heat tape becomes the right call when the situation genuinely requires active heat — cold-climate states with sustained sub-zero temperatures, pipes in completely unheated spaces, and any pipe with a documented freezing history despite foam protection. It is a tool for specific levels of vulnerability, not a universal upgrade. The additional cost, electricity dependency, and annual inspection requirement only make sense where foam alone has proven insufficient for the specific pipe location and local climate.
For the most vulnerable pipe runs — crawl spaces and exterior wall cavities in cold-climate regions — combining heat tape under foam insulation is the standard professional recommendation. The foam traps the cable’s heat and makes it more efficient; the cable provides the active protection that foam alone eventually can’t sustain through the deepest cold. Our guide to preventing frozen pipes covers the complete winter protection strategy, including where each of these products fits within a layered whole-home approach.
✍️ About This Comparison
PTR Editorial Team — Product Comparisons. We compare manufacturer specifications, installation requirements, compatibility and available product documentation to help homeowners choose suitable tools and parts. How we review →
Pop-up drains seal to hold water; grid drains never close but resist clogs better and cost less. Here's how to choose between them for your bathroom sink.
Test strips, digital meters or send-to-lab testing? Match the method to your situation — screening, ongoing monitoring, or a real health concern.
25-foot vs 50-foot drain snake: compare handling, the cable diameter trade-off and the jobs that justify extra length, plus where 50 feet stops.

