Please note: Product information and cost estimates in this guide are based on our research at time of writing and are subject to change. Always follow manufacturer instructions and consult a licensed plumber if you are unsure about any aspect of your home’s plumbing.
Introduction
Frozen pipes are one of the most costly and avoidable winter plumbing emergencies facing US homeowners. When a water pipe freezes and bursts, the resulting water damage can average $5,000 or more in repairs — not including the cost of drying out walls, replacing flooring, or dealing with mold. The good news is that pipe insulation is one of the most cost-effective home maintenance tasks you can do: most homes can be fully protected in a single afternoon for well under $50 in materials.
In this guide we cover three methods of pipe protection — foam pipe insulation (the standard approach for most pipes), outdoor spigot covers, and self-regulating heat tape for pipes in extremely cold unheated spaces. Whether you’re winterizing a new home or finally getting around to a task you’ve put off for years, this guide covers everything you need.
For our recommendations on the best foam products available, see our guide to the best pipe insulation. And if you’ve already experienced a pipe failure, our guide to the best pipe repair clamps covers your emergency repair options.
Why Pipes Freeze and Burst
Understanding why pipes burst helps you know exactly where to focus your insulation efforts. When water freezes, it expands by approximately 9% in volume. Inside a rigid pipe, that expansion has nowhere to go — it creates enormous internal pressure that the pipe wall simply cannot contain. The pipe cracks or splits, and when the ice thaws, water pours freely into your home.
The freezing doesn’t always happen where you expect. A pipe often freezes in one location — an unheated basement, a crawl space, an exterior wall cavity — but the burst occurs somewhere else entirely when pressure builds and finds the weakest point. This is why the resulting water damage can be so extensive before you even know there’s a problem.
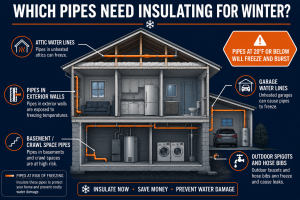
The most vulnerable pipes in any home are those exposed to outdoor temperatures or located in spaces that receive no heating:
- Pipes in unheated basements, crawl spaces, and attics
- Pipes running through exterior walls
- Water supply lines in garages and outbuildings
- Outdoor hose bibs and spigots
- Pipes near vents or drafty areas where cold air enters the home
⚠️ Warning: Pipes can begin to freeze at 20°F (−7°C) or below — and it can happen faster than you expect during a sudden cold snap. Insulate before the first hard frost of the year, not after.
Which Pipes Need Insulating
Not every pipe in your home is at risk — pipes inside heated interior walls and in climate-controlled spaces rarely freeze. The goal is to identify the vulnerable runs and focus your effort there. Here’s a checklist of the areas to prioritize:
Unheated Basements and Crawl Spaces
Unheated basements and crawl spaces are the most common location for frozen pipes. Any water supply lines running through these areas — especially those close to the foundation wall — should be fully insulated. Even a partially heated basement can develop cold spots near vents, windows, or foundation penetrations.
Pipes in Exterior Walls
Pipes routed through exterior walls are particularly vulnerable because the wall cavity can drop close to outside temperature on cold nights. Check under bathroom sinks on outside walls, kitchen plumbing on exterior walls, and any utility pipes that run through attached garages.
Garages and Outbuildings
If your garage has a water supply line — for a utility sink, washing machine, or hose bib — insulate it thoroughly. Garages receive no heating and can reach outdoor temperatures even when the garage door is closed.
Outdoor Hose Bibs and Spigots
Every outdoor spigot needs attention before winter. The combination of disconnecting garden hoses, shutting off the indoor supply valve, draining residual water, and fitting a foam spigot cover gives outdoor bibs the best chance of surviving a hard freeze undamaged.
💡 Tip: Focus first on pipes within 6 feet of an exterior wall or in any space that drops below 40°F in winter — these are most at risk. Well-insulated interior pipes need little or no attention.
Pipe insulation requires minimal tools and is available at any hardware store. Here’s everything to have on hand before you start:
Materials
- Foam pipe insulation — pre-slit polyethylene or foam rubber tubes sized to match your pipe diameter. See our guide to the best pipe insulation products for our top picks
- Pipe insulation tape or zip ties — to secure foam at joints, bends, and regular intervals along straight runs
- Self-regulating heat cable — for pipes in extremely cold unheated spaces where foam insulation alone may not be sufficient
- Outdoor faucet covers — dome-shaped foam covers that fit over exterior spigots and hose bibs
Tools
- Measuring tape — to measure pipe outside diameter and total run lengths
- Utility knife or sharp scissors — to cut foam tubes to length and make miter cuts at pipe bends
- Marker or pencil — to mark cut lines on foam before cutting
- Flashlight or headlamp — essential for working in dark crawl spaces and basements
Step 1 — Measure and Cut Foam Insulation
Before buying materials, measure the outside diameter of the pipes you plan to insulate. Foam pipe insulation is sold in sizes matched to standard US pipe diameters — buying the wrong size means the insulation won’t snap shut properly and will leave gaps that let cold air reach the pipe.
Measuring Pipe Diameter
The most common residential water pipe sizes in the US are:
- ½ inch — the most common size for branch lines and individual fixture supply lines
- ¾ inch — common for main supply runs and hot water distribution lines
- 1 inch — found on main water supply lines from the meter in some larger homes
Use a measuring tape wrapped around the pipe to find its circumference, then divide by 3.14 to get the outside diameter — or compare the pipe against a ruler. If in doubt, take a photo or a short sample length of pipe to your hardware store for a direct match. Buy foam insulation tubes that correspond to your pipe diameter.
Cutting Foam to Length
Measure the total length of each pipe run and add 10% for waste at joints and bends. Cut foam tube sections to length with a utility knife using a straight edge as a guide. For pipe bends and elbows, cut each adjoining piece of foam at a 45-degree miter angle so the two pieces meet snugly at the curve without leaving a gap.
💡 Tip: When in doubt, buy foam insulation that’s slightly larger in diameter than your pipe — it can be snugged down and secured with insulation tape. Foam that’s too small won’t close fully around the pipe and leaves a gap along the top of the run.
Step 2 — Install Foam Pipe Insulation
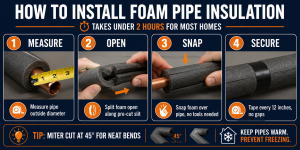
Foam pipe insulation comes pre-slit lengthwise, making installation straightforward — no special tools are needed to fit it to the pipe. The key is ensuring continuous coverage with no gaps, which is where cold air enters and insulation effectiveness drops sharply.
Installing on Straight Runs
- Hold the foam tube with the slit facing upward and open it along the slit
- Snap it firmly over the pipe — it should close completely around the pipe with no gap at the seam
- Butt each piece end-to-end with no gaps between sections — even a short gap lets cold air reach the pipe directly
- Secure with pipe insulation tape or a zip tie every 12 inches along straight runs
- At pipe fittings and valves, cut the foam neatly to fit and tape it firmly around the fitting on both sides
Installing at Bends and Elbows
Bends are the trickiest part of the job — a poor fit here creates a gap that undermines the protection of the whole run:
- Cut two pieces of foam at 45-degree miter angles so they meet squarely at the bend
- Snap each piece over its section of pipe and press the mitered ends together firmly
- Wrap the joint tightly with insulation tape to hold the two pieces in firm contact
For tighter bends, make multiple shallow cuts on the inside curve of the foam so it can flex around the elbow without buckling or creating a gap on the outside of the curve.
💡 Tip: Pay extra attention to joints, bends, and where pipes pass through walls or floors — gaps at these points are where cold air gets in and where freezing most often begins. Use extra tape at every connection and transition.
Step 3 — Insulate Outdoor Pipes and Spigots
Outdoor spigots and hose bibs are among the most commonly damaged components in a winter freeze. Protecting them takes less than 10 minutes per spigot and costs very little. Complete this step before the first hard frost of the season — once the ground freezes, it’s already too late for the most vulnerable connections.
Shutting Down Outdoor Water Lines
- Disconnect all garden hoses from outdoor spigots — a hose left connected traps water in the bib regardless of whether you’ve turned off the shutoff valve inside
- Locate the indoor shutoff valve that feeds the outdoor spigot — typically found in the basement or crawl space near where the supply pipe exits the foundation wall
- Turn the indoor shutoff valve off (clockwise until it stops firmly)
- Open the outdoor spigot fully to drain any residual water from the line — leave it open until all dripping stops completely, then close it back up
Fitting Outdoor Faucet Covers
Outdoor faucet covers are dome-shaped foam covers with an elastic or drawcord seal that fits snugly over the spigot, trapping an insulating air pocket around the bib. Fit one over every outdoor spigot after draining — they’re widely available and take seconds to install.
For spigots on particularly exposed walls or in regions with severe winters, also wrap the short section of pipe between the exterior wall and the bib with foam pipe insulation for an additional layer of protection.
⚠️ Warning: Never leave garden hoses connected in winter. A hose traps water inside the bib and the pipe behind it — the water cannot drain, will freeze, and backs pressure up into the pipe inside your wall. Disconnect every hose before the first freeze of the season.
Step 4 — Install Heat Tape for Extreme Cold
In regions with prolonged hard freezes — or for pipes in extremely cold unheated spaces where foam insulation alone cannot provide sufficient protection — self-regulating heat tape (also called heat cable) is the solution. Unlike foam, which only slows heat loss, heat tape actively warms the pipe to prevent it from reaching freezing temperature.
What Is Self-Regulating Heat Tape?
Self-regulating heat cable contains a heating element that automatically increases its output as the surrounding temperature drops and reduces it as the temperature rises. This means it only draws significant power when the pipe is genuinely at risk of freezing — keeping energy use efficient and reducing the fire risks associated with older constant-wattage heat tapes.
How to Install Heat Tape
- Ensure the pipe surface is clean and completely dry before installation begins
- Wrap the heat cable in a spiral along the pipe — follow the manufacturer’s specified pitch exactly (typically one full wrap every 1–2 feet on straight runs)
- Secure the cable to the pipe with electrical tape at regular intervals — never standard duct tape, which degrades with heat cycling
- Apply foam pipe insulation over the top of the heat cable to maximize efficiency and contain the warmth
- Plug into a standard 120V outlet — always use a GFCI-protected outlet in damp areas such as basements and crawl spaces
- Test the installation before temperatures drop: feel the pipe for warmth 30 minutes after plugging in to confirm the cable is functioning
⚠️ Warning: Never overlap heat tape on itself. Any point where the cable crosses over itself creates a concentrated hot spot that can overheat and cause a fire. Follow the manufacturer’s installation instructions precisely and use only UL-listed heat cable products.
Pipe insulation does most of the work — but these additional habits give your home’s plumbing the best possible protection during a hard winter.
- Keep your home heated to at least 55°F (13°C) even when away — turning the thermostat off entirely to save money while traveling is one of the most common causes of burst pipes in vacant homes
- Open cabinet doors under sinks on exterior walls during cold nights — this allows warm interior air to circulate around the pipes and prevents cold spots in otherwise insulated wall cavities
- Let the cold-water tap farthest from your main supply drip during extreme cold snaps — running water is far harder to freeze than standing water, and even a slow drip relieves pressure if ice begins to form
- Know where your main water shutoff valve is located — and make sure every adult in your household knows too. If a pipe bursts, shutting off the water immediately is the single most effective step in limiting damage
- Check your insulation at the start of each winter season — foam can shift, split, or slip off bends over time. A 15-minute visual walkthrough each autumn confirms your protection is still fully in place before temperatures drop
If a pipe fails despite your precautions, see our guides to the best pipe repair kits and best pipe repair clamps for the fastest emergency repair options while you wait for a plumber.
Frequently Asked Questions
Q: At what temperature do pipes freeze?
Pipes can begin to freeze when outdoor temperatures drop to 20°F (−7°C) or below — but this depends on how well-insulated the pipes are and how long the cold persists. Pipes in unheated basements, crawl spaces, or exterior wall cavities are more vulnerable and can freeze faster than pipes in conditioned spaces. The American Red Cross recommends taking protective steps (dripping taps, opening cabinet doors) whenever temperatures are forecast to fall below 20°F for any sustained period.
Q: How much does pipe insulation cost?
Foam pipe insulation is one of the least expensive home maintenance materials available. A full supply of foam tubes, insulation tape, and outdoor faucet covers for an average-sized home typically comes to well under $50 at any hardware store. Self-regulating heat tape costs more and varies by the length of pipe you need to cover, but represents excellent value for pipes in very cold unheated spaces where foam alone cannot do the job.
Q: Can I insulate pipes myself or do I need a plumber?
Fitting foam pipe insulation and outdoor faucet covers is a straightforward DIY task that requires no plumbing knowledge or special tools — most homeowners can complete the job in a single afternoon. Installing self-regulating heat tape is also DIY-friendly but requires a GFCI-protected electrical outlet and careful adherence to the manufacturer’s installation instructions. You only need a plumber if pipes are already frozen or have burst, or if they run through locations that are genuinely inaccessible without professional assessment.
Q: What do I do if my pipes freeze?
If you turn on a tap and get little or no water on a cold morning, a pipe may have frozen. First, turn off the main water supply valve as a precaution in case the pipe has already cracked. If you can locate the frozen section, apply gentle heat using a hair dryer on its lowest setting, a heating pad, or warm towels — never an open flame. Work from the tap back toward the frozen section so melting water has somewhere to drain. If you cannot locate the frozen section, if water is already leaking anywhere, or if you hear cracking sounds from the wall, call a licensed plumber immediately.
Conclusion — The Best $50 You Can Spend Before Winter
Pipe insulation is one of the highest-return home maintenance tasks you can complete before the cold arrives. Spending under $50 and 2–3 hours on foam insulation, outdoor spigot covers, and basic precautions can prevent thousands of dollars in water damage — and the significant disruption of a burst pipe in the middle of winter.
- Most homes can be fully insulated in 2–3 hours using foam tube insulation, insulation tape, and outdoor faucet covers — no plumbing experience required
- Focus on the highest-risk areas first — unheated basements, crawl spaces, exterior walls, and outdoor spigots are where the vast majority of freeze damage originates
- Add heat tape for extreme cold areas where foam alone may not be sufficient during prolonged hard freezes
- Back it up with simple habits — keeping the heat on when you travel, dripping taps during cold snaps, and knowing where your main shutoff valve is
For our tested recommendations on the best foam products for this job, see our full guide to the best pipe insulation for US homeowners. For the wider picture on keeping pipes from freezing, see our complete winter freeze-protection guide.
✍️ About This Review
Mike Reynolds, DIY Home Improvement Writer — Mike Reynolds spent over a decade working as a residential contractor before turning his expertise into practical writing for homeowners. He specialises in step-by-step how-to guides that make plumbing repairs accessible for beginners and experienced DIYers alike. Learn how we test →