Please note: Information in this guide is based on our research at time of writing and is subject to change. Always follow the specific instructions included with your product, since exact steps vary by model.
Introduction
A deck-mounted soap dispenser installs right through a hole in your sink or counter rather than sitting freestanding on the surface, which gives it a cleaner, more built-in look than a standalone pump bottle. For most homeowners, this is a genuinely approachable weekend project — the core installation is mostly hand-tightening a mounting nut from underneath the sink, with no cutting, soldering, or plumbing experience required.
There are two things worth confirming before you buy, though. First, you’ll need an available mounting hole — either one that already exists, such as a former sprayer or air gap hole that’s no longer in use, or one you’re prepared to drill yourself. Second, you’ll need enough clearance in the cabinet or vanity below to reach up and secure the mounting hardware by hand. Neither requirement is unusual, but skipping this check before purchasing is the most common reason people run into trouble partway through. This guide walks through the full installation from checking hole compatibility to filling and testing the reservoir, plus what to do if you need to drill a new hole from scratch. If you’re still deciding which dispenser to buy, our soap dispenser reviews compare manual pump, touchless, and deck-mounted options side by side.
At a Glance
| Skill Level |
Beginner to Intermediate DIY |
| Tools Needed |
Adjustable wrench; a drill with the correct bit size if you need to drill a new hole |
| Time Needed |
Roughly 15–30 minutes for an existing hole; longer if drilling is required |
| Critical First Step |
Confirm you have an available mounting hole and enough clearance underneath to reach and tighten the mounting nut |
✏️ Our Take
Installing a deck-mounted soap dispenser is a genuinely quick project if you already have an available mounting hole — often a former sprayer or air gap hole that’s no longer in use. The installation itself is mostly hand-tightening a mounting nut from below the sink, no different in difficulty from installing a faucet. The one step that trips people up is access: if the space under your sink is tight or crowded with plumbing, reaching the mounting hardware to tighten it securely takes a bit more patience. Drilling a new hole is a bigger step and worth taking slowly if it’s required.
Before You Start — Checking for a Mounting Hole
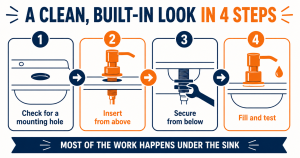
The first thing to check, before you buy a dispenser or reach for any tools, is whether your sink or counter already has an available hole to mount it in. This is the single factor that determines whether installation is a 15-minute job or a bigger project, so it’s worth a few minutes of inspection up front rather than discovering the issue partway through.
Common sources of an existing, unused hole include a former sprayer hole left behind when a kitchen faucet was replaced with a pull-down model that doesn’t use a separate sprayer, an air gap hole originally intended for a dishwasher or reverse osmosis system, or a hole left over from a previous accessory that’s no longer installed. Bathroom sinks and vanity counters sometimes have a similar spare hole, particularly on setups originally designed for a separate soap dispenser or accessory that’s since been removed. Look underneath the sink or counter as well as on top — a capped or plugged hole is easy to miss from above.
Once you’ve located an available hole, measure its diameter and compare that measurement to your dispenser’s mounting shank specification before you buy. This step matters more than it might seem, since a shank that’s too large or small for the hole means either a difficult installation or a dispenser that sits loose and wobbles no matter how well you tighten the mounting nut. If no hole exists on your sink or counter at all, you have two options: drill a new one, which is covered later in this guide, or choose a different mounting style, such as a freestanding countertop dispenser, instead.
💡 Tip: Most deck-mounted soap dispensers are designed to fit a standard 1 to 1.5 inch hole, similar to a standard faucet accessory hole. Measure your specific hole and compare it to the product’s listed specifications before buying, since sizes can vary slightly between manufacturers.
Step 1: Prepare the Dispenser and Gather Tools
Before you start the installation itself, take a few minutes to unpack the dispenser and lay out all of its included hardware. Confirm that everything is present: the mounting nut, a washer, a gasket, and the reservoir tube that runs down into the soap bottle or reservoir. Missing hardware is rare, but it’s far easier to notice and address before you’re halfway through the job with your hand under the sink.
Gather your tools next. An adjustable wrench works for nearly every model, though many dispensers include a small proprietary wrench sized specifically for their mounting nut — use whichever fits more securely. A flashlight or headlamp is also worth having on hand if the cabinet space under your sink is dim, since you’ll be working mostly by feel in a tight, poorly lit area.
Depending on the specific product, you may fill the reservoir with soap before installation or wait until after the dispenser is mounted — check your product’s instructions, since this varies by design. Some reservoirs are easier to fill while sitting on the counter, while others are designed to be filled in place once installed. Either approach works fine; there’s no functional difference once the dispenser is fully installed and tested.
Step 2: Insert the Dispenser Through the Hole
With your tools and hardware ready, insert the dispenser’s mounting shank down through the hole from above the sink or counter. It should pass through cleanly if the hole diameter matches the shank size you confirmed earlier — if it feels like it’s forcing or binding, stop and double-check the fit rather than pushing harder.
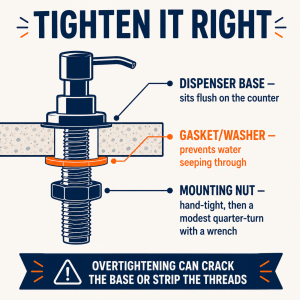
Before the shank goes all the way through, make sure any included gasket or washer is seated correctly between the base of the dispenser and the counter or sink surface. This gasket is what prevents water from seeping down through the hole and underneath the counter over time, so it’s worth confirming it sits flat and evenly around the shank rather than bunched to one side.
Once the shank is through the hole, hold the dispenser in your desired position and orientation — most people angle the pump head toward the center of the sink for easy access — while you move to the next step. It helps to have a second person hold the dispenser steady from above while you work underneath, though a single installer can usually manage by bracing the dispenser base with one hand while working with the other below.
Step 3: Secure the Mounting Hardware From Below
Reach underneath the sink or counter and locate the shank protruding through the hole. Slide the washer onto the shank first, followed by the mounting nut, threading it on by hand. Getting the nut started evenly by hand — rather than immediately reaching for a wrench — helps avoid cross-threading, which can damage the threads on the shank and make the nut difficult to remove later if you ever need to.
Once the nut is hand-tight, switch to an adjustable wrench to finish tightening. The goal here is snug, not maximally tight — you want the dispenser held firmly in place without excessive force applied to the plastic or metal threads. While tightening, periodically check from above that the dispenser hasn’t shifted out of your desired position, since the tightening process can sometimes rotate the base slightly if you’re not holding it steady.
Once the nut feels firmly tightened, do a final check from above: the dispenser should sit flush against the counter surface with no visible gap, and it shouldn’t wobble or shift when you press gently on the pump head or base. If it does wobble, the nut likely needs another quarter-turn — return underneath and tighten slightly more before rechecking. This back-and-forth check is worth the extra minute, since it’s much easier to catch and fix now than after the reservoir is filled and connected.
⚠️ Warning: Avoid overtightening the mounting nut — this can crack the dispenser base or strip the threads on the mounting shank. Hand-tight followed by a modest quarter-turn with a wrench is usually sufficient.
Step 4: Fill the Reservoir and Test
If you haven’t already filled the reservoir during Step 1, do so now with your chosen liquid soap. Most reservoirs sit below the sink and connect to the pump head via the tube that runs up through the shank, so make sure the tube is seated at the bottom of the reservoir before closing it up.
Pump the dispenser several times to prime the mechanism. It’s normal for the first several pumps to produce nothing or only air, since the soap needs to travel up the full length of the tube before it reaches the pump head — don’t assume something is wrong until you’ve given it a reasonable number of pumps to draw soap all the way up.
While testing, reach underneath one more time and check around the mounting hardware and gasket for any signs of leaking or moisture. Catching a leak now, while the area is still dry and easy to inspect, is far simpler than discovering water damage weeks later. If everything pumps smoothly and stays dry underneath, the installation is complete.
Drilling a New Hole (If Needed)
If your sink or counter doesn’t have an available hole, drilling a new one is the next option to consider — but it’s a bigger step than the standard installation above, and it’s worth confirming your material before you start. Stainless steel sinks and most solid surface counters (acrylic composite, laminate) can generally be drilled safely with the correct bit and a careful, patient approach. Natural stone counters, such as granite or quartz, are a different situation entirely: these typically require a specialized diamond-tipped bit, water cooling to prevent cracking from heat buildup, and considerably more caution — or professional drilling, which is often the safer and more practical choice.
Once you’ve confirmed your material can be safely drilled, mark the drilling location carefully with a pencil or piece of tape, checking that there’s enough clearance from the sink basin, backsplash, and any existing fixtures. A center punch can help keep a drill bit from wandering when you start on a hard or slick surface like stainless steel or stone.
Use a step bit or hole saw sized to match your dispenser’s mounting shank diameter — this is the same measurement you’d use to confirm compatibility with an existing hole. Drill slowly and let the bit do the work rather than forcing it, especially on stainless steel, where excessive speed and pressure generate heat that can warp the metal or dull the bit prematurely. If you’re drilling through stone or tile, keep the drilling area cool with a small amount of water throughout the process to reduce heat and the risk of cracking.
US Regional Context: If your counter is natural stone, such as granite or quartz, and you’re not confident drilling it yourself, many US countertop fabricators and hardware stores offer this as a low-cost service. A cracked stone counter is a far more expensive mistake than the cost of professional drilling.
Troubleshooting Common Installation Issues
If the dispenser wobbles or shifts after installation, the most likely cause is a mounting nut that isn’t fully tightened. Return underneath the sink and give the nut another quarter-turn with your wrench, then check from above again — a small additional turn is usually enough to eliminate movement without risking overtightening.
If soap doesn’t flow after priming with several pumps, check that the reservoir tube actually reaches the bottom of the soap reservoir rather than sitting suspended above the liquid, and confirm the tube isn’t kinked or pinched anywhere along its length. A tube that’s too short for a taller reservoir bottle is a common and easy-to-miss cause of a dispenser that pumps air but never draws up soap.
If you notice water or moisture seeping around the base of the dispenser after use, first confirm the gasket or washer is seated correctly and hasn’t shifted out of place during tightening. If the gasket looks properly seated and you’re still seeing moisture, adding a small amount of plumber’s putty or a bead of silicone sealant around the base — beneath the visible dispenser collar — provides extra assurance without requiring you to remove and reinstall the whole unit.
Need a Professional Plumber?
Deck-mounted soap dispenser installation is a genuine DIY job for almost everyone. But if you run into a stuck or corroded sink fitting, discover unexpected plumbing crowding the space under your sink, or you’re not confident drilling through a stone counter yourself, search PlumberArchive.com — the US plumber directory with 12,000+ verified local plumbers across all 50 states.
Find a trusted plumber near you → PlumberArchive.com
Frequently Asked Questions
Q: Can I install a deck-mounted soap dispenser without drilling a new hole?
Yes, as long as your sink or counter already has an available, appropriately sized hole. Common sources include a former sprayer hole left behind after a faucet upgrade, an air gap hole for a dishwasher or reverse osmosis system that’s no longer used for that purpose, or a hole left over from a previous accessory. Check both above and below the sink for a capped or unused opening before assuming you’ll need to drill. If no existing hole is available, drilling a new one or choosing a freestanding countertop dispenser instead are your two remaining options.
Q: What size hole does a deck-mounted soap dispenser need?
Most deck-mounted soap dispensers are sized to fit a standard 1 to 1.5 inch hole, similar in size to a standard faucet accessory hole. That said, exact shank diameters vary slightly between manufacturers and models, so always measure your specific hole and compare it against the product’s listed mounting shank specification before purchasing. Buying without checking this measurement is the most common reason a dispenser doesn’t fit properly or sits loose even after tightening.
Q: Can I drill through a granite or quartz countertop myself?
It’s possible with the right equipment, but it requires more caution than drilling stainless steel or a solid surface counter. Natural stone like granite or quartz generally needs a specialized diamond-tipped bit along with water cooling throughout the process to prevent cracking from heat buildup. If you’re not confident in your equipment or experience, many US countertop fabricators and hardware stores offer drilling as a low-cost service — a far cheaper option than repairing or replacing a cracked stone counter.
Q: Is a deck-mounted dispenser harder to install than a standard countertop one?
A standard freestanding countertop dispenser requires no installation at all — you simply set it down and fill it. A deck-mounted dispenser takes more effort by comparison, since it involves inserting the unit through a hole and securing hardware from below, similar in difficulty to installing a faucet. For most people with an available hole and reasonable access underneath, this still amounts to a straightforward 15 to 30 minute job rather than a genuinely difficult one — the tradeoff is a cleaner, more built-in appearance in exchange for a bit more installation effort up front.
Conclusion
Installing a deck-mounted soap dispenser is a genuinely manageable project for most homeowners, and in the best-case scenario — an existing, correctly sized mounting hole and reasonable clearance underneath — it takes 15 to 30 minutes from start to finish. The core skill involved is no different from installing a faucet: insert the shank, secure a mounting nut from below, and check that everything sits flush and stable. The two things most worth double-checking before you start are hole compatibility, since a mismatched shank size causes more installation headaches than anything else, and access underneath the sink, since a cramped or crowded cabinet makes the tightening step slower and more awkward than the hardware itself ever is.
If drilling a new hole turns out to be necessary, take that step slowly and confirm your countertop material first — professional drilling is a small expense next to the cost of a cracked stone counter. For dispenser options across manual pump, touchless, and deck-mounted styles, our soap dispenser reviews compare the top picks. And if you’re tackling other small bathroom accessory installs at the same time, our toilet paper holder installation guide and our bathroom faucet replacement guide cover similar through-counter mounting work.
Prices and ratings may change. Always check Amazon for current prices.
✍️ About This Guide
PTR Editorial Team — Plumbing Guides. We compare manufacturer specifications, installation requirements, compatibility and available product documentation to help homeowners choose suitable tools and parts. How we review →