Please note: Information in this guide is based on our research at time of writing and is subject to change. Always follow the specific instructions included with your product, since exact steps vary by model.
Introduction
Installing a toilet paper holder is one of the quickest, most approachable projects in the entire bathroom — most installations take twenty minutes or less, and none of the three common approaches require any specialized skill. Whether you’re drilling a permanent bracket into the wall, applying a modern adhesive mount, or simply setting a freestanding stand on the floor, this is about as forgiving as home improvement projects get.
That said, “installing a toilet paper holder” isn’t quite as one-size-fits-all as it sounds. There are three genuinely different paths — screw-mounted, adhesive-mounted, and freestanding — and each has its own small but important details that determine whether the result feels sturdy or ends up loose or peeling off the wall within a few weeks. A screw-mounted holder needs the right anchor for your wall material. An adhesive-mounted holder lives or dies by how well you clean the wall beforehand and whether you respect the cure time. A freestanding holder needs almost nothing at all, but placement still matters more than people expect.
This guide walks through all three installation types step by step, plus the standard mounting height most US bathrooms use and how to troubleshoot the most common issues with each approach. If you haven’t chosen a holder yet, our toilet paper holder reviews compare the top screw-mounted, adhesive, and freestanding options across price tiers and finishes. And if you’re also thinking about how your new holder’s finish will look next to your existing faucets and fixtures, our faucet finishes guide covers how to coordinate hardware finishes throughout a bathroom. If you’re tackling a few bathroom hardware projects at once, our how to install a toilet seat guide covers another quick swap that pairs well with a fresh toilet paper holder.
At a Glance
| Skill Level |
Beginner-friendly for all three installation types |
| Tools Needed |
Varies by type — a drill and screwdriver for screw-mount, nothing beyond a level and clean surface for adhesive, no tools at all for freestanding |
| Time Needed |
Roughly 10–20 minutes, depending on installation type |
| Critical First Step |
Decide on installation type and mounting location before measuring or drilling anything |
✏️ Our Take
Installing a toilet paper holder is one of the quickest bathroom upgrades you can do yourself, but the installation type you choose matters more than most people expect. Screw-mounted holders are the most secure long-term option and are worth the extra few minutes of drilling if you’re not renting. Adhesive mounts are genuinely convenient for renters or anyone who wants to avoid wall damage, but surface prep and weight limits matter more than they do with a screw-in mount. Freestanding holders skip installation entirely and are the simplest option of all, though placement still deserves a little thought. Whichever type you choose, getting the height and position right the first time saves you from an awkward reach every single day after.
Before You Start — Choosing Your Installation Type
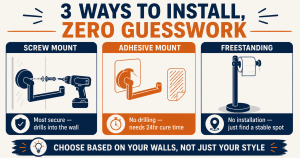
Before you measure anything or open the box, take a minute to settle on which of the three installation types actually fits your situation, since the right choice depends less on personal preference and more on a few practical factors: whether you own or rent, what your bathroom walls are made of, and how much floor space you have to work with.
A screw-mounted holder is the most secure and permanent option available. It attaches directly into the wall with wall anchors or, less commonly, into a stud, and once installed it isn’t going anywhere. The tradeoff is that it requires drilling — completely reasonable if you own your home, but often restricted or outright prohibited under a rental lease. If you’re a homeowner who wants a holder that will never wobble or come loose, this is generally the best choice.
An adhesive-mounted holder uses a strong modern adhesive strip or pad instead of screws, which means no drilling and no permanent damage to the wall. Today’s adhesive mounts are considerably stronger than older versions and can hold a standard toilet paper holder without issue, but they do have a lower overall weight capacity than a screw-mounted bracket, and their performance depends heavily on how well the wall surface is prepped before the adhesive goes on. Skip the prep, and even a good adhesive product will struggle to hold.
A freestanding holder requires no installation at all. It’s simply a weighted or based stand that sits on the floor near the toilet, and it can be placed anywhere you have the space for it — no walls, studs, or adhesive involved. This is the simplest option by a wide margin, and it’s a natural fit for bathrooms where wall space is awkward, tiled, or otherwise difficult to mount into. The main consideration is making sure you have enough clear floor space for it to sit without being in the way.
Weigh those three factors — ownership status, wall material, and floor space — and the right installation type usually becomes clear fairly quickly.
💡 Tip: If you’re renting, check your lease’s policy on wall-mounted fixtures before drilling — many leases restrict or prohibit it, and an adhesive or freestanding option avoids the issue entirely.
Standard Mounting Height and Placement
Getting the height and position right the first time matters more than it might seem, since a holder that’s mounted too high, too low, or too far away turns into a small daily annoyance you’ll notice every time you use the bathroom. Fortunately, there’s a well-established standard that works for the vast majority of households and bathroom layouts.
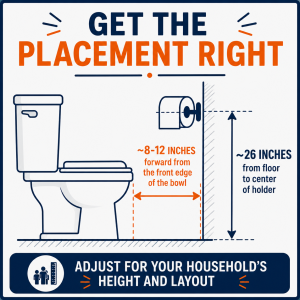
- Aim for roughly 26 inches from the floor to the center of the holder. This is the common standard height used in US homes and building guidelines, and it works comfortably for most adult users whether seated or standing.
- Position the holder 8 to 12 inches forward from the front edge of the toilet bowl. This range keeps the roll within easy reach without requiring you to lean or twist to access it.
- Adjust the standard measurements for your household. If your household includes young children, taller-than-average adults, or anyone with mobility considerations, it’s worth shifting the height a few inches in either direction to better suit who actually uses that bathroom most.
- Account for your specific bathroom layout. A pedestal sink, a swinging door, or a narrow side wall can all affect where a holder can realistically go, so use the standard measurements as a starting point rather than a rule that overrides your actual space.
- Avoid mounting directly above or right next to a heat register, towel bar, or other fixture. Anything that interferes with a clean, unobstructed reach will make the holder less convenient than it should be, even if the height itself is technically correct.
Once you’ve settled on a height and position that works for your bathroom, mark it clearly with a pencil before moving on to the installation steps for your chosen type below. A level is worth using here even for a single mark — a holder that’s mounted a few degrees off-level is one of the most noticeable small imperfections in a bathroom, precisely because it’s used so often.
Installing a Screw-Mounted Holder
A screw-mounted holder is the most involved of the three installation types, but “involved” is relative — this is still a project most people finish in under twenty minutes with basic tools.
- Mark the mounting location using a pencil and a level. Use the height and placement guidance above, and double-check the mark is level before drilling anything.
- Check for a wall stud if possible. A stud finder makes this quick, but don’t worry if the marked location doesn’t land on one — most toilet paper holders are light enough that a properly rated wall anchor holds them securely without needing a stud at all.
- Drill pilot holes at the marked locations. Use a drill bit sized appropriately for your wall anchors, and drill straight and level rather than at an angle.
- Insert wall anchors into the pilot holes if you’re not mounting into a stud. Tap them in gently until they sit flush with the wall surface, and choose anchors rated for your specific wall material — drywall, plaster, and tile all call for different anchor types.
- Screw the mounting bracket into place. Tighten evenly and check that the bracket sits flush against the wall without gaps or visible tilting.
- Attach the holder arm or post to the mounted bracket. Most designs slide or snap into place, and many include a small set screw underneath to lock the arm so it doesn’t spin loosely once installed.
⚠️ Warning: Always check the wall for hidden pipes or electrical wiring before drilling, especially near existing plumbing fixtures. A stud finder with built-in wire/pipe detection is inexpensive and worth using if you’re at all unsure what’s behind the wall.
Installing an Adhesive-Mounted Holder
An adhesive-mounted holder is the fastest hands-on installation of the three, but it’s also the one where skipping a step causes the most problems down the line. Take the prep steps seriously and this installation type performs reliably.
- Clean the wall surface thoroughly with rubbing alcohol and let it dry completely. This step matters more than any other for adhesive holding strength — any residual soap film, dust, or oil on the wall will noticeably weaken the bond, no matter how strong the adhesive itself is.
- Mark the mounting location with a pencil and a level. Use the same height and placement guidance covered earlier in this guide.
- Remove the adhesive backing and press the mount firmly against the marked location. Line it up carefully before pressing, since repositioning after initial contact can weaken the bond on some adhesive types.
- Apply firm, even pressure for the full time specified by the product. This is often 30 to 60 seconds — resist the urge to rush this part, since the initial pressure window is what activates the adhesive’s full holding strength.
- Let the mount cure for the full recommended period before hanging any weight on it. Most adhesive mounts require roughly 24 hours of cure time, and loading the holder with a roll of toilet paper before that window is up is one of the most common reasons these mounts fail early.
💡 Tip: Don’t skip the cure time on adhesive mounts — using the holder before the adhesive has fully set is the single most common reason adhesive-mounted holders fail early.
Setting Up a Freestanding Holder
A freestanding holder is by far the simplest of the three options, since there’s no wall involved at all — just a stable spot on the floor.
- Choose a stable, level spot near the toilet with enough clearance to sit or stand without bumping it. Think through how you’ll actually move around the bathroom day to day, not just where it looks tidy when the room is empty.
- Unpack the holder — most models require no assembly beyond this. A handful of designs include a screw-together base or post, but the majority arrive fully or nearly fully assembled straight out of the box.
- Place it on a flat, dry surface rather than a rug or uneven tile. Some models include a small weighted or anti-slip base, and that base performs best — and stays most stable — on a solid, even floor rather than a soft or uneven one.
Troubleshooting Common Installation Issues
If a screw-mounted holder feels loose after installation, the first thing to check is whether the wall anchors you used are actually rated for your wall material and the weight involved. A lightweight plastic anchor in a soft or crumbling wall material won’t hold as securely as one properly rated for that surface. If you find the anchor spinning freely or pulling out under light pressure, remove it, patch the hole if needed, and re-drill with an anchor sized and rated correctly for your wall.
If an adhesive mount fails to hold, the most common cause by far is inadequate surface cleaning before application, closely followed by not allowing the full cure time before putting any weight on the holder. If a mount has already failed, remove any adhesive residue, clean the wall thoroughly with rubbing alcohol, let it dry fully, and try again with a fresh adhesive strip if your product includes a spare.
If a freestanding holder tips easily, first confirm it’s actually sitting on a level surface rather than a slight incline or an uneven section of tile or flooring. Next, check that the base isn’t obstructed by a bath mat, rug edge, or nearby fixture that’s preventing it from sitting flat. In most cases, moving the holder a few inches to a flatter, more open spot resolves the tipping issue without needing to do anything to the holder itself.
US Regional Context: Wall materials vary widely across US homes — older plaster walls often need different anchors than modern drywall, and tile walls require anchors rated specifically for tile installation. If you’re not sure what’s behind your bathroom wall, a hardware store can help you choose the right anchor for your specific wall type.
Need a Professional Plumber?
This is generally a simple, low-tool project, but if you run into an unexpected plumbing issue while working in your bathroom, it’s worth having a licensed plumber take a look. Search PlumberArchive.com — the US plumber directory with 12,000+ verified local plumbers across all 50 states.
Find a trusted plumber near you → PlumberArchive.com
Frequently Asked Questions
Q: What’s the standard height to install a toilet paper holder?
The common standard used in US homes places the center of the holder roughly 26 inches from the floor, positioned about 8 to 12 inches forward from the front edge of the toilet bowl. This range works comfortably for most adult users, though it’s worth adjusting slightly if your household includes young children, taller-than-average adults, or anyone with specific mobility needs. Whatever height you settle on, using a level when marking the spot matters more than most people expect, since a holder that’s mounted even a few degrees off is noticeable every time it’s used.
Q: Are adhesive toilet paper holders actually secure?
Yes, when installed correctly. Modern adhesive strips and pads are considerably stronger than older versions and can reliably hold a standard toilet paper holder. The key word is “correctly” — a thorough alcohol-based wall cleaning before application and a full cure time, typically around 24 hours, before hanging any weight on the mount are what actually determine whether an adhesive mount holds long-term. Skip either step, and even a high-quality adhesive product is likely to fail sooner than expected. Adhesive mounts also generally have a lower weight capacity than screw-mounted brackets, which is worth keeping in mind if you tend to load your holder heavily.
Q: Do I need to find a wall stud to install a toilet paper holder?
Not necessarily. Toilet paper holders are light enough that most screw-mounted installations hold securely using a properly rated wall anchor rather than a stud. Finding a stud is a nice bonus if your marked location happens to line up with one, but it’s not something you need to plan your placement around. What matters far more is choosing an anchor that’s actually rated for your specific wall material — drywall, plaster, and tile all call for different anchor types, and using the wrong one is a more common cause of a loose holder than not hitting a stud.
Q: How long should I wait before using an adhesive-mounted holder?
Most adhesive mounts require roughly 24 hours of cure time before they can safely hold any weight, though it’s worth checking your specific product’s instructions since cure times can vary by brand and adhesive type. Loading a roll of toilet paper onto the holder before that window has passed is one of the most common reasons adhesive-mounted holders come loose or fail entirely within the first few weeks. It’s a genuinely easy step to rush past since the mount often looks and feels secure well before the adhesive has actually finished setting, so treat the full recommended cure time as a hard rule rather than a rough suggestion.
Conclusion
Installing a toilet paper holder is a genuinely quick project no matter which of the three installation types you choose, but the small details specific to each one are what determine whether the result feels solid or starts wobbling within a few weeks. For screw-mounted holders, that means using the right anchor for your wall material. For adhesive mounts, it means thorough surface prep and respecting the full cure time before adding any weight. For freestanding holders, it’s simply a matter of picking a stable, level, unobstructed spot. Get the standard mounting height and placement right alongside whichever installation method you choose, and you’ll have a holder that’s both convenient to reach and genuinely secure — a fifteen-minute project that you won’t have to think about again.
Prices and ratings may change. Always check Amazon for current prices.
✍️ About This Guide
PTR Editorial Team — Plumbing Guides. We compare manufacturer specifications, installation requirements, compatibility and available product documentation to help homeowners choose suitable tools and parts. How we review →