Please note: Information in this guide is based on our research at time of writing and is subject to change. Always consult a licensed plumber for diagnosis of serious plumbing issues before attempting repairs.
Introduction
Installing a toilet seat is one of the most beginner-friendly home maintenance tasks there is — the actual installation takes around 10 minutes once you have the right seat in hand. Most homeowners who’ve never done it assume the job is more complicated than it is and end up calling a handyman for a task that genuinely requires no plumbing knowledge at all. This guide walks through the full process from removal to testing, including the one step that actually takes patience: dealing with old mounting bolts that have corroded in place over years of use.
If you’re choosing a replacement seat, our guide to the best toilet seats covers what to look for at every price point. If you haven’t chosen a seat yet, see our comparison of wood vs. plastic toilet seats to decide which material suits your bathroom. And if you’re doing a more complete toilet refresh at the same time, our roundup of the best toilet repair kits covers fill valves, flappers and flush hardware in one package.
At a Glance
| Difficulty |
Easy |
| Time |
10–20 Minutes |
| Cost |
Free if just installing — $ for a new seat |
| Tools Needed |
Adjustable wrench or screwdriver, possibly a basin wrench for stuck bolts |
| Skill Level |
Beginner |
✏️ Our Take
Installing a toilet seat is one of the simplest plumbing jobs a homeowner can do — most people overpay a handyman for a 10-minute task. The only real challenge is old, corroded mounting bolts that won’t budge, which is more about patience and the right tool than skill. If your old bolts are badly rusted, plan for that step to take longer than the actual installation itself.
What You’ll Need
The tool list for this job is short. Most homeowners already have everything needed, and the only purchase required is the seat itself.
- New toilet seat — matching your bowl shape (round or elongated — see the section below if you’re unsure)
- Adjustable wrench or screwdriver — which one depends on whether your mounting hardware uses nuts or a screwdriver-slot bolt head
- Penetrating oil — only needed if the old mounting bolts are corroded and won’t turn freely
- Old towel or rag — for wiping down the bowl surface during cleaning and to protect the porcelain if you’re using tools near it
💡 Tip: Bring a tape measure to the store, or measure your bowl shape before buying — round and elongated seats are not interchangeable, and this is the single most common return reason. A 30-second measurement before you leave the house saves a trip back.
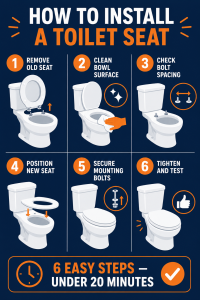
Step 1 — Remove the Old Seat
Open the toilet seat to the upright position and look at the back of the hinge — you’ll see either plastic hinge caps or exposed bolt heads covering the mounting hardware. On most modern seats, the caps flip up or pop off with light finger pressure to reveal the bolt beneath. On older seats without caps, the bolt head is exposed and visible from the top.
Hold the bolt steady from above with a flathead screwdriver or by gripping the bolt head, then use your adjustable wrench to turn the nut underneath the bowl rim counterclockwise. Once both nuts are off, lift the seat straight up and off the bowl. Set aside the old hardware — you won’t need it for the new installation since replacement seats include their own bolts and nuts.
💡 Tip: Quick-release hinges common on newer seats let you pop the seat off without tools at all — check for a release tab or button on the hinge before reaching for a wrench. Many homeowners don’t realize this feature exists until they’ve already grabbed a screwdriver.
Step 2 — Clean the Bowl Surface
With the old seat removed, wipe down the area around the mounting holes at the back of the bowl. This area typically collects mineral deposits, old washer residue, and grime that’s impossible to reach properly with a seat installed. Use a damp rag or your preferred bathroom cleaner — give it a thorough wipe while you have unobstructed access.
Check whether the old seat left behind any rubber or plastic washers sitting in the bolt holes or resting against the bowl surface. Remove any worn-out washers — your new seat will come with fresh mounting hardware that includes its own washers and bumper feet, so the old components can be discarded.
💡 Tip: This is the perfect opportunity to deep-clean the hinge area and the back of the bowl rim — it’s nearly impossible to reach properly once a new seat is installed. A few extra minutes here saves buildup you won’t be able to address again for years.
Step 3 — Check Bolt Hole Spacing
Before positioning the new seat, confirm the bolt hole spacing on your bowl matches the new seat’s mounting hardware. The standard spacing on US toilets is 5.5 inches center-to-center between the two mounting holes. Measure across from the center of one hole to the center of the other — on virtually all modern toilets manufactured for the US market this will be 5.5 inches.
Most replacement toilet seats sold in the US include adjustable mounting hardware that accommodates slight variations in hole spacing, but it’s worth verifying before you start threading bolts. If your toilet is an older or non-standard model, the manufacturer’s replacement seat is the safest choice to guarantee fit.
💡 Tip: Almost all modern toilet seats sold in the US use the standard 5.5-inch bolt hole spacing — spacing mismatches are rare but worth a quick check before you start. It takes 10 seconds and eliminates any chance of a frustrating mid-installation discovery.
Step 4 — Position the New Seat
Place the new seat on the bowl and align the hinge bracket with the mounting holes. Most seats have plastic or rubber bumper feet on the underside of the hinge that rest on the bowl surface and help center the seat naturally — let these settle into position before doing anything else. Check that the seat sits evenly across the bowl and that the front of the seat is centered over the bowl opening rather than shifted to one side.
Once the seat looks correctly positioned, insert the bolts down through the hinge holes and the bowl mounting holes. Hold the bolt lightly in place from the top — don’t let it drop through entirely — while you reach underneath to start threading the mounting nut by hand.
💡 Tip: Lay the seat in place and check the centering carefully before tightening anything — it’s much easier to adjust position at this stage than after the bolts are snug. Look at the gap between the seat edge and the bowl rim all the way around before you commit to the position.
Step 5 — Secure the Mounting Bolts
With the bolts inserted and the seat correctly centered, thread the wing nuts or mounting nuts onto the bolts from underneath the bowl. Start both nuts by hand at the same time rather than fully tightening one side before starting the other — alternating sides keeps the seat from shifting position as the hardware tightens.
Hand-tighten both nuts until they’re firmly seated against the underside of the bowl but not yet fully tightened. Check the seat position one more time from above before moving to the final tightening step. If you need to include a lock washer or the seat came with a stabilizing nut, thread that on now according to the seat’s included instructions. Our roundup of the best toilet repair kits covers multi-component hardware sets if you’re doing a more thorough refresh at the same time.
💡 Tip: Many modern seats use plastic wing nuts that only need hand-tightening — over-tightening with a wrench can crack the plastic mounting hardware or the nut itself. If the hardware is plastic, snug by hand and a quarter-turn more is all that’s needed.
Step 6 — Tighten and Test
Give each nut a final snug with your wrench or screwdriver, tightening both sides alternately by small increments rather than fully tightening one at a time. If the mounting hardware is metal, a firm snug is appropriate — stop before applying significant torque, since the goal is to clamp the seat firmly against the bowl surface without stressing the porcelain around the mounting holes.
Once both sides are tightened, lower the seat and lid and test by applying weight and shifting side to side. The seat should feel completely solid with no lateral movement or rocking. If there’s any wobble, identify which side has more play and snug that nut slightly more before retesting. Replace the hinge caps if your seat has them — they should click or press firmly into place over the bolt heads.
💡 Tip: A seat that wobbles after installation usually means one side is tighter than the other — loosen both sides slightly, re-center the seat, and retighten evenly. Rarely is a wobble caused by insufficient tightening on both sides simultaneously.
Dealing with Stuck or Corroded Bolts
If the old mounting bolts won’t turn with hand pressure, apply a generous amount of penetrating oil around the nut and where the bolt passes through the bowl. Wait 10 to 15 minutes — the oil needs time to work into the corroded thread — before attempting removal again. A second application and another wait often makes the difference between a bolt that eventually frees and one that doesn’t.
When attempting removal, hold the bolt steady from above with a flathead screwdriver while applying counterclockwise force to the nut with a wrench below. Holding the bolt from turning above is as important as the nut removal force — without it, the bolt just spins with the nut rather than the nut threading off.
US regional note: In homes with hard water, mounting bolts and nuts can corrode and seize over years of mineral exposure — particularly in states like Arizona, Texas, Nevada and parts of California. If your bolts won’t turn with reasonable force after penetrating oil, applying a second coat and waiting longer usually works better than applying more force, which risks damaging the porcelain.
⚠️ Warning: Never force a seized bolt with excessive pressure — this risks cracking the porcelain bowl, which means replacing the entire toilet rather than just the seat. If penetrating oil and reasonable wrench force won’t free the bolt, cutting the bolt with a hacksaw or oscillating tool is the safer option. Seat replacement bolt hardware is inexpensive; a cracked bowl is not.
As a last resort, cutting through the bolt with a hacksaw or mini oscillating saw is a clean solution that avoids all risk to the porcelain. Cut as close to the nut as possible from below, then tap the remaining bolt stub upward and through the bowl hole. The new seat’s included bolts replace everything that was removed. If you just need fresh mounting hardware without replacing the whole seat, our roundup of the best toilet seat hinges and replacement hardware covers the options.
Round vs Elongated Seats — How to Tell
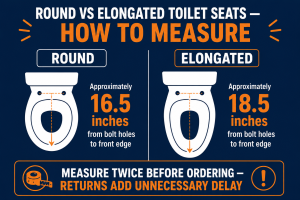
US toilets come in two primary bowl shapes — round and elongated — and the seats are not interchangeable. An elongated seat fitted to a round bowl will overhang the front noticeably; a round seat on an elongated bowl will leave a visible gap. Getting this right before buying is the single most important measurement in the whole process.
To determine your bowl shape, measure from the center of the mounting bolt holes at the back of the bowl straight to the front outer edge of the bowl rim. A measurement of approximately 16.5 inches indicates a round bowl. A measurement of approximately 18.5 inches indicates an elongated bowl. There is no ambiguous middle ground — these two measurements are clearly different and the result will be unambiguous.
If you’re also shopping for a new seat, our guide to the best toilet seats covers what to look for at every price point, including soft-close mechanisms, quick-release hinges, and the best options for both bowl shapes.
💡 Tip: When in doubt, measure twice before ordering — round and elongated seats look similar in photos but are not interchangeable, and returns add unnecessary delay to a job that should take 15 minutes. The measurement takes 30 seconds and eliminates all guesswork.
Need a Professional Plumber?
Toilet seat installation is a genuine DIY job for almost everyone. But if your inspection reveals a cracked bowl, a shutoff valve that won’t close, or a toilet that rocks on the floor rather than sitting level — those are issues worth a plumber’s assessment before you invest in new hardware on top of a bigger underlying problem.
Find a licensed plumber in your area at PlumberArchive.com — the US plumber directory with 12,000+ verified local plumbers across all 50 states.
Find a trusted plumber near you → PlumberArchive.com
Follow Us on Facebook
Get weekly plumbing tips, honest tool reviews and DIY maintenance guides delivered straight to your Facebook feed. We cover toilet repairs, bathroom fixtures, pipe maintenance and everything in between — written for US homeowners who want to handle more themselves.
Follow PlumbingToolsReview on Facebook →
Frequently Asked Questions
Q: How do I know what size toilet seat to buy?
Measure from the center of the mounting bolt holes at the back of the bowl to the front outer edge of the bowl rim. Approximately 16.5 inches means a round bowl; approximately 18.5 inches means an elongated bowl. All toilet seats sold in the US are labeled as either round or elongated, and the seats are not interchangeable between bowl shapes. If you’re not sure and can’t measure before going to the store, note the toilet’s brand and model number (usually printed inside the tank lid) — most manufacturers publish the bowl shape specification online, and many hardware stores have staff who can look it up on the spot.
Q: What if my toilet seat bolts won’t come off?
Apply penetrating oil generously around the nut and bolt thread, wait 10 to 15 minutes, and try again while holding the bolt steady from above with a flathead screwdriver. A second application and a longer wait often frees bolts that didn’t budge the first time. If the bolt still won’t turn after two applications and adequate wait time, cutting through the bolt from below with a hacksaw or oscillating tool is the correct next step — it’s quick, safe, and your new seat comes with replacement hardware. Never force a seized bolt with excessive torque — the porcelain bowl can crack if you apply too much pressure around the mounting hole area.
Q: Do I need any special tools to install a toilet seat?
For most toilet seat installations, an adjustable wrench and a flathead screwdriver are all you need — and on many newer seats with plastic wing nut hardware, you don’t even need the wrench since hand-tightening is sufficient. A basin wrench is occasionally useful for reaching underneath a bowl with limited clearance, but it’s not typically required for standard installations. The only scenario that calls for additional tools is a stuck or corroded bolt removal, which may require penetrating oil and — in worst cases — a hacksaw or small oscillating saw to cut through the bolt.
Q: Why is my new toilet seat wobbly?
A wobbling toilet seat after installation almost always means the mounting nuts are unevenly tightened — one side is snug and the other has some remaining play, allowing the hinge to pivot slightly. Loosen both nuts by half a turn, recheck that the seat is centered on the bowl, then retighten both sides alternately in small increments until both sides are equally snug. If the seat still wobbles after even tightening, check whether the rubber bumper feet on the hinge are fully contacting the bowl surface — a missing or folded-under bumper foot on one side can cause residual movement even with the hardware properly tightened.
Conclusion
Installing a toilet seat takes under 20 minutes for most people — less once you’ve done it once. The six steps are genuinely straightforward, the tool requirement is minimal, and the result is immediately functional. The part of the job that warrants the most patience is removing old corroded bolts rather than anything about the installation itself, and penetrating oil handles that problem in the vast majority of cases without any need to force hardware.
The two things that prevent a smooth job are buying the wrong seat shape (measure before you shop — round and elongated are not interchangeable) and over-tightening plastic mounting hardware (hand-tight plus a small snug is all plastic wing nuts need). Avoid those two missteps and the rest follows naturally.
For seat recommendations at every price point, our guide to the best toilet seats covers soft-close models, quick-release hinges, and the best options for both round and elongated bowls. If your toilet has other issues beyond the seat — a running fill valve or a faulty flapper — our guide to fixing a running toilet covers those repairs step by step. For a complete internal hardware refresh, the best toilet repair kits bundle everything needed in one package. If you’re adding a bidet attachment under the seat, see our guide to installing a bidet attachment.
✍️ About This Guide
PTR Editorial Team — Plumbing Guides. We compare manufacturer specifications, installation requirements, compatibility and available product documentation to help homeowners choose suitable tools and parts. How we review →