
Guides
19 Oct 2026

Can’t Reach the Faucet Nut? Choose the Right Tool Before You Buy
Not sure which tool fits your faucet nut? Identify the fixing, see how it lets go and check your clearance first. Then choose a tool, or use one you own.
How to fix a leaking outdoor faucet or hose bib: diagnose a spout drip, a handle leak, or a wall leak, then repair the washer, packing, or stem yourself.

Please note: Information in this guide is based on our research and hands-on experience at time of writing and is subject to change. Always follow your specific faucet manufacturer’s instructions and local plumbing code, and consult a licensed plumber if you run into conditions beyond the scope of this guide.
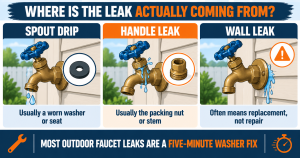
An outdoor faucet — a hose bib, spigot, or sillcock, depending on where you grew up — leaks in one of three places, and which one it is tells you almost everything about the fix. Water dripping from the spout when the handle is fully closed is a worn washer or a damaged valve seat: the most common problem by far, and usually a five-minute repair. Water seeping out around the handle or the packing nut only while the faucet is running is a packing or stem problem, also a straightforward fix with a wrench and a few cents of packing material. Water appearing at the wall where the pipe enters the house, or dripping off the pipe behind the faucet inside a crawlspace or basement, is a different situation entirely — that usually means a cracked body or a pipe split by a past freeze, and it is a replacement job, not a repair.
This guide covers the two repairs a homeowner can genuinely do at the faucet — a dripping spout and a leak at the handle — plus how to tell those apart from the third case and from a failing vacuum breaker, which mimics a faucet leak but is a separate part. Once your faucet is sealing properly again, our hose bib timer reviews and our how to install and program a hose bib timer guide are worth a look if you’re adding automated watering to the same spigot. For a faucet that is cracked, corroded past a rebuild, or leaking behind the wall, our guide to how to replace an outdoor faucet covers the full swap; this guide points you there when repair stops being the right call rather than repeating that procedure.
At a Glance
| Skill Level | Beginner to intermediate DIY. A dripping-spout washer swap is a genuine beginner repair; a seized packing nut or a stem that needs replacing pushes it toward intermediate. No soldering, no pipe cutting. |
| Tools Needed | An adjustable wrench (or a set of open-end wrenches); a flathead and a Phillips screwdriver; a replacement washer assortment plus graphite packing string or a packing washer to fit your faucet; penetrating oil for a stuck packing nut or bonnet; plumber’s grease. A seat wrench and a seat-dressing (reseating) tool are worth having if the valve seat turns out to be scored. |
| Time Needed | About 10 to 20 minutes for a washer or packing repair once the water is off. Add time if a packing nut is corroded in place and needs penetrating oil and a soak before it will move. |
| Critical First Step | Shut off the water to the faucet at its dedicated interior shutoff valve — usually on the supply pipe just inside the wall the faucet passes through, in a basement, crawlspace, or utility area — then open the outdoor faucet to drain the line and confirm the water is off before you take anything apart. Our guide to how to shut off water to a single fixture covers finding that valve. |
✏️ Our Take
Most outdoor faucet leaks are not a reason to replace the faucet. A drip from the spout is almost always a worn rubber washer that costs a few cents and takes one trip to the toolbox to swap; a leak at the handle is usually a packing nut that needs a slight turn or a fresh wrap of packing string. Full replacement is the right call only when the faucet body is cracked, the threads are stripped, the valve seat is too far gone to resurface, or the leak is actually behind the wall. Diagnose which of those you have before you buy anything — the fix for the common cases is measured in minutes and cents, not a weekend and a new sillcock.
IN THIS GUIDE
Before you touch a tool, watch the faucet through a full cycle: closed, running wide open, then closed again. Where the water shows up, and whether the handle is open or shut when it does, points straight at the cause — and the repairs below are quick fixes for different problems, so doing the wrong one wastes the trip.
| What you see | Where the problem is | What to do |
|---|---|---|
| Drip from the spout with the handle fully closed | Worn washer, or a scored/pitted valve seat | Washer and seat repair, below |
| Water around the handle or packing nut, only while the faucet runs | Loose packing nut, worn packing, or a worn stem | Packing and stem repair, below |
| Spitting or dribbling from the small vent holes near the top of the faucet, mostly right after you shut a running hose off | Vacuum breaker (anti-siphon device), not the main valve | Vacuum breaker section, below |
| Water at the wall where the pipe enters, or dripping off the pipe behind the faucet in the basement or crawlspace | Cracked or corroded faucet body, or a pipe split by a past freeze | Not a repair — see replacement, below |
One caveat for frost-free sillcocks, the long-barreled type common in cold climates: after you shut one off, the spout keeps draining for a few seconds to a minute while water sitting in the barrel runs out. That is the design working, not a leak. A frost-free that keeps dripping well past that, or drips when unused, has a bad washer or seat at the far (interior) end of the stem — the same repair below, with a longer stem to withdraw. One that leaks from the handle end, or that you can hear spraying inside the wall while it runs, has a barrel cracked by a freeze, which is a replacement covered in our guide to how to replace an outdoor faucet.
A spout that drips with the handle shut is water getting past the rubber washer at the bottom of the stem, which is supposed to press tight against a brass ring inside the body called the seat. The washer is a wear part and it hardens, flattens, and grooves over the years. With the interior shutoff closed and the outdoor faucet opened to drain, start by removing the handle: there is a screw in the center of it — flathead, Phillips, or a small hex set screw on some lever handles — and once that is out the handle pulls straight off. Set it and its screw aside together.
Behind the handle is a large hex nut — the packing nut or bonnet nut — that retains the stem. Loosen it counterclockwise with a wrench while holding the faucet body steady so you are not twisting the whole faucet in the wall. With the nut backed off, turn the stem counterclockwise, as if opening the faucet fully, and it walks itself out; finish unthreading it by hand. The rubber washer is on the end, held by a single brass screw.
💡 Tip: Before you pull anything apart, take a photo of the assembled faucet, and then lay each part on a rag in the exact order you remove it, oriented the way it came off. Hose bib stems, washers, and packing nuts all go back together one specific way, and a phone photo settles any doubt when you are reassembling twenty minutes later.
Note the washer’s shape — flat, beveled, or cone — and its size before removing it, then match it from the assortment kit. A washer that is grooved, flattened, torn, or rock-hard is your leak; replace it, and the brass retaining screw too if it is corroded. A fresh washer on a good seat is the whole fix for most dripping spouts.
Before reassembling, check the seat: shine a flashlight into the body where the washer sits and run a fingertip around that brass ring. Smooth and even, and you are done. Pitted, rough, or crusted with scale means a new washer will chew out against it within weeks. A removable seat unthreads with a seat wrench (an L-shaped key) so you can drop in a replacement; a fixed seat can be ground flat with a seat-dressing (reseating) tool in a dozen turns by hand. A fixed seat too deeply pitted for that is the point where the faucet itself needs replacing.
Reassemble in reverse: a light smear of plumber’s grease on the stem threads and packing, thread the stem in hand-tight, snug the bonnet nut while bracing the body, and refit the handle. Snug, not gorilla-tight — the seal comes from the washer on the seat, not from cranking the nut.
If water only appears around the handle or packing nut while the faucet runs — and the spout shuts off cleanly — water is escaping past the stem where it exits the body. The packing seals that gap: depending on the faucet’s age and design it is a graphite-impregnated string wound into the nut, a molded fiber packing washer, or an O-ring on the stem.
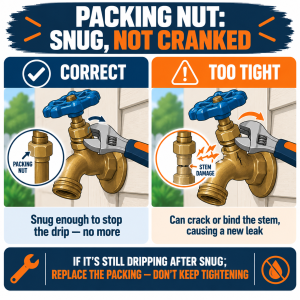
Try the easy fix first. With the faucet running just slightly, snug the packing nut about an eighth to a quarter turn with a wrench and watch the leak. If it stops and the handle still turns without excessive effort, you are done — worn packing compresses over time and often just needs to be taken up a little.
⚠️ Warning: Do not overtighten the packing nut trying to stop a leak. A nut cranked down hard clamps the stem so the handle turns stiffly, and it can crack an old brass nut or gall the stem threads — turning a two-minute adjustment into a stem or full-faucet replacement. Tighten only until the weep stops, then stop.
If snugging does not do it, the packing is worn out. Shut the water off again, drain the faucet, and remove the handle and packing nut. If what is under the nut is old graphite string, wind two or three wraps of fresh self-forming packing string clockwise around the stem into the nut recess, press it in, and reassemble. If it is a packing washer or O-ring, match the old one for size at the store. A dab of plumber’s grease helps new packing seat and last.
Sometimes the stem itself is worn — a polished groove where the packing rides, a slight bend, or a broached end rounded off so the handle slips. Fresh packing will not seal that. Replacement stems for common hose bib and frost-free brands are sold individually; match the length, thread, and broaching shape. If none matches yours, replacing the whole faucet becomes the simpler path — see the replacement section below.
Most outdoor faucets sold in recent decades — and every frost-free sillcock — have a vacuum breaker (anti-siphon device): a small dome or threaded cap on top of the faucet, or an add-on collar between the spout and the hose. It prevents water sitting in a hose from being siphoned back into your drinking water if house pressure drops. Our comparison of a frost-free vs standard outdoor faucet covers what it does and why US code requires it, so this guide keeps it short.
As a leak source: a vacuum breaker with a stuck, swollen, or torn internal check spits or dribbles from its vent holes, most noticeably the moment you shut a running hose off, sometimes as a steady weep while the faucet runs. That is not the main valve failing and does not call for replacing the faucet. On most designs the cap unscrews to reveal a small rubber cartridge or poppet that swaps for a couple of dollars; an add-on collar just unthreads and is replaced whole. Only a non-serviceable integral breaker with no available part becomes a replacement question — so check for a cartridge first.
Turn the interior shutoff back on slowly — a quarter turn, pause, then the rest — so the line refills without a surge slamming the fresh washer. Leave the outdoor faucet open while it fills, run it full for twenty to thirty seconds, then close it firmly. Watch the spout stop (allowing the frost-free drain-down), and watch for a weep at the handle or the vacuum breaker vents.
Then the real test: attach a hose with a closed nozzle and open the faucet fully, so it holds house pressure against a dead end. That loads the washer against the seat and is also when a marginal vacuum breaker shows itself. Run a dry paper towel around every joint — bonnet nut, packing nut, the wall connection — since a slow weep is damp before it is a visible drip. Re-check a few hours later and again the next day; fresh packing sometimes weeps only after it has been under pressure a while.
💡 Tip: Note on your calendar to re-check the faucet after its first heavy use of the season — filling a pool, a long sprinkler run, pressure-washing. Sustained flow is a tougher test than a thirty-second check, and better to catch a slow weep then than to find a rot spot on the siding in the fall.
Rebuilding a faucet is throwing parts at it when any of the following is true, and recognizing that early saves you an hour of work the parts were never going to fix:
The body is cracked — a hairline split along the barrel or at the wall-thread, most often the aftermath of a hard freeze on a standard (non-frost-free) faucet.
Water shows up at the wall penetration, or behind the faucet inside the wall or crawlspace, when the faucet runs — the leak is upstream of anything you can service from the outside.
The valve seat is fixed, deeply pitted, and will not clean up with a reseating tool.
The stem threads or bonnet threads are stripped or so corroded that a nut will not hold torque.
It is a frost-free sillcock with a split barrel — it drips or sprays inside the wall while running, or it will not fully shut off.
In any of those cases, our guide to how to replace an outdoor faucet walks through the swap — shutting off, removing the old sillcock, measuring for the correct frost-free length, sealing the wall penetration, and testing. If you are replacing it anyway and want to move up from a plain bibb to a frost-free or quarter-turn model, our roundup of the 5 best outdoor faucets covers choosing one. This guide stops here, because that one owns the procedure.
The common cases are squarely DIY, but hand a few situations to a plumber. A leak that continues after a correct washer, seat, and packing repair — especially water coming from the body casting rather than a serviceable joint — points to a cracked body or an upstream supply-line problem. Any water inside the wall or at the foundation that is not obviously just the faucet — staining on interior drywall below the spigot, a damp rim joist, a wet basement wall near the pipe — should be looked at before it turns into a framing or mold problem.
It is also a pro job if there is no working interior shutoff, so you would have to kill water to the whole house and still could not isolate a persistent leak — a plumber can add a dedicated stop. And a frost-free that needs replacing where the wall is thick, finished inside, or the connection behind it is not accessible is often cleaner to hand off.
US Regional Context: Outdoor faucets in the US use a 3/4-inch garden hose thread (GHT) at the spout, and replacement stem washers come in a small set of standard sizes — most commonly 00, 0, 1/4-inch regular, and 1/2-inch — sold as an inexpensive assortment kit at any hardware store, usually on the same aisle as brand-specific hose bib repair kits for Woodford, Prier, Arrowhead, and Mansfield frost-free sillcocks. Graphite packing string is equally standard and universal. Because the parts are cheap and stocked nationwide, it is worth buying the assortment rather than a single washer, so the right size is on hand without a second trip.
If a leak persists after a correct repair, there is water showing up inside the wall, or a frost-free replacement means opening a finished wall, it is worth getting a professional to look. Search PlumberArchive.com — the US plumber directory with 12,151+ verified local plumbers across all 50 states.
Get weekly plumbing tips and DIY guides delivered straight to your Facebook feed.
That is normal on a frost-free sillcock: its shutoff valve is at the far end of a long barrel, so when you close the handle the water sitting in the barrel drains out the spout over the next several seconds to a minute. It is only a problem if the drip never stops, if it drips when unused, or if a standard short-body faucet does it — all of which point to a worn washer or seat.
No. Even a quick washer swap means backing the stem out of the body, which opens the line completely — with the water still on, that is a face full of pressurized water and no way to stop it. Find and close the faucet’s interior shutoff valve, then open the outdoor faucet to drain the line and confirm it is dead, before any part comes off.
Give it penetrating oil and time — a spray, a twenty-minute soak, another spray — rather than more force. Use a properly sized wrench, not an adjustable one opened too wide, and brace the faucet body so you turn the nut and not the whole faucet in the wall. If the corners start to round off, stop: a stem or full-faucet replacement is then the realistic path.
If you replace the washer and the drip returns within days or weeks, the seat is the culprit. Confirm by feel and light: a good seat is a smooth, even brass ring; a bad one is visibly pitted or rough. A removable seat swaps out with a seat wrench; a fixed one can often be ground smooth with a reseating tool. A fixed seat too far gone for that means the faucet needs replacing.
That collar is an add-on vacuum breaker, and a leak from its side vents is the breaker failing, not the main valve. Most unthread from the spout and replace as a whole unit for a few dollars; some have a replaceable internal cartridge under a cap. Our comparison of a frost-free vs standard outdoor faucet explains what the device does and why it is there.
Most outdoor faucet leaks trace back to one of two cheap, serviceable parts — the spout washer or the stem packing — and telling them apart takes one look at where the water appears and whether the handle is open or shut. Shut the water off at the interior valve, make the fix, test against a closed nozzle, and re-check the next day. Save replacement for the cases that warrant it — a cracked body, a ruined fixed seat, stripped threads, or a leak behind the wall — and when you hit one, our guide to how to replace an outdoor faucet takes it from there.
Prices and ratings may change. Always check Amazon for current prices.
✍️ About This Guide
PTR Editorial Team — Plumbing Guides. We compare manufacturer specifications, installation requirements, compatibility and available product documentation to help homeowners choose suitable tools and parts. How we review →
Not sure which tool fits your faucet nut? Identify the fixing, see how it lets go and check your clearance first. Then choose a tool, or use one you own.
Check your manual and the drain route first: gravity hose, built-in pump or external pump. Then see whether you need a dehumidifier hose at all.
Explore portable bidets that need no water-line connection, from bottle caps and squeeze bottles to battery-powered handhelds.

