
Guides
19 Oct 2026

Can’t Reach the Faucet Nut? Choose the Right Tool Before You Buy
Not sure which tool fits your faucet nut? Identify the fixing, see how it lets go and check your clearance first. Then choose a tool, or use one you own.
A leaking, frozen-cracked, or outdated outdoor faucet is a genuinely approachable weekend repair — here's how to identify your connection type and replace it correctly.
Please note: Information in this guide is based on our research at time of writing and is subject to change. Always follow your specific faucet manufacturer’s instructions, and consult a licensed plumber if you encounter plumbing conditions beyond the scope of this guide.
A leaking outdoor faucet, one that cracked during last winter’s freeze, or simply an old standard bibb you’d like to upgrade to a frost-free model are all good reasons to replace it — and for most homeowners, this is a genuinely approachable weekend project rather than a job that requires calling in a professional. The catch is that “approachable” depends almost entirely on what you find once you open up the connection behind the faucet. Outdoor faucets connect to the home’s supply line in one of three common ways, and the type you have determines both the tools you’ll need and how difficult the job actually is.
A threaded connection, the most common setup in residential replacements, unscrews and reinstalls with basic hand tools in well under an hour. A push-fit connection is nearly as simple once you have the correct disconnect tool. A soldered copper connection, however, is a different situation entirely — disconnecting and reconnecting one safely requires a torch, solder, and enough experience to sweat pipe without damaging anything nearby, and that’s a legitimate point to call a plumber rather than push through it. This guide walks through identifying your connection type, shutting off and draining the line safely, removing the old faucet, measuring correctly for a frost-free sillcock, and sealing and testing the new installation. If the problem turns out to be minor — a dripping spout or a leak at the handle — full replacement might be more than you need; our how to fix a leaking outdoor faucet guide covers the repairs that don’t require a full swap. And if you’re weighing whether to upgrade to a frost-free model as part of this replacement, our frost-free vs standard outdoor faucet comparison covers that decision in detail.
At a Glance
| Skill Level | Varies by connection type — Beginner for threaded, Advanced for soldered |
| Tools Needed | Adjustable or pipe wrench, pipe sealant or thread tape, exterior-grade caulk, and — depending on connection type — a soldering torch or a push-fit disconnect tool/clip |
| Time Needed | 30 minutes to 2 hours, depending on connection type and any corrosion |
| Critical First Step | Identify your connection type and shut off the water supply before doing anything else |
✏️ Our Take
Replacing an outdoor faucet is a genuinely approachable project for most homeowners — but only once you know what you’re actually working with. A threaded connection unscrews and reinstalls with basic tools in under an hour. A soldered copper connection is a different story entirely, and unless you’re comfortable and equipped to sweat pipe safely, this is a legitimate point to call a plumber rather than push through it. Whichever connection type you find, take the time to measure correctly for a frost-free sillcock’s length and get the drainage pitch right — skipping either of those is how a brand new faucet still ends up frozen and cracked next winter.
IN THIS GUIDE
Not every outdoor faucet problem calls for a full replacement — sometimes a worn washer or a new packing nut is all it takes. But a few specific signs point to the faucet itself needing to come out rather than being repaired in place. Persistent dripping or leaking that doesn’t resolve after replacing the washer or stem packing is one of the clearest signals, since it usually means the valve seat or internal body has worn or corroded beyond a simple parts swap. Visible cracking in the faucet body — often the result of water that froze and expanded inside the faucet during a cold snap the previous winter — is another sign that repair isn’t really an option, since a cracked casting will only fail again under pressure.
Corrosion or mineral buildup that prevents the valve from fully shutting off is a third common reason, particularly on older faucets where internal parts have degraded to the point that even a fresh washer won’t seal properly against a pitted or scaled valve seat. Finally, plenty of homeowners choose to replace a functioning standard faucet with a frost-free sillcock specifically for better freeze protection — if you’ve dealt with a frozen or burst outdoor faucet before, or simply want to stop worrying about it each winter, upgrading to a frost-free model is a reasonable and common motivation on its own, independent of any current leak or damage. If you’re still deciding between models rather than ready to install one, our outdoor faucet reviews compare current frost-free and standard options in more depth; this guide focuses specifically on the installation itself.
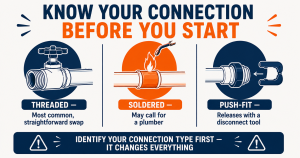
Before you buy a replacement faucet or gather tools, take a few minutes to inspect exactly how your current faucet connects to the supply pipe behind the wall — this single detail determines almost everything else about how the job will go. Most residential outdoor faucets use one of three connection types, and each looks and behaves differently once you know what to look for.
A threaded connection is by far the most common in residential replacement scenarios. You’ll see a visible pipe thread fitting where the faucet’s shank screws into a threaded adapter or directly into galvanized or threaded copper pipe, and the joint typically has a distinct hexagonal or ridged shape you can grip with a wrench. A soldered (sweat) connection looks completely different: the copper pipe runs directly into the back of the faucet with a smooth, seamless joint and no visible threads at all — the faucet was originally installed by heating the joint and flowing solder into it, and disconnecting it requires applying heat again. A push-fit connection — often recognized by the SharkBite brand name — has a distinctive plastic or metal collar around the pipe where it enters the fitting, with no threads or solder joint visible; these connections release with a dedicated disconnect tool or clip rather than a wrench or torch.
To identify yours, go to the point where the faucet meets the supply pipe — usually visible from inside a basement, crawlspace, or utility area on the interior side of the exterior wall — and look closely at that joint rather than guessing based on the faucet’s age or appearance. If access is limited, a flashlight and a bit of patience usually reveal enough to tell the three types apart.
Step 1: Shut Off and Drain the Water Supply
Regardless of which connection type you’re dealing with, fully shutting off and draining the line is the step that determines whether the rest of the job stays clean and controlled or turns into an unexpected mess.
1. Locate the shutoff valve controlling this specific line — many homes have a dedicated interior shutoff for each exterior faucet, typically found in a basement, crawlspace, or utility room close to where the pipe exits toward the faucet.
2. If no dedicated shutoff exists for that line, you’ll need to close the home’s main water shutoff instead, which stops water everywhere in the house, not just at the faucet.
3. Turn the identified shutoff valve clockwise until it stops, fully closing off flow to the line you’re working on.
4. Go outside and open the faucet fully to drain the remaining water in the line and relieve any built-up pressure.
5. If your faucet is a frost-free type with an interior shutoff already built in, or if the line has a separate drain cap, open that as well so the horizontal run of pipe empties completely rather than leaving standing water inside it.
Leave the outdoor faucet open while you work, both to confirm the line stays drained and to relieve any residual pressure that builds up as you disconnect fittings.
How you remove the old faucet depends entirely on the connection type you identified earlier, so confirm that before starting this step rather than assuming.
1. For a threaded connection, grip the pipe behind the faucet with one wrench to hold it steady, and use an adjustable or pipe wrench on the faucet itself to turn it counterclockwise, applying steady, even pressure rather than excessive force on a corroded fitting.
2. For a soldered connection, removal typically means cutting the copper pipe a short distance behind the old faucet with a tubing cutter, then preparing that cut end for a new solder joint — or, more commonly among DIYers, transitioning to a push-fit or threaded adapter fitting instead of re-soldering, which avoids needing a torch altogether.
3. For a push-fit connection, use the manufacturer’s specified disconnect clip or removal tool, inserting or engaging it exactly as directed, since forcing a push-fit collar apart without the correct tool can damage the fitting or the pipe end.
4. Once disconnected, remove any remaining mounting screws or brackets securing the faucet to the exterior wall, and pull the old faucet free from the wall penetration.
5. Inspect the pipe stub and the wall penetration for corrosion, damage, or deterioration before moving forward, since this is your best opportunity to catch a problem while everything is already exposed.
Step 3: Measure for the Correct Sillcock Length
If you’re installing a frost-free sillcock — the standard choice for freeze protection in most of the US — getting the length right is arguably more important than the installation itself, since an undersized unit can defeat the entire purpose of the upgrade.
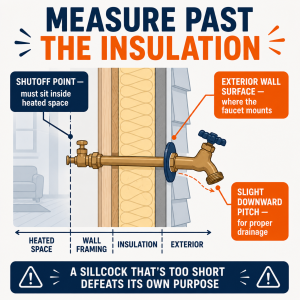
1. Understand what makes a frost-free sillcock work: its actual shutoff valve sits at the back end of a long stem, not at the wall face, so that the valve itself is located inside heated interior space rather than in the unheated wall cavity or exterior sheathing.
2. Measure the total distance from the exterior wall surface back to a point that’s reliably inside heated living space — this means measuring past any exterior siding, sheathing, wall cavity insulation, and interior wall material, not just the visible wall thickness.
3. Add a small margin to that measurement rather than cutting it exactly to the minimum, since wall assemblies are rarely perfectly uniform and insulation can shift or compress over time.
4. Choose a sillcock with a stem length that meets or slightly exceeds this measurement — sillcocks are typically sold in a range of common lengths (roughly 4 to 14 inches), so measure first and buy accordingly rather than guessing based on what’s in stock.
5. Keep in mind that an undersized sillcock leaves its internal shutoff point sitting in unheated space, which means the small amount of water trapped between that valve and the wall face can still freeze and crack the unit — effectively recreating the exact problem you installed a frost-free faucet to solve.
With the correct faucet or sillcock in hand, installation itself is usually the most straightforward part of the job, provided the connection matches what you removed.
1. For a threaded connection, apply pipe sealant (pipe dope) or wrap the male threads with several turns of thread tape before threading the new faucet on, working in the direction that tightens the tape rather than unwinding it.
2. Thread or connect the new faucet onto the supply pipe using the connection method that matches what you identified earlier — threading it on by hand first, then snugging with a wrench for a threaded connection, or engaging a push-fit fitting fully per the manufacturer’s instructions.
3. Tighten the connection firmly enough to seal completely, but stop as soon as it’s snug rather than overtightening — excessive force on a threaded joint can crack fittings or strip threads, undoing the careful work from the previous steps.
4. Feed the sillcock or faucet body through the wall penetration from outside as you make the connection, confirming the faucet body sits flush against the exterior wall surface once fully connected, with no gap or looseness at the mounting point.
5. Secure the faucet to the exterior wall using its mounting flange and appropriate exterior-rated screws, checking that it sits level and doesn’t wobble once fastened.
A properly sealed wall penetration is easy to overlook once the faucet itself is installed and working, but skipping it invites water intrusion and pests behind the wall over time.
1. Clean any dust, old caulk residue, or debris from around the wall penetration before applying new sealant, so the new bead adheres properly to both the wall surface and the faucet’s mounting flange.
2. Apply a bead of exterior-grade caulk or sealant fully around the perimeter of the wall penetration, where the faucet body and its mounting flange meet the siding or exterior wall surface.
3. Smooth the bead so it forms a continuous, gap-free seal rather than leaving pinholes or thin spots, particularly along the top edge where water is most likely to run down and collect.
4. Allow the sealant to cure fully per the product’s instructions — this can range from a few hours to a full day depending on the product — before exposing it to water from testing or normal use.
The final step confirms that everything you’ve just installed actually works and holds up under normal water pressure.
1. Turn the shutoff valve back on slowly rather than opening it all the way at once, watching the new connection closely as the line pressurizes.
2. Check the new connection point and the area around the wall penetration carefully for any dripping, spraying, or dampness.
3. Turn on the outdoor faucet and let it run for about a minute, confirming normal, steady flow with no sputtering, and then shut it off and confirm it stops completely.
4. For a frost-free sillcock specifically, confirm it drains completely on its own once shut off — this is where the correct slight downward pitch of the sillcock body toward the outside matters, since that pitch is what lets residual water drain out by gravity rather than sitting trapped inside the long stem where it could freeze.
Not every outdoor faucet replacement is a reasonable DIY project, and recognizing when to stop is just as important as knowing how to do the job. A soldered connection you’re not equipped or comfortable to safely disconnect and re-solder is the most common reason to call a professional — working with an open torch near wood framing, insulation, or other combustible material carries real risk if you haven’t done it before, and a poorly sweated joint can leak for months before it’s noticed. If reaching the connection requires opening the wall significantly beyond the faucet’s immediate mounting area — cutting into drywall or siding well past the penetration itself — that’s a sign the situation has moved past a simple faucet swap and into a repair that benefits from professional tools and experience.
An unclear or inaccessible plumbing configuration is another reasonable stopping point — if you can’t get a clear look at how the pipe is routed behind the wall, or the layout doesn’t match what you expected once you open things up, guessing at a repair in that situation risks bigger problems than the one you started with. Similarly, any sign of more extensive pipe damage or corrosion beyond the faucet connection itself — soft or discolored framing, pipe that flexes or crumbles under light pressure, or corrosion extending well past the fitting — points to a repair that goes deeper than a faucet replacement.
Replacing an outdoor faucet is a manageable DIY job when you’re dealing with a threaded or push-fit connection. But if you’ve found a soldered joint you’re not equipped to handle, a wall that needs to be opened up further than expected, or a repair that’s turned into something bigger than anticipated, search PlumberArchive.com — the US plumber directory with 12,000+ verified local plumbers across all 50 states.
Get weekly plumbing tips and DIY guides delivered straight to your Facebook feed.
Look closely at the joint where the faucet connects to the supply pipe, usually visible from inside a basement, crawlspace, or utility area behind the exterior wall. A threaded connection has a visible pipe thread fitting with a hexagonal or ridged shape you can grip with a wrench. A soldered connection shows a smooth, seamless copper joint with no threads at all, since it was originally joined with heat and solder rather than mechanical fasteners. A push-fit connection has a distinctive plastic or metal collar around the pipe with no threads or solder joint visible, and releases only with a dedicated disconnect tool or clip. If you genuinely can’t tell after a close look, a photo of the connection point can help you — or a plumber — identify it correctly before you buy parts.
A frost-free sillcock works by placing its actual shutoff valve at the back of a long stem, positioned inside heated interior space rather than at the exterior wall face. If the sillcock you install is too short for your wall’s actual depth, that internal shutoff point ends up sitting in an unheated wall cavity or exterior sheathing instead of in genuinely heated space. In that situation, the small amount of water trapped between the valve and the wall face can still freeze during cold weather, which can crack the sillcock or the supply line — effectively recreating the exact freeze damage the frost-free upgrade was meant to prevent, just with a new part.
Yes, in many cases. Rather than re-soldering a new faucet directly to the existing copper pipe, you can cut the pipe cleanly behind the old faucet and install a push-fit or compression fitting that transitions to a threaded connection, letting you attach the new faucet without a torch. This approach works well for many homeowners who are comfortable with basic tools but not with sweating copper pipe. That said, cutting copper pipe cleanly and squarely still takes some care, and if you’re not confident doing that step correctly, this is a reasonable point to call a plumber instead.
A frost-free sillcock should be installed with a slight downward pitch toward the outside — generally just a small, gentle angle rather than anything dramatic — so that any residual water inside the long stem drains out by gravity once the valve is shut off. Without that pitch, water can pool inside the stem even after the faucet is closed, and that trapped water is exactly what freezes and cracks the unit during cold weather. Most sillcocks are designed to install with this pitch naturally when mounted correctly and level side-to-side, so the main thing to check is that the unit wasn’t accidentally installed tilted upward or perfectly horizontal.
Replacing an outdoor faucet is a project most homeowners can genuinely handle themselves, but the difficulty swings widely depending on what you find once you open up the connection. A threaded or push-fit connection is a straightforward swap with basic tools in under an hour; a soldered connection is a fair reason to call a plumber unless you’re already equipped and comfortable working with a torch. Whichever type you’re dealing with, the two details worth getting right are measuring correctly for your frost-free sillcock’s length so its shutoff point actually sits in heated space, and confirming the correct downward pitch so residual water drains out rather than freezing inside the stem next winter.
If you’re still choosing which faucet to install, our outdoor faucet reviews compare current frost-free and standard models in more detail. And once your new faucet is installed, our guide to how to winterize outdoor faucets covers the seasonal maintenance that keeps it protected each year — a different job from the full replacement covered here. For a broader look at protecting your home’s plumbing from cold weather, see our guide to how to prevent frozen pipes.
Prices and ratings may change. Always check Amazon for current prices.
✍️ About This Guide
PTR Editorial Team — Plumbing Guides. We compare manufacturer specifications, installation requirements, compatibility and available product documentation to help homeowners choose suitable tools and parts. How we review →
Not sure which tool fits your faucet nut? Identify the fixing, see how it lets go and check your clearance first. Then choose a tool, or use one you own.
Check your manual and the drain route first: gravity hose, built-in pump or external pump. Then see whether you need a dehumidifier hose at all.
Explore portable bidets that need no water-line connection, from bottle caps and squeeze bottles to battery-powered handhelds.

