
Guides
19 Oct 2026

Can’t Reach the Faucet Nut? Choose the Right Tool Before You Buy
Not sure which tool fits your faucet nut? Identify the fixing, see how it lets go and check your clearance first. Then choose a tool, or use one you own.
Step-by-step guide to replacing a kitchen faucet — basin wrench technique, supply lines, deck plates, and single vs multi-hole sinks.

Please note: Information in this guide is based on our research at time of writing and is subject to change. Always consult a licensed plumber for diagnosis of serious plumbing issues before attempting repairs.
Replacing a kitchen faucet is one of the highest-impact upgrades you can make in a kitchen, and it’s a job well within reach of most homeowners willing to spend an afternoon under the sink. Unlike a bathroom faucet swap, a kitchen faucet replacement usually means working in a deeper, more cluttered cabinet that’s often shared with a garbage disposal, a dishwasher supply line, and whatever cleaning supplies have accumulated over the years — so clearing space and having the right tool for the job matters more here than it does under a bathroom vanity. This is an intermediate-level job: the individual steps are straightforward, but reaching mounting nuts behind a deep sink basin and freeing connections that may not have been touched in decades take patience and the correct tool. If you haven’t chosen a new faucet yet, our guide to the best kitchen faucets can help you pick one. And if you’re tackling both fixtures, our guide to replacing a bathroom faucet covers that shallower, simpler job.
At a Glance
| Difficulty | Moderate |
| Time | 1–2 Hours |
| Cost | $$ — new faucet plus basic supplies |
| Tools Needed | Basin wrench, adjustable wrench, bucket, plumber’s tape (PTFE), flashlight, towels |
| Skill Level | Intermediate |
✏️ Our Take
Replacing a kitchen faucet is a genuine intermediate DIY job — not because the steps are complicated, but because working under a kitchen sink in a cramped cabinet while disconnecting old corroded connections is genuinely awkward. The basin wrench is the tool that makes or breaks this job: without it, reaching the mounting nuts behind the sink basin is nearly impossible. Buy one before you start, not after you’re already lying on the cabinet floor with water dripping on you.
IN THIS GUIDE
Gather everything before you start — once you’re under the sink with the water off, you don’t want to be crawling out repeatedly to grab a forgotten tool.
If you haven’t purchased a new faucet yet, our guide to the best kitchen faucets covers the main options for single-hole and multi-hole sink configurations.
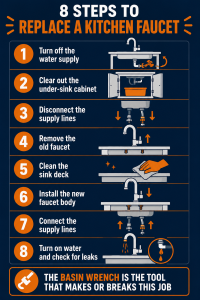
Step 1 — Turn Off the Water Supply
Locate the hot and cold shut-off valves under the sink and turn both fully clockwise to close them. These are usually small oval or lever handles on the supply lines coming out of the wall or floor, just above the P-trap.
Once both valves are closed, turn on the kitchen faucet — both hot and cold sides — to release any remaining pressure in the lines and drain the residual water that’s still sitting in the pipes. Let it run until the flow stops completely before you disconnect anything.
If no dedicated under-sink shut-off valves exist, or they’re painted or seized shut, turn off the home’s main water supply instead.
Remove everything from under the sink — cleaning supplies, trash bags, the garbage disposal’s spare parts, everything — to give yourself maximum working room. Kitchen sink cabinets accumulate clutter fast, and a full cabinet makes an already tight space nearly unworkable.
Lay down towels to protect the cabinet floor and catch any drips as you work. Then grab a flashlight or headlamp — kitchen sink cabinets are deep and dark, and you’ll be spending most of this job looking straight up into shadow, often around a garbage disposal unit or dishwasher drain line that further crowds the space.
Place a bucket under the supply line connections to catch any residual water still sitting in the lines. Using an adjustable wrench, loosen the supply line nuts by turning counterclockwise — one hand steadying the valve, the other turning the nut, to avoid twisting the whole line.
Older connections may put up more of a fight. If a nut won’t budge, apply penetrating oil and give it additional soak time before trying again rather than forcing it.
US regional note: In older homes across the Northeast and Midwest — particularly those built before 1970 — kitchen faucet supply line connections are often corroded brass or galvanized steel rather than modern braided stainless, and the mounting nuts may not have been turned in decades. Penetrating oil applied the night before and a longer soak time makes a significant difference on connections this old. Don’t force corroded connections — if a nut won’t turn after penetrating oil and a firm turn, cut the supply line rather than risk cracking the faucet seat.
Use the basin wrench to loosen and remove the mounting nuts underneath the sink deck. This is exactly the situation the basin wrench was designed for — its pivoting jaw grips the nut from below while the long handle gives you leverage in a space too tight for your arm and a standard wrench together.
Once the mounting nuts are off, the faucet body should lift straight up and out from above. Old putty or sealant around the base sometimes holds it in place a little longer — break it free with a putty knife if the faucet doesn’t lift free on the first try.
With the old faucet out, scrape away old putty, sealant or mineral deposits from around the faucet holes. Years of buildup around the base of a faucet is common and needs to come off completely before the new faucet goes in.
Clean the deck surface thoroughly — a clean surface ensures a proper seal for the new faucet and prevents the fresh gasket or sealant from bonding to old residue instead of the sink itself.
Read the manufacturer’s instructions for your specific faucet model before installing — mounting hardware and gasket setups vary more between kitchen faucet brands than you’d expect, and a few minutes reading now saves a return trip under the sink later.
Thread the supply lines and any mounting hardware down through the faucet hole from above, then get back underneath to finish the job. Hand-tighten the mounting nuts from below, then use the basin wrench to snug them — do not overtighten, since excessive force can crack the faucet base or the sink deck itself. Our guide to faucet cartridges is worth a look if you’re also planning to keep spare cartridges on hand for future maintenance.
Wrap PTFE tape clockwise around the threaded supply valve stems before connecting — two or three wraps is enough for a good seal without excess tape bunching in the fitting.
Hand-tighten the supply line nuts first, then snug them with a wrench — a quarter turn past hand-tight is typically sufficient. Do not overtighten; supply line nuts are designed to seal with moderate torque, not maximum force, and over-tightening can deform the seal and cause the exact leak you’re trying to prevent.
Turn the shut-off valves back on slowly. Run both hot and cold water through the new faucet for about 30 seconds to clear any debris and confirm normal flow.
Check every connection point with a dry cloth — even a slow drip will show on dry fabric that a quick visual check might miss. Pay particular attention to the supply line connections and the mounting nuts under the sink deck.
Sink deck configuration is one of the most common places this job goes sideways — confirming yours before you buy a faucet saves a frustrating return trip to the store.

1-hole sinks require a single-hole faucet — confirm this before buying, since a faucet designed for a 3-hole deck won’t work without additional holes being drilled.
3-hole sinks accept most standard faucets. If your new faucet only requires 1 hole for the body, use a deck plate to cover the two unused holes for a clean, finished look.
4-hole sinks have a fourth hole that’s typically used for a side spray or a soap dispenser, separate from the faucet body itself.
Sometimes a job is too big for DIY — badly corroded connections, a cracked supply line, or a sink deck that’s harder to reach than expected. If you need a licensed plumber in your area, search PlumberArchive.com — the US plumber directory with 12,000+ verified local plumbers across all 50 states.
Get weekly plumbing tips, honest tool reviews and DIY guides delivered to your Facebook feed.
Most kitchen faucet replacements are within reach of a homeowner with basic tools and some patience — it’s an intermediate job rather than a beginner one, mainly because of the cramped working space and the possibility of stubborn, corroded connections. A basin wrench solves most of the access problem. Call a plumber if you encounter corroded connections that won’t budge even after penetrating oil, a cracked supply line, or unexpected damage once the old faucet is removed.
Budget 1 to 2 hours for a straightforward swap where the new faucet matches your existing sink hole configuration and the old connections come apart without a fight. Older homes with corroded or seized supply line connections can take longer, especially if you need to let penetrating oil soak before a connection will turn.
A basin wrench is a long-handled tool with a pivoting jaw at one end, designed specifically to reach and turn the mounting nuts behind a deep sink basin — a spot a standard wrench or socket simply cannot reach because of the limited clearance and awkward angle. Yes, you need one. Attempting this job without a basin wrench is the single biggest reason DIY kitchen faucet replacements stall out or turn into an unplanned trip to the hardware store.
Look at the sink deck around your current faucet — count every hole, including ones currently covered by a soap dispenser, side spray, or a blank deck plate. A standard kitchen sink has 1, 3, or 4 holes. If you’re replacing a faucet with an identical hole count, any faucet designed for that configuration will fit. If you’re switching faucet types, confirm the new faucet’s hole requirement against what your sink deck actually has before buying, since a mismatch may require a deck plate or, in some cases, drilling.
A basin wrench and patience with old connections are the two things that determine whether this job goes smoothly. The mounting nuts behind a deep sink basin are the one obstacle a standard wrench can’t solve — don’t skip buying one before you start.
Replace the supply lines at the same time as the faucet — they’re inexpensive and often just as old as the faucet you’re removing, so reusing them just delays the next repair. And always check for leaks immediately after turning the water back on, then again after 10 minutes under pressure, since some slow leaks only reveal themselves once the connections have had time to settle.
If you haven’t picked a new faucet yet, our guide to the best kitchen faucets covers the top options for every sink configuration. If you’re also due for a bathroom update, our guide to replacing a bathroom faucet covers that shallower, simpler job. And for ongoing maintenance once your new faucet is installed, our guide to faucet cartridges is worth bookmarking for when a cartridge eventually needs replacing.
✍️ About This Guide
PTR Editorial Team — Plumbing Guides. We compare manufacturer specifications, installation requirements, compatibility and available product documentation to help homeowners choose suitable tools and parts. How we review →
Not sure which tool fits your faucet nut? Identify the fixing, see how it lets go and check your clearance first. Then choose a tool, or use one you own.
Check your manual and the drain route first: gravity hose, built-in pump or external pump. Then see whether you need a dehumidifier hose at all.
Explore portable bidets that need no water-line connection, from bottle caps and squeeze bottles to battery-powered handhelds.

