Please note: Information in this guide is based on our research at time of writing and is subject to change. Always consult a licensed plumber for diagnosis of serious plumbing issues before attempting repairs.
Introduction
Sediment builds up inside every water heater tank over time — minerals from your water supply gradually settle at the bottom of the tank and accumulate with every passing month. Most homeowners never notice because the buildup is invisible from the outside, but it quietly reduces heating efficiency, causes the unit to work harder, and shortens the lifespan of a tank that costs well over a thousand dollars to replace. Flushing removes this buildup and is one of the most impactful maintenance tasks any homeowner can do themselves.
This guide walks through the full process safely from start to finish — eight steps that take between 30 and 60 minutes using tools most homeowners already have on hand. Before you start, it helps to have the right equipment ready: our guide to the best water heater flush tools covers what to have on hand. And if your tank has already been making noises or running poorly, check our guide to the signs your water heater is failing before proceeding — a very old or already-damaged tank may need more than a flush. It’s also worth checking the anode rod while the tank is drained — our roundup of the best water heater anode rods covers what to look for and when to replace it.
At a Glance
| Difficulty |
Easy to Moderate |
| Time |
30–60 Minutes |
| Cost |
$ — Under $30 for tools if needed |
| Tools Needed |
Garden hose, bucket, flathead screwdriver, work gloves |
| Skill Level |
Beginner |
✏️ Our Take
Flushing a water heater is one of the most overlooked maintenance tasks in any home, mainly because it’s invisible — you can’t see sediment building up inside a sealed tank. The process itself is genuinely simple and takes under an hour, but skipping it for years is one of the most common reasons water heaters fail early. If you’ve never flushed yours and it’s more than a year old, expect the water to come out cloudy or rust-colored the first time — that’s completely normal and a sign the flush was overdue.
Why Flushing Your Water Heater Matters
Every water supply contains dissolved minerals — primarily calcium and magnesium — that separate from the water as it heats. Over months and years, these minerals settle at the base of the tank as a layer of solid sediment. The problem is structural: that sediment layer sits between the burner or heating element and the water above it, forcing the unit to run longer and hotter to reach the same temperature. The result is higher energy bills, reduced heating efficiency, and a heating element or tank lining under more thermal stress than it was designed to handle.
The most audible symptom is a popping or rumbling noise during heating cycles — that’s water trapped beneath or within the sediment layer boiling and escaping. The longer the buildup is left in place, the harder it becomes to remove and the more damage it does. Annual flushing removes the sediment while it’s still loose, improves recovery time, lowers energy consumption, and meaningfully extends the working life of the tank.
💡 Tip: If your water heater makes popping or rumbling sounds, that’s sediment hitting the heating element — a clear sign a flush is overdue. The longer you wait, the more compacted the buildup becomes.
What You’ll Need
This job requires no specialist plumbing tools. Most homeowners already have everything needed on hand. Before starting, gather the following:
- Garden hose — long enough to reach a floor drain, outdoor area, or drainage point away from the tank
- Bucket — for the first few gallons until the hose is running freely
- Flathead screwdriver — needed if your tank has a gate-style drain valve rather than a ball valve
- Work gloves — hot water and steam are present throughout the process
For a full overview of what’s available including upgraded drain valves and sediment removal tools, see our guide to the best water heater flush tools.
💡 Tip: A ball-style drain valve flushes faster and more completely than the standard plastic gate valve most tanks ship with — many homeowners upgrade theirs during their first flush. It’s a straightforward swap that makes every future flush easier.
Step 1 — Turn Off Power or Gas
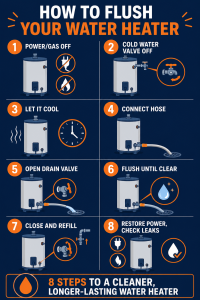
Before touching the drain valve or any water connections, the heat source must be off. For an electric water heater, locate the dedicated circuit breaker in your electrical panel — typically labeled “water heater” — and switch it fully off. For a gas water heater, turn the gas valve on the unit to the “pilot” setting, which keeps the pilot light lit but stops the main burner from firing. On some older models you may need to turn it fully off — check your unit’s manual if unsure.
This step is not optional and cannot be deferred until later in the process. Draining a tank while the power or gas is still active exposes the heating elements or burner to conditions they are not designed to handle.
⚠️ Warning: Never drain a water heater tank with the power or gas still on — electric heating elements can burn out instantly if exposed to air while powered, and this is an expensive repair. Always cut power at the breaker or shut down the gas before draining.
Step 2 — Turn Off the Cold Water Supply
Locate the cold water shut-off valve at the top of the water heater — it’s on the inlet pipe that feeds cold water into the tank. Turn it clockwise until it stops to close it fully. This prevents fresh water from continuing to enter the tank while you drain it, which would slow the process and dilute any sediment you’re trying to flush out.
The shut-off valve is almost always directly above the tank. If your tank has a dedicated shut-off at a panel or elsewhere, use that one — the goal is to isolate the tank from the incoming supply before draining.
💡 Tip: If your shut-off valve is stiff or won’t turn, don’t force it — a stuck valve is worth fixing before it fails during an emergency. A valve that seizes completely is far worse to discover during an active leak than during a planned maintenance session.
Step 3 — Let the Water Cool
If the water heater has been in use recently, wait at least 30 minutes before proceeding to the drain valve. Water inside a standard residential tank reaches temperatures of 120–140°F during normal operation — draining it immediately after use means hot water flowing through the hose and into your drain or outdoor area at temperatures that can cause serious scalding burns on contact.
If the tank hasn’t been used in several hours, cooling time is less critical. When in doubt, wait the 30 minutes — it costs nothing and eliminates the burn risk entirely. You can use the waiting time to route your garden hose to the drain point and set up your bucket.
⚠️ Warning: Water heater tanks can reach 140°F or higher — draining immediately after use risks serious scald burns. Always allow cooling time first. This step is particularly important if children or elderly family members are nearby during the process.
Step 4 — Connect a Garden Hose to the Drain Valve
The drain valve is located near the bottom of the water heater tank — it looks similar to a standard hose bib or outdoor spigot. Thread the garden hose onto the drain valve and hand-tighten until it’s secure. A loose connection will spray water when you open the valve, so take the extra moment to make sure the fit is firm before proceeding.
Run the other end of the hose to your chosen drainage point — a floor drain, a utility sink, or an outdoor area where sediment-laden water can drain safely. Keep in mind that the first water out of a neglected tank may be discolored or contain visible sediment particles, so routing it to a floor drain or outdoors is preferable to a sink if possible.
💡 Tip: Running the hose outside or to a floor drain is much easier than repeatedly emptying buckets — plan your hose route before starting. Confirm the hose is long enough to reach without kinking, which would slow drainage significantly.
Step 5 — Open the Drain Valve
Before opening the drain valve, open the pressure relief valve at the top of the tank. This small lever-operated valve lets air into the tank as water drains out, preventing a vacuum from forming inside. On some setups you can alternatively open a hot water tap at a nearby fixture to accomplish the same thing — either method works.
With air entry established, open the drain valve fully. If it’s a gate-style valve, use your flathead screwdriver to turn it counterclockwise until it stops. If it’s a ball-style valve, rotate the lever 90 degrees to the open position. Water should begin flowing through the hose immediately. Place your bucket at the hose end to catch the initial flow while you confirm drainage is working correctly before leaving it unattended.
💡 Tip: Opening the pressure relief valve first prevents a vacuum from forming inside the tank, which otherwise slows drainage significantly. If your pressure relief valve hasn’t been operated in years, open it gently — stiff valves can drip after being operated for the first time.
Step 6 — Flush Until Water Runs Clear
Once most of the standing water has drained from the tank, briefly open the cold water supply valve to allow fresh water to flow in and stir up any remaining sediment settled at the base. Let this run for a minute or two to agitate the buildup, then close the supply again and let the sediment-laden water drain out completely through the hose.
Repeat this stir-and-drain process two to three times, or until the water flowing out of the hose runs clear with no visible particles or discoloration. On a tank that hasn’t been flushed in several years, expect to repeat more cycles — the first flush often takes longer than subsequent annual flushes once a regular maintenance rhythm is established.
US regional note: In hard water states like Arizona, Texas, Nevada and Southern California, sediment builds up significantly faster due to higher mineral content in the water supply — homeowners in these states should expect heavier initial buildup and may need additional flush cycles to achieve clear water. In softer water regions like the Pacific Northwest and New England, the process is typically faster with less sediment volume to clear.
💡 Tip: The first flush on a neglected tank often runs cloudy or rust-colored for several minutes — this is normal and means the flush is working. Don’t stop early; continue until the water runs visibly clear before moving to the next step.
Step 7 — Close the Drain Valve and Refill
Once the water runs completely clear, close the drain valve fully — clockwise on a gate valve, or quarter-turn to closed on a ball valve. Then close the pressure relief valve or the hot water tap you opened for air entry. With both closed, turn the cold water supply valve back on to begin refilling the tank.
As the tank fills, keep a hot water tap open at a nearby fixture — a bathroom or kitchen sink will do. This allows air to escape from the top of the tank as water fills from the bottom. When water flows steadily from the tap with no sputtering or air bursts, the tank is full. Close the tap and proceed to Step 8.
⚠️ Warning: Never turn the power back on to an electric water heater before the tank is completely full — heating elements exposed to air will burn out immediately, often requiring a full element replacement. Confirm the tank is full via a running hot tap before restoring power.
Step 8 — Restore Power and Check for Leaks
With the tank confirmed full, restore power at the breaker for electric units, or return the gas valve to its normal operating setting for gas units. The tank will now begin heating the fresh water. Allow the full heating cycle to complete — typically 30 to 60 minutes depending on tank size — before testing hot water output at a tap. If the pilot light went out during the process on a gas unit, our guide to how to relight a water heater pilot light walks through the restart procedure.
While waiting, inspect the drain valve and all nearby connections for any signs of dripping. Drain valves that haven’t been operated in years sometimes develop a slow drip after being opened and closed for the first time — wrapping the valve stem with plumber’s tape and retightening usually resolves this. Check the pressure relief valve discharge pipe as well.
💡 Tip: Check the drain valve again after a few hours — a slow drip that wasn’t visible immediately can appear once the tank is back under full operating pressure. Catching it now means a simple fix rather than water damage discovered later.
How Often Should You Flush
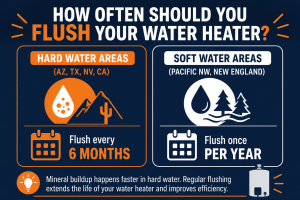
For most US households, flushing once per year is the standard recommendation for tank water heaters. Annual flushing keeps sediment from accumulating to the point where it becomes difficult to remove, maintains consistent heating efficiency, and ensures the drain valve operates freely each time rather than seizing from disuse.
Homeowners in hard water areas — Arizona, Texas, Nevada, Southern California, and other regions with high mineral content in the water supply — should flush every six months. The higher mineral load means sediment builds up at roughly double the rate of soft water regions, making twice-yearly maintenance the correct interval rather than an optional extra. In soft water regions like the Pacific Northwest and New England, annual flushing is typically sufficient.
Tankless water heaters require a different approach — they don’t accumulate sediment in the same way, but mineral scale builds up on the heat exchanger and requires an isolator valve flush rather than this drain-and-refill method. For more on sizing and long-term maintenance planning, see our water heater sizing guide.
💡 Tip: Mark your flush date on a calendar or phone reminder — this is the maintenance task most homeowners forget until something goes wrong. Setting a recurring annual reminder costs nothing and consistently prevents the neglect that shortens water heater lifespans.
Need a Professional Plumber?
If your inspection reveals a stuck drain valve, a pressure relief valve that won’t reseat, or a tank that’s been making concerning noises for years and may need professional assessment, a licensed plumber is the right call. Getting a professional involved before a failure — not after — is always the lower-cost outcome.
Find a licensed plumber in your area at PlumberArchive.com — the US plumber directory with 12,000+ verified local plumbers across all 50 states.
Find a trusted plumber near you → PlumberArchive.com
Follow Us on Facebook
Get weekly plumbing tips, honest tool reviews and DIY maintenance guides delivered straight to your Facebook feed. We cover water heater maintenance, seasonal plumbing checks, drain clearing and everything in between — written for US homeowners who want to handle more themselves.
Follow PlumbingToolsReview on Facebook →
Frequently Asked Questions
Q: How often should I flush my water heater?
For most US households, once per year is the standard recommendation. If you live in a hard water region — Arizona, Texas, Nevada, Southern California, or anywhere with water hardness above 10 grains per gallon — flush every six months. Higher mineral content in the water supply causes sediment to build up at roughly double the rate of soft water areas. Annual flushing is the minimum maintenance cadence; twice-yearly is the correct interval in hard water states. If you’ve never flushed your tank and it’s more than two years old, start as soon as possible — the longer sediment sits, the more compacted it becomes and the more effort the first flush requires.
Q: Is it normal for water to be cloudy or rusty when flushing?
Yes — completely normal, and it’s actually a sign the flush is working. The discoloration comes from mineral sediment that has accumulated at the base of the tank being stirred up and carried out through the drain valve. On a tank that hasn’t been flushed in a year or more, the first few gallons will often run visibly cloudy, yellowish, or rust-colored. Continue flushing with repeated stir-and-drain cycles until the water runs clear before closing the valve and refilling. If the water doesn’t clear after multiple cycles, that may indicate rust from the tank lining itself — in that case, consult our guide to the signs your water heater is failing.
Q: Can I flush my water heater myself or do I need a plumber?
For a standard tank water heater in normal working condition, this is a straightforward DIY job that most homeowners can complete in under an hour with tools they already own. No specialist plumbing knowledge or tools are required. The steps in this guide cover the process completely. A plumber is warranted if you discover a drain valve that is seized shut and won’t open, a pressure relief valve that won’t reseat after being operated, or if the tank is very old and shows other signs of wear alongside the sediment. For tankless water heaters, the process is different and may involve more complex isolator valve work — that setup is worth a professional consult on the first visit.
Q: What happens if I never flush my water heater?
Sediment accumulates on the bottom of the tank year after year, building into a progressively thicker insulating layer between the burner and the water. The unit has to run longer and hotter to reach temperature, driving up energy bills and stressing the tank lining. Over time this causes popping and rumbling sounds during heating cycles, reduced hot water volume and recovery speed, and eventually premature failure — often years earlier than a well-maintained tank would last. In severe cases, heavy sediment buildup causes overheating and tank damage that manufacturers specifically exclude from warranty coverage. A water heater that is never flushed will consistently fail earlier and cost significantly more to operate than one maintained annually.
Conclusion
Flushing a water heater takes under an hour and meaningfully extends the life of a tank that costs well over a thousand dollars to replace. The process requires no specialist tools and no plumbing knowledge beyond what’s covered in this guide — it’s one of the highest-return maintenance tasks any homeowner can add to their annual routine.
The two rules that matter most: always cut power before draining — electric elements exposed to air while powered burn out immediately, and that’s an expensive repair — and always let the tank cool before opening the drain valve to avoid scalding burns. Follow those two steps and the rest is straightforward.
If you’re in a hard water state, flush every six months rather than once a year — the higher mineral load makes the difference between a useful annual flush and one that barely keeps up. And if your tank has already been making noises or running poorly, check our guide to the signs your water heater is failing alongside this flush to assess whether the unit needs more than maintenance. For full tool recommendations, the guide to the best water heater flush tools covers what to have on hand. And for long-term planning on sizing and replacement, see our water heater sizing guide.
✍️ About This Guide
PTR Editorial Team — Plumbing Guides. We compare manufacturer specifications, installation requirements, compatibility and available product documentation to help homeowners choose suitable tools and parts. How we review →