Introduction
Low shower pressure is one of the most frustrating bathroom problems a homeowner can face. A weak trickle where you expect a powerful spray makes rinsing off feel like a chore — and a slow shower wastes more time than water. The frustrating part is that the cause could be anything from a five-minute fix to a job that needs a licensed plumber.
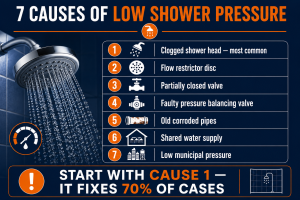
The good news is that the most common causes of low shower pressure are completely DIY fixable in under an hour and cost nothing at all. This guide walks through 7 causes in order from most to least common — starting with the simplest fixes and working toward more serious plumbing issues. If you are also considering a new shower head or replacement shower valves, check those guides once you have diagnosed the cause — upgrading to the right fixture can make a significant difference to pressure and flow.
⚡ AT A GLANCE
| Difficulty |
Easy to Moderate |
| Time |
30 Minutes – 2 Hours |
| Cost |
$ – $$ |
| Tools Needed |
Adjustable wrench, white vinegar, screwdriver |
| Skill Level |
Beginner |
🔧 OUR TAKE
Low shower pressure is almost always caused by one of three things — a clogged shower head, a partially closed valve, or a pressure balancing issue at the shower valve. The good news is that the most common cause (mineral deposits in the shower head) takes 30 minutes and costs nothing to fix. Work through these causes in order before calling a plumber.
Cause 1 — Clogged Shower Head
This is the single most common cause of low shower pressure in US homes, and the most satisfying to fix because it is completely free. Over time, mineral deposits — primarily calcium and magnesium — build up inside the spray nozzles of your shower head, gradually blocking the holes that water passes through. The result is a patchy, weak spray that gets worse month by month.
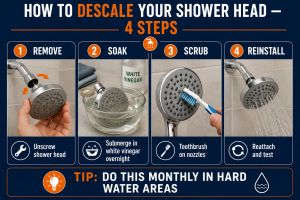
The fix is simple. Unscrew the shower head by turning it counter-clockwise (use an adjustable wrench if it is stiff — wrap the fitting in a cloth first to protect the finish). Place the shower head in a bowl or bag filled with undiluted white vinegar and leave it to soak overnight, or for at least two hours if you need a quicker result. After soaking, use an old toothbrush to scrub the nozzle holes, rinse thoroughly under a tap, then reinstall and test. In most cases, pressure is fully restored.
US Regional Context: In hard water states like Arizona, Texas, Nevada, and Southern California, mineral buildup in shower heads is the single most common cause of low shower pressure — calcium and magnesium deposits clog the spray nozzles within 6–12 months in areas with very hard water. A monthly white vinegar soak prevents this entirely. If you live in one of these states and your pressure has been gradually declining, a clogged shower head is almost certainly the culprit. Check out our guide to the best shower heads if yours is too far gone to clean effectively — modern models with rubber nozzles resist mineral buildup far better than older designs.
💡 Tip: A monthly 30-minute vinegar soak prevents mineral buildup entirely — the simplest maintenance habit for any shower. Fill a zip-lock bag with white vinegar, submerge the shower head while it is still attached to the wall, and secure the bag around the neck with a rubber band.
Cause 2 — Flow Restrictor
If your shower head is clean but pressure is still low, the next thing to check is the flow restrictor. Many modern shower heads — particularly those sold in the United States after the 1992 Energy Policy Act — include a small plastic disc inside the inlet that limits water flow to 2.5 gallons per minute (GPM) or less. While this saves water, it can feel restrictive if your home already has moderate water pressure.
To locate it, unscrew the shower head from the arm. Look inside the inlet — you will see a small plastic disc, usually colored (red, white, or green) with a small hole in the center. This is the flow restrictor. Remove it carefully using needle-nose pliers or a small flathead screwdriver, taking care not to damage the surrounding threads or the O-ring seal. Reinstall the shower head and test the pressure. The difference is often immediate and noticeable.
⚠️ Warning: Removing a flow restrictor increases water usage — check local water regulations before removing in drought-prone states like California and Arizona, where low-flow requirements may be legally mandated in some jurisdictions. If you are renting, check with your landlord before making this change.
Cause 3 — Partially Closed Valve
This is one of the easiest causes to overlook and one of the easiest to fix. Your home’s water supply runs through two critical shut-off valves — the main water supply valve at the meter, and individual shut-off valves that serve different areas of the house. If either was partially closed during maintenance work and never fully reopened, your shower pressure will be reduced even though there is no actual plumbing fault.
Start by checking the shut-off valve under the bathroom sink or nearest to the bathroom — it should be fully open. Then locate the main water supply valve where your service line enters the house (typically near the water meter, in a utility room, basement, or outside wall). Both valves must be completely open to allow full pressure through.
There are two common valve types. Gate valves (round wheel handle) are fully open when the handle is turned counter-clockwise until it stops. Ball valves (lever handle) are fully open when the lever is parallel to the pipe — if it is perpendicular (at 90 degrees to the pipe), it is fully closed.
💡 Tip: A valve that is even 10% closed can reduce shower pressure significantly — always check these first before assuming a more serious issue. This takes two minutes and costs nothing.
Cause 4 — Faulty Pressure Balancing Valve
Inside your shower wall sits a pressure balancing valve — also called a thermostatic cartridge or shower cartridge — that controls both the water temperature and the balance between hot and cold supply. This valve wears out over time. As the internal cartridge degrades, it restricts flow through the shower valve, reducing pressure even when the supply pipes are delivering full pressure to the valve body.
A worn cartridge is a common cause of low shower pressure in homes where the shower is 10 or more years old and has never had the valve serviced. You can often confirm this is the issue by checking pressure at a bathroom faucet on the same supply line — if that runs fine but the shower is weak, the shower valve cartridge is the likely culprit. See our guide to the best shower valves for help choosing a replacement if the valve body itself needs updating.
Cartridge replacement is a DIY-possible job for a confident homeowner. Shut off the water supply to the bathroom, remove the shower handle and trim plate, extract the old cartridge (noting its orientation), and insert a matching replacement cartridge. Cartridge model numbers are typically stamped on the old part or printed in the valve documentation. Many manufacturers — Moen, Delta, Kohler — sell replacement cartridges specifically for their valve models.
⚠️ Warning: If pressure drops suddenly when another fixture runs — such as when a toilet flushes or a washing machine fills — this is classic pressure balancing valve failure. A plumber can replace the cartridge in under an hour, and the part cost is typically in the $ range.
Cause 5 — Old or Corroded Pipes
Homes built before 1970 often have galvanized steel supply pipes. While galvanized steel was the standard at the time, it corrodes from the inside out over decades — rust and mineral deposits accumulate along the interior walls, gradually narrowing the pipe’s bore and restricting water flow. Unlike a clogged shower head, corroded pipes restrict pressure throughout the entire home, not just at one fixture.
Signs that corroded pipes are the issue include low pressure at multiple fixtures simultaneously, water that appears rusty or brown (particularly after the supply has been off for a while), and a home built before 1970 that has never been repiped. You can confirm by checking the supply pipe material — galvanized steel pipes have a dull grey appearance and a threaded connection style, and will show visible rust or discoloration on their exterior as they age.
Unfortunately, there is no DIY fix for corroded pipes. The only permanent solution is repiping — replacing the old galvanized supply lines with modern materials. PEX (cross-linked polyethylene) tubing is the most popular choice for repipe projects today: it is flexible, resistant to corrosion and freezing, and significantly cheaper to install than copper. Copper remains an excellent choice for durability and longevity.
💡 Tip: If your home has galvanized steel supply pipes and low pressure throughout — repiping with PEX or copper is the only permanent fix. Get multiple quotes and ask your plumber about a partial repipe if the issue is isolated to one bathroom.
Cause 6 — Shared Water Supply
In some older homes, the supply pipes that feed the bathroom were sized for the water demands of a different era — before dishwashers, washing machines, and multiple showers became standard household fixtures. When multiple fixtures draw water simultaneously, the pipes simply cannot deliver enough volume to maintain strong pressure at any single point.
The test for this is simple: shower when no other water is running anywhere in the house. If pressure is good in isolation but drops when someone runs a tap, flushes a toilet, or starts the dishwasher, the shared supply line is undersized for your current demand. This is common in homes built before 1960 where 1/2-inch supply lines are still in place — modern best practice is 3/4-inch main supply lines with 1/2-inch branches to individual fixtures.
The solution depends on severity. A pressure booster pump installed on the main supply line can compensate for low pressure in moderate cases and is a plumber-installed item that typically runs in the $$ range including labor. For homes with seriously undersized pipes, repiping with larger-diameter lines is the more comprehensive fix.
💡 Tip: If pressure is fine when showering alone but drops when someone flushes or runs a tap elsewhere — undersized supply pipes are the cause, not a faulty shower head or valve. A plumber can assess the pipe diameter and recommend the right fix.
Cause 7 — Low Municipal Water Pressure
If you have checked everything above and pressure is consistently low at all fixtures throughout the home, the problem may originate at the street — not inside your house. Municipal water suppliers deliver water at a set pressure, but this can vary by neighborhood, by time of day, and by demand on the local network. Standard US residential water pressure runs between 40 and 80 PSI. Below 40 PSI is considered low and will result in noticeably weak showers.
Call your water supplier and ask them to confirm the pressure at the street connection to your property. They can often test this remotely from meter data or dispatch a technician. If street pressure is adequate, check the pressure reducing valve (PRV) — a bell-shaped device typically fitted to the main supply pipe where it enters the house, sometimes near the water meter or in a utility space. The PRV has an adjusting screw on top: turning it clockwise increases downstream pressure, counter-clockwise reduces it. The factory setting is usually around 50–60 PSI. Before adjusting, attach a water pressure gauge to the nearest hose bib to get a baseline reading. See our guide on how to increase water pressure for step-by-step PRV adjustment instructions.
⚠️ Warning: Never adjust the pressure reducing valve above 80 PSI — this can damage appliances, water heaters, and pipe fittings, and will void the warranty on many plumbing fixtures. If you are unsure how to adjust the PRV safely, call a licensed plumber.
How to Prevent Low Shower Pressure
Most cases of declining shower pressure are preventable with a small amount of regular maintenance. These four habits will keep your shower running at full pressure year-round:
- Monthly vinegar soak on the shower head — prevents mineral buildup before it becomes a flow problem. Fill a bag with white vinegar, secure it around the shower head with a rubber band, leave for 30 minutes, and rinse.
- Annual check of all supply shut-off valves — confirm every valve in the bathroom is fully open. Valves left partially closed after a repair are a surprisingly common cause of unexplained pressure loss.
- Install a water softener in hard water areas — in states like Arizona, Nevada, Texas, and Southern California, a whole-home water softener prevents the mineral deposits that clog shower heads, nozzles, and valves. It also extends the life of your water heater and appliances.
- Check PRV setting every 2–3 years — pressure reducing valves can drift over time. A quick check with an inexpensive pressure gauge keeps your supply in the optimal 50–70 PSI range.
💡 Tip: A simple water pressure gauge screws onto any hose bib and gives you an instant reading of your home supply pressure. Check it once a year — it takes 30 seconds and tells you immediately if your PRV needs adjusting or if street pressure has dropped. Our guide to
how to test water pressure walks through the full process step by step.
Need a Professional Plumber?
Some shower pressure issues — corroded pipes, PRV faults, or undersized supply lines — need a licensed plumber to fix properly. If you need a trusted professional in your area, search PlumberArchive.com — the US plumber directory with 12,151+ verified plumbers across all 50 states.
Find a trusted plumber near you →
Frequently Asked Questions
Q: What is normal shower water pressure?
Normal US residential water pressure runs between 40 and 80 PSI, with most homes sitting comfortably in the 50–70 PSI range. In terms of shower experience, this translates to a strong, even spray with a flow rate of around 2.0–2.5 gallons per minute from a standard shower head. If your shower feels noticeably weak, pressure below 40 PSI is often the underlying cause — test with an inexpensive pressure gauge at a hose bib to get your baseline reading.
Q: Why does my shower pressure drop when the toilet flushes?
This is a classic sign of a pressure balancing valve issue inside the shower wall, or undersized supply pipes that cannot maintain pressure to multiple fixtures simultaneously. A functioning pressure balancing valve should compensate automatically when another fixture draws water — if yours does not, the internal cartridge is likely worn and needs replacing. A plumber can assess and replace the cartridge in a single visit. See Cause 4 above for more detail.
Q: Can I increase shower pressure myself?
Yes — in most cases. Cleaning a clogged shower head, removing the flow restrictor, and ensuring all supply valves are fully open are all easy DIY fixes that take under an hour. Adjusting the pressure reducing valve is also something a confident DIYer can do safely with a pressure gauge for reference. However, fixing corroded pipes, replacing a shower valve cartridge, or installing a pressure booster pump are better handled by a licensed plumber unless you have plumbing experience. If street pressure is consistently low throughout the home, our roundup of the best water pressure booster pumps covers the options for raising it at the source.
Q: How do I know if my shower head needs replacing?
If you have soaked the shower head in white vinegar, scrubbed the nozzles clean, and pressure is still uneven or weak — with some nozzles spraying sideways or not at all — the shower head is likely beyond cleaning and should be replaced. Rubber nozzles crack and degrade over time, and the internal components of older shower heads can corrode in a way that vinegar cannot address. A new shower head is one of the most affordable and impactful bathroom upgrades you can make. See our guide to the best shower heads for options across all price ranges.
Conclusion
Low shower pressure is almost always fixable — and in most homes, the fix takes less than an hour and costs nothing. Work through the causes in order: start with the shower head. A white vinegar soak resolves roughly 70% of low pressure complaints on its own, especially in hard water areas. If that does not restore pressure, check the flow restrictor and all supply valves before moving on to the shower valve cartridge.
- Start here: Remove and soak the shower head in white vinegar overnight.
- If still low: Remove the flow restrictor disc inside the shower head inlet.
- Check valves: Confirm all shut-off valves are fully open — both bathroom and main.
- Shower valve: If pressure drops when other fixtures run, the cartridge likely needs replacing.
- Call a plumber: Corroded pipes, undersized supply lines, or street pressure issues need professional assessment.
If you are dealing with low pressure throughout the entire home, that is a sign the issue is upstream of the shower — at the PRV, the supply pipes, or the municipal connection. For tips on tackling the broader problem, see our guide on how to increase water pressure throughout your home. And if a replacement is the right call, our guides to the best shower heads and best shower valves will help you find the right upgrade.
✍️ About This Guide
PTR Editorial Team — Plumbing Guides. We compare manufacturer specifications, installation requirements, compatibility and available product documentation to help homeowners choose suitable tools and parts. How we review →