
Guides
19 Oct 2026

Can’t Reach the Faucet Nut? Choose the Right Tool Before You Buy
Not sure which tool fits your faucet nut? Identify the fixing, see how it lets go and check your clearance first. Then choose a tool, or use one you own.
How to replace a toilet flange step by step: identifying the flange type, repair ring vs full replacement, setting it flush, new bolts, and leak-testing.

Please note: Information in this guide is based on our research and hands-on experience at time of writing and is subject to change. Always follow the directions supplied with the specific flange, wax ring, and toilet you are using, and consult a licensed plumber if you run into conditions beyond the scope of this guide.
A toilet flange — also called a closet flange — is the round fitting that anchors the toilet to the floor and connects its outlet to the drain below. It does two jobs: a slotted ring holds the two closet bolts that clamp the toilet down, and a flat face gives the wax ring a firm surface to seal against. It should sit with its face at or slightly above the finished floor. When it is intact and at the right height you never think about it; when it cracks, corrodes, or sits too low, the toilet loosens and water works its way out at the base.
Three signs point to the flange. The first is a visible crack, usually through a bolt slot, so the closet bolt pulls up through the broken slot when you tighten the toilet. The second is corrosion — an older steel, brass, or cast-iron ring rusting until it is thin or partly gone. The third is a toilet that still rocks or leaks at the base after a fresh wax ring and evenly tightened bolts. Before pulling the toilet on that assumption, our guide to how to fix a toilet that rocks or wobbles walks through the full diagnosis — loose bolts, an uneven floor, and worn shims cause the same symptoms and are far quicker to fix.
This guide picks up once the toilet is off and you have confirmed the flange is the problem. It covers identifying the flange type, choosing between a repair ring and a full replacement, doing either job, fitting new closet bolts, and reseating the toilet. It keeps the wax-ring choice brief — our comparison of a wax ring vs a wax-free toilet seal covers that decision and the flange-height math, and this guide links out to it rather than repeating it. If your flange is fine and you’re setting a new toilet, our step-by-step guide to installing a toilet covers the whole job.
At a Glance
| Skill Level | Intermediate DIY. A repair ring is a 15-minute job; cutting out a cast-iron flange is a real project. Handling a heavy toilet alone is the main difficulty. |
| Tools Needed | A new wax ring (or wax-free seal) and new closet bolts; a repair/reinforcement ring or a replacement flange to suit your pipe; an adjustable wrench, screwdriver, and putty knife; rags to plug the drain; a sponge or shop vacuum. For a full replacement add a hacksaw, an oscillating multi-tool or inside pipe cutter, and either PVC primer and cement or a drill and corrosion-resistant screws. |
| Time Needed | About 30 to 45 minutes for a repair ring; 1 to 2 hours for a full replacement, longer if an old cast-iron flange has to be cut out. |
| Critical First Step | Shut the water off at the stop valve and fully empty the tank and bowl before you unbolt anything. Flush and hold the handle, sponge or vacuum out what is left, and disconnect the supply line — a toilet lifted with water in it pours it across the floor. |
✏️ Our Take
Most homeowners assume a bad flange means cutting one out and gluing a new one in. Far more often, a stainless or brass repair ring screwed down over the existing flange — or a flange spacer to bring a recessed one up to floor level — fixes it in under an hour, with no cutting and no glue. Save full replacement for a flange cracked all the way around, rusted to pieces, or sitting so low a spacer stack cannot reach. Whichever route you take, the two things that decide whether the repair lasts are getting the flange face flush with the finished floor and setting the wax ring square before you lower the toilet straight down without rocking it.
IN THIS GUIDE
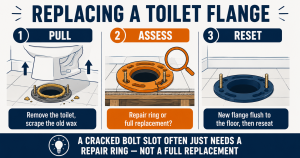
Turn off the water at the stop valve, then flush and hold the handle to drain the tank and bowl. Sponge or shop-vacuum out what is left so the toilet is light and will not slosh, and disconnect the supply line. Pry the caps off the two closet bolts and remove the nuts and washers; if a bolt just spins, cut it with a hacksaw or an oscillating tool.
Break the toilet free of the old wax by rocking it gently side to side, lift it straight up — bend your knees, it is heavier than it looks — and set it on its side on a towel or cardboard. This guide does not cover a full toilet-pull walkthrough; the point is that the flange is now exposed. Scrape the old wax off the flange and the toilet’s outlet horn with a putty knife until both are down to clean plastic or metal, since old wax left in place stops a new ring from seating.
Before buying a part, work out what the flange is made of and how it meets the pipe coming up through the floor:
• PVC hub-style. White plastic, with a wide collar the drain pipe glues up inside. Common in homes built or re-plumbed from the 1990s on.
• PVC spigot-style (inside-fit). White plastic with a short tube that pushes down inside a 3-inch or 4-inch pipe instead of a hub on top. Used where the pipe is already at floor level.
• ABS. Black plastic, otherwise like the PVC versions — hub or spigot. Typical where the drain pipe is black ABS, common in the western US.
• Cast iron. Heavy, dark gray, often painted or rusted, either bolted to a cast-iron pipe or caulked into the pipe hub with lead. Standard in homes built before the 1970s.
• Brass or all-metal. A yellowish brass ring, sometimes on a lead bend, or a stamped-steel ring on a plastic base — the builder-grade type that rusts at the ring first.
The connection decides your options. A cracked or rusted ring on a sound pipe is the ideal case for a repair ring. A flange glued or leaded solidly into the pipe you reinforce rather than remove, since taking it out means cutting the pipe. A spigot flange can often be pulled without touching the pipe. Cast iron is its own category — see the warning below.
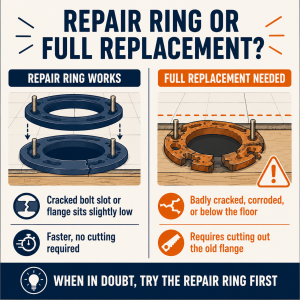
Most flange problems do not need the flange removed. Match the damage to the fix:
• Cracked at a bolt slot, ring otherwise solid — a metal repair ring (also sold as a spanner ring, super ring, or flange reinforcement ring): a stainless or brass ring with fresh bolt slots that screws down over the old flange into the floor. The most common fix, and quick.
• Flange up to about half an inch below the finished floor — a flange spacer (or extender) ring, or a stack of them, bedded on silicone and screwed down to raise the face to floor level.
• Ring corroded thin, broken in more than one place, or crumbling — full replacement; there is nothing solid for a repair ring to grip.
• More than about half an inch below the floor, or wrong size for the pipe — full replacement with a correctly sized flange set at the right height.
• Flange loose in the pipe, or the pipe cracked at the top — full replacement, and inspect the pipe.
Once you know which part you need, our roundup of the 4 Best Toilet Flange & Wax Ring Kits covers repair rings, spacers, and full replacement flanges, and which type suits each pipe material.
Dry-fit the repair ring over the old flange and turn it so its bolt slots land where you need the closet bolts — straight across from each other, parallel to the wall behind the toilet. Mark the screw holes. If the old ring is proud of the floor the repair ring sits on top of it; if it is flush, the repair ring sits on the floor around it. Run a bead of silicone around the underside, set the ring, and drive corrosion-resistant screws into the subfloor at every hole — use all of them, long enough to bite solid wood rather than just the top skin of a soft subfloor.
A flange spacer goes on the same way: silicone underneath, set it over the existing flange, screw it down. To stack two or three to reach floor level, put a continuous bead of silicone between every layer and on top, then clamp the stack with the screws. The goal is one sealed unit whose top face ends level with the finished floor.
Replacing the Flange Fully
For a plastic flange glued into a hub, the cleanest removal is to cut the pipe just below the flange with an inside pipe cutter in a drill, or carefully with an oscillating multi-tool, leaving the pipe end square. You then fit a repair-style replacement flange that glues or expands inside the remaining pipe. A spigot flange can often be worked out of the pipe by softening it with a heat gun and levering it up with a flat bar, then cleaning the pipe wall for the new one.
Cast iron is a different job. A bolt-on ring may free with penetrating oil and patience; a ring caulked or leaded into the pipe hub has to be broken out with a hammer and cold chisel or cut with a cast-iron cutter, working carefully so you do not crack the pipe below the floor. This is where many DIYers stop and call a plumber — a cracked cast-iron drain under a bathroom floor is a large repair.
With the pipe clean and square, dry-fit the new flange and check two things: its face will sit flush with or just above the finished floor (add a spacer beneath it, or trim the pipe, to get there), and the bolt slots line up parallel to the back wall. Then make the connection permanent — solvent-weld a glue-in flange with primer and cement, or tighten an expanding or compression flange per its instructions — and screw the ring into the subfloor at every hole. It should not move when you push on it.
Installing New Closet Bolts
Always fit new closet bolts, never the old ones — they cost very little, and a corroded bolt that snaps mid-tighten means pulling the toilet and starting over. Slide the two bolts into the flange or repair-ring slots so they stand straight up, directly across from each other and square to the back wall. Most flanges have keyhole slots: drop the bolt head into the wide part and slide it to the narrow part so it cannot lift out. If your kit includes plastic retainer washers that press down over each bolt onto the flange, use them — a bolt that tips over as the toilet comes down is the most common reason a reseat has to be redone.
If your kit lacks retainers, or you want brass hardware and color-matched caps, our roundup of the 5 Best Toilet Bolt Caps & Hardware Kits covers full sets. Do not cut the bolts to length yet — leave them long, set the toilet, and trim them only after it is down and the nuts are on.
Pull the rag out of the drain. Set the new seal on the flange — press a wax ring gently onto it, centered on the opening, plastic horn side down toward the drain if it has one, or fit a wax-free rubber seal per its instructions. Whether to use traditional wax or a wax-free seal, and how flange height changes that choice, is covered in our comparison of a wax ring vs a wax-free toilet seal; for a flange you have just brought flush with the floor, a standard wax ring is the usual choice.
Lift the toilet over the bolts, line them up with the holes in the base, and lower it straight down in one motion without tipping or twisting — you get one clean attempt before the wax distorts. Press down firmly with your weight to compress the seal, check the gap to the wall is even, then hand-thread a washer and nut onto each bolt and tighten a little at a time, alternating side to side, until the toilet is snug and no longer rocks. Stop as soon as it is solid.
Turn the water back on, let the tank fill, and flush several times, watching the base and the floor around it each time — a flange or wax-ring leak usually shows within a few flushes as a bead of water seeping along the floor line. Feel all the way around the base with a dry hand or paper towel, since a slow leak can wick under the toilet before it appears at the edge.
Then check stability: push the toilet from the side and try to rock it front to back — it should not move at all. If it does, snug the bolts a little more; if it still moves with the bolts tight, shim the low side with plastic toilet shims and re-check. Once it is dry through several flushes and rock-solid, trim the closet bolts flush with the nuts, press on the caps, and run a bead of tub-and-tile caulk around the base — leaving a short gap at the very back so a future leak has somewhere to show rather than hiding under the toilet.
A repair ring or a straightforward plastic flange swap is well within DIY range. Hand the job off when it turns structural. A subfloor gone soft or spongy around the flange from a long-running leak has to be cut back to sound framing and rebuilt before new hardware will hold. A cast-iron flange leaded into a corroded cast-iron drain that needs cutting carries a real risk of cracking the pipe below the floor. And any sign the problem is past the flange — the pipe below it cracked or crushed, the closet bend broken, or the toilet draining slowly toward the branch drain rather than the seal — is a plumber’s call.
For a cracked bolt slot, a rusted ring on a sound pipe, or a flange sitting a little low, the steps above are the whole job.
If the subfloor around the flange is rotted, a cast-iron flange is fused into a corroded drain, or the problem runs past the flange into the pipe below, it is worth getting a professional to look. Search PlumberArchive.com — the US plumber directory with 12,151+ verified local plumbers across all 50 states.
Get weekly plumbing tips and DIY guides delivered straight to your Facebook feed.
A repair ring is enough for the most common failure — a flange cracked at the bolt slots but otherwise solid on a sound pipe. It screws over the existing flange and gives the bolts a fresh anchor, no cutting or glue. Save full replacement for a flange corroded through, broken in several places, loose in the pipe, or more than about half an inch below the floor.
It is if the gap is more than the wax ring can bridge. A flange face at or slightly above the floor is what a standard wax ring seals; a recessed one often leaks. Bring it up with a flange spacer, or a stack siliconed between each layer, so the top face ends level with the floor. Our comparison of a wax ring vs a wax-free toilet seal covers how much height difference each seal type tolerates.
Yes. Always fit new bolts, nuts, and washers — they cost very little, and an old corroded bolt that snaps while you are tightening the toilet means pulling it and starting over.
Rule out the quick causes first — loose closet nuts, an uneven floor, and worn shims all make a toilet rock and are much faster to fix. Our guide to how to fix a toilet that rocks or wobbles covers that diagnosis. If it still rocks or leaks at the base after a fresh wax ring and evenly tightened bolts, the flange is the usual culprit.
Sometimes. A bolt-on cast-iron ring on a sound pipe can be freed with penetrating oil, or reinforced with a metal repair ring without removing it at all. A flange leaded into a cast-iron pipe hub is harder — cutting it out risks cracking the pipe below the floor, and that is a job most people should hand to a plumber with the right cutters.
A failing toilet flange sounds like a major repair and often is not. The most useful thing to know before you start is that a metal repair ring or a flange spacer fixes the large majority of cases — a cracked bolt slot, a rusted ring, a slightly low flange — in about an hour, with hand tools and no cutting. Full replacement is the answer only when there is nothing solid left to build on, or the flange sits too low for a spacer to reach.
Whichever route the flange needs, the job comes down to the same fundamentals: confirm the flange is actually the problem before you pull the toilet, get the finished face flush with the floor or a hair above it, fit new closet bolts held upright, set the wax ring square, and lower the toilet straight down without a wiggle. For diagnosing the rock in the first place, lean on our guide to how to fix a toilet that rocks or wobbles; for the seal, our wax ring vs wax-free toilet seal comparison covers the choice; and our 4 Best Toilet Flange & Wax Ring Kits roundup covers the repair rings, spacers, and flanges worth buying.
Prices and ratings may change. Always check Amazon for current prices.
✍️ About This Guide
PTR Editorial Team — Plumbing Guides. We compare manufacturer specifications, installation requirements, compatibility and available product documentation to help homeowners choose suitable tools and parts. How we review →
Not sure which tool fits your faucet nut? Identify the fixing, see how it lets go and check your clearance first. Then choose a tool, or use one you own.
Check your manual and the drain route first: gravity hose, built-in pump or external pump. Then see whether you need a dehumidifier hose at all.
Explore portable bidets that need no water-line connection, from bottle caps and squeeze bottles to battery-powered handhelds.

