
Guides
19 Oct 2026

Can’t Reach the Faucet Nut? Choose the Right Tool Before You Buy
Not sure which tool fits your faucet nut? Identify the fixing, see how it lets go and check your clearance first. Then choose a tool, or use one you own.
A wobbling toilet isn't just annoying — left unfixed, it can crack the wax ring seal and cause a hidden leak. Learn how to diagnose and fix it.
Please note: Information in this guide is based on our research at time of writing and is subject to change. Always check Amazon for the latest product details before purchasing.
A toilet that rocks or wobbles when you sit down is easy to dismiss as a minor annoyance — something you learn to live with, or quietly avoid mentioning to guests. But that dismissal is the wrong instinct. Every time a loose toilet shifts even slightly, it puts uneven, repeated stress on the wax ring seal underneath the base, the one component keeping wastewater and sewer gas from escaping where the toilet meets the drain pipe. A seal that’s been slowly worked loose by months of rocking doesn’t fail all at once — it fails quietly, often as a slow leak that seeps into the subfloor long before you see any water on the bathroom tile.
That’s the real reason this is worth fixing promptly rather than tolerating indefinitely. The good news is that in the large majority of cases, the underlying cause is simple — loose base bolts or an uneven floor — and the fix is a genuinely approachable weekend project that takes well under an hour. This guide walks through why toilets rock in the first place, how to safely diagnose which cause applies to your situation, and the full repair process, from tightening bolts through shimming and sealing, plus how to recognize when the wax ring itself has already failed and a bigger repair is needed. If you’re also due for a new seat while you have the toilet apart, our how to install a toilet seat guide covers that separate task in detail.
At a Glance
| Most Common Cause | Loose base bolts, an uneven or sloped floor, or a worn wax ring no longer providing a stable cushion |
| Tools Needed | Adjustable wrench, plastic shims, caulk and caulk gun, possibly a new wax ring |
| Time Needed | 30–60 minutes for a bolt-tightening or shimming fix; longer if the wax ring needs replacing |
| Warning Sign | Water pooling at the base means the wax ring has already failed — don’t wait to address it |
✏️ Our Take
A wobbling toilet is one of those problems that’s easy to live with for months before addressing — until the constant rocking finally breaks the seal underneath and water starts working its way into the subfloor. The good news is that in most cases, the fix is genuinely simple: tightening the base bolts or adding a shim to correct an uneven floor takes well under an hour. It’s only when the wobble has already caused visible water at the base that the job grows into something bigger, which is exactly why it’s worth addressing the movement early rather than waiting.
IN THIS GUIDE
The most common cause by far is simple: loose or unevenly tightened base bolts. The two bolts anchoring the toilet to the closet flange naturally lose a small amount of tension over years of use and temperature changes. Once even one side loosens, the base has room to shift with any applied weight, and that movement tends to get worse over time rather than better on its own.
An uneven or slightly sloped bathroom floor is the second major cause, especially common in older homes. Subfloors settle unevenly over decades, and a toilet installed level when the house was new may no longer sit flush against a floor that has shifted since. In this situation, even freshly tightened bolts won’t stop the rocking, because the base is resting on an uneven surface rather than a flat one.
A worn or improperly seated wax ring is the third cause, and the one that matters most to catch early. The wax ring beneath the toilet base does more than seal against leaks — it also acts as a cushion that helps stabilize the toilet against the flange. Once that wax has compressed unevenly or lost its shape, it can no longer provide that cushion, and the toilet will continue to rock even after the bolts are tightened and the floor is confirmed level.
Less commonly, a damaged or uneven flange — the fitting the toilet actually bolts down to — can be the root cause. A cracked flange or one bent out of true during a previous repair produces a wobble that bolt-tightening and shimming can mask temporarily but not fully resolve. This guide walks through diagnosing and addressing all of these in order, starting with the simplest and most common fix first.
Before starting, clear the area immediately around the toilet so you have room to kneel, reach behind the bowl, and see the base clearly from multiple angles. Move bath mats, trash cans, or anything else that limits your access — you’ll need to get low enough to see the floor-to-base gap on both sides and behind the tank.
Have a couple of old towels on hand before you begin, in case there’s already some water present at the base from a partially compromised seal. It’s better to find this out with towels ready than to discover it mid-repair with nothing to catch the mess.
If you suspect based on the symptoms below that the wax ring may already have failed and you’ll need to remove the toilet entirely, turn off the water supply at the shutoff valve behind or beside the toilet before doing anything else, and flush to clear most of the water from the tank and bowl. This step isn’t necessary for a straightforward bolt-tightening or shimming fix, but it’s worth doing upfront if there’s any chance the repair will grow into the bigger job covered later in this guide.
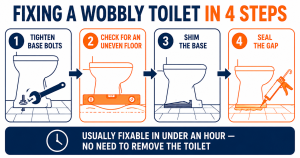
Checking the base bolts is the fastest possible diagnostic step and the most common fix, so it’s always worth doing first before assuming a bigger problem is at play.
If tightening the bolts fully resolves the wobble, you’re done — no further steps are needed. If the toilet still rocks even with both nuts firmly tightened and no more thread to take up, move on to checking whether the floor itself is the actual source of the movement.
If tightened bolts didn’t solve the problem, the next most likely cause is a floor that isn’t perfectly flat underneath the toilet base.
This step is purely diagnostic — once you’ve confirmed there’s a real gap between the base and the floor rather than just residual bolt looseness, you’re ready to move on to correcting it directly.
Shimming fills the gap identified in the previous step, giving the toilet base solid, even support all the way around rather than resting unevenly on a high spot.
Once the toilet sits level and stable with no remaining rock, trim any excess shim material flush with the base and move on to sealing the gap so the repair is finished and protected.
Sealing locks the repair in place, hides the shims from view, and keeps water from finding its way underneath the base during regular cleaning or mopping.
With the bolts tightened, any floor gap shimmed, and the base sealed, most rocking or wobbling toilets are fully resolved at this point. If the toilet still rocks despite all of the above, or if you noticed water at the base at any point during this process, the wax ring itself is the likely remaining cause, covered next.
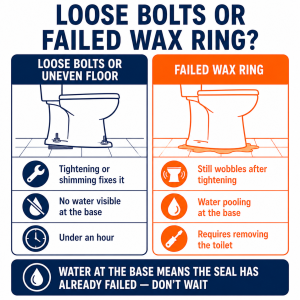
If the base bolts are already tight, the floor has been confirmed level, and the toilet still rocks, the wax ring underneath has most likely lost its shape and can no longer provide the stable cushion it’s supposed to. The same conclusion applies immediately, regardless of what else you’ve checked, if you see water visibly pooling at the base — that’s a direct sign the seal has already failed rather than merely aged.
Unlike tightening bolts or adding a shim, replacing the wax ring requires fully removing the toilet from the floor: disconnecting the water supply, removing the tank if separate, taking out the base bolts entirely, and lifting the bowl clear of the flange to access the old ring underneath. This is a meaningfully bigger job than anything covered earlier in this guide, and it’s worth treating as its own project. Our toilet wax ring reviews cover the current top options, including standard wax rings and wax-free alternatives, and our toilet flange and wax ring kits roundup is worth checking first if you suspect the flange itself may also need attention.
While the toilet is removed, inspect the flange for cracks, corrosion, or a height mismatch relative to the finished floor — a damaged flange is a common reason a freshly replaced wax ring still doesn’t hold a stable seal, and it’s far easier to address now than to discover later after resetting the toilet.
If the wobble keeps returning despite a solid repair, or you suspect a cracked flange or structural subfloor issue, search PlumberArchive.com — the US plumber directory with 12,000+ verified local plumbers across all 50 states.
Get weekly plumbing tips and DIY guides delivered straight to your Facebook feed.
Using it briefly while you gather tools isn’t an emergency, but it’s not something to leave indefinitely. Every use puts additional uneven stress on the wax ring seal, and the longer the rocking continues, the more likely that seal is to fail. If you notice any water at the base, stop using the toilet until it’s addressed, since that’s a sign the seal may have already given way.
Start with the simpler explanation first: tighten the base bolts and check for a level floor before assuming the wax ring is the problem. If the toilet still rocks after both bolts are fully tight and the floor has been confirmed level, or if you see water pooling at the base at any point, the wax ring is the most likely remaining cause and full removal and reseating is the appropriate next step.
Plastic shims are the better choice. Wood absorbs moisture readily in a bathroom environment and can swell, warp, or rot over time, undermining the stability you’re trying to create. Plastic shims made specifically for toilet installation are inexpensive and widely available, and won’t degrade the way wood will in a consistently damp setting.
If tightening didn’t resolve the movement, the most likely explanations are an uneven floor underneath the base or a wax ring that’s lost its shape and no longer provides a stable cushion. Check for a visible gap between the base and floor with a level first — if that’s confirmed, shimming is the next step. If the floor is level and the bolts are tight and the wobble persists, the wax ring has likely failed and the toilet needs to be removed and reset with a new ring.
A rocking or wobbling toilet is worth fixing as soon as you notice it, not because the movement itself is dangerous, but because it’s quietly working against the wax ring seal every time the toilet is used. In most cases, the fix is refreshingly simple: tighten the base bolts gradually and evenly, check for an uneven floor with a level, shim any gap you find, and seal the base once everything sits stable — all realistically achievable in well under an hour with basic tools.
The one sign that changes the scope of the job is water actually visible at the base — that means the wax ring has already failed, and the repair becomes a full toilet removal and reseating rather than a quick bolt-and-shim fix. Either way, addressing a wobble early is the difference between a straightforward weekend task and a repair that also involves a damaged subfloor.
Prices and ratings may change. Always check Amazon for current prices.
✍️ About This Guide
PTR Editorial Team — Plumbing Guides. We compare manufacturer specifications, installation requirements, compatibility and available product documentation to help homeowners choose suitable tools and parts. How we review →
Not sure which tool fits your faucet nut? Identify the fixing, see how it lets go and check your clearance first. Then choose a tool, or use one you own.
Check your manual and the drain route first: gravity hose, built-in pump or external pump. Then see whether you need a dehumidifier hose at all.
Explore portable bidets that need no water-line connection, from bottle caps and squeeze bottles to battery-powered handhelds.

