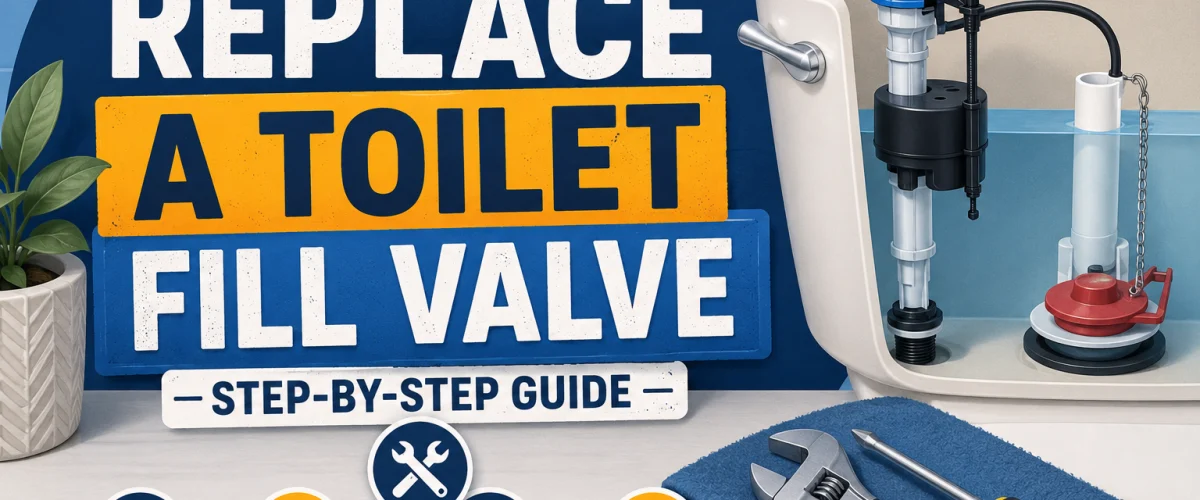
Please note: Information in this guide is based on our research at time of writing and is subject to change. Always follow your fill valve manufacturer’s specific instructions when replacing yours.
Introduction
If your toilet runs on and off throughout the day, refills slowly, or makes a loud hissing sound after every flush, the fill valve is usually the culprit — and replacing it is one of the more approachable repairs a confident DIYer can tackle without calling a plumber. The fill valve is the component inside the tank responsible for refilling it with water after each flush and shutting off once the tank reaches the correct level. Over time, the internal seals and mechanisms wear down, mineral deposits build up, or the valve simply fails to seal completely, and once that happens, adjusting the float or fiddling with the valve rarely fixes the problem for good.
The good news is that replacing a fill valve doesn’t require specialized plumbing tools or advanced skills. A new fill valve, an adjustable wrench, and about thirty to forty-five minutes are usually all it takes to swap out the old one and have your toilet running quietly again. This guide walks through the entire process step by step, from shutting off the water supply through testing the new valve once it’s installed, so you can handle the repair confidently the first time.
At a Glance
| Skill Level |
Beginner to Intermediate DIY |
| Tools Needed |
Adjustable wrench, a bucket or towels, the new fill valve |
| Time Needed |
Roughly 30–45 minutes |
| Critical First Step |
Shut off the water supply to the toilet before starting |
✏️ Our Take
Replacing a toilet fill valve is one of the more approachable repairs you can tackle yourself — the whole job usually takes under an hour and doesn’t require any specialty tools beyond an adjustable wrench. The most important step is one people skip: fully shutting off and draining the water before starting, which prevents a messy surprise partway through. Once the tank is empty, the actual valve swap is straightforward, and a quick water level adjustment at the end is all it takes to get everything working quietly and reliably again.
Signs Your Fill Valve Needs Replacing
Before assuming a fill valve is the problem, it helps to recognize the specific signs that point to the fill valve itself rather than another toilet component. A toilet that runs continuously, or that cycles on and off intermittently well after a flush should have finished, is one of the most common signs of a failing fill valve — though a worn flapper can cause similar symptoms, so it’s worth ruling that out too, as covered in the troubleshooting section below. A tank that refills noticeably slower than it used to, or one that never quite reaches a full, consistent water level, often points to internal wear or mineral buildup restricting water flow through the valve.
A loud hissing, whining, or whistling noise during the refill cycle is another telltale sign, especially if the noise wasn’t present when the toilet was newer. Visible mineral scale or corrosion on the valve itself, particularly around the cap or fill tube, is a good visual indicator that the internal components have degraded even if the toilet is still functioning. Finally, if you’ve already tried adjusting the float height or the valve’s water level setting and the problem persists, that’s usually a sign the valve has worn out rather than simply needing recalibration — at that point, replacement is typically more reliable and less time-consuming than continued troubleshooting.
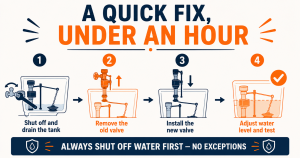
Step 1: Shut Off Water and Drain the Tank
Shutting off the water supply completely and draining the tank is the most important step in this entire repair, and it’s the one step that, if skipped or done incompletely, turns a simple swap into a messy situation.
1. Locate the shutoff valve, typically a small oval or round handle on the wall or floor behind or beside the toilet, where the water supply line connects to the base of the tank.
2. Turn the shutoff valve clockwise until it stops, fully closing off the water supply to the toilet.
3. Flush the toilet to drain most of the water out of the tank — with the supply shut off, the tank won’t refill afterward.
4. Hold the flush handle down briefly, or flush a second time if needed, to drain as much water from the tank as possible.
5. Use a sponge or an old towel to soak up the remaining water pooled in the bottom of the tank, since a small amount will always remain below the drain outlet.
Taking a minute to fully drain the tank now makes the next steps considerably cleaner and easier to work through.
⚠️ Warning: Always confirm the shutoff valve is fully closed before disconnecting the water supply line — a valve that’s only partially closed can still allow water to spray out once the line is disconnected.
Step 2: Remove the Old Fill Valve
With the tank empty and the water supply shut off, removing the old fill valve is generally the fastest part of the entire job.
1. Locate the water supply line connection at the base of the fill valve, on the underside of the tank, where the flexible supply line threads into the valve.
2. Using an adjustable wrench, turn the coupling nut counterclockwise to disconnect the water supply line from the base of the fill valve — keep a towel handy underneath, since a small amount of residual water typically drips out at this point.
3. Locate the locknut securing the fill valve to the bottom of the tank, usually a plastic nut threaded onto the valve’s shank beneath the tank.
4. Turn the locknut counterclockwise to loosen and remove it, using the adjustable wrench if it’s on too tight to turn by hand.
5. Once the locknut is off, lift the old fill valve straight up and out of the tank’s mounting hole from the inside.
Take a moment to inspect the mounting hole and the surrounding area for any mineral buildup or debris before installing the new valve, since a clean mounting surface helps the new valve’s gasket create a proper seal.
Step 3: Install the New Fill Valve
Installing the new fill valve is where a small amount of care up front — particularly around height adjustment — makes a noticeable difference in how well the finished repair performs.
1. Before inserting the new fill valve, check the manufacturer’s instructions for the correct height setting relative to your tank, and adjust the valve accordingly — most modern fill valves have an adjustable section that twists or slides to change the overall height.
2. Confirm the washer or gasket included with the new fill valve is properly seated at the base of the valve’s shank, since this is what creates the watertight seal against the bottom of the tank.
3. Insert the shank of the new fill valve down through the tank’s mounting hole from the inside, guiding it through until the gasket sits flush against the bottom of the tank.
4. From underneath the tank, thread the locknut onto the valve’s shank and hand-tighten it as far as it will comfortably go, keeping the valve body straight and centered in the tank as you do.
5. Using the adjustable wrench, snug the locknut down further, turning it clockwise until it’s firmly seated — but stop as soon as it’s snug rather than applying excessive force, since overtightening can crack the tank or damage the valve’s plastic housing.
Double-check that the valve is sitting straight and centered in the tank once the locknut is fully tightened, rather than leaning to one side, since an off-center valve can interfere with the flapper or other tank components once everything is reassembled.
💡 Tip: Most modern fill valves are height-adjustable to fit a range of tank sizes — check the manufacturer’s markings or instructions to set the correct height before locking it into place, rather than guessing.
Step 4: Reconnect the Water Supply
With the new fill valve installed and secured, reconnecting the water supply is quick, but it’s worth checking carefully for leaks before considering the job finished.
1. Reconnect the flexible water supply line to the threaded connection at the base of the new fill valve, making sure the coupling nut starts threading on straight rather than at an angle.
2. Hand-tighten the coupling nut as far as it will comfortably go before reaching for a tool.
3. Using the adjustable wrench, snug the connection a bit further — typically a quarter to half turn past hand-tight is enough for a secure, leak-free seal.
4. Turn the shutoff valve counterclockwise slowly to restore the water supply, rather than opening it all the way at once, and watch the connection closely as the line pressurizes.
5. Once the water is flowing, check every connection point — both at the shutoff valve and at the base of the fill valve — for any dripping or spraying, and snug further if you spot even a small leak.
Step 5: Adjust the Water Level and Test
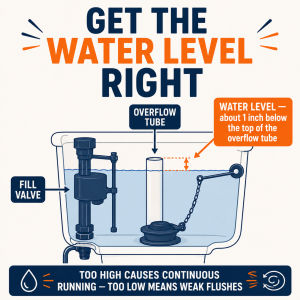
The last step is adjusting the new valve so the tank fills to the correct level and shuts off cleanly, followed by a few test flushes to confirm everything is working as it should.
1. Locate the water level adjustment mechanism on the new fill valve — depending on the model, this is typically a small screw, a sliding clip, or the float itself, and the exact method varies by manufacturer.
2. Adjust the mechanism so the tank’s water level will sit approximately one inch below the top of the overflow tube, which is the standard target level for most toilets.
3. Flush the toilet and watch the tank refill completely, checking whether the water level lands where you set it and whether the valve shuts off cleanly once that level is reached.
4. If the level is off, make small adjustments and flush again, repeating until the tank consistently fills to the correct level and shuts off on its own.
5. Flush the toilet several more times in a row to confirm consistent performance, and listen closely for any continued running, hissing, or trickling sound once the tank has finished filling — a properly installed and adjusted valve should shut off completely and go silent.
Troubleshooting Common Issues
Even with a careful installation, a few common issues can crop up after replacing a fill valve, and most have straightforward explanations and fixes.
If the toilet still runs after replacement, first double check the water level adjustment — a level set too high can cause water to continuously trickle into the overflow tube, mimicking a running toilet even with a perfectly good new valve. If the water level looks correct, check the flapper seal next, since a worn or poorly seated flapper is a separate, equally common cause of a running toilet and won’t be fixed by a new fill valve. Our guide to how to fix a running toilet covers broader troubleshooting if the valve replacement alone didn’t fully resolve things, and our guide to how to replace a toilet flapper walks through that separate repair if the flapper turns out to be the actual issue.
If the new fill valve doesn’t shut off completely, confirm it’s seated straight and fully in the mounting hole, and that the height adjustment actually matches your specific tank — a valve set too low sometimes struggles to shut off cleanly. Persistent leaks at either connection point usually mean the locknut or the supply line coupling needs to be snugged a bit further, rather than indicating a defective part.
US Regional Context: Fill valve designs vary slightly between manufacturers, and most US hardware stores stock universal or adjustable models that fit the vast majority of standard toilet tanks. If your toilet is an unusual size or an older/imported model, confirming compatibility before purchasing avoids a return trip.
Need a Professional Plumber?
Replacing a fill valve is a manageable DIY job for most homeowners. But if you’re dealing with a persistent leak, an older tank with unusual fittings, or a repair that’s turned into something bigger than expected, search PlumberArchive.com — the US plumber directory with 12,000+ verified local plumbers across all 50 states.
Find a trusted plumber near you → PlumberArchive.com
Frequently Asked Questions
Q: How do I know if it’s the fill valve or the flapper causing a running toilet?
The easiest way to tell the difference is to watch and listen closely right after the tank finishes refilling. If water is continuously trickling into the overflow tube even though the tank has reached its normal level, the fill valve usually isn’t shutting off completely and is the more likely cause. If instead the tank is fully quiet but you can hear or see water slowly leaking from the tank into the bowl between flushes — sometimes only audible as a faint trickle — that points to a worn flapper failing to seal properly. Adding a few drops of food coloring to the tank water and checking the bowl a few minutes later without flushing is a reliable way to confirm a flapper leak specifically, since colored water appearing in the bowl means the flapper isn’t sealing. Our toilet flapper vs. fill valve comparison breaks down the two components in more detail if you’re not sure which one you’re dealing with.
Q: Do I need to turn off the main water supply to replace a fill valve?
No — in most homes, you only need to shut off the small dedicated shutoff valve located behind or beside the toilet itself, rather than the home’s main water supply. That local shutoff valve controls water flow to that toilet specifically, so closing it lets you safely disconnect and replace the fill valve without affecting water to the rest of the house. The main supply only needs to come into play if that local shutoff valve is missing, stuck, or not fully sealing when closed.
Q: How often should a toilet fill valve be replaced?
A quality fill valve typically lasts anywhere from five to ten years under normal residential use, though the exact lifespan depends on water quality, hardness, and how heavily the toilet is used. Homes with hard water or high mineral content in their water supply tend to see fill valves wear out faster, since mineral deposits accumulate inside the valve’s internal components over time. Rather than replacing on a fixed schedule, it’s generally more practical to replace the valve once you notice the signs covered earlier in this guide — running, slow refills, unusual noise, or a valve that no longer responds reliably to adjustment.
Q: Can I replace a fill valve without draining the entire tank?
You don’t need to remove every last drop of water, but draining as much as reasonably possible makes the job significantly cleaner and easier to manage. Flushing the toilet with the water supply shut off removes most of the tank’s water, and a sponge or towel can handle the small amount that remains pooled at the bottom. Attempting the swap with a substantial amount of water still in the tank makes it harder to see what you’re doing, increases the mess when you disconnect the supply line and locknut, and doesn’t offer any real time savings over the few extra minutes it takes to drain and dry the tank properly first.
Conclusion
Replacing a toilet fill valve is a repair well within reach for most homeowners, and the payoff — a quiet, reliably functioning toilet instead of one that runs constantly or refills unpredictably — is well worth the thirty to forty-five minutes the job typically takes. The keys to a smooth repair are the ones this guide has emphasized throughout: fully shutting off and draining the water before you start, getting the new valve’s height set correctly before locking it in place, and taking the time to test and fine-tune the water level once everything is reconnected.
If you’re shopping for a replacement valve, our toilet fill valve reviews compare current options to help you choose one that fits your tank and your budget. And if a running toilet turns out to be caused by something other than the fill valve, our guide to how to fix a running toilet covers the broader troubleshooting picture.
Prices and ratings may change. Always check Amazon for current prices.
✍️ About This Guide
Written by Mike Reynolds, DIY Home Improvement Writer at PlumbingToolsReview — former residential contractor helping US homeowners tackle plumbing repairs with confidence. Learn how we test →