Guides
4 Oct 2026

How to Make a PEX Crimp or Clamp Connection (2026) — Step-by-Step Guide
Make a PEX crimp or clamp connection step by step: ring and clamp placement, gauge checks, failed joints and code notes from maker sheets.
Feed adapter, faucet drilling, drain saddle, tank precharge and first flush — from two manufacturer manuals, for tank-based RO systems.

Please note: Product information is based on our research at time of writing and may change. This guide is general. Always follow the installation instructions that come with your system, and check local plumbing code if you’re unsure.
An under-sink reverse osmosis (RO) system filters your drinking water through several stages and a membrane, storing the result in a small tank and delivering it from a dedicated faucet. Installing one is a bigger job than swapping a filter cartridge. You’ll tap into the cold supply, mount a faucet on the sink or countertop, and connect a drain line.
This guide covers tank-based systems, which are what most under-sink RO kits are. Tankless electric systems skip the tank steps but need a nearby outlet and have their own instructions. To choose a system first, see our best under-sink water filters review, or the whole-house vs. under-sink comparison.
At a Glance
| Difficulty | Moderate |
| Time | 2–3 Hours, plus 2–3 hours of tank fill time before first use |
| Cost | $ for install materials (system not included); a professional may be needed to drill stone |
| Tools Needed | Variable-speed drill with a 1/2 inch bit (1-1/4 inch for an air-gap faucet, diamond bit for granite), adjustable wrench, Phillips screwdriver, Teflon tape and a utility knife |
| Skill Level | Intermediate |
✏️ Our Take
This is a real weekend-afternoon project, and two steps decide how it goes: drilling the faucet hole and connecting the drain. Read your system’s manual first, go slowly on those two, and hire a pro if your countertop is natural stone or you’re unsure of your local drain rules.
IN THIS GUIDE
1. Your countertop or sink material. iSpring’s manual says to use a diamond core bit for granite and a titanium bit for steel, warns against a hammer drill on natural stone, glass and ceramic, and cautions that porcelain chips easily. For natural stone it recommends hiring an experienced professional. APEC advises marking stainless steel with a center punch so the bit doesn’t walk.
2. Your shutoff valve. You’ll need a cold water shutoff under the sink that turns. If it’s stuck or corroded, see our guide to removing a stuck or corroded shutoff valve, or call a plumber.
3. Your drain. The system’s drain line connects to the sink drain through a saddle clamp, so you need an accessible section of drain pipe. If yours is inaccessible or unusual, ask a plumber.
4. Your water. APEC’s manual says not to use the system with water that is microbiologically unsafe or of unknown quality without adequate disinfection before or after it.
The manuals we read differ on the exact order and details, so follow your own system’s manual. The steps below are the ones iSpring and APEC have in common.
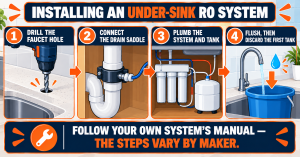
Turn off the cold water shutoff under the sink, then open the kitchen faucet to release pressure and make sure the water has stopped, as iSpring’s manual describes. If the shutoff won’t stop the water, APEC says the main supply to the house must be shut off.
The feed water adapter connects to the cold shutoff valve. iSpring notes a bushing that converts a 3/8 inch compression connection to 1/2 inch NPT, so check your shutoff valve’s thread against the adapter before you start.
Mark the location, then drill the faucet hole in the sink deck or countertop with the bit your material calls for. A standard RO faucet takes a 1/2 inch hole, and APEC lists 1-1/4 inch for an air-gap faucet. Go slowly, especially on stone, porcelain or stainless steel. Then mount the faucet as your kit describes.
The saddle clamps onto the drain pipe. iSpring’s steps are to drill a 1/4 inch hole in the drain pipe, paste the sticky pad around the hole, insert the tubing, and tighten the back plate with its two screws. APEC’s instructions place the saddle above the trap and warn that misaligned holes will block the drain water and can damage the membrane, so line the saddle hole up carefully.
Mount the filter housings or manifold under the sink as your manual shows, then connect the tubing between the feed adapter, filters, faucet, drain saddle and tank. Follow the color codes or port labels in your manual, and push each tube in fully.
iSpring’s manual has you wrap the tank fitting with 10 to 15 turns of Teflon tape, clockwise, and tighten by hand without overtightening. Check the tank’s air pressure with a tire gauge before connecting it. iSpring’s manual gives 7 to 10 psi, and APEC’s tanks come pre-charged at 5 psi (4 gallon) and 7 psi (14 gallon), so check your own tank’s specification.
Turn the cold water back on slowly. iSpring’s manual has you flush the first three stages into a bucket until the water runs clear, then open the RO faucet and let it trickle for at least 15 minutes. The tank then fills. iSpring lists 1.5 to 2.5 hours and APEC lists 2 to 3 hours.
Both iSpring and APEC say not to use the first tank of water. Drain it fully through the RO faucet. Check every connection for leaks as it fills, and iSpring recommends checking daily for the first two weeks.
Leak at a tubing connection. Turn off the supply, take the tube out and check that it’s cut squarely and pushed in fully. Refit it and test again.
Water at the drain saddle. Turn off the water and check that the saddle pad is seated flat around the hole and the back plate screws are snug, without overtightening.
Slow or no water from the RO faucet. The tank may still be filling, so give it the hours your manual states. Then check that the supply valve is open, no tubing is kinked, and the tank’s air pressure matches its specification.
Drain problems after installing. APEC warns that a misaligned saddle hole blocks the drain water and can damage the membrane. Shut off the supply and recheck the alignment.
Plumbing codes address how drinking water treatment units discharge to the drain. The Uniform Plumbing Code language we found calls for discharge through an air gap or an approved air gap device, and adoption differs from place to place. Both iSpring and APEC leave code compliance to the installer, and APEC’s manual says the installation needs to comply with state and local laws. Some RO faucets are air-gap faucets, which need a larger hole. If you’re unsure what your area requires, ask your local building department or a licensed plumber. For how an air gap works in general, see our dishwasher air gap vs. high loop comparison.
Tankless RO systems, such as Waterdrop’s, work differently. The manual we read describes a powered unit with a power cord and no storage tank to pressurize, so it needs an outlet nearby and skips the tank steps. It also flushes itself automatically. Follow the system’s own manual for those parts of the job.
If any of the checks above point to a bigger problem than a straightforward install, that’s worth a plumber’s assessment before you invest more time or materials.
Find a licensed plumber in your area at PlumberArchive.com — the US plumber directory with 12,000+ verified local plumbers across all 50 states.
Get weekly plumbing tips, honest tool reviews and DIY maintenance guides delivered straight to your Facebook feed. We cover toilet repairs, bathroom fixtures, pipe maintenance and everything in between — written for US homeowners who want to handle more themselves.
Many homeowners do. It needs a drill, hand tools and patience, and the drilling and drain connection are the two steps to take slowly. Hire a professional for natural stone.
It depends on your local code. Some manufacturers sell both types, and an air-gap faucet needs a larger hole (APEC lists 1-1/4 inch). Ask your local building department if you’re unsure.
No. Both iSpring and APEC say not to use the first tank of water. Drain it fully first.
The tank takes roughly two to three hours to fill, with iSpring listing 1.5 to 2.5 hours and APEC 2 to 3. Then discard that first tank.
No. An under-sink RO system treats drinking water at one faucet. See our whole-house filter review for the other approach.
Installing an RO system is a step up from most under-sink jobs, but a careful homeowner can do it: shut off and depressurize, fit the feed adapter, drill and mount the faucet, connect the drain, plumb the system and tank, then flush and discard the first tank. Take extra care on the two steps that can go wrong, and bring in a plumber for stone countertops or unclear code questions. To choose a system, see our under-sink filter review.
✍️ About This Guide
PTR Editorial Team — Plumbing Guides. We compare manufacturer specifications, installation requirements, compatibility and available product documentation to help homeowners choose suitable tools and parts. How we review →
Make a PEX crimp or clamp connection step by step: ring and clamp placement, gauge checks, failed joints and code notes from maker sheets.
Install a bathroom sink pop-up drain assembly step by step: remove the old stopper, seat the flange, connect the pivot rod, and adjust the lift rod strap.
Replace or install a submersible sump pump in an existing pit: disconnect power, set the pump, connect the discharge pipe and check valve, then test.

