
Guides
19 Oct 2026

Can’t Reach the Faucet Nut? Choose the Right Tool Before You Buy
Not sure which tool fits your faucet nut? Identify the fixing, see how it lets go and check your clearance first. Then choose a tool, or use one you own.
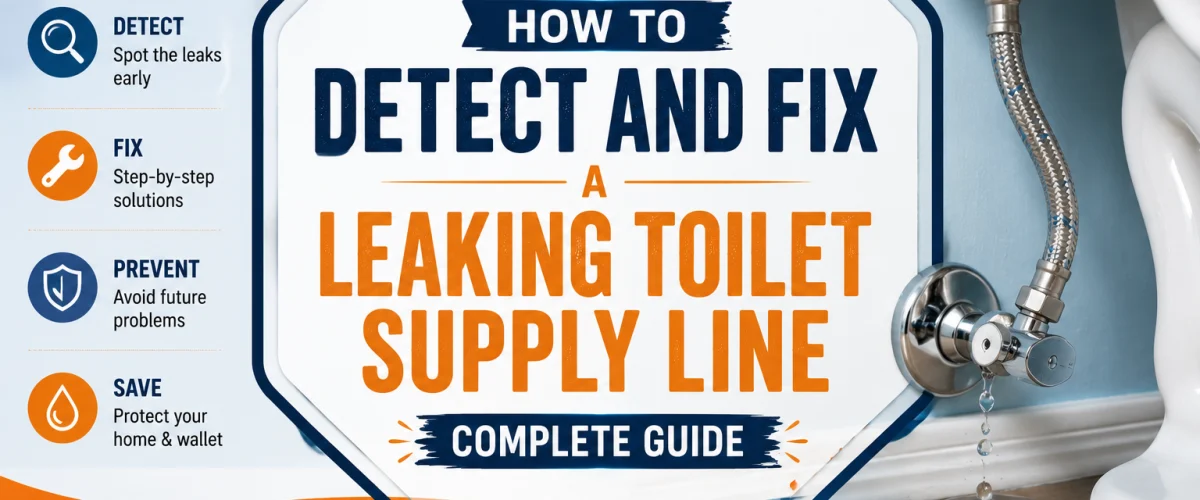
How to detect and fix a leaking toilet supply line — diagnose the source, tighten connections, reapply PTFE tape, or replace the line.
Please note: Information in this guide is subject to change. If you notice water damage to surrounding flooring or subflooring, or you’re uncertain about shutting off your home’s main water supply, consult a licensed plumber.
A puddle near the base of a toilet is almost always blamed on the same two culprits: a failing wax ring or a cracked tank. Both are real possibilities, but a commonly overlooked third cause is the supply line running from the wall shutoff valve up to the base of the tank, along with the two connections at either end. A loose nut, a worn washer, or old plumber’s tape are all quick to fix once you know that’s where the water is actually coming from — yet homeowners often spend far more time and money chasing a wax ring replacement before ever checking the line itself.
This guide covers how to correctly identify a supply line leak, rule out the more commonly assumed causes, and fix it — whether that means tightening a connection, wrapping fresh PTFE tape, or replacing the line outright. If your toilet’s problem is actually inside the tank, our How to Fix a Running Toilet guide covers that separately, and if you’re shopping for a new shutoff valve, our Water Shut Off Valves review is a good next stop.
At a Glance
| Difficulty | Easy to Moderate (depending on whether the supply line itself needs replacing) |
| Time | 15–45 Minutes |
| Cost | $ — a replacement supply line costs very little; most other steps require no parts at all |
| Tools Needed | Adjustable wrench, flashlight, towels, bucket, plumber’s tape (PTFE), a replacement braided supply line (if needed) |
| Skill Level | Beginner to Intermediate |
✏️ Our Take
A leaking toilet supply line is one of the most commonly misdiagnosed toilet problems, because the water shows up on the floor and gets blamed on the toilet itself, the wax ring, or condensation — when the actual source is a loose or worn connection at the shutoff valve or the tank. The good news is that once you’ve correctly identified the supply line as the source, the fix is almost always simple: tighten a connection, wrap fresh PTFE tape, or swap in a new braided line, which costs very little and takes about fifteen minutes. The part people skip, and shouldn’t, is drying everything completely before testing again — a damp connection makes it impossible to tell if a repair actually worked.
IN THIS GUIDE
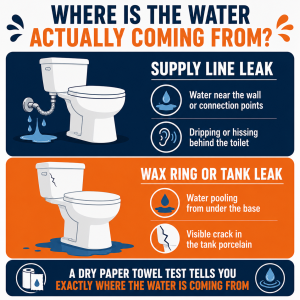
The clearest sign is location. Water pooling near the wall or floor where the line connects, rather than spreading from under the toilet’s base, points at the line rather than the wax ring. A wax ring failure spreads water from all sides of the base, while a supply line leak stays more contained, tracking down the wall or pooling directly under the connection.
A closer look often confirms it. Visible dampness, dripping, or mineral buildup and corrosion directly on the line or its connections is a strong indicator water has been slowly escaping there, even if the puddle seems small. Mineral deposits form gradually along a slow leak path, so a chalky crust on the line is often evidence of a leak older than it appears.
Sound is another clue. A faint hissing or dripping from behind or beside the toilet, rather than inside the tank, usually means water is escaping under pressure at a connection point rather than cycling through the fill valve — worth investigating before assuming it’s an internal tank component.
An adjustable wrench handles the connection nuts at both ends of the line and is really the only specialized tool this repair requires. A flashlight is worth having too, since the space behind a toilet is often dim, making it hard to spot corrosion or a loose nut without direct light.
Towels and a small bucket manage the water that ends up on the floor once you disconnect a line. PTFE tape is needed for re-sealing any threaded connection, and a replacement braided stainless steel line should be on hand in case the existing one is damaged rather than simply loose.
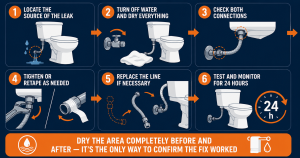
Step 1 — Locate the Source of the Leak
Use a flashlight to inspect the entire visible length of the line, from the shutoff valve up to the tank. Look for dampness along the sleeve itself, not just the two ends, since a line can develop a pinhole leak or crack partway along its length.
Pay close attention to both connection points. At the shutoff valve, check around the nut for dampness or water on the valve body. At the tank, check the same way — this connection is often harder to see without getting down at floor level and angling the flashlight up.
Rule out the other common sources while you’re down there, since the fix for each is different. A wax ring leak pools from underneath the entire base rather than concentrating near the wall. A cracked tank shows a visible fracture line on the porcelain, usually with water tracking down its outside. Neither involves the supply line, so confirming which you’re looking at saves working on the wrong part of the toilet.
Turn the shutoff valve fully clockwise to stop water flow to the toilet — it’s almost always on the wall or floor directly behind or beside the toilet, close to where the line originates.
Flush the toilet to drain the tank, then use a towel to thoroughly dry the supply line, both connection points, and the surrounding floor and wall completely. Don’t rush this — get the area genuinely dry, not just wiped enough to look dry at a glance.
This dry baseline matters more than it seems. You can’t diagnose a leak’s source, or later confirm a fix worked, on a surface already damp from the original problem.
With everything dry, inspect where the line’s nut connects to the shutoff valve. Try gently turning the nut by hand to check for looseness, and look for corrosion around the threads or a washer that looks worn, flattened, or cracked.
A loose connection here is one of the most common and easiest-to-fix sources of a leak. Normal vibration, temperature changes, or routine cleaning can gradually work a connection loose, especially if it wasn’t tightened firmly during a previous installation.
Move to the other end and inspect where the line meets the underside of the tank, using the same approach — looseness, corrosion, and washer condition.
This connection typically relies on a rubber or fiber washer that dries out, cracks, or wears down over time, particularly in older installations. Unlike a loose nut, a degraded washer won’t reliably reseal from tightening alone. If your toilet has also shown signs of running or cycling on its own, that’s a separate, unrelated repair — see our How to Replace a Toilet Flapper guide.
If your inspection turned up a loose connection at either end, use an adjustable wrench to snug the nut clockwise. Hand-tighten as far as it will go, then add roughly a quarter to a half turn with the wrench — enough to compress the washer and seal without forcing it.
Stop well short of forcing it. Overtightening can crack the tank’s porcelain fitting or strip the threads, turning a simple fix into a much larger repair. If the connection still won’t seal after reasonable tightening, that’s a sign the washer or line needs replacing rather than more torque.
In older homes across the Northeast and Midwest, particularly those with original 1960s-80s plumbing fixtures, toilet supply lines are still sometimes the older rigid or vinyl style rather than modern braided stainless steel — these older lines are considerably more prone to cracking and leaking as they age, and are a common source of slow, hard-to-notice leaks in homes that haven’t had their toilet connections updated in decades. If your home falls into this category and you’ve never replaced your supply lines, it’s worth doing proactively even before a leak appears, since braided stainless steel lines are inexpensive and dramatically more reliable.
If the leak is at a threaded connection rather than a compression fitting, tightening alone may not be enough once old sealant has degraded. Disconnect that end, remove old tape residue with a dry cloth, and wrap fresh PTFE tape clockwise, three to four wraps with firm, even tension.
Reconnect and hand-tighten first so the threads engage evenly, then snug the rest of the way with the wrench — this prevents cross-threading, a common cause of leaks that persist even after fresh tape.
If tightening and fresh tape don’t resolve the leak, or the line shows visible cracking or damage, the most reliable fix is replacing the entire line rather than patching a failing one — also the right call for proactively upgrading an old rigid or vinyl line, as covered above.
Disconnect both ends and compare the new line against the old one before installing — length and connection type need to match. Hand-tighten both connections first, then snug each with a wrench using the same firm-but-not-forced approach from Step 5. Considering a new shutoff valve too? Our Water Shut Off Valves review compares current options.
Slowly turn the shutoff valve back on and let the tank fill completely. Turning it slowly reduces the initial pressure surge on the connections you just worked on, giving a better first read on whether they’re holding.
As soon as the tank is full, immediately check both connection points with a dry paper towel, pressing it gently against each fitting for a few seconds. This catches any connection that’s still obviously leaking right away.
Even after an immediate check looks clean, place a dry paper towel under each connection point — shutoff valve and tank — and leave both undisturbed for a full 24 hours.
Check the towels the next day for dampness. A dry towel after 24 hours strongly confirms the repair worked, while any dampness means the connection isn’t fully sealed and needs another look.
Most supply line leaks are a straightforward DIY fix, but a few situations are worth handing off to a professional. If a correctly installed replacement line still leaks at a connection, there’s likely an underlying issue with the valve or tank fitting beyond a simple swap.
A shutoff valve that’s corroded, seized, or won’t fully stop water flow is also better suited to a plumber — forcing a seized valve can snap the stem or crack the body, requiring access to the line inside the wall. Any water damage to surrounding flooring or subfloor beyond the immediate leak area is worth assessing separately, since it can involve structural considerations outside this repair’s scope.
If your shutoff valve is seized, corroded, or you’ve found water damage beyond the supply line itself, search PlumberArchive.com — the US plumber directory with 12,000+ verified local plumbers across all 50 states.
Get weekly plumbing tips and DIY guides delivered straight to your Facebook feed.
Location tells them apart. A supply line leak stays contained near the wall or floor where the line connects, while a wax ring leak spreads from underneath the entire base, since it seals the joint between the toilet and floor drain. Drying the area and placing dry paper towels under each suspected source separately, as in Step 1, confirms which you’re dealing with.
Yes, in almost all cases. Toilets have their own dedicated shutoff valve near the base, and turning that off stops flow to just that fixture. You’d only need the main valve if the toilet’s own shutoff is broken, seized, or missing — see When to Call a Plumber above.
There’s no strict schedule, but every 5 to 10 years is reasonable for braided stainless steel lines, sooner with visible corrosion, cracking, or an older rigid or vinyl line that’s never been updated. Many homeowners replace lines proactively during other bathroom work, since the part is inexpensive and the swap takes minutes.
No — a properly sealed connection should be completely dry. Occasional tank condensation in humid weather is a separate, normal phenomenon, but any consistent moisture at a connection point indicates a leak that needs addressing, not monitoring.
A supply line leak is frequently mistaken for a more serious toilet problem — a failing wax ring, a cracked tank, or a fill valve issue — but once correctly identified, it’s usually one of the simplest repairs in home plumbing. Locating the exact source, rather than assuming based on where water is pooling, is what separates a fifteen-minute fix from wasted time replacing the wrong component.
Drying the area completely, both before diagnosing and after repairing, is what actually confirms whether the fix worked. Skipping that step is the most common reason homeowners think they’ve fixed a leak that’s actually still there.
If your home still has an original rigid or vinyl line, particularly in older Northeast and Midwest housing stock, replacing it proactively with an inexpensive braided stainless steel line is worth doing before a leak forces the issue. And if your toilet’s real problem is inside the tank, our How to Fix a Running Toilet guide and How to Replace a Toilet Flapper guide cover those repairs, while our Water Shut Off Valves review can help if it’s time to upgrade the valve.
✍️ About This Guide
PTR Editorial Team — Plumbing Guides. We compare manufacturer specifications, installation requirements, compatibility and available product documentation to help homeowners choose suitable tools and parts. How we review →
Not sure which tool fits your faucet nut? Identify the fixing, see how it lets go and check your clearance first. Then choose a tool, or use one you own.
Check your manual and the drain route first: gravity hose, built-in pump or external pump. Then see whether you need a dehumidifier hose at all.
Explore portable bidets that need no water-line connection, from bottle caps and squeeze bottles to battery-powered handhelds.

