Please note: Information in this guide is based on our research at time of writing and is subject to change. Always consult a licensed plumber for diagnosis of serious plumbing issues before attempting repairs.
Introduction
A shower head that keeps dripping after the water is off, or leaks while it’s running, is one of the most common bathroom plumbing complaints — and one of the easiest to actually fix once you know where to look. The cause almost always narrows down to a small number of possibilities: a worn washer or O-ring inside the head, a poorly sealed connection at the wall, mineral buildup restricting flow, or a loose joint where the arm meets the head.
This guide walks through diagnosing exactly where your leak is coming from before you attempt any repair, since the location of the drip tells you which fix to try first. If your current fixture is beyond saving, our guide to the best shower heads covers strong replacement options, and our guide to installing a shower head walks through full replacement step by step.
At a Glance
| Difficulty |
Easy |
| Time |
15–30 Minutes |
| Cost |
Free to $ — washers and O-rings cost very little |
| Tools Needed |
Adjustable wrench, plumber’s tape (PTFE), replacement washer or O-ring |
| Skill Level |
Beginner |
✏️ Our Take
A shower head that drips after the water is turned off almost always has one of three causes: a worn washer or O-ring inside the head, a loose or improperly sealed connection at the wall pipe, or mineral buildup blocking the flow and causing backpressure that forces water out. All three are beginner-level fixes that cost under a few dollars in parts — the most expensive version of this repair is usually the PTFE tape. If none of these fixes work, the shower valve cartridge inside the wall is the likely culprit, which is a slightly more involved fix.
Where Exactly Is the Leak Coming From?
Before touching a wrench or buying any parts, take a minute to actually watch the leak. A shower head can drip or leak from three distinct locations, and each one points to a different fix — trying the wrong fix first just wastes a trip to the hardware store and a disassembled fixture.
- Drip from the shower head face itself — water beading or dripping from the spray plate after the water is shut off is usually a washer, O-ring, or mineral buildup issue inside the head.
- Leak from the wall pipe connection where the arm enters the wall — this is almost always a thread seal issue, meaning the PTFE tape has failed or was never applied correctly.
- Leak from the joint between the shower arm and the shower head — usually a loose connection or a worn O-ring at that specific joint, separate from the wall connection.
💡 Tip: Turn off the water completely and watch where the drip actually starts — the location tells you which fix to try first before disassembling anything.
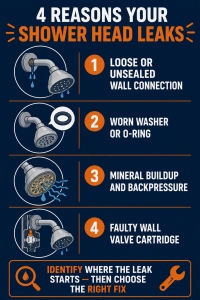
Fix 1 — Tighten or Reseal the Wall Connection
Turn off the water supply before working on any part of this connection — either the dedicated shut-off if your bathroom has one, or the main supply to the house. Once the water is off, start with the simplest possible fix: hand-tighten the shower arm where it enters the wall. It may simply have worked loose over time, and a firm hand-tighten alone resolves a surprising number of wall-connection leaks.
If the leak persists after hand-tightening, remove the arm entirely, clean off all the old PTFE tape from the threads, and rewrap with three to four fresh layers before reinstalling. Old tape that’s compressed, torn, or only partially covering the threads is a common cause of a slow leak that tightening alone won’t solve. If your current shower head is old enough that finding matching replacement parts is difficult, our guide to the best shower heads covers current models worth switching to instead of continuing to chase parts for a discontinued fixture.
💡 Tip: Wrap PTFE tape clockwise when facing the thread end — wrapping the wrong direction unwinds the tape as you screw the fitting back in.
Fix 2 — Replace the Washer or O-Ring
If the drip is coming from the face of the shower head itself rather than the wall connection, the fix is almost always inside the head. Unscrew the shower head from the arm — most twist off counter-clockwise by hand, though a stubborn or corroded fitting may need a wrench wrapped in a cloth to protect the finish.
Once it’s off, locate the rubber washer or O-ring at the connection point inside the shower head. This small seal is what stops water from weeping past the threads, and after enough time and mineral exposure it hardens, cracks, or compresses to the point it no longer seals properly. Replace it with a matching size — most standard shower heads use a common size available at any hardware store. This is the same type of small rubber seal that fails inside faucet valves too, so if you’re stocking up on seals for the bathroom generally, our guide to the best faucet cartridges covers the related valve-side component worth checking at the same time.
💡 Tip: Bring the old washer or O-ring to the hardware store rather than guessing the size — matching it exactly costs you a few cents and saves a second trip.
Fix 3 — Descale a Clogged Shower Head
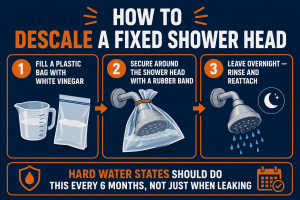
Mineral buildup inside the shower head restricts the normal flow paths, and the resulting backpressure can force water out past seals that would otherwise hold fine. If your water leaves visible white or chalky residue on fixtures, descaling is worth trying even if you’re not certain it’s the cause.
Remove the shower head and soak it in white vinegar for several hours or overnight — a full submersion gives the vinegar time to dissolve mineral deposits inside the nozzles and at the connection threads. For fixed shower heads that can’t be easily removed, fill a plastic bag with vinegar and rubber-band it around the head so the nozzles stay submerged for the same effect. Rinse thoroughly and reattach, then run the water and check whether the drip has reduced or stopped.
In hard water states like Arizona, Texas, Nevada and parts of California, mineral deposits inside the shower head are a contributing cause of leaks far more often than in soft water regions — the buildup creates backpressure that forces water past worn seals faster than it would in low-mineral areas. Homeowners in these states should plan to descale their shower head every 6 months as a routine step, not just when a visible drip starts.
💡 Tip: A vinegar soak also clears individual clogged spray nozzles — run the shower after reattaching and check whether the full spray pattern has returned to even coverage.
Fix 4 — Check the Shower Arm Connection
If the first three fixes haven’t stopped the leak, go back and inspect the specific joint between the shower arm and the shower head for visible corrosion or thread damage. This connection is separate from the wall connection covered in Fix 1, and it fails for the same basic reasons — worn threads, a compressed seal, or a fitting that was never fully tightened.
Hand-tighten the connection and check again — some leaks at this joint are nothing more than a connection that loosened gradually from vibration and temperature cycling over months of use. If hand-tightening doesn’t hold, a light wrench tightening on top of it usually will.
⚠️ Warning: Don’t overtighten the shower head with pliers directly on a chrome finish — use a cloth between the wrench and the fitting to avoid scratching, and stop when hand-tight plus a quarter turn is reached.
When the Shower Valve Cartridge Is the Problem
If the shower head drips continuously even hours after the water is shut off, and none of the fixes above have made a difference, the leak may actually be coming from the wall valve rather than the head itself. This is an easy source to misdiagnose, because the water still appears to come out of the shower head — it’s just originating from further back in the system.
A faulty shower valve cartridge allows water to slowly pass even when the handle is in the off position, which shows up at the shower head as a persistent, slow drip that no amount of head-side tightening or reseating will fix. Our guide to the best shower valve cartridge options covers what to look for if replacement turns out to be necessary. If your setup switches between a fixed shower head and a tub spout, a worn diverter valve is another possible source of water escaping somewhere other than where it should — our roundup of the best shower diverter valves covers that separate part.
💡 Tip: Remove the shower head entirely and check whether water still drips from the arm — if it does, the problem is the wall valve, not the shower head at all.
When to Replace the Shower Head Entirely
Not every leak is worth chasing with washers and tape indefinitely. A shower head with a cracked or visibly corroded body isn’t worth resealing — even a perfect seal at the threads won’t stop water finding its way out through a compromised housing, and the repair cost in time quickly exceeds the cost of a new fixture.
The same applies to mineral damage that cleaning cannot reverse after multiple descaling attempts — if nozzles remain clogged or the spray pattern stays uneven after two or three vinegar soaks, the internal channels are likely permanently restricted. At that point, full replacement is the more practical fix. Our guide to installing a shower head walks through the full replacement process step by step, and our guide to the best shower heads covers current options worth considering.
💡 Tip: If you’re already replacing the shower head, this is a good moment to check whether your current CFM and spray pattern actually matches your water pressure — upgrading while you’re already working on the fitting costs nothing extra.
Need a Professional Plumber?
If you’ve worked through every fix here and the shower head is still leaking, or you suspect the wall valve itself needs replacing, a licensed plumber is the right call. Getting a professional involved before a small drip becomes a bigger repair is always the lower-cost outcome.
Find a licensed plumber in your area at PlumberArchive.com — the US plumber directory with 12,000+ verified local plumbers across all 50 states.
Find a trusted plumber near you → PlumberArchive.com
Follow Us on Facebook
Get weekly plumbing tips, honest tool reviews and DIY maintenance guides delivered straight to your Facebook feed. We cover bathroom repairs, faucet replacements, drain maintenance and everything in between — written for US homeowners who want to handle more themselves.
Follow PlumbingToolsReview on Facebook →
Frequently Asked Questions
Q: Why does my shower head drip after I turn the water off?
A drip that continues for a few seconds or a minute after shutoff is usually residual pressure equalizing through a worn washer or O-ring inside the head — this is normal wear and an easy fix. A drip that continues steadily for hours points to a different cause: either mineral buildup creating backpressure inside the head, or a failing valve cartridge behind the wall that’s letting water pass even with the handle off. Watch how long the drip lasts and how steady it is before deciding which fix to try first.
Q: How do I stop my shower head from leaking at the connection?
Start by hand-tightening the connection, whether it’s at the wall or at the joint between the arm and the head — a surprising number of connection leaks are simply loose fittings. If tightening alone doesn’t stop it, remove the fitting, strip off any old PTFE tape, and rewrap with three to four fresh layers, wound clockwise when facing the thread end, before reinstalling. This resolves the vast majority of connection leaks without needing any replacement parts.
Q: Can I fix a leaking shower head without turning off the main water supply?
If your shower has a dedicated shut-off valve, yes — close that instead of the main and the rest of the house is unaffected. If there’s no dedicated shut-off, you’ll need to close the main supply for the short time it takes to remove the head or arm, since these connections are directly pressurized whenever the main is open, regardless of whether the shower handle itself is on or off.
Q: How long does a shower head washer typically last?
A standard rubber washer or O-ring typically lasts several years under normal use, though hard water shortens that lifespan noticeably since mineral exposure hardens and cracks rubber seals faster than in soft water areas. If you’re replacing a washer for the first time in a fixture that’s five or more years old, it’s worth checking the O-ring at the arm-to-head joint at the same time, since both seals age on a similar timeline.
Conclusion
Identify exactly where the leak is coming from before starting any repair — the wall connection, the shower head face, or the arm-to-head joint each point to a different fix, and diagnosing correctly the first time saves you from disassembling the fixture twice. Most shower head leaks come down to a washer, O-ring, or thread seal, and all three are beginner-friendly fixes that take well under 30 minutes and cost only a few dollars in parts.
A leak that persists after trying all three fixes points to the shower valve cartridge behind the wall, which is a slightly more involved repair worth confirming before you buy any parts. For further reading, our guide to the best shower heads covers strong replacement options, our guide to installing a shower head walks through full replacement, and our guide to the best faucet cartridges covers the wall-valve component if that turns out to be the actual source of the leak.
✍️ About This Guide
PTR Editorial Team — Plumbing Guides. We compare manufacturer specifications, installation requirements, compatibility and available product documentation to help homeowners choose suitable tools and parts. How we review →