Please note: Information in this guide is based on our research at time of writing and is subject to change. Always check the care label or product listing for the manufacturer’s specific cleaning instructions before applying any cleaner to your shower curtain liner.
Introduction
A shower curtain liner has one of the toughest jobs in the bathroom, and one of the least forgiving environments to do it in. It’s exposed to a constant cycle of moisture and warmth, then typically left bunched against the tub or wall between uses without much chance to fully dry. That combination makes liners especially prone to mold and mildew, and the telltale pink or black spots — along with a musty smell that lingers even after the bathroom airs out — are one of the most common bathroom complaints in the US.
The good news is that most liners can be effectively cleaned, and the mold kept from returning with a few consistent habits. This guide is specifically about mold and mildew, a moisture problem rather than a mineral one — if what you’re seeing is a chalky white film instead of pink or black spots, you’re more likely dealing with hard water buildup, and our how to remove hard water stains from shower glass guide covers that separate issue.
At a Glance
| Why It Happens |
Repeated moisture exposure without fully drying between uses |
| Best General Approach |
Cleaning method depends on liner material — PEVA/plastic vs fabric |
| Tools Needed |
A mild cleaning solution, a scrub brush or cloth, and for machine-washable liners, a washing machine |
| Time Needed |
A standard cleaning takes 15-30 minutes; prevention habits take seconds per use |
✏️ Our Take
Mold on a shower curtain liner is almost always a moisture problem, not a durability problem — even a high-quality liner will develop mold if it’s left damp and folded against itself after every use. The cleaning method differs by material: PEVA and plastic liners respond well to a simple wipe-down or soak, while fabric liners generally need a proper machine wash. But cleaning alone doesn’t solve the underlying issue — the habits that keep a liner spread out and dried between uses matter more for long-term prevention than any single deep clean.
Why Shower Curtain Liners Are Prone to Mold
A shower curtain liner sits at the intersection of everything mold needs to grow: warmth, high humidity, and a surface that stays damp far longer than it should. Every shower fills the stall with warm, moisture-saturated air, and the liner — hanging directly in that airflow — absorbs and traps a share of it. Unlike shower glass or tile, which dry relatively quickly once the water is shut off, a liner often gets pushed to one side or left bunched against the tub or wall right after use, where its folds trap moisture against itself with almost no airflow to help it dry.
That trapped moisture is only half the equation. Mold and mildew are living organisms, and like anything else, they need food as well as water. Soap scum, body oil, and shampoo residue all end up on the liner’s surface over time, and that organic film is exactly the kind of material mold spores feed on. A liner that’s rinsed and dried regularly never builds up enough residue to feed significant growth. One that’s left damp and unwashed for weeks gives mold both the moisture and the food source it needs, which is why the two problems — dampness and residue buildup — tend to show up together.
Bathrooms without much airflow make the problem worse. A bathroom exhaust fan pulls humid air out after a shower, speeding up how quickly everything in the room — including the liner — dries. Without one, humidity lingers longer, extending the window during which the liner stays damp enough for mold to take hold. None of this means a liner is defective — the conditions that cause mold are simply baked into how a shower functions, and managing them is a matter of habit as much as cleaning product.
PEVA/Plastic vs Fabric — Different Cleaning Approaches
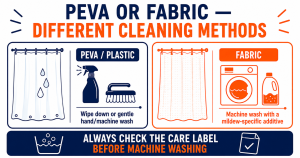
Before reaching for a cleaner, it’s worth knowing which material you’re actually dealing with, since PEVA and plastic liners and fabric liners respond to genuinely different cleaning methods. Treating one like the other either wastes effort or, in some cases, damages the liner.
PEVA and plastic liners are the more common option and generally the easier of the two to maintain. Because the material doesn’t absorb water the way fabric does, most mold and mildew sits on the surface rather than working its way into the material itself, which means a simple wipe-down or soak is often enough. Many PEVA and plastic liners can also be hand-washed, and for some, a gentle machine cycle alongside a couple of towels for balance is safe — but this varies by product, so always check the specific liner’s care instructions first rather than assuming.
Fabric liners behave differently. The material absorbs moisture rather than shedding it, which means mold and mildew can work into the fibers themselves rather than staying on the surface. That typically calls for a proper machine wash rather than a wipe-down, and depending on how established the mildew is, may benefit from a slightly different detergent or additive approach than a regular laundry load. The next two sections walk through each method separately, since the right technique genuinely depends on which material you’re working with.
💡 Tip: Always check the specific care label or product listing before machine washing any liner — not every PEVA or plastic liner is machine-safe, and using the wrong method can damage the material.
Step 1: Remove and Pre-Rinse the Liner
Regardless of material, every cleaning approach starts the same way: get the liner off the rod and take a clear look at what you’re actually dealing with before choosing a method.
- Unhook or unclip the liner from the rod. Working with it fully off the rod, rather than trying to clean it while it’s still hanging, gives you far better access to both sides and the full length of the material.
- Lay it flat or hang it separately to inspect the extent of buildup. Spread it out somewhere you can see the whole surface — mold and mildew spots are often more widespread than they appear when the liner is bunched on the rod, especially along the bottom hem and in the folds.
- Give it a quick rinse under the shower or with a hose. A plain-water rinse before applying any cleaning solution removes loose surface debris, soap residue, and the lightest surface mold, so the actual cleaning step in Step 2 or Step 3 can focus on what’s left rather than fighting through a layer of grime first.
Step 2: Clean a PEVA/Plastic Liner
With loose debris rinsed away, a PEVA or plastic liner is ready for a more targeted clean. This method works whether the liner stays hanging over the tub during cleaning or gets laid flat on a work surface.
- Mix a mild cleaning solution. A diluted mild detergent or a diluted vinegar solution both work well on most mold and mildew spots found on PEVA and plastic liners.
- Apply the solution and scrub spot by spot. Use a scrub brush or cloth to work the solution directly into visible mold and mildew spots, giving stubborn areas a little extra time and attention rather than scrubbing the entire liner uniformly.
- If the label allows it, run a gentle machine cycle instead. For a liner that’s confirmed machine-wash safe, a gentle cycle with a couple of towels added helps agitate and scrub the liner without the towels themselves getting damaged, and the towels help balance the load.
- Rinse thoroughly after either method. Whether hand-scrubbed or machine-washed, rinse until no cleaning solution residue remains, since leftover residue can attract new grime faster.
- Avoid high heat in washing or drying. Hot water and high-heat drying can warp, cloud, or otherwise damage PEVA and plastic material — stick to cool or lukewarm water and a low-heat or no-heat drying approach, covered in more detail in Step 4.
⚠️ Warning: Never combine a vinegar-based cleaning solution with a bleach-based product — mixing acidic and chlorine-based cleaners can produce dangerous fumes. Choose one cleaning approach and rinse thoroughly before switching products.
Step 3: Clean a Fabric Liner
A fabric liner needs a different process, since the mildew you’re dealing with is likely worked into the fibers rather than sitting purely on the surface.
- Check the care label for water temperature guidance. Most fabric liners are machine washable, but the correct water temperature varies by product, and washing at the wrong temperature risks shrinking or damaging the fabric.
- Add a mildew-fighting boost alongside regular detergent. A small amount of baking soda, or a mildew-specific laundry additive, added to the wash alongside your regular detergent can help break down existing mildew more effectively than detergent alone.
- Run the full cycle at the recommended setting. Follow the water temperature and cycle length indicated on the care label rather than defaulting to your usual laundry settings.
- Skip the fabric softener. Fabric softener can reduce the water-repellent treatment some fabric liners are designed with, making the liner absorb more water going forward rather than less.
- Inspect before drying. If mildew staining is still visible after the wash cycle finishes, repeat the wash rather than drying it — heat-drying set-in mildew stains can make them considerably harder to remove afterward.
Step 4: Dry Completely Before Rehanging
This last step matters as much as the cleaning itself. A liner that goes back on the rod still damp is essentially restarting the exact cycle that caused the mold in the first place.
- Air-dry the liner fully spread out, not bunched or folded. Hang it somewhere with good airflow and enough space that no part of the material is resting against itself, since folded sections trap moisture and dry far more slowly than exposed ones.
- For a machine-washed liner, use a low-heat or no-heat drying setting. High heat is risky for both PEVA/plastic and fabric liners — it can warp plastic material and, depending on the fabric, cause shrinking or fiber damage.
- Don’t rehang until it’s genuinely dry to the touch, not just dry-looking. A liner that feels even slightly damp, especially along the bottom hem or in any folds, hasn’t finished drying — rehanging it at that point undoes much of the benefit of cleaning it in the first place.
Daily and Weekly Habits That Prevent Mold
Once a liner is clean, keeping it that way takes far less effort than the cleaning process itself did — provided the right habits are actually in place. A handful of small changes make a bigger difference over time than any single deep clean.
Spreading the liner out flat after each shower, rather than leaving it bunched against the wall or tub edge, is the single most effective daily habit available. It takes only a few seconds, and since mold needs sustained dampness to take hold, giving the liner room to air out after every use removes the exact condition mold depends on. Running a bathroom exhaust fan during and immediately after showering reinforces the same goal from a different angle — it pulls humid air out of the room faster, reducing how long the liner and everything else in the bathroom stays in a damp, mold-friendly environment.
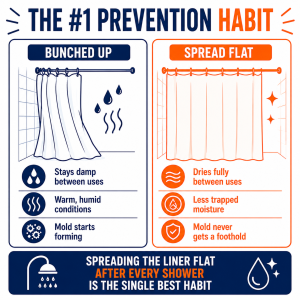
A quick weekly wipe-down rounds out the routine. Running a cloth with a mild cleaning solution over the liner’s surface once a week catches soap scum and body oil residue before it has time to build up into the kind of organic film mold feeds on, meaning it never reaches the point where a full deep clean like the process in Steps 1 through 4 becomes necessary. Together, these three habits — spreading the liner flat, running the exhaust fan, and a weekly wipe-down — address both halves of what mold needs to grow: moisture and food.
US Regional Context: Bathrooms in humid regions across the US, or any bathroom without a working exhaust fan, are especially prone to faster mold and mildew buildup on shower curtain liners. Households in these conditions may find a weekly wipe-down and consistently spreading the liner flat between uses makes a bigger difference than in drier climates or well-ventilated bathrooms.
If you’re already updating your setup, it’s worth checking the hardware the liner hangs from at the same time. Our shower curtain rod reviews cover mount type, shape, and sizing if the rod itself needs attention alongside the liner.
When to Replace Instead of Clean
Not every liner is worth continuing to clean. A few signs reliably indicate that a liner has reached the end of its useful life, and that replacement is the more practical option than another cleaning attempt.
Heavy, ingrained mold staining that doesn’t lift even after a proper cleaning attempt is the clearest sign — the mold has likely worked deep enough into the material that it’s no longer just a surface problem. A persistent musty smell that remains after a full, correctly-executed wash is another strong indicator, since it usually means mold or mildew has established itself somewhere the cleaning process isn’t fully reaching. Visible material breakdown — cracking, tearing, or peeling, particularly around the grommets or along the bottom hem — is a third sign worth watching for, since a liner in that condition won’t hold up to cleaning attempts the way intact material does, regardless of the method used.
If any of those apply, replacement is the more practical path forward. Our 5 Best Shower Curtain Liners review covers durable PEVA and fabric options across a range of price points, including liners with rustproof grommets and heavier-gauge material that hold up to daily use and cleaning better over time than a lightweight, standard-weight liner.
Need a Professional Plumber?
If persistent mold or moisture problems in your bathroom seem to be coming from somewhere beyond the liner itself — a ventilation issue or a hidden leak, for example — search PlumberArchive.com — the US plumber directory with 12,000+ verified local plumbers across all 50 states.
Find a trusted plumber near you → PlumberArchive.com
Frequently Asked Questions
Q: Can I put a shower curtain liner in the washing machine?
In many cases, yes — but it depends on the specific liner. Most fabric liners are designed to be machine washable, and many PEVA and plastic liners can also tolerate a gentle machine cycle, especially with a couple of towels added for balance. That said, not every liner is machine-safe, and the correct water temperature and cycle setting vary by product, so check the care label or product listing before washing rather than assuming. When machine washing is off the table, hand-scrubbing with a mild cleaning solution works well for most PEVA and plastic liners.
Q: Does vinegar actually kill mold, or just remove the visible stain?
Vinegar is mildly acidic, and that acidity does have a genuine effect on mold and mildew beyond just lifting visible staining — it’s a widely used household option for exactly that reason. It works best on light-to-moderate mold and mildew and generally performs better when given a few minutes of contact time against the surface rather than being wiped off immediately. For heavy, deeply set mold, especially in fabric that’s absorbed it into the fibers, a proper machine wash with a mildew-specific additive is typically more thorough than a vinegar wipe-down alone.
Q: How often should I deep clean my shower curtain liner?
There’s no fixed schedule that applies to every household — it depends on how consistently you’re already spreading the liner flat and running an exhaust fan between uses. A liner that gets those daily habits may only need a deep clean every few weeks to a month, while one that’s regularly left damp and bunched up will need attention far more often. A weekly wipe-down, covered above, is a good middle step that reduces how often a full deep clean becomes necessary.
Q: Is a moldy shower curtain liner actually harmful to breathe, or just unpleasant?
For most people, mold on a shower curtain liner is primarily an unpleasant nuisance rather than a serious health hazard, but it isn’t something to ignore — mold spores can irritate people with allergies, asthma, or other respiratory sensitivities, and a musty bathroom smell is itself a sign of an ongoing moisture problem. If mold keeps returning quickly no matter how often you clean, treat that as a signal to address ventilation and moisture control more seriously rather than continuing to clean around it.
Conclusion
Cleaning mold off a shower curtain liner comes down to matching the method to the material: a mild detergent or diluted vinegar solution for PEVA and plastic liners, a proper machine wash with a mildew-fighting boost for fabric ones, and full, spread-out drying before rehanging either type. But the cleaning itself is only half the job — the daily habit of spreading the liner flat after every shower, paired with running the exhaust fan and a quick weekly wipe-down, does more to keep mold from coming back than any single deep clean. And if a liner has reached the point of ingrained staining, a persistent smell, or visible material breakdown, replacing it is a more practical use of your time than continuing to fight a losing cleaning battle.
Prices and ratings may change. Always check Amazon for current prices.
✍️ About This Guide
Written by Mike Reynolds, DIY Home Improvement Writer at PlumbingToolsReview — former residential contractor helping US homeowners tackle plumbing repairs with confidence. Learn how we test →


