Please note: Information in this guide is based on our research at time of writing and is subject to change. Always consider your own bathroom’s humidity, ventilation, and how often the caddy is used when applying these suggestions.
Introduction
A wooden bathtub caddy takes on more repeated water exposure than almost any other accessory in the bathroom. Where a countertop organizer or a toothbrush holder might catch the occasional splash, a bathtub caddy sits directly over standing bath water every single time it’s used — often for twenty minutes or more at a stretch, several times a week. That’s a fundamentally different exposure pattern than most bathroom accessories ever face, and it’s exactly why wood care matters so much more here than it does almost anywhere else in the bathroom.
The good news is that the difference between a wooden caddy that lasts for years and one that warps, cracks, or develops mold within months usually has very little to do with the quality of the wood itself. Two identical caddies, one cared for consistently and one left to dry on its own after every use, can age at completely different rates. This guide walks through what that consistent care looks like, so your caddy holds up for years instead of needing replacement within its first.
At a Glance
| Cleaning Frequency |
Wipe down after each use; deeper clean every 1–2 weeks |
| Tools Needed |
Mild soap, soft cloth, food-safe mineral oil for periodic conditioning |
| Time Needed |
2–3 minutes after each use; 10–15 minutes for periodic oiling |
| Critical Habit |
Always dry thoroughly and store upright or ventilated — never left flat in a damp spot |
✏️ Our Take
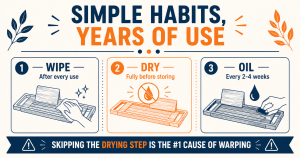
A wooden bathtub caddy faces more repeated water exposure than nearly any other bathroom accessory, which means the maintenance habits matter more here than almost anywhere else in the bathroom. The good news is that proper care is genuinely simple — wipe it down after each use, let it dry completely before storing it, and condition the wood with a food-safe oil every few weeks. Skipping the drying step is the single most common reason a wooden caddy warps or develops mold prematurely. Consistent small habits do far more for a wooden caddy’s lifespan than any one deep-cleaning session.
Why Wood Care Matters More for a Bathtub Caddy
Most bathroom accessories get wet, dry off between uses, and rarely face standing water for any real length of time. A wooden bathtub caddy is different. It’s designed to rest directly across the width of the tub, which means its underside sits in close, sustained contact with bathwater for the entire duration of every bath — often fifteen, twenty, or more minutes at a time. Multiply that by several uses a week, and a wooden caddy accumulates far more cumulative moisture exposure over a year than almost anything else in the bathroom.
Wood is a porous, natural material, and that porosity is part of what makes it appealing in the first place — it’s part of why bamboo and teak caddies feel warmer and more substantial than plastic or metal alternatives. But that same porosity means wood absorbs moisture readily, and repeated absorption without a chance to fully dry back out is what eventually causes trouble. Water that soaks into the wood’s fibers and doesn’t fully evaporate before the next use gradually breaks down the wood’s cell structure, which is what produces warping over time. Trapped moisture beneath the surface also creates exactly the damp, dark conditions mold needs to take hold, often before it’s visible from the outside.
None of this means a wooden caddy is a poor choice — it simply means the maintenance habits around it carry more weight than they would elsewhere. A caddy that’s dried thoroughly and conditioned periodically can last for years under the same water exposure that would degrade an unmaintained one within months. The wood itself usually isn’t the deciding factor in how long a caddy lasts — the routine around it is.
Daily and After-Use Cleaning
The single most impactful habit for a wooden bathtub caddy is also the simplest: wipe it down immediately after every use, before setting it aside. This routine takes only a couple of minutes but prevents water from sitting on the wood’s surface long enough to soak in.
1. As soon as you’re done with your bath, lift the caddy off the tub rather than leaving it resting in place with water still pooled on its surface.
2. Wipe down every surface — top, underside, and any recessed areas like soap dish cutouts or book ledges — with a soft, absorbent cloth or towel.
3. Pay particular attention to any splashed bath products, soap residue, or lotion, since these can sit on the wood’s finish and, left long enough, contribute to buildup that’s harder to remove later.
4. Once wiped down, set the caddy somewhere it can finish air-drying rather than immediately returning it to a still-damp spot across the tub.
This after-use wipe-down is a small habit, but it’s the one that does the most cumulative work over the life of the caddy. A caddy that’s wiped down after every single use rarely accumulates enough standing moisture to cause real problems, even without a strict deep-cleaning schedule layered on top. Skipping it even occasionally, on the other hand, gives water more chances to soak in than the wood can fully recover from between uses.
💡 Tip: Keep a small towel or cloth near the tub specifically for wiping down the caddy after each use — making this a genuine habit, rather than an occasional afterthought, is the single biggest factor in how long a wooden caddy lasts.
Deeper Cleaning Every 1-2 Weeks
On top of the after-use wipe-down, a wooden bathtub caddy benefits from a more thorough cleaning roughly every one to two weeks, depending on how often it’s used and how much product residue tends to build up on its surface.
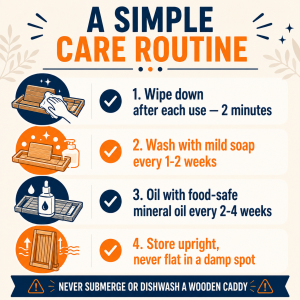
1. Wash the caddy with a mild soap — a gentle dish soap or castile soap works well — applied with a soft cloth or sponge rather than anything abrasive.
2. Avoid harsh chemical cleaners, bleach-based products, or anything with a strong solvent, since these can strip away the wood’s protective finish and leave the surface more vulnerable to moisture going forward.
3. Skip abrasive scrubbers, scouring pads, or anything textured enough to scratch the finish — a soft cloth or a non-abrasive sponge is enough to lift soap scum and residue without damaging the surface underneath.
4. Rinse gently with a damp cloth to remove any soap residue, rather than running the caddy under a faucet or submerging it.
5. Dry the caddy thoroughly and immediately with a clean towel as soon as you’re done washing it — this deeper clean introduces more moisture than a quick wipe-down, so the drying step afterward matters even more here.
This deeper clean doesn’t need to be complicated or time-consuming — ten to fifteen minutes every week or two is generally enough to keep soap scum, mineral deposits, and general grime from building up to the point where they start affecting the wood’s appearance or finish. A mild soap and gentle touch protect the finish that keeps water out of the wood in the first place.
⚠️ Warning: Never put a wooden bathtub caddy in a dishwasher or leave it soaking in water — both accelerate warping and cracking far more than normal daily use. Hand washing with a quick, thorough dry is always the safer approach.
Conditioning and Oiling the Wood
Cleaning keeps a wooden caddy free of residue and buildup, but conditioning is what actually replenishes the wood’s natural moisture-resistant properties as they wear down from repeated water exposure. Skipping this step is one of the more common reasons an otherwise well-cleaned caddy still ends up looking dried out or developing small surface cracks over time.
1. Choose a food-safe mineral oil — the same type commonly used to condition wooden cutting boards and butcher blocks — rather than a general-purpose furniture oil or anything not rated as food-safe, since the caddy regularly comes into contact with soap, skin, and bath products.
2. Apply the oil every two to four weeks, adjusting the frequency based on how often the caddy is used and how humid your bathroom tends to be. A caddy used daily in a consistently humid bathroom will need oiling more often than one used a few times a week in a well-ventilated space.
3. Apply a thin, even coat with a clean, soft cloth, working with the direction of the wood grain rather than against it.
4. Let the oil absorb for the amount of time specified on the product’s instructions — this is typically anywhere from fifteen minutes to a few hours, depending on the specific oil.
5. Wipe away any excess oil that hasn’t absorbed with a clean, dry cloth before returning the caddy to regular use.
Consistent conditioning does more for a wooden caddy’s long-term appearance and durability than almost any other single maintenance step, since it directly restores the protective barrier that repeated washing and water exposure gradually wears away. A caddy oiled on a regular schedule keeps its color and finish looking new far longer than one that’s only cleaned.
Proper Drying and Storage Between Uses
Cleaning and conditioning only address part of the picture — how a caddy is stored between uses matters just as much, since a caddy that’s cleaned properly but left to sit in a damp, flat position afterward can still develop the same warping and mold problems this guide is trying to prevent.
After cleaning, dry the caddy completely with a towel, and if your schedule allows it, let it finish air-drying fully before putting it back into regular use or storing it away. Whenever possible, store the caddy standing upright or resting on its side in a well-ventilated spot rather than laying it flat in a damp corner of the bathroom. Standing the caddy up allows air to circulate around all of its surfaces at once, including the underside, the area most prone to trapped moisture. A caddy left flat, by contrast, traps moisture against whatever surface it’s resting on, which slows drying and creates the conditions that lead to warping or mold over time.
A bathroom with a working exhaust fan or a window that can be opened after a bath will help a caddy dry faster regardless of where it’s stored, since ambient humidity affects drying time as much as the caddy’s position does. Running the fan for twenty to thirty minutes after a bath, or cracking a window, meaningfully speeds up how quickly the caddy returns to a fully dry state.
US Regional Context: Bathroom humidity varies significantly across US regions and by how well a specific bathroom is ventilated. In consistently humid climates or bathrooms without a strong exhaust fan, a wooden bathtub caddy may need more frequent oiling and more careful drying attention than the general guidance above suggests.
Signs of Damage and When to Replace
Even with consistent care, a wooden bathtub caddy won’t last indefinitely, and knowing which signs point to normal cosmetic wear versus a genuine structural problem helps you decide when it’s actually time for a replacement rather than another round of maintenance.
Visible cracking along the wood grain, especially cracks that run through a significant portion of a plank or support arm, is a sign the wood’s structural integrity has been compromised rather than just its finish. Warping that affects how stably the caddy sits across the tub — rocking, uneven contact with the tub’s edges, or arms that no longer sit flush — is another structural concern, since an unstable caddy risks tipping or dropping items into the bath. Dark spots or discoloration that seem to originate from beneath the surface finish, rather than sitting on top of it, often indicate mold or mildew growing in wood that’s absorbed moisture the finish could no longer keep out. A rough, dried-out texture that doesn’t improve even after a fresh coat of conditioning oil is also worth watching, since it suggests the wood has lost enough of its natural moisture-resistant properties that oiling alone can no longer restore them.
By contrast, minor surface scratches, small dents from normal use, or a gradual, even fading of the wood’s color from repeated water and light exposure are cosmetic issues that don’t affect the caddy’s function or safety, and they don’t require replacement on their own. The distinction that matters is cosmetic versus structural: cracking, unstable warping, or persistent mold beneath the surface mean it’s time to retire the caddy rather than keep maintaining it. If you’ve reached that point, our bathtub caddy reviews can help you compare current options built to hold up well over time.
Need a Professional Plumber?
Maintaining a bathtub caddy is a no-tools task everyone can handle without any special skills. But if you’re dealing with a tub or fixture issue that goes beyond routine accessory care, search PlumberArchive.com — the US plumber directory with 12,000+ verified local plumbers across all 50 states.
Find a trusted plumber near you → PlumberArchive.com
Frequently Asked Questions
Q: How often should I oil a wooden bathtub caddy?
Most wooden bathtub caddies benefit from conditioning oil every two to four weeks, though the right frequency depends on how often the caddy is used and how humid your bathroom is. A caddy used daily in a warm, humid bathroom without much airflow will dry out and need reconditioning faster than one used a few times a week in a well-ventilated space. Watching the wood itself works too — if it looks dry, dull, or feels rough to the touch, it’s due for another coat regardless of the exact schedule.
Q: Can I use regular cooking oil to condition a wooden caddy?
Regular cooking oils like olive oil or vegetable oil aren’t a good substitute for a proper mineral oil conditioner, even though they might seem like a convenient option already sitting in the kitchen. Most cooking oils are prone to going rancid over time, especially in a warm, humid bathroom environment, which can leave the caddy with an unpleasant odor. Food-safe mineral oil, the same type sold for cutting boards and butcher blocks, is formulated specifically to resist that kind of breakdown while still being safe for surfaces that come into regular contact with skin and bath products, which makes it the more reliable choice for a bathtub caddy.
Q: Why did my wooden bathtub caddy start warping?
Warping in a wooden bathtub caddy almost always comes down to uneven or repeated moisture absorption that the wood didn’t get a chance to fully dry out from between uses. This is especially common when a caddy is left resting flat across the tub with water still on its underside, or when it’s stored in a damp, poorly ventilated spot rather than somewhere it can air out completely. Once wood absorbs enough moisture unevenly, it swells and contracts at different rates across its surface, which is what produces the visible warping. Getting into the habit of drying the caddy thoroughly after every use and storing it upright in a ventilated spot going forward can slow or stop further warping, though a caddy that’s already warped significantly usually won’t fully reverse back to its original shape.
Q: Is bamboo or teak easier to maintain long-term?
Teak generally holds up to repeated water exposure with somewhat less maintenance effort than bamboo, thanks to natural oils in the wood that give it inherent water resistance. Bamboo is still a perfectly viable material for a bathtub caddy, but it tends to be more sensitive to moisture and generally benefits from more consistent conditioning to reach the same level of durability teak offers more naturally. Neither material eliminates the need for the basic care habits covered in this guide — regular drying, periodic cleaning, and conditioning oil — but if long-term upkeep is a priority and cost isn’t the deciding factor, teak is typically the lower-maintenance option of the two. For a closer look at how these and other materials compare, our bamboo vs stainless steel bathroom accessories comparison covers the tradeoffs across material types in more detail.
Conclusion
A wooden bathtub caddy asks for more consistent care than almost any other bathroom accessory, but that care doesn’t need to be complicated. Wipe it down after every use, deep clean every week or two, condition the wood every few weeks with a food-safe oil, and always make sure it’s fully dry before storage — that last habit alone prevents most warping and mold problems a wooden caddy is likely to face over its lifetime.
None of this requires special skills, just consistency. A caddy maintained this way can realistically last for years under regular use, while one left to dry on its own after every bath is far more likely to need replacing within its first year. If you’re shopping for a caddy built to hold up to this kind of care, our bathtub caddy reviews compare current options across materials and price tiers, and our guide to organizing a small bathroom vanity covers similar habit-forming principles for the rest of the bathroom.
Prices and ratings may change. Always check Amazon for current prices.
✍️ About This Guide
Written by Mike Reynolds, DIY Home Improvement Writer at PlumbingToolsReview — former residential contractor helping US homeowners tackle plumbing repairs with confidence. Learn how we test →