Please note: Information in this guide is based on our research at time of writing and is subject to change. Always consider your own bathroom’s layout and household needs when applying these suggestions.
Introduction
A cluttered bathroom vanity feels like a space problem — too many bottles, not enough counter, nowhere for anything to actually go. But in most bathrooms, the real issue isn’t square footage at all. It’s that nothing on the vanity has a dedicated spot, so everything ends up wherever it was last set down. A genuinely small vanity can stay organized indefinitely once every item has an assigned home; a large vanity with no system behind it will look cluttered within a week regardless of how much counter space it started with.
The fix isn’t more storage for its own sake — it’s a system built around three ideas. First, give every item that lives on or near the vanity a specific, dedicated spot, using wall-mounted or no-drill accessories to move as much as possible off the counter entirely. Second, group items by how often they’re actually used, so the things you reach for daily are the most accessible and everything else is stored a step further away. Third, be honest about what genuinely needs counter real estate versus what can live in a drawer, a cabinet, or somewhere else in the bathroom altogether. This guide walks through that system step by step, from an initial declutter through a sample layout you can adapt to your own vanity. If dedicated organizer trays and drawer inserts are what you actually need rather than a full decluttering system, our best bathroom vanity organizers roundup covers the specific products worth buying.
At a Glance
| Approach |
Declutter first, then assign zones, then add accessories |
| Cost |
Most solutions are inexpensive — roughly $10–30 per accessory |
| Time Needed |
A focused weekend afternoon for a full vanity overhaul |
| Biggest Impact Change |
Moving frequently-used items off the counter and onto the wall |
✏️ Our Take
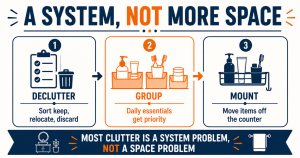
Most cluttered vanities aren’t actually short on space — they’re short on a system. Every item that sits loose on the counter is competing for the same limited surface, while wall-mounted and no-drill accessories can move a surprising amount of that clutter off the counter entirely without any renovation. The households that keep a small vanity organized long-term aren’t the ones with the most storage, they’re the ones who assigned every item a specific spot and stuck with it. Start with decluttering, then build the system around what’s actually left.
Step 1: Declutter Before You Organize
Before you buy or install a single organizing product, sort everything currently on and around the vanity into three piles: keep, relocate, and discard. This step alone often solves a meaningful portion of the clutter problem, since a surprising amount of what sits on a typical vanity doesn’t actually need to be there at all.
Work through the process methodically rather than trying to eyeball it all at once:
1. Pull everything off the counter, out of drawers, and off any shelves so you’re working with a completely clear surface and a full view of what you actually own.
2. Check expiration dates on anything that has one — sunscreen, certain skincare products, and some medications lose effectiveness or go bad well before most people think to check.
3. Be honest about duplicates. Multiple half-used bottles of the same lotion or three near-empty tubes of the same toothpaste are common, and consolidating them into one full container immediately frees up real space.
4. Sort what’s left into keep-on-vanity, relocate-elsewhere-in-the-home, and discard piles before you touch a single organizing product.
By the time you’ve worked through all four steps, most people find their vanity’s actual footprint of “must stay here” items is smaller than they expected. That’s the whole point — decluttering isn’t a chore you do before the real organizing starts, it’s the step that determines how much organizing you actually need.
This step matters more on a small vanity than a large one, precisely because there’s no spare capacity to absorb items that don’t earn their spot. On a bigger counter, a half-used bottle of something you rarely reach for can sit unnoticed in a corner for months. On a genuinely small vanity, that same bottle is directly competing with something you use every day, which is exactly why decluttering has an outsized impact here compared to almost any other bathroom in the house.
💡 Tip: Resist the urge to buy organizing products before decluttering. Adding storage to a vanity that’s full of items you don’t actually need just organizes the clutter instead of removing it.
Step 2: Group Items Into Zones
Once you’ve decluttered, the items you’re keeping need a system for where they live, and that system starts with grouping by function and frequency of use rather than by category alone. Not everything you use in the bathroom deserves prime counter real estate, and treating every item as equally important is one of the fastest ways a small vanity ends up cluttered again within weeks.
Daily essentials — a toothbrush and toothpaste, hand soap, and whatever skincare products you use every single morning and night — need to be the most accessible items on the vanity. These are the things you’ll reach for without thinking, so they belong somewhere immediate: the counter itself if there’s room, or a wall-mounted spot within easy reach if there isn’t.
Occasional-use items sit a tier down. Extra hand towels, backup supplies of things you use daily but don’t need to restock constantly, and grooming tools you reach for a few times a week can all live in a drawer or a cabinet rather than out on the counter. They’re close enough to grab when needed without permanently occupying visible space.
Rarely-used items are the third tier, and they’re the ones most commonly misplaced on a small vanity by default rather than by choice. Seasonal products, rarely-needed first aid supplies, or anything you reach for a handful of times a year should be stored elsewhere in the bathroom or home entirely — a linen closet, an under-sink bin, or a hallway cabinet — rather than occupying space on a vanity that’s already tight.
Step 3: Move Items Off the Counter With Wall-Mounted Accessories
Once your daily essentials are identified, wall-mounted or no-drill adhesive accessories are the single most effective way to reclaim counter space without any renovation. Each individual accessory only frees up a few square inches, but on a genuinely small vanity, a handful of small wins add up to a meaningfully clearer counter.
A wall-mounted soap dispenser is one of the easiest places to start, since a countertop pump bottle is one of the most common single items taking up space right at the edge of the sink. Moving it to the wall clears that spot permanently without affecting how easy the dispenser is to reach. A toothbrush holder is another strong candidate — several wall-mounted and no-drill options exist specifically to get toothbrushes and toothpaste off the counter and onto the wall near the sink, which our toothbrush holder reviews cover in more detail.
Most of these accessories mount with no-drill adhesive rather than screws and anchors, which means installation is quick and renter-friendly. If you’ve installed an adhesive-mounted accessory elsewhere in the bathroom before, the same core principles apply here — our guide to installing an adhesive shower caddy covers surface prep and cure time in detail, and the same lessons carry over directly to any adhesive-mounted vanity accessory.
Beyond the obvious candidates, a small corner shelf or a mirror-mounted organizer can absorb items that don’t fit neatly into a single-purpose holder — hair ties, a razor, a small container of cotton swabs. These aren’t always necessary, but on a vanity where every square inch of counter is genuinely contested, they’re worth considering once the higher-priority accessories are in place. The goal at every step is the same: identify what’s currently occupying counter space purely out of habit, and give it a specific spot somewhere that isn’t the counter.
⚠️ Warning: Before choosing adhesive wall-mounted accessories, confirm your bathroom wall surface is smooth and non-porous (glazed tile, glass, or painted drywall in good condition) — textured surfaces or natural stone generally don’t hold adhesive mounts well long-term.
Step 4: Choose the Right Accessories for Your Vanity
Once you know which categories of accessory you need, the next decision is matching specific products to your household’s actual needs rather than buying whatever’s generically popular. Sizing an accessory to genuine need, rather than maximum available capacity, is what keeps a small vanity from feeling crowded again a few months later.
A family with kids has different needs than a single-person household. Multiple people sharing one bathroom generally benefits from a multi-slot toothbrush holder rather than a single-brush stand, since a holder sized for one person just pushes the overflow back onto the counter. The same logic applies to trash cans — a household of four generates more daily bathroom waste than a single person does, and a larger-capacity can that only needs emptying once or twice a week is a genuine convenience upgrade over a small one that fills up daily. Our bathroom trash can reviews break down capacity and footprint tradeoffs across several sizes.
A single-person household can generally go the other direction and prioritize a compact footprint over maximum capacity — a smaller soap dispenser, a single-brush toothbrush holder, and a minimal overall countertop presence, since there’s no need to plan around shared usage. Neither approach is objectively better; the goal is matching the accessory to how your specific household actually uses the space, not defaulting to whatever has the most capacity available.
Material is worth a second thought too, since a vanity accessory lives in one of the more consistently humid parts of the house. Stainless steel and quality plastics generally hold up better over years of daily moisture exposure than lower-grade metal that can develop rust spots, and a material that resists water stains will simply look better after a year of use than one that doesn’t. It’s a smaller factor than capacity or mounting style, but it affects how long an accessory stays looking good rather than needing an early replacement.
Step 5: Maintain the System
An organized vanity doesn’t stay organized on its own — it stays organized through a handful of small, consistent habits. The single most important one is simply putting items back in their assigned spot immediately after use, rather than setting something down “just for now” and letting it become permanent clutter by default.
A quick monthly check helps catch problems before they build back up. Look for expired products that slipped through the initial declutter, duplicate items that have crept back in, and anything that’s drifted out of its assigned zone. This check takes only a few minutes but prevents the slow, gradual re-cluttering that eventually undoes an otherwise well-organized system.
Finally, resist the urge to let new purchases pile up on the counter without a designated spot first. Every new product that enters the bathroom should get assigned a zone — daily, occasional, or rarely-used — the same way the original decluttering process sorted everything else, rather than defaulting to whatever open counter space happens to be available at the time.
US Regional Context: Bathroom vanity sizes vary significantly across US home ages — older homes, particularly those built before the 1980s, often have noticeably smaller vanities and less built-in storage than newer construction. If you’re working with a genuinely small or older vanity, prioritizing wall-mounted accessories over countertop ones makes an even bigger difference.
A Sample Small Vanity Layout
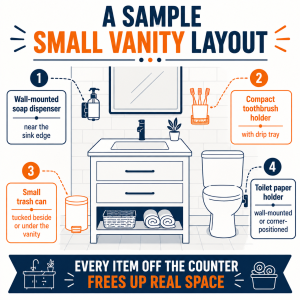
To see how these individual choices come together as a system, it helps to walk through a practical example. Picture a genuinely small vanity in an older home, with a single sink and only a narrow strip of counter on either side.
A wall-mounted soap dispenser sits just above and to the side of the sink edge, within easy reach but off the counter entirely. A compact toothbrush holder with a built-in drip tray mounts nearby, keeping toothbrushes upright and air-drying without leaving a wet ring on the counter itself. The trash can isn’t on the counter at all — it’s tucked beside or under the vanity, out of the way but still within a step of reach when needed. Near the toilet rather than the vanity, a wall-mounted or corner-positioned toilet paper holder keeps that item off any surface entirely and within easy reach from a seated position.
What’s left on the actual counter in this layout is minimal — hand soap if it isn’t wall-mounted, and perhaps one or two daily skincare items in active rotation. Everything else has a specific, deliberate spot, which is exactly the point: a small vanity organized this way doesn’t feel small, because nothing is competing for the same limited surface anymore.
None of these individual choices requires a renovation, a plumber, or a significant budget — each one is a self-contained decision you can make and install independently, in whatever order fits your schedule. The value comes from treating them as pieces of one coordinated system rather than a random assortment of accessories added one at a time whenever the counter starts feeling crowded again.
Need a Professional Plumber?
Organizing a vanity is a no-tools project for almost everyone. But if a broader bathroom renovation is on the table, or you’re dealing with a vanity that needs plumbing work before you can reorganize around it, search PlumberArchive.com — the US plumber directory with 12,000+ verified local plumbers across all 50 states.
Find a trusted plumber near you → PlumberArchive.com
Frequently Asked Questions
Q: What’s the single most effective change for a cluttered small vanity?
Moving frequently-used items off the counter and onto the wall makes the single biggest visible difference, and it’s usually the change people notice first. A wall-mounted soap dispenser or toothbrush holder each individually frees up only a small amount of counter space, but on a genuinely small vanity those small wins compound quickly. That said, decluttering first matters just as much even though it’s less visually dramatic — moving clutter you don’t actually need onto the wall just relocates the problem instead of solving it, so the sequence matters: declutter, then relocate what’s left. Skipping straight to accessories without decluttering first is the most common reason people feel like they’ve “organized” a vanity and it still looks cluttered a few weeks later.
Q: Should I choose wall-mounted or countertop accessories for a small bathroom?
For a genuinely small vanity, wall-mounted or no-drill adhesive accessories generally deliver more value, since every item you move off the counter directly increases usable surface area. Countertop accessories are still worth using for items you need to reach without looking — the difference is that on a small vanity, you’ll want to be more selective about what stays on the counter versus what moves to the wall. Larger vanities have more flexibility to keep a mix of both without feeling cluttered, since there’s enough surface that a few countertop items don’t crowd out everything else the way they would on a genuinely tight vanity.
Q: How often should I declutter a bathroom vanity?
A quick monthly check is enough to catch expired products, duplicate items, and anything that’s drifted out of its assigned zone before it builds back into real clutter. A more thorough decluttering pass — genuinely sorting everything into keep, relocate, and discard piles the way you would in an initial overhaul — is worth doing once or twice a year, or any time the vanity starts feeling cluttered again despite regular use of your organizing system. Tying it to a recurring event, like a seasonal change or a birthday, makes it easier to remember than trying to schedule it on its own.
Q: Do adhesive wall-mounted accessories work on every bathroom wall surface?
No — adhesive mounting works best on smooth, non-porous surfaces like glazed tile, glass, or painted drywall in good condition. Textured tile, natural stone, and unsealed grout lines generally don’t hold an adhesive mount reliably over the long term, regardless of how carefully the surface is prepped. If your bathroom has one of these more difficult surfaces, look for accessories with a screw-mounted or freestanding option instead of relying on adhesive alone. When in doubt, a small test with a low-cost adhesive hook in an inconspicuous spot can confirm whether your specific wall will hold before you commit to mounting a full accessory somewhere more visible.
Conclusion
A cluttered small vanity is almost always a systems problem rather than a space problem. Declutter first so you’re only organizing what you actually need, group what’s left by how often you use it, and lean on wall-mounted or no-drill accessories to move as much as reasonably possible off the counter entirely. None of these steps require a renovation or a large budget — they require deciding, once, where every item belongs and sticking with it.
Start with a single weekend afternoon, work through the five steps in order, and resist the temptation to skip straight to buying accessories before you’ve decluttered. A small vanity organized this way stays organized far longer than one that simply has more storage bolted onto it.
Prices and ratings may change. Always check Amazon for current prices.
✍️ About This Guide
PTR Editorial Team — Plumbing Guides. We compare manufacturer specifications, installation requirements, compatibility and available product documentation to help homeowners choose suitable tools and parts. How we review →