Please note: Information in this guide is based on our research at time of writing and is subject to change. Always consult a licensed plumber for complex issues or before making major modifications to your home’s plumbing system.
Introduction
Low water pressure is one of the most frustrating plumbing problems a homeowner can face. A weak trickle from the shower, appliances that take an age to fill, a garden hose that barely reaches the lawn — it affects comfort and convenience throughout the entire home. The good news is that the vast majority of low pressure problems have a straightforward DIY fix that takes under an hour to complete.
Before reaching for the phone to call a plumber, it’s worth working through a simple checklist. Many causes of low pressure — a partially closed shutoff valve, a clogged aerator, or a misadjusted pressure regulator — are completely fixable without any specialist knowledge or expensive tools. If you’re unsure whether your pressure is actually low or simply inconsistent, our guide to water pressure too high or too low covers the symptoms of both problems in detail.
This step-by-step guide walks you through every common cause of low water pressure at home, from the simplest check to more involved solutions. Start at Step 1 and work through each check in order — most homeowners find and fix the problem before they reach the end. To get a precise measurement of your current pressure before you start, pick up one of the best water pressure gauges — they’re inexpensive, take 60 seconds to use, and every homeowner should have one in their toolkit.
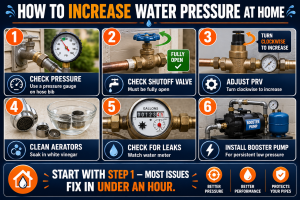
Step 1 — Check Your Current Water Pressure
Before attempting any fix, you need to know exactly what pressure you’re dealing with. Guessing wastes time — a water pressure gauge gives you a precise reading in 60 seconds and tells you exactly how far out of range you are.
Attach a water pressure gauge to an outdoor hose bib (spigot). Turn the tap on fully and read the dial. Normal residential water pressure falls between 40 and 80 PSI, with 60 PSI considered ideal for most homes. Anything below 40 PSI is classified as low pressure and will noticeably affect shower performance, appliance fill times, and garden hose reach.
Take readings at different times of day — early morning and late evening — since municipal supply pressure can dip during peak usage hours in your neighborhood. If your readings are consistently below 40 PSI, work through the steps below in order to identify and correct the cause.
💡 Tip: A water pressure gauge costs under $15 and takes 60 seconds to use — every homeowner should own one. It removes all guesswork from diagnosing pressure problems and lets you confirm a fix has worked before calling the job done.
Step 2 — Check the Main Shutoff Valve
The main shutoff valve controls all water entering your home from the municipal supply. If it isn’t fully open, you’ll experience reduced pressure throughout the entire house — every tap, every shower, every appliance. This is the most common cause of sudden whole-house low pressure, and the fix takes about ten seconds.
The main shutoff is typically located where the supply line enters the house — commonly in the basement, utility room, garage, or near the water meter. It will be one of two types:
- Gate valve — a round wheel handle. Turn it fully counterclockwise to open. Fully open means you cannot turn it any further in that direction.
- Ball valve — a lever handle. The lever must be parallel to the pipe to be fully open. If the lever is perpendicular (at a 90° angle to the pipe), the valve is fully closed.
Confirm your main shutoff is in the fully open position. A ball valve lever at even a slight angle can partially restrict flow without looking obviously closed. Open it fully, wait a moment for pressure to stabilize, then retest with your gauge.
💡 Tip: This is the most common cause of sudden low pressure — check this first before anything else. Shutoff valves are often accidentally nudged during maintenance work, a move, or a meter inspection, and a partially closed valve is easy to miss at a glance.
Step 3 — Check the Pressure Regulator Valve (PRV)
Most homes connected to a municipal water supply have a Pressure Regulator Valve (PRV) — a small, brass, bell-shaped device installed on the main supply line, usually close to the main shutoff valve and water meter. Its job is to reduce the high incoming pressure from the municipal supply (which can exceed 100 PSI) down to a safe and comfortable level for your home’s pipes and appliances.
PRVs are factory-set to deliver between 50 and 60 PSI. Over time, the internal diaphragm wears out or the adjustment drifts, causing pressure to drop significantly below that range. You can adjust a PRV yourself with basic hand tools:
- Locate the adjustment bolt on top of the PRV — it sits inside a locknut
- Loosen the locknut with a wrench to free the adjustment bolt
- Turn the adjustment bolt clockwise to increase pressure, or counterclockwise to decrease it
- Adjust in small increments — a quarter turn at a time — then recheck with your pressure gauge
- Once you reach the desired pressure (aim for 60–65 PSI), retighten the locknut firmly to lock the new setting
If your PRV is old, visibly corroded, or no longer responds to adjustment, the internal diaphragm has likely failed and the valve needs replacing. See our roundup of the best pressure regulator valves for the most reliable replacement options for US homes.
⚠️ Warning: Never adjust the PRV above 80 PSI. High water pressure puts serious strain on your pipes, water heater, washing machine hoses, and other appliances — and can cause pipe joints to fail or seals to blow out. Keep your setting in the 55–70 PSI range for reliable, safe performance.
Step 4 — Clean or Replace Aerators and Showerheads
If the low pressure is isolated to one faucet or showerhead — rather than affecting the whole house — the culprit is almost certainly a blocked aerator or a clogged showerhead nozzle. Over time, mineral deposits (limescale) build up inside these small components and progressively restrict water flow. In areas with hard water, significant buildup can occur within just a few months.
Cleaning a Faucet Aerator
The aerator is the small threaded fitting screwed onto the end of your faucet spout. Unscrew it by hand (or use pliers padded with a cloth to protect the finish). Inside you’ll find a disc with a fine mesh screen — this is where mineral deposits collect and restrict flow. Soak the aerator in undiluted white vinegar for 30 minutes, then scrub gently with an old toothbrush to dislodge remaining buildup. Rinse thoroughly under running water and refit. In most cases this restores full flow immediately.
If the aerator mesh is damaged or heavily corroded beyond cleaning, replace it. Aerators are inexpensive standard fittings available at any hardware store — bring the old one to match the thread size.
Cleaning a Showerhead
Remove the showerhead by unscrewing the collar nut counterclockwise. Submerge the entire showerhead in a bowl of undiluted white vinegar and soak for 30–60 minutes. Use a toothbrush or wooden skewer to clear any individual nozzle holes that remain blocked after soaking. Rinse well, wrap the supply threads with fresh plumber’s tape, refit the showerhead, and test the flow.
If the showerhead nozzles are permanently blocked or the fixture is old and corroded, replacement is the most effective long-term fix.
💡 Tip: If only one fixture has low pressure while the rest of the house is normal, a blocked aerator is almost always the cause. It’s a five-minute fix with white vinegar and a toothbrush — always try this before replacing any hardware.
Step 5 — Check for Leaking Pipes
A leak anywhere in your home’s supply lines diverts pressurized water away from your faucets and appliances, reducing overall pressure throughout the affected zones. Even a small hidden leak inside a wall cavity or under a floor can cause a noticeable pressure drop at fixtures across the home.
The fastest way to detect a leak is with your water meter:
- Turn off all faucets, appliances, and water-using fixtures throughout the house
- Locate your water meter (usually outside near the curb, or inside near the utility room)
- Note the current meter reading, then wait 15–20 minutes without using any water
- Check the meter again — if the reading has moved, or if the small leak-indicator dial is spinning, water is escaping from the system somewhere
If you suspect a leak but cannot pinpoint the source, a water leak detector placed near suspect areas — under sinks, behind appliances, near exposed pipe joints — will alert you the moment moisture is detected. Multiple leaks, or leaks concealed inside walls or underground, should be handled by a licensed plumber without delay.
Step 6 — Consider a Water Pressure Booster Pump
If you’ve worked through Steps 1–5 and your pressure is still consistently low, the problem may be beyond your control — a low municipal supply pressure, a very long supply run from the street, or a home at a higher elevation than neighboring properties. In these situations, a water pressure booster pump is the appropriate solution.
A booster pump installs directly onto your main supply line and uses a motor and impeller to increase pressure throughout the entire home. Most residential models raise pressure by 20–50 PSI and operate automatically — activating when water is drawn and shutting off when demand stops. Key points to consider before buying:
- Flow rate (measured in GPM — gallons per minute) must match your household’s peak demand
- The pump requires a dedicated electrical outlet in the installation area
- A small pressure tank (accumulator) is often installed alongside to prevent the motor cycling on every minor draw
- Professional installation is strongly recommended — improper fitting can create dangerous pressure spikes or void the pump warranty
Before investing in a booster pump, confirm with your water utility that the incoming supply pressure at the meter is genuinely low (below 40 PSI). If pressure is adequate at the meter but drops inside the home, a failing PRV or heavily corroded galvanized pipes are more likely causes. See our roundup of the best pressure regulator valves if PRV replacement is your next step.
When to Call a Plumber
DIY fixes resolve the great majority of household low pressure problems — but there are situations where a licensed plumber is the right call. Don’t attempt to push past these on your own:
- Pressure below 30 PSI after completing all steps — this points to a supply-side issue or significant pipe damage that needs professional assessment and equipment
- Multiple leaks found throughout the home — widespread leaks indicate systemic pipe deterioration, not isolated failures, and require a full diagnosis
- Old galvanized steel pipes — galvanized pipes corrode from the inside over decades, and the rust buildup progressively chokes flow. Re-piping is the only permanent fix; partial repairs are rarely effective long-term
- PRV replacement needed — adjusting a PRV is a DIY job, but full replacement involves cutting into the main supply line under pressure and is best handled by a professional
- Leaks inside walls, under slabs, or underground — these require specialist leak detection equipment and experienced repair techniques
Frequently Asked Questions
Q: What is normal water pressure for a house?
Normal residential water pressure is between 40 and 80 PSI, with 60 PSI widely considered the ideal sweet spot. At 60 PSI, showers feel strong, appliances fill at the correct rate, and there’s enough pressure for two fixtures to run simultaneously without either dropping noticeably. Below 40 PSI is considered low pressure; above 80 PSI is high pressure and can gradually damage pipe fittings, appliance hoses, and water heater connections over time. Use a water pressure gauge on an outdoor hose bib for a quick, accurate reading at any time of day.
Q: Why is my water pressure suddenly low?
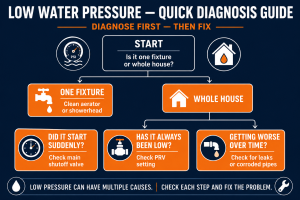
Sudden whole-house low pressure most commonly has one of three causes: the main shutoff valve has been accidentally moved to a partially closed position, the PRV has failed or its setting has shifted, or a new leak has developed somewhere in the supply lines. Start by checking the main shutoff valve (Step 2 above) — it takes ten seconds and is the most frequent culprit after any recent maintenance or meter work. If the shutoff is fully open, inspect the PRV (Step 3), then test for hidden leaks using the water meter method (Step 5). If only one fixture has suddenly lost pressure, a blocked aerator (Step 4) is almost certainly the cause.
Q: Can I increase water pressure myself?
Yes — in most cases, increasing water pressure is a straightforward DIY job. Opening a partially closed shutoff valve, cleaning a blocked aerator, and adjusting the PRV are all tasks any homeowner can complete with basic tools and no plumbing experience. PRV adjustment (Step 3) takes around 15 minutes and can deliver an immediate, meaningful pressure increase. The only steps that typically warrant calling a plumber are full PRV replacement, re-piping corroded galvanized pipes, or installing a booster pump — though booster pump installation is within reach of confident DIYers comfortable with basic plumbing and electrical work.
Q: How much does it cost to fix low water pressure?
The cost varies widely depending on the cause. Cleaning an aerator costs nothing. A replacement aerator or showerhead falls in the $ to $$ range. Adjusting the PRV is free if you do it yourself; a full PRV replacement by a licensed plumber typically runs in the $$$ range, including parts and labor. A water pressure booster pump with professional installation is a more significant investment in the $$$$ range. In the majority of cases, the DIY fixes covered in this guide — shutoff valve check, PRV adjustment, and aerator cleaning — cost very little and fully resolve the problem without any professional help needed.
Conclusion
Low water pressure feels like a major problem, but in most homes it has a simple cause and a simple fix. Start with the basics: confirm your main shutoff valve is fully open, check that your PRV is set correctly, and clean any blocked aerators. These three steps alone resolve the majority of low pressure complaints, cost next to nothing, and can be completed by any homeowner in under an hour.
If those checks don’t resolve the issue, test for hidden leaks using the water meter method and consider a booster pump if your municipal supply is genuinely undersupplied at the meter. For persistent or complex problems — old galvanized pipes, multiple leaks, or pressure below 30 PSI after all checks — a licensed plumber is the right next step. Search PlumberArchive.com
Looking for our top recommended tools in one place? Browse our curated Amazon Storefront →
to find a verified plumber in your area.
For more on diagnosing pressure issues, read our full guide to water pressure too high or too low — it covers both extremes, what causes them, and how to tell them apart. And to get an accurate pressure reading before you start any fix, pick up one of the best water pressure gauges — a small investment that removes all the guesswork from diagnosing and confirming your repair. Our step-by-step guide to testing water pressure shows exactly how, our low shower pressure guide covers the single-fixture case, and if the supply itself is weak, see the best water pressure booster pumps.
✍️ About This Review
Mike Reynolds, DIY Home Improvement Writer — Mike Reynolds spent over a decade working as a residential contractor before turning his expertise into practical writing for homeowners. He specialises in step-by-step how-to guides that make plumbing repairs accessible for beginners and experienced DIYers alike. Learn how we test →