Please note: This guide covers installing a whole-house sediment pre-filter on a private well system. Pipe materials, main line layout, and local code requirements vary by home — if anything about your specific setup doesn’t match what’s described here, a licensed plumber is the safer next step.
Introduction
Well water carries sand, silt, and rust particles far more often than municipal supply does — it’s pulled straight from the ground rather than treated and filtered before it reaches your property line. A whole-house sediment pre-filter catches that material before it works its way through your home’s plumbing, where it wears down faucet cartridges, clogs aerators, and shortens the life of anything downstream, like a water softener or water heater.
This guide covers the physical installation — mounting the housing, plumbing it into your main line, and getting it pressure-tested and running. If you haven’t picked a filter yet, our whole-house sediment pre-filters for well water roundup covers the full buying decision — cartridge housing versus spin-down, and which micron rating fits your well’s water. Come back here once you’ve got a unit in hand and are ready to install it.
At a Glance
| Skill Level |
Intermediate — involves cutting into and joining the main water line, not just swapping a part. |
| Tools Needed |
A pipe wrench or channel-lock pliers, Teflon tape, a tubing cutter or hacksaw depending on your pipe material, and union fittings plus ball valves if your line doesn’t already have them nearby. |
| Time Needed |
1 to 2 hours for most installs, longer if you’re adding shutoff valves and unions that weren’t there before. |
| Critical First Step |
Shut off the main water supply and drain the line before cutting into it — working on a pressurized line is how this job goes wrong fast. |
Mechanism Recap: Cartridge Housing vs. Spin-Down
Quick recap before you start, since the installation differs slightly depending on which you bought. A cartridge housing holds a replaceable filter element you swap out on a schedule — it’s the more common setup and typically threads or unions directly into the line. A spin-down filter uses a reusable mesh screen you flush clean instead of replacing, and mounts the same way but with a drain or catch bucket nearby for flushing. Either type follows the same general installation process below — mounting, plumbing in, and pressure testing. For the full breakdown of which mechanism and micron rating fits your well’s water, see our whole-house sediment pre-filters for well water roundup.
Choosing the Installation Location
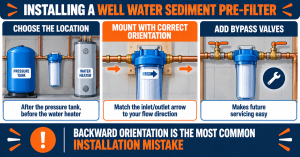
The standard placement on a well system is after the pressure tank and before the water heater or any downstream treatment equipment like a water softener — this way the sediment filter protects everything else in the house, including that equipment, from the particles it’s designed to catch. If you’re not sure where your pressure tank sits in the line, trace the main pipe from the well or pressure switch; the filter goes on the house side of the tank, upstream of everything else.
Beyond that sequencing, pick a spot with enough clearance to actually service the unit later — room below the housing to pull a long cartridge straight down, or space to open a spin-down’s flush valve without contorting yourself. A location too tight to service comfortably is one of the most common regrets after installation, since you’ll be back at this spot every few months.
Gathering Materials
Beyond the filter housing itself, gather shutoff valves and union fittings for both sides of the installation — even if your kit doesn’t include them, they’re worth adding now rather than retrofitting later. You’ll also need Teflon tape for any threaded connections, and fittings matched to your pipe material: solder fittings and a torch for copper, solvent cement for PVC, or the appropriate crimp or push-to-connect fittings for PEX. Confirm what you have before you start rather than discovering a material mismatch mid-job with the water already off.
Shutting Off Water and Cutting Into the Main Line
Shut off the main water supply, then open the lowest faucet in the house and let the line drain fully before you cut anything — a line that still holds pressure or standing water makes this job messy and, on a well system with the pump still cycling, potentially unsafe. Measure and mark the section of pipe you’re removing to make room for the housing plus its valves and unions, then cut it out with the appropriate tool for your pipe material.
Dry-fit everything — the housing, valves, and unions — before you solder, solvent-weld, or crimp anything permanently. Confirming the whole assembly actually fits the gap and lines up correctly now saves you from discovering a measurement error after a joint is already sealed.
Mounting the Housing
Check the housing for inlet and outlet markings — usually a stamped or molded arrow showing flow direction — before you connect anything. If your kit includes a wall-mounting bracket, use it; a full housing is significantly heavier once it’s filled with water, and relying on the pipe connections alone to support that weight over time strains the joints and can eventually cause a leak.
⚠️ Warning: Installing the housing backward — inlet and outlet reversed — is one of the most common mistakes on this job. Water will still flow through a backward-installed cartridge housing, but filtration is compromised or bypassed depending on the design, and you may not notice until sediment problems downstream tell you something’s wrong. Double-check the flow arrow against your actual water flow direction before final assembly.
Installing Shutoff Valves and Unions
Install a ball valve on each side of the housing, along with union fittings that let you disconnect the unit without cutting pipe again. This isn’t just a nice-to-have: without bypass valves, changing a cartridge or servicing the housing down the road means shutting off water to the entire house every time. With them, you isolate just the filter section and everything else keeps running.
💡 Tip: Install bypass valves even if your specific housing didn’t come with them or strictly require them. The extra half hour and few dollars in fittings now saves a whole-house water shutoff every time you need to service the filter later — and with well water, that’s often every few months.
Pressure Testing and Checking for Leaks
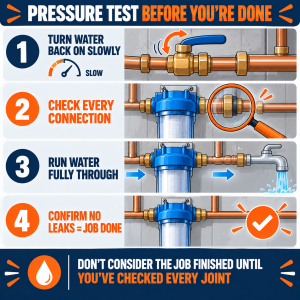
Turn the main water supply back on slowly rather than all at once — a sudden full-pressure surge into new connections is more likely to reveal a weak joint as a real leak rather than a slow drip you can catch and fix easily. Check every connection you made: both unions, both shutoff valves, and the housing’s own seal. Let water run through the system for several minutes and recheck each joint once, since a slow weep sometimes takes a few minutes of flow to show itself.
Installing the First Filter Cartridge or Screen
If you haven’t already, load the cartridge or confirm the spin-down’s mesh screen is seated before closing up the sump and restoring full flow. From here, how often you’ll be back depends entirely on your well’s water — a clean well might go two to three months between cartridge changes, while a well with heavy sand or seasonal turbidity can load a filter in a few weeks. Keep an eye on flow and pressure at first to get a feel for your specific well’s rhythm.
US Regional Context: Well-system main lines vary by region and home age — copper and galvanized steel are more common in older wells, particularly across the Northeast and Midwest, while PEX and CPVC have become standard in newer well installations nationwide for their ease of installation and resistance to mineral buildup. Whichever material you have, the post-pressure-tank, pre-treatment-equipment installation point described above is the standard convention across US well systems regardless of region.
When to Call a Professional
Call a licensed plumber if you’re not confident cutting and joining your specific pipe material — soldering copper or solvent-welding PVC both take some practice to do reliably, and a bad joint on the main line is a bigger problem than a bad joint almost anywhere else in the house. The same goes if you discover any sign the existing main line is already compromised — corrosion, a previous repair, or unexpected material — once you’ve cut into it. Some jurisdictions also have permit requirements for main-line modifications on a well system, so check your local code before starting if you’re unsure.
✏️ Our Take
Two details are worth getting right the first time, because both are annoying to fix after the fact: orientation and bypass valves. Install the housing backward and you’ll be troubleshooting a filtration problem that traces back to a five-second mistake during install. Skip the bypass valves and every future cartridge change means shutting off water to the whole house instead of just the filter. Get those two right, and the rest of this job is a straightforward afternoon of standard pipe work.
Prices and ratings may change. Always check Amazon for current prices.
Frequently Asked Questions
Q: Where should a sediment pre-filter go in a well system?
After the pressure tank and before any downstream equipment like a water heater or softener, so the filter protects everything else in the house. See the Choosing the Installation Location section above for more detail.
Q: Do I need shutoff valves and unions, or just the housing?
Technically just the housing works, but adding bypass valves and unions is strongly worth the extra effort. Without them, every future cartridge change or service call means shutting off water to the entire house.
Q: How do I know if I installed the housing backward?
Check the arrow molded or stamped on the housing against your actual water flow direction before final assembly — this is the step to catch it at. After installation, persistent sediment problems downstream despite a fresh cartridge can be a sign the orientation is reversed.
Q: Which mechanism should I buy — cartridge housing or spin-down?
That depends on your well’s water and how you’d rather maintain the system. Our whole-house sediment pre-filters for well water roundup covers the full comparison, including micron rating guidance based on your specific water conditions.
Conclusion
Installing a whole-house sediment pre-filter comes down to getting the sequence right: shut off and drain the line, dry-fit before you commit to a permanent joint, mount with correct orientation, and add bypass valves even if they feel optional. Pressure-test thoroughly before calling it done. If you’re still deciding which filter to buy, our best whole-house sediment pre-filters for well water roundup covers the full mechanism and micron-rating decision.
✍️ About This Guide
Written by Mike Reynolds, DIY Home Improvement Writer at PlumbingToolsReview — former residential contractor helping US homeowners tackle plumbing repairs with confidence. Learn how we test →


