Please note: This guide covers replacing the four most common US bathtub drain stopper mechanisms. Hardware and internal components vary by manufacturer and by home — if anything about your specific stopper doesn’t match what’s described here, a licensed plumber is the safer next step.
Introduction
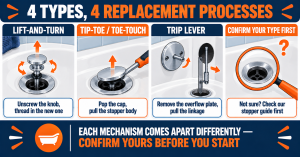
Bathtub drain stoppers come in four common mechanism types — lift-and-turn, tip-toe, toe touch, and trip lever — and each one comes apart and goes back together differently. There’s no single universal replacement process that works across all four, so the most important thing you can do before starting is confirm exactly which type you’re working with. If you’re not sure, our bathtub drain stoppers roundup and trip lever kits roundup both cover detailed identification guidance — what each mechanism looks like, where it’s located, and how it operates — so check there first if you need to identify your type before jumping into the procedures below.
This guide picks up once you already know your mechanism type, and walks through the actual replacement steps for each — jump straight to your type using the guide below rather than reading all four in order.
At a Glance
| Skill Level |
Beginner for lift-and-turn, tip-toe, and toe touch; intermediate for trip lever, which involves more disassembly. |
| Tools Needed |
Pliers or a specialty drain removal tool, a flathead screwdriver, and plumber’s putty or silicone sealant if you’re reseating a flange. |
| Time Needed |
15 to 20 minutes for lift-and-turn, tip-toe, or toe touch. 30 to 45 minutes for trip lever. |
| Critical First Step |
Confirm your mechanism type before starting — the removal method differs significantly between types, and starting the wrong procedure risks damaging a stopper you didn’t mean to remove yet. |
Replacing a Lift-and-Turn Stopper
A lift-and-turn stopper has a small knob at the drain opening that you lift and rotate to open and close it. Grip the knob and turn it counterclockwise — most lift-and-turn stoppers unscrew directly from a center post threaded into the drain body, separating the knob assembly from the post underneath. If it doesn’t turn by hand, a pair of pliers with a cloth wrapped around the knob for grip usually breaks it free without scratching the finish.
Once the old assembly is off, clean any old putty, mineral buildup, or debris from the post and drain opening. Thread the new stopper’s post into the drain body clockwise until snug, then attach the new knob assembly the same way. Test the lift-and-turn action a few times before moving on — it should turn smoothly and hold its position in both the open and closed positions without slipping.
Replacing a Tip-Toe or Toe-Touch Stopper
Tip-toe and toe touch stoppers both sit at the drain opening and respond to foot pressure, but they come apart slightly differently. Most tip-toe caps unscrew counterclockwise from the drain body, similar to a lift-and-turn knob but without the rotating action during normal use. Toe touch caps more often need to be pried up gently first — a flathead screwdriver at the edge of the cap, applied carefully to avoid scratching the surrounding finish, usually pops it free before you can unscrew the body underneath.
With the old cap and body removed, clean the drain opening thoroughly — these mechanisms have more internal components than a lift-and-turn stopper, and leftover debris is a common reason a new one won’t seat or seal properly. Thread the new stopper body in clockwise until snug, then press the new cap into place until it clicks or seats fully. Press-test it a few times: it should engage and release cleanly with consistent foot pressure. If the new stopper doesn’t seat or seal correctly on the first few tries, it’s usually a sign the body underneath isn’t threaded in fully rather than a defective part — back it out and re-thread it before assuming you need a different stopper.
Replacing a Trip Lever Stopper
A trip lever stopper is operated by a lever on the overflow plate — the plate on the tub wall above the waterline — connected to a linkage that runs down inside the overflow tube to a plunger near the drain. This is the most involved of the four mechanisms to replace, since the working parts aren’t visible or accessible from the drain opening itself.
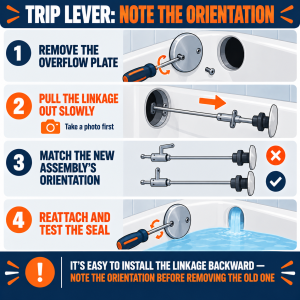
Start by removing the two screws holding the overflow plate to the wall, then carefully pull the plate outward. The linkage assembly is attached to the back of the plate and comes out with it, sliding up through the overflow tube as you pull.
💡 Tip: Note the orientation of the linkage assembly — which way the plunger and any adjustment nuts are facing — before you finish removing it, or take a quick photo as it comes out. It’s easy to install the new one backward or at the wrong length if you’re working from memory alone, and that’s the single most common reason a trip lever doesn’t seal properly after replacement.
Thread the new linkage assembly onto the trip lever mechanism at the plate, then feed it back down through the overflow tube in the same orientation as the one you removed. Reattach the overflow plate with its two screws — snug, not overtightened, since the plate is typically thin metal or plastic trim. If the plunger doesn’t fully seal the drain when the lever is down, most trip lever assemblies have an adjustment nut on the linkage rod that lengthens or shortens it; make small adjustments and retest rather than guessing at a large change.
⚠️ Warning: Don’t overtighten the overflow plate screws or any plastic components on the linkage assembly. Many trip lever kits use plastic or lightweight metal trim pieces that crack or strip under too much force — snug enough to sit flush and stop wobbling is the target, not maximum tightness.
Testing and Adjusting the Seal
Regardless of which mechanism you replaced, finish with the same test: close the stopper and fill the tub with a few inches of water, then let it sit for several minutes. Watch the water level — it shouldn’t drop noticeably. If it does, the most common culprits are a stopper that isn’t seated or threaded in fully, debris caught under the seal, or — for trip lever systems specifically — a linkage that needs a small adjustment to fully close the plunger. Re-check the relevant step above before assuming the new stopper itself is defective; a seal problem right after installation is almost always a fit or adjustment issue, not a bad part.
US Regional Context: Overflow-to-drain spacing on US bathtubs is fairly standardized, which is why most replacement stoppers and trip lever kits are sold as universal fits rather than model-specific parts. Older US homes — generally pre-1980s — are more likely to have brass drain and overflow components, which hold up well but can develop stiff or corroded threads over decades of use; newer construction more commonly uses plastic (ABS or PVC) components, which are lighter to work with but shouldn’t be overtightened, as covered above.
When to Call a Professional
Call a licensed plumber if a trip lever linkage won’t adjust to seal properly even after you’ve confirmed correct installation and orientation — that can point to a worn or damaged overflow tube rather than a linkage adjustment issue, which is a bigger repair than swapping the visible hardware. The same goes for any sign of water damage around the overflow plate once it’s removed, such as soft drywall, staining, or a musty smell — that indicates an existing leak that predates this repair and needs its own diagnosis. For the other three mechanism types, professional help is rarely necessary; persistent leaking after a correctly installed lift-and-turn, tip-toe, or toe touch stopper more often points to a drain flange or gasket issue below the stopper itself than something requiring a plumber.
✏️ Our Take
The single most common mistake here isn’t a botched repair, it’s starting the wrong procedure because the mechanism type wasn’t confirmed first — these four jobs don’t overlap much, and mixing up the steps wastes time fast. Get your type right before you touch a tool. Once you have, three of the four mechanisms are straightforward, well-under-30-minute jobs. Trip lever is the genuine outlier — more disassembly, more room for a backward or misaligned linkage, and the one type worth taking your time with rather than rushing.
Prices and ratings may change. Always check Amazon for current prices.
Frequently Asked Questions
Q: How do I know which type of bathtub drain stopper I have?
Check the drain opening and the overflow plate on the tub wall. A knob you lift and turn, a cap you press with your toe, or a lever on the overflow plate each point to a different mechanism. Our bathtub drain stoppers roundup and trip lever kits roundup both cover detailed identification guidance if you’re not sure.
Q: Why won’t my new stopper seal the drain properly?
Almost always a fit or adjustment issue rather than a defective part — a stopper body that isn’t threaded in fully, debris under the seal, or, for trip lever systems, a linkage that needs a small length adjustment. See the Testing and Adjusting the Seal section above before assuming you need a different replacement.
Q: Is replacing a trip lever stopper harder than the other types?
Yes, noticeably. Lift-and-turn, tip-toe, and toe touch stoppers all come apart and reinstall directly at the drain opening in 15 to 20 minutes. A trip lever system involves removing the overflow plate and working with a linkage assembly inside the overflow tube, which takes longer and has more room for a misaligned or backward installation.
Q: Can I use any replacement stopper, or do I need to match my exact brand?
Most replacement stoppers are designed as universal fits for standard US drain and overflow spacing, so exact brand matching usually isn’t necessary. Check the product listing for your specific mechanism type to confirm compatibility before buying.
Conclusion
Confirm your mechanism type first, then follow the matching procedure above — lift-and-turn, tip-toe, and toe touch are all quick, straightforward swaps, while trip lever takes more care with the linkage assembly and its orientation. Finish every job the same way: fill the tub partway and confirm the seal actually holds before considering it done. If you’re still shopping for the right replacement part, our best bathtub drain stoppers roundup and best trip lever kits roundup cover picks for each mechanism type.
✍️ About This Guide
Written by Mike Reynolds, DIY Home Improvement Writer at PlumbingToolsReview — former residential contractor helping US homeowners tackle plumbing repairs with confidence. Learn how we test →