
Guides
19 Oct 2026

Can’t Reach the Faucet Nut? Choose the Right Tool Before You Buy
Not sure which tool fits your faucet nut? Identify the fixing, see how it lets go and check your clearance first. Then choose a tool, or use one you own.
How to use plumber's putty the right way: where it seals, how much to use, rolling and seating technique, cleanup, curing, and stain-free formulas.
Please note: Information in this guide is based on our research and hands-on experience at time of writing and is subject to change. Always follow the directions supplied with the specific putty and fixture you are using, and consult a licensed plumber if you run into conditions beyond the scope of this guide.
Plumber’s putty is one of the simplest products in a plumber’s bucket — a soft, dough-like sealing compound you press between a fixture and the surface it sits on. It has been sealing sink drains and faucet bases for generations, it never fully hardens, and it costs a few dollars a tub. And yet it is one of the most frequently misused products in DIY plumbing. When a newly installed strainer or pop-up drain starts to weep a week later, the putty usually gets the blame — “must have been a bad tub” — but the product is almost never the problem.
Nearly every plumber’s putty “failure” traces back to technique: too little to bridge the gap, too much so it squeezes out and holds the fixture off its seat, a dusty or wet surface, a mounting nut run down crooked, or using it somewhere it was never meant to seal — a threaded joint, or a natural-stone sink it will stain. That last point is worth its own decision — our plumber’s putty vs silicone comparison covers when each product is actually the right call. Get the handful of fundamentals right and a putty seal will outlast the fixture; get them wrong and you get the callback. This guide walks through each one. If you are still choosing a tub, our companion review of the 5 Best Plumber’s Putty covers standard and stain-free formulas.
At a Glance
| Skill Level | Beginner-friendly DIY |
| Tools Needed | A tub of plumber’s putty (standard, or a stain-free formula for stone); a clean dry rag; a plastic putty knife or an old credit card for trimming; the fixture’s own mounting hardware. No power tools, no solvent, no curing equipment. |
| Time Needed | About 5–10 minutes to apply and seat; the fixture is ready to use immediately, with no wait for it to set |
| Critical First Step | Roll it into a uniform rope before applying — don’t press it on in a lump. A lump leaves thick and thin spots, and the thin spots are exactly where it leaks. |
✏️ Our Take
Plumber’s putty has a reputation for being unreliable that it does not deserve. Almost every callback on a putty seal — a weeping strainer, a damp cabinet floor under a new faucet — comes down to how it was applied, not the tub it came from: not enough of it, a rope that varied in thickness, a surface that was not wiped clean first, or a mounting nut run down crooked. The product is forgiving; the technique is what you have to get right. Standard putty does stain porous stone, so on granite, marble, or quartz the answer is a stain-free formula, not a different sealing method.
IN THIS GUIDE
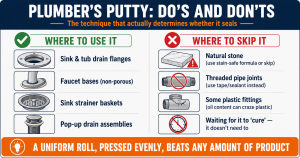
Plumber’s putty seals a joint that is squeezed together mechanically — not threaded, and not under line pressure. Its job is to fill the gap between a fixture flange and the surface it clamps against so water sitting in or around the fixture cannot seep through. The classic uses are all variations on that:
• Sink strainer bodies — the flange of a kitchen basket strainer or a bathroom drain body against the sink deck.
• Pop-up drain flanges — the trim ring of a bathroom pop-up assembly where it meets the basin.
• Faucet bases and deck plates — the underside of a faucet body or escutcheon where it sits on a non-porous countertop or sink deck. Many modern faucets ship with a rubber or foam gasket instead, in which case you skip the putty and use the gasket.
• Some tub and shower drain flanges, where the manufacturer’s instructions call for it.
Just as important is knowing where putty is the wrong product:
• Threaded pipe connections. Putty does not seal threads under pressure — it oozes out and the joint weeps. Threaded and slip-joint connections need PTFE tape or a pipe-joint compound; our review of the 5 Best Pipe Thread Sealants covers those and spells out the difference.
• Natural stone without a stain-safe formula. The oils in standard putty wick into granite, marble, travertine, and some quartz and leave a permanent dark halo. Use a stain-free putty or clear silicone.
• Some plastics. Those same oils can craze or embrittle certain plastic fixtures over time. Many plastic pop-ups and strainers are meant to seal with a supplied gasket, not putty — check the instructions.
• Anywhere the manufacturer specifies silicone or a gasket. Follow that. Substituting putty can void a warranty and may not seal the shape involved.
• Gaps that need to bridge movement or bond two parts. Putty seals by compression only — it is not an adhesive and will not span a flexing joint. That is silicone’s job.
The right amount is enough to squeeze out slightly all the way around the joint when the fixture is fully seated — a continuous bead, not a starved line with gaps and not a thick skirt of overflow. For most sink strainers and pop-up flanges that means a rope about half an inch thick, roughly the diameter of a marker pen, laid in one unbroken ring.
Too little is the more common failure: a thin or broken rope leaves stretches of the flange with nothing behind them, and water finds them. If you seat the fixture and see no squeeze-out anywhere, there was not enough — pull it, add more, and reseat. Too much has its own problems: an over-thick rope can hold the fixture off its stop so the mounting nut bottoms before the flange is tight, and the excess extrudes into the drain opening, where a stray lump can break loose and lodge in the trap. Aim for a modest, even squeeze-out you trim once and forget.
Take a lump a little bigger than you think you need and warm it by working it in your hands for fifteen or twenty seconds — putty from a cold garage or van is stiff and rolls unevenly. Then roll it on a clean flat surface, or between your palms, into a rope of consistent thickness along its whole length. Consistency is the entire point: a rope fat in the middle and thin at the ends seals in the middle and leaks at the ends.
Wrap the rope around the underside of the flange (for a strainer or pop-up body) or the perimeter of the base (for a faucet), pressing lightly so it stays put. Bring the two ends together and pinch them firmly into each other — an open butt seam is a direct leak path. Keep the rope on the flange, not spilling into the center hole, then set the fixture in place.
Putty seals as the fixture is drawn down against it, so how evenly you tighten matters more than how hard. Press the fixture straight down into the putty by hand first to set it and start the putty spreading. Then bring the mounting hardware — the large locknut under a strainer, the nut on a pop-up body, the bracket and nuts on a faucet — to finger-tight, checking the fixture is square and any visible trim ring is oriented the way you want.
Now snug the hardware down evenly, a little at a time, working around multiple fasteners rather than fully tightening one before the next. A bead of putty should appear all the way around the flange as you go. Stop when the fixture is firmly seated and that bead is continuous — not when the nut refuses to turn. Over-tightening past that point is counterproductive: it can distort a thin strainer flange or plastic body, crack a china or enameled surface, and it forces almost all the putty out of the joint, leaving little behind to seal. Firm and even beats maximum torque.
Deal with the excess right away, while it is still soft. Wipe the visible bead — around a trim ring on top of the sink, around a faucet base — with a dry rag or a fingertip, following the joint line in one direction for a clean edge. A damp rag helps on a final pass, but go dry first; water can smear a film of putty oil across the surface. Underneath, wipe the ring of squeeze-out from around the strainer flange and clear any putty that pushed into the drain opening.
Let the squeeze-out skin over first and it peels off in strings rather than wiping cleanly. It is not a disaster — putty stays soft enough to pick off for a long time — but a two-minute wipe now saves scraping a crusted bead off a faucet base later. Leave the trimmed bead just proud of the joint; do not dig it out flush, or you have removed the seal you just made.
No — and this is the single most common misunderstanding about the product. Plumber’s putty does not cure, set, or dry the way silicone caulk, epoxy putty, or solvent cement do. It goes into the joint soft and stays soft. There is no wait time before you run water: a strainer or pop-up sealed with putty is watertight the moment it is tightened down, so you can fill the basin and check for leaks straight away.
Homeowners often assume putty needs to “harden overnight” because they are picturing silicone, which does need hours to skin and a full day to cure before it is watertight. Putty is the opposite: its seal comes entirely from being compressed between two surfaces, so it works instantly and keeps working for as long as the fixture stays tight. Over the years the exposed outer edge stiffens and can be picked away, but the putty inside the joint stays pliable — which is what lets you take the fixture apart later without a fight.
Standard plumber’s putty is safe and reliable on the non-porous materials most fixtures and sinks are made of: stainless steel, chrome-plated brass, enameled cast iron, vitreous china (porcelain), and glazed fireclay. On these it seals well, cleans up easily, and causes no staining or damage over time.
Three materials call for a change of approach. Natural stone (granite, marble, travertine) and some engineered quartz stain permanently under standard putty — use a stain-free formula or clear silicone; the formula options are in our 5 Best Plumber’s Putty review. Cultured marble and solid-surface are usually fine, but check the fixture instructions, which sometimes specify stain-free. And plastic drain bodies (ABS, PVC, polypropylene) can craze from the oil in some putties over time — most ship with a rubber gasket for that reason, so use it, and if you do use putty, use a low-oil stain-free formula.
Common Mistakes
• Using too little. A thin or broken rope leaves unsealed arcs of the flange. No squeeze-out when you tighten down means there was not enough.
• Using too much. A rope much thicker than half an inch holds the fixture off its seat and pushes a mess of putty into the drain.
• Applying to a dirty or wet surface. Putty seals by contact — dust, old residue, grease, or standing water under the flange all break it. Wipe both surfaces clean and dry first.
• Using it on threaded joints. Putty is not a thread sealant and weeps under pressure. Threaded and slip-joint connections need PTFE tape or pipe-joint compound — see our 5 Best Pipe Thread Sealants review.
• Using standard putty on stone. Permanent staining. Stain-free formula or clear silicone on granite, marble, and quartz.
• Not removing old hardened putty. Fresh putty over a crusty ring gives an uneven surface that will not seal. Scrape both faces back to clean material, wipe down (mineral spirits cuts leftover oil film), let dry, then apply fresh.
• Over-tightening. Forces the putty out and can crack the fixture or sink. Snug and even, then stop.
• Gouging the bead out flush. That bead is part of the seal. Trim it just proud of the joint, not below it.
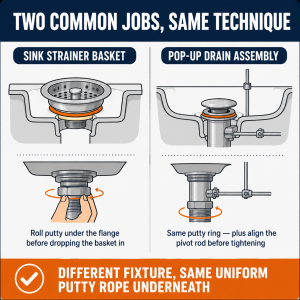
The technique is the same everywhere putty is used; only the fixture changes. Here is how it plays out in the two jobs homeowners do most often — technique snapshots, not full installation walkthroughs.
Clean both faces of the drain opening until they are bare and dry. Roll a half-inch rope of putty and press it around the underside of the strainer flange in a closed ring. Push the strainer down into the opening from above so putty squeezes out under the flange, then from below fit the rubber and fiber washers and thread on the large locknut. Hold the strainer from spinning as you tighten the locknut evenly, until the flange is firmly down and a bead of putty shows all the way around on top. Wipe the top bead, clear any putty that pushed into the drain, and connect the tailpiece. If you are replacing a worn strainer rather than just resealing one, our 5 Best Kitchen Sink Strainers & Baskets review covers the styles worth buying.
A lavatory pop-up has two sealing points, and only one is putty. The flange — the visible ring in the bottom of the basin — gets a thin rope around its underside before you drop it through the drain hole. The other seal, where the drain body meets the underside of the basin, uses the rubber gasket and friction washer supplied with the assembly — no putty there. Seat the flange in its bed of putty, thread the body up from below with the gasket in place, turn the pivot-rod opening to face the back, and tighten the locknut until the flange pulls down and squeezes out a small bead. Trim the bead, connect the tailpiece and pivot rod, and fill the basin to test. Some modern pop-ups — especially plastic and “designer” units — seal with an O-ring at the flange too and need no putty at all, so follow the box. Our 5 Best Bathroom Sink Pop-Up Drain Assemblies review flags which type each design uses.
Sealing a fixture with plumber’s putty is about as low-stakes as plumbing gets, and it is rarely a reason to call anyone. Two situations genuinely warrant it. The first is a sink or countertop that is visibly warped, chipped, or uneven around the drain opening, so the flange cannot make full contact no matter how the putty is applied — a surface problem putty cannot fix. The second is a fixture that still weeps after you have cleaned everything, rolled a proper rope, and reseated it correctly; that points to a leak somewhere else — a cracked strainer body, a bad slip-joint washer at the trap, a hairline crack in the sink — not the putty joint.
For the ordinary job — a new strainer, a replacement pop-up, resealing a faucet base — none of that applies. Clean it, roll it, seat it, wipe it, and run water.
If a fixture will not seat because the sink or counter surface is damaged or out of true, or a drip persists after a correct reseal and points to a cracked part or a trap problem, it is worth getting a professional to look. Search PlumberArchive.com — the US plumber directory with 12,151+ verified local plumbers across all 50 states.
Get weekly plumbing tips and DIY guides delivered straight to your Facebook feed.
It doesn’t. Putty stays soft permanently and seals by compression, so a fixture sealed with it is watertight the moment you tighten it down — fill the sink and test right away. Only silicone and epoxy need cure time, and people routinely confuse the two.
Not standard putty — its oils stain porous stone permanently, leaving a dark ring around the fixture that will not clean off. Use a putty labeled stain-free, or bed the fixture in clear silicone. If you are unsure how porous a surface is, test a small amount on a hidden spot first.
It resists standing and splashing water indefinitely, which is exactly what it is for — drain flanges, strainers, and faucet bases. It is not for pressurized joints or full submersion, and it is not an adhesive; it only holds a seal while the fixture is clamped tight against it.
Yes. Scrape the old putty off both the fixture flange and the sink surface, wipe the area clean and dry — a little mineral spirits cuts any leftover oil film — and apply fresh putty. Old or reused putty has lost its plasticity and will not seal reliably.
Plumber’s putty earns its bad reputation only when it is used carelessly. The product itself is about as simple and forgiving as sealing compounds get — it works instantly, needs no cure time, and stays serviceable for years. Every reliable putty seal comes down to the same short list: the right places only (compression joints on non-porous surfaces, never threads or bare stone), a uniform half-inch rope in a closed ring, both surfaces wiped clean and dry, the fixture drawn down firmly and evenly until a continuous bead squeezes out, and that bead trimmed but not gouged away.
Do those things and the seal will outlast the fixture. If you are still picking a tub — standard for most jobs, stain-free for stone — our 5 Best Plumber’s Putty review lays out the options.
Prices and ratings may change. Always check Amazon for current prices.
✍️ About This Guide
PTR Editorial Team — Plumbing Guides. We compare manufacturer specifications, installation requirements, compatibility and available product documentation to help homeowners choose suitable tools and parts. How we review →
Not sure which tool fits your faucet nut? Identify the fixing, see how it lets go and check your clearance first. Then choose a tool, or use one you own.
Check your manual and the drain route first: gravity hose, built-in pump or external pump. Then see whether you need a dehumidifier hose at all.
Explore portable bidets that need no water-line connection, from bottle caps and squeeze bottles to battery-powered handhelds.

