
Guides
19 Oct 2026

Can’t Reach the Faucet Nut? Choose the Right Tool Before You Buy
Not sure which tool fits your faucet nut? Identify the fixing, see how it lets go and check your clearance first. Then choose a tool, or use one you own.
A worn anode rod is one of the most overlooked water heater maintenance tasks — here's how to identify, remove, and replace one safely.
Please note: Information in this guide is based on our research at time of writing and is subject to change. Always follow your specific water heater manufacturer’s instructions, and consult a licensed plumber if you encounter conditions beyond the scope of this guide — this is doubly true for anything involving gas appliances or a pressurized tank.
The anode rod is one of the most overlooked parts of a water heater, largely because it does its job invisibly, inside a sealed tank most homeowners never think about until something goes wrong. It’s a sacrificial length of metal — magnesium, aluminum, or an aluminum/zinc alloy — installed specifically to corrode instead of the steel tank around it. As long as the rod has active metal left to sacrifice, the tank itself is protected. Once the rod is fully depleted, that protection is gone, and the tank’s own steel becomes the next thing corrosion attacks.
Replacing a depleted rod before that happens is one of the few maintenance tasks that can meaningfully extend a water heater’s usable lifespan, and it’s genuinely within reach for most homeowners. That said, the actual difficulty varies a lot from one installation to the next — a rod with good clearance above the tank and no significant corrosion at the fitting is a straightforward under-an-hour job, while a seized fitting or a tight utility closet can turn it into something more involved. This guide walks through identifying the right replacement rod, the safety-critical shutdown steps for electric and gas units, removing and installing the rod, and how to tell when a tank has degraded past the point where a new rod is still worth installing.
At a Glance
| Skill Level | Beginner to Intermediate — higher if the rod is seized |
| Tools Needed | Socket wrench or breaker bar, pipe sealant or thread tape, garden hose for draining, non-contact voltage tester (electric units), penetrating oil, and possibly a segmented/flexible rod if clearance above the tank is limited |
| Time Needed | 30 minutes to over an hour, depending on rod condition and clearance |
| Critical First Step | Identify whether your unit is electric or gas — the shutdown procedures are genuinely different, not interchangeable |
✏️ Our Take
Replacing a water heater anode rod is one of the more overlooked maintenance tasks homeowners can do themselves, and it genuinely extends the life of the tank by replacing the sacrificial metal that corrodes instead of the tank itself. The actual difficulty depends heavily on two things: how much clearance you have above the water heater to remove the rod, and whether the old rod has seized in place from years of corrosion. A straightforward replacement with good clearance takes well under an hour. A seized rod or tight clearance space can turn this into a more involved repair — and knowing when to stop forcing a stuck fitting rather than risk damaging the tank is one of the most important judgment calls in this whole process.
IN THIS GUIDE
A rotten-egg odor in your hot water is one of the most common signs, and it’s often a sign of bacteria in the tank reacting with a depleted magnesium rod’s byproducts rather than a problem with the water supply itself. Visibly rusty, discolored, or metallic-tasting hot water is another indicator worth taking seriously, since it can mean the rod has depleted enough that the tank’s own steel has started corroding and shedding into the water.
Age alone is also a reasonable trigger: if your water heater is more than two to three years old and the anode rod has never been checked, it’s worth a look regardless of whether you’ve noticed any symptoms yet, since depletion often happens well before any obvious sign shows up in the water. If you do pull the rod for inspection, the visual condition tells you plainly whether replacement is warranted — a rod reduced to a thin wire core running through little or no remaining metal, or one that’s heavily pitted and corroded along most of its length, has done its job and needs to be replaced before the tank starts absorbing that corrosion instead. Our water heater anode rod reviews cover current replacement options if you’re ready to shop once you’ve confirmed the rod needs to come out.
Before buying a replacement, confirm the thread size and length your specific water heater requires. Most residential tanks use a 3/4-inch NPT threaded fitting for the anode rod, but this isn’t universal, and matching the fitting correctly matters more than assuming based on tank brand or size alone. Length matters just as much — a rod that’s too long will bottom out against the tank floor before it can be fully seated, while one that’s too short leaves more of the tank’s interior surface without the sacrificial protection the rod is meant to provide.
You’ll also need to choose a rod material. Magnesium rods provide more active corrosion protection and are generally the better default choice, particularly with soft water. Aluminum or aluminum/zinc rods are often preferred instead in hard water situations, or specifically to address a rotten-egg odor problem, since they tend to produce less of the bacterial reaction that causes that smell. Neither material is universally “better” — the right choice depends on your specific water chemistry and what problem you’re trying to solve.
Finally, measure the vertical clearance above your water heater before you buy anything. A standard rigid anode rod needs enough open space above the tank to be withdrawn in one straight piece during removal and installation, and in a tight utility closet, an unfinished basement with low ductwork, or a similarly cramped space, that clearance may simply not exist. If it doesn’t, you’ll need a segmented or flexible rod instead, covered in more detail further down this guide — buying the wrong type here means an extra trip back to the store before you can finish the job.
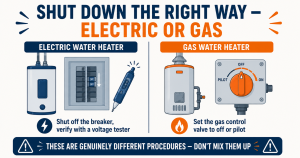
Step 1: Shut Off the Energy Source (Electric vs Gas)
This is the step where electric and gas water heaters genuinely diverge, and treating them the same is a real safety risk. Confirm which type you have before doing anything else, and follow only the procedure that matches your unit.
For ELECTRIC water heaters:
1. Locate the dedicated circuit breaker for the water heater at your home’s electrical panel — it should be individually labeled, but confirm rather than assuming if the labeling is unclear.
2. Switch that breaker fully to the off position.
3. Before touching any wiring or components, verify power is actually off at the unit itself using a non-contact voltage tester, rather than trusting the breaker label alone. Breaker panels are occasionally mislabeled, and this verification step is what actually confirms you’re safe to proceed.
For GAS water heaters:
1. Locate the gas control valve on the unit itself, typically near the bottom of the tank.
2. Turn the control valve to the “off” or “pilot” position, following the specific instructions printed on or near the valve for your unit — different manufacturers use slightly different control designs.
3. Do not shut off the gas supply line itself at this stage unless the specific procedure for your unit’s control valve instructs you to do so; for most standard tank-style gas water heaters, setting the control valve to off or pilot is the correct and sufficient step.
With the energy source confirmed off, the next step is making sure the tank isn’t pressurized before you open the anode rod fitting.
1. Close the cold water supply valve at the top of the water heater, which stops any more water from entering the tank.
2. Open a hot water faucet somewhere else in the house — a bathroom or kitchen sink works well — and leave it open. This relieves built-up pressure in the tank and allows air to enter the system as needed, rather than leaving the tank sealed and pressurized.
3. Optionally, briefly open the water heater’s pressure relief valve as an additional confirmation that pressure has actually been released before you open the rod fitting. If you do this, be ready for a small amount of water or steam to escape, and close the valve again once you’ve confirmed the release.
With the energy source off and the tank depressurized, you’re ready to actually get to the rod itself.
1. Locate the anode rod fitting on top of the water heater. Depending on the specific unit, it’s either under a plastic cap of its own or combined with the hot water outlet fitting — check your unit’s manual if it isn’t obviously visible.
2. Fit a socket wrench or breaker bar onto the hex head of the fitting.
3. Loosen the fitting by turning it counterclockwise, applying steady, even pressure rather than a sudden jerking force.
4. Expect some water to drain out as the rod loosens and comes free, even with the tank’s water supply shut off — have a container or old towels positioned underneath to catch it.
5. Carefully withdraw the old rod fully from the tank opening, taking note of its condition as you do — this tells you a lot about both how depleted it was and, potentially, about the condition of the tank itself, covered further down this guide.
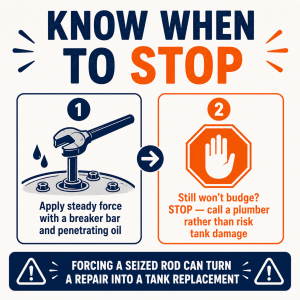
An anode rod that’s been in place for years, especially in an area with hard or mineral-heavy water, can genuinely corrode into the fitting to the point where it takes real, sustained effort to break free — this is common enough that it’s worth planning for rather than treating as a rare surprise.
Start by applying steady, even pressure with a breaker bar rather than a standard ratchet, since the extra leverage a breaker bar provides is often what a seized fitting genuinely needs. If it still won’t budge, apply penetrating oil directly to the threads where the fitting meets the tank, and give it time to work its way in — anywhere from fifteen minutes to a few hours, depending on how bad the corrosion is — before trying again. Repeating this cycle of oil, wait, and steady pressure is often what eventually frees a stubborn fitting without resorting to excessive force.
But there’s a real limit here. If the fitting still won’t move after a reasonable, honest effort with a breaker bar and penetrating oil, that’s the point to stop rather than push harder. The fitting is mounted directly into the tank’s top plate, and enough force can crack that plate, strip the fitting’s threads, or otherwise damage the tank itself — at which point a simple maintenance task turns into a full tank replacement.
A standard rigid anode rod is typically 44 inches long or close to it, and pulling one straight out requires roughly that much clear vertical space directly above the water heater. In a tight utility closet, a basement with low overhead ductwork, or any similarly cramped installation, that clearance simply isn’t available, and it’s a genuine, common obstacle rather than an edge case.
A segmented or flexible anode rod is built specifically to solve this problem. Rather than one rigid length, it’s made of several shorter sections linked together, allowing the rod to bend as it’s withdrawn or installed rather than needing to come straight up in one piece. This lets you replace the anode rod in a space that would make a standard rigid rod impossible to remove, without relocating the water heater or cutting into the ceiling or ductwork above it. Functionally, once installed, a segmented rod provides the same sacrificial corrosion protection as a rigid one — the segmented design solves an installation problem, not a performance one.
With the old rod out and the correct replacement in hand, installation is generally the most straightforward part of the whole job.
1. Apply pipe sealant (pipe dope) or wrap the threaded fitting of the new rod with several turns of thread tape, working in the direction that tightens rather than unwinds the tape as you thread it in.
2. Carefully lower the new rod into the tank opening — for a segmented rod, guide each linked section in as it bends to clear whatever obstruction limited your clearance.
3. Thread the fitting in by hand first to confirm it’s seated correctly and isn’t cross-threading, then snug it further with the socket wrench.
4. Tighten firmly enough to seal completely, but stop once it’s snug rather than overtightening — excessive torque on this fitting can crack it or strip the threads, the same risk covered in the seized-rod section above, just from the opposite direction.
The final step brings the water heater back online, and again, electric and gas units diverge at one specific point.
1. Close the hot water faucet elsewhere in the house that you opened earlier to relieve pressure.
2. Open the cold water supply valve and allow the tank to fill completely. You’ll know it’s full once water runs from the hot water faucet in a steady stream without any sputtering or spitting, which indicates trapped air has fully cleared the system.
3. For ELECTRIC units, restore power at the breaker only after you’ve confirmed the tank is completely full — turning power back on to a heating element in an empty or partially empty tank can damage the element.
4. For GAS units, follow your specific manufacturer’s relighting procedure for the pilot light and control valve, since these steps vary somewhat by manufacturer and model.
5. Once everything is back up and running, check the new rod fitting closely for any signs of leaking, and recheck it again after the tank has had time to reach full temperature and pressure.
Not every situation calls for simply installing a new rod and moving on. If the rod you removed shows extremely severe corrosion — reduced to almost nothing, or accompanied by significant rust particles or heavy sediment in the water beyond what depletion alone would typically cause — that can be a sign the tank’s own steel has already started corroding, not just the rod.
Any visible sign of the tank itself rusting through, weeping, or actively leaking is a more serious indicator still, and installing a new anode rod at that point won’t reverse damage that’s already happened to the tank wall. Age matters too — if the water heater is already well beyond its typical expected service life, a fresh rod may extend a tank that’s fundamentally on its way out rather than meaningfully preventing a future failure.
In any of these situations, it’s worth having an honest conversation about full water heater replacement rather than continuing to invest maintenance effort into an aging tank. Our guide to signs your water heater is failing covers the broader warning signs worth weighing alongside what you find when you pull the anode rod.
A seized rod that won’t budge with reasonable force, an unfamiliar gas control valve, or any sign the tank itself may be compromised are all good reasons to bring in a professional rather than push further. Search PlumberArchive.com — the US plumber directory with 12,000+ verified local plumbers across all 50 states.
Get weekly plumbing tips and DIY guides delivered straight to your Facebook feed.
A common general guideline is every two to three years, though the actual timeline depends heavily on your local water hardness and usage. Homes with notably hard or mineral-heavy water can deplete a rod significantly faster than that guideline suggests, while soft water conditions may allow a rod to last longer. Rather than relying on a fixed schedule alone, physically checking the rod’s condition periodically — especially once your water heater passes the two-to-three-year mark — gives you a much more accurate picture than guessing based on age alone.
For most homeowners comfortable with basic tools and following a safety-focused process carefully, this is a genuinely approachable DIY task. The key is respecting the process: correctly identifying and following the electric-versus-gas shutdown procedure for your specific unit, fully relieving tank pressure before opening the rod fitting, and knowing when to stop rather than force a seized fitting. If any of those steps feel outside your comfort level — particularly anything involving the gas control valve, or a rod that won’t budge with reasonable effort — calling a plumber is a completely reasonable choice rather than a last resort.
Magnesium rods offer more active corrosion protection and are generally the better default choice, particularly in areas with soft water. Aluminum, or aluminum/zinc alloy rods, are often preferred in hard water conditions, where magnesium can deplete unusually fast, or specifically to address a rotten-egg odor in the hot water, since the zinc component tends to reduce the bacterial reaction responsible for that smell. Neither material is a universal best choice — the right one depends on your specific water chemistry and, if odor is the issue you’re solving, on the smell itself rather than on water hardness alone.
Yes. A segmented or flexible rod provides the same sacrificial corrosion protection as a standard rigid rod once installed — the segmented design exists to solve a clearance problem during installation and removal, not to offer a different level of performance. If you have full clearance above your water heater, a standard rigid rod is typically simpler and less expensive, but there’s no functional downside to choosing a segmented rod anyway if you’d rather have the flexibility for next time.
Replacing a water heater anode rod is a genuinely worthwhile maintenance task that most homeowners can handle themselves, provided the electric-versus-gas shutdown procedure is followed correctly and a seized fitting is never forced past the point of reasonable effort. Take the time to identify the right rod material and length for your situation, measure your clearance before buying, and don’t skip the pressure-relief step before opening the fitting.
If what you find when you pull the old rod points to more than simple depletion — a severely corroded tank, visible leaking, or a unit already well past its expected lifespan — that’s a sign to shift the conversation toward replacement rather than continued maintenance. Our guide to signs your water heater is failing and our how to flush a water heater guide both pair well with this one as part of a broader annual maintenance routine.
Prices and ratings may change. Always check Amazon for current prices.
✍️ About This Guide
PTR Editorial Team — Plumbing Guides. We compare manufacturer specifications, installation requirements, compatibility and available product documentation to help homeowners choose suitable tools and parts. How we review →
Not sure which tool fits your faucet nut? Identify the fixing, see how it lets go and check your clearance first. Then choose a tool, or use one you own.
Check your manual and the drain route first: gravity hose, built-in pump or external pump. Then see whether you need a dehumidifier hose at all.
Explore portable bidets that need no water-line connection, from bottle caps and squeeze bottles to battery-powered handhelds.

