Please note: Information in this guide is based on our research at time of writing and is subject to change. Always check your softener manufacturer’s instructions before working inside the brine tank.
Introduction
Salt bridging is one of the most common reasons a water softener quietly stops working even though the brine tank still looks like it has plenty of salt in it. A hard crust forms above the water line inside the tank, and that crust separates the salt above it from the water below — which means the regeneration cycle keeps running, but without the salt it needs to actually recharge the resin bed. From the outside, nothing looks wrong.
Most homeowners don’t realize anything is off until hard water symptoms come back: scale buildup returns, soap stops lathering the way it used to, or fixtures start showing the same mineral spots the softener was supposed to prevent. The tank still has salt in it, so a bridge is easy to overlook as the cause. This guide walks through how to identify a salt bridge, break it up safely, and stop it from forming again.
At a Glance
| What It Is |
A hard crust of salt forming above the water line in the brine tank, disconnecting the salt supply from the water below it |
| Common Cause |
Humidity, temperature swings, or using the wrong salt type for your system |
| Tools Needed |
A long-handled tool like a broom handle or a dedicated brine tank tool — no specialty equipment required |
| Time Needed |
Typically 10–15 minutes |
✏️ Our Take
Salt bridging is a genuinely simple fix once you know what to look for, but it’s easy to miss because the symptoms show up as vague hard-water complaints rather than an obvious system failure. The tank can look full of salt while the actual usable salt sitting in contact with water is nearly gone, trapped below a hardened crust. Breaking up the bridge takes a few careful minutes with a long handle and a bit of caution not to damage the tank or the internal components — after that, most softeners return to normal operation immediately once the salt and water are back in contact.
What Causes Salt Bridging
Salt bridging almost always comes down to moisture and temperature changing the salt’s physical structure over time. Humidity inside the space where the softener sits can cause the top layer of salt to partially dissolve, and when conditions dry out again, that dissolved layer re-hardens into a solid crust rather than settling back into loose granules. Repeat that cycle a few times — through normal seasonal humidity swings or a softener located somewhere with fluctuating temperatures, like a garage or unconditioned basement — and the crust becomes thick enough to fully separate the salt above from the water below.
Salt type plays a role too. Not every salt product behaves the same way inside every softener, and some systems are more prone to bridging with certain types than others — a pellet salt formulated to dissolve evenly generally resists bridging better than a lower-quality crystal salt that clumps more easily. Our water softener salt reviews cover which types are specifically formulated to reduce this kind of buildup.
Letting the salt level run too low before refilling is another common contributor. A brine tank that’s nearly empty has less loose salt available to buffer against humidity and temperature changes, and the smaller remaining volume can dry and re-harden into a bridge more easily than a well-stocked tank would. Keeping the tank reasonably full is one of the simplest ways to reduce how often bridging happens in the first place.
Signs You Have a Salt Bridge
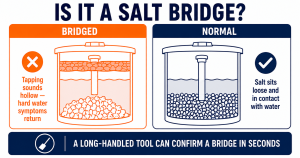
The clearest sign is hard water symptoms returning even though the brine tank still appears to have salt in it. Scale starting to reappear on faucets and fixtures, soap and detergent not lathering as easily, or a general sense that the water “feels” harder than it did — all of these point to the softener no longer regenerating properly, and a salt bridge is one of the most common reasons why, especially if the tank looks fine at a glance.
A hollow sound when tapping the outside of the tank near the top is another useful clue. If you gently tap or knock on the tank’s exterior around where the salt level should be, a solid, full tank tends to sound dull and dense, while a tank with a bridge and an air gap beneath it can sound noticeably hollow in that area, even though salt is clearly visible when you look inside.
The most direct confirmation comes from actually looking into the tank. Normal softener salt sits as loose, granular material that shifts easily. A bridge looks different — a solid, crusted layer across some or all of the surface, sometimes with a visible gap or empty space underneath it once you look closely or probe it. That crusted appearance, rather than loose granules, is the clearest visual confirmation that bridging has occurred.
💡 Tip: A quick way to check: gently push down on the salt near the center of the tank with a broom handle or similar long tool. If you feel resistance from a hard layer before reaching water, that’s very likely a salt bridge rather than normal loose salt.
Step 1: Turn Off or Bypass the Softener
Before working inside the brine tank, put the softener into bypass mode. This keeps the system from attempting to regenerate while you’re in the middle of the job, and it prevents untreated water from being sent through the house if the tank happens to be open or disturbed during a cycle.
- Locate your softener’s bypass valve. This is typically mounted on or near the control head where the plumbing connects to the unit. Check your owner’s manual if you’re not sure exactly where it is or which direction switches it into bypass.
- Switch the valve into bypass mode. Follow the specific instructions for your model — some use a lever, others a rotating valve — and confirm it’s fully in the bypass position rather than partway between settings.
- Double-check that the control head isn’t mid-cycle. If the display or indicator shows the system actively regenerating, wait for the cycle to finish before proceeding, since interrupting one partway through can cause its own separate issues.
- Confirm bypass is engaged before opening the tank. With bypass active, the softener is isolated from the rest of the plumbing, which means it’s now safe to work inside the brine tank without affecting water flow to the rest of the house.
Step 2: Locate and Assess the Bridge
With the softener safely bypassed, the next step is confirming the bridge is actually there and getting a sense of its size before breaking anything up. Rushing straight to breaking up salt without assessing it first makes it easy to miss part of the bridge or misjudge how much force is actually needed.
- Open the brine tank lid and look at the surface. Note whether the salt looks loose and granular or solid and crusted — a bridge is often visible just from looking, especially near the center or along one side of the tank.
- Take a long-handled tool and gently probe from the top down. A broom handle, a wooden dowel, or a dedicated brine tank tool all work. Push down slowly and feel for the transition between loose salt and the hard, crusted layer beneath it.
- Note roughly how thick the bridge is and how far down it sits. This gives you a sense of how much material you’re dealing with before you start breaking it apart, and it helps you avoid probing too aggressively once you reach the harder layer.
- Check whether the bridge spans the whole tank or just part of it. Some bridges cover the entire surface, while others form in just one section — probing around the perimeter as well as the center gives you the full picture before you begin.
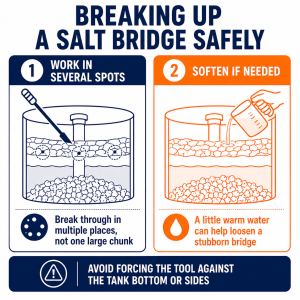
⚠️ Warning: Be careful not to force the tool down hard against the bottom or sides of the tank — some brine tanks have a float valve or other internal components near the bottom that can be damaged by aggressive probing. Work carefully and stop if you feel significant resistance beyond the salt crust itself.
Step 3: Break Up the Bridge Carefully
With the bridge located and assessed, the actual job is straightforward: break the crusted layer apart so the remaining salt can settle and make contact with the water again. The goal is separating the bridge from the tank, not aggressively excavating the whole tank at once.
- Use the long-handled tool to break through the crust in several spots. Push firmly but under control through the hardened layer at a few different points rather than trying to lift or remove it in one large piece, which can be difficult and risks damaging the tank.
- Work around the perimeter as well as the center. A bridge is often attached to the tank walls around its edges, so working the tool around the outside helps fully separate it rather than leaving sections still connected.
- For a stubborn bridge, try a small amount of warm water. Carefully pouring a small amount of warm — not boiling — water over a particularly hard section can help soften it slightly, making it easier to break apart with the tool afterward.
- Continue until the crust is fully broken into smaller pieces. You’ll typically feel the resistance change once the bridge is broken up — the tool should move through the remaining material much more easily than it did against the intact crust.
Step 4: Clean Out Loose Debris
Once the bridge is broken up, a bit of cleanup helps the tank return to normal operation. This step is about tidying up, not emptying the tank — most of the broken salt should stay right where it is.
- Remove any large hardened chunks that won’t easily dissolve. Bigger pieces of broken crust can sometimes take much longer to dissolve than loose salt, so scooping out the largest chunks helps the tank return to normal function faster.
- Gently stir the remaining loose salt. This helps it settle evenly across the bottom of the tank rather than leaving uneven piles that could contribute to a new bridge forming later.
- Avoid removing more salt than necessary. The goal here is breaking up and clearing the bridge, not emptying the tank — leave the loose, granular salt in place so the softener has what it needs once it’s back in service.
Step 5: Refill and Restart the System
The last step gets the softener back to normal operation and confirms the fix actually worked. Don’t skip the restart check — it’s the easiest way to know the bridge is fully resolved rather than assuming it is.
- Add fresh salt if the level is now low. Removing broken debris can leave the tank lower than it was, so top it back up to a normal working level with your softener’s recommended salt type.
- Switch the bypass valve back to normal operating position. This reconnects the softener to the rest of the plumbing so it can resume regenerating on its normal schedule.
- Run a manual regeneration cycle if your softener supports one. Most control heads have a manual regeneration option — running one confirms the system cycles properly now that the salt and water are back in contact, rather than waiting for the next scheduled cycle to find out.
Preventing Salt Bridging from Recurring
Keeping the salt level from dropping too low before refilling is one of the simplest habits that reduces bridging. A tank running near-empty has less loose salt to buffer against humidity and temperature swings, and topping it off before it gets that low keeps the conditions inside more stable.
Using the salt type your specific softener’s manufacturer recommends, rather than assuming any softener salt works the same way in every system, also helps. Some systems are simply more prone to bridging with certain salt types than others, and checking your manual for a specific recommendation is worth the few minutes it takes. Our salt vs salt-free water softener comparison covers the broader technology decision if you’re reconsidering your setup entirely, and our water softener reviews cover the systems themselves if a bridging-prone unit has you considering a replacement.
Periodically checking the tank, even when nothing seems wrong, is the last piece of effective prevention. A developing bridge is far easier to deal with when it’s caught early — a few minutes with a broom handle every couple of months is much less hassle than a fully formed crust discovered only after hard water symptoms have already returned.
US Regional Context: Salt bridging can be more common in US regions with high humidity or households that keep their softener in an unconditioned space like a garage or basement with significant temperature swings. Checking the brine tank every few months, rather than only when symptoms appear, helps catch a developing bridge early in these conditions.
Frequently Asked Questions
Q: How do I know if my water softener has a salt bridge versus a different problem?
The clearest indicator is a mismatch between what you see and what you feel: the tank looks like it has salt, but hard water symptoms are back anyway. From there, physically checking — tapping the tank for a hollow sound, or gently probing with a long tool to feel for a hard crusted layer versus loose granules — usually confirms it within a minute or two. If the salt looks and feels normal throughout and symptoms persist, the issue is more likely a mechanical problem with the control head, the resin bed, or the regeneration cycle rather than bridging, and may be worth a closer look at the system itself.
Q: Can I prevent salt bridging by using a specific type of salt?
Salt type can meaningfully affect how prone your system is to bridging, though it isn’t a guarantee against it entirely. Pellet salt formulated to dissolve evenly generally resists bridging better than lower-quality crystal salt, and checking your softener manufacturer’s specific salt recommendation is worth doing if bridging has become a recurring problem. That said, humidity and temperature conditions in the space where your softener sits also play a significant role, so switching salt type alone may not fully eliminate the issue if those environmental factors are the bigger contributor.
Q: Is it safe to use hot or boiling water to break up a salt bridge?
Warm water can help soften a stubborn bridge, but boiling water isn’t necessary and isn’t recommended. Excessive heat isn’t needed to soften a salt crust, and pouring boiling water into a plastic brine tank risks warping or damaging the tank itself. If you choose to use water to help loosen a bridge, warm tap water is sufficient, poured carefully and in a small amount rather than a large volume all at once.
Q: How often should I check my brine tank for salt bridging?
Checking every couple of months is a reasonable habit for most households, and more often if your softener sits somewhere with high humidity or noticeable temperature swings, such as an unconditioned garage or basement. Checking whenever you refill the salt is a convenient way to build the habit in, since you’re already opening the tank at that point anyway. Catching a bridge early, before hard water symptoms appear, is always easier than dealing with a fully formed one later.
Conclusion
Salt bridging is a common but easy-to-miss problem — the tank looks full, but a hardened crust above the water line quietly stops the softener from working the way it should. Bypass the system, locate and assess the bridge, break it up carefully with a long-handled tool, clear out the loose debris, and restart the system to confirm everything’s working again. The whole process typically takes 10 to 15 minutes and needs nothing more than a broom handle or similar tool. Keeping the salt level topped up, using the right salt type for your system, and checking the tank periodically are the simplest ways to keep bridging from becoming a recurring problem rather than a one-time fix.
Prices and ratings may change. Always check Amazon for current prices.
✍️ About This Guide
Written by Mike Reynolds, DIY Home Improvement Writer at PlumbingToolsReview — former residential contractor helping US homeowners tackle plumbing repairs with confidence since. Learn how we test →