Please note: Information in this guide is based on our research at time of writing and is subject to change. Always check the manufacturer’s instructions for your specific hoses and fittings before beginning.
Introduction
Washing machine supply lines are one of the more overlooked items in a home’s plumbing. They sit behind a large appliance, out of sight and rarely inspected, quietly handling a steady flow of pressurized water for years at a time. Most homeowners never think about them until one fails — and when a supply line fails, it usually doesn’t announce itself with a slow drip. A burst or split hose can dump gallons of water per minute into a laundry room, and if it happens while no one is home, the damage can be extensive before anyone notices.
The good news is that replacing a washing machine supply line is a genuinely simple job. There’s no cutting, no soldering, and no specialty tools involved — just two threaded connections per hose, accessible with a basic wrench or a pair of channel-lock pliers. Most homeowners can replace both the hot and cold lines in well under 30 minutes with no prior plumbing experience. This guide walks through exactly how to do it, from spotting the warning signs to reconnecting everything and confirming the new lines are leak-free.
At a Glance
| Signs You Need to Replace |
Bulging, cracking, or visible corrosion on the hose, or hoses over 5 years old made of rubber rather than braided steel |
| Tools Needed |
Adjustable wrench or channel-lock pliers — no specialty tools required |
| Time Needed |
Roughly 15–20 minutes for both hot and cold lines |
| Water Shutoff |
Always shut off both hot and cold supply valves before starting |
✏️ Our Take
Replacing a washing machine supply line is one of the easiest wins in home maintenance — it takes about 15 minutes, requires no specialty tools, and meaningfully reduces the risk of a burst hose flooding your laundry area while you’re not home. If your current hoses are still the original rubber ones that came with the washer, or if they show any bulging or cracking, replacing them with braided stainless steel lines is a cheap form of insurance most homeowners put off far longer than they should.
Signs Your Supply Line Needs Replacing
Supply line failures rarely happen without warning — the hose usually shows some visible sign of wear before it actually gives out. The trouble is that most people never pull the washer out far enough to look, so these signs go unnoticed until the hose has already failed. Knowing what to check for, and checking periodically, is the simplest way to catch a problem before it becomes a flood.
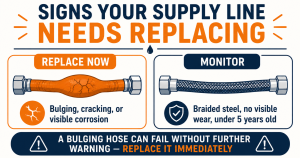
The clearest warning sign is a bulge or balloon anywhere along the hose. This happens when the internal reinforcement layer — the woven fabric or steel braid that gives the hose its strength — has already failed at that spot, leaving only the outer rubber or vinyl layer holding back the water pressure. A bulge is not a cosmetic issue; it’s a structural one, meaning that section could rupture at any time, even under normal operating pressure.
Cracking or brittleness in the rubber is another clear sign, especially on older hoses. As rubber ages, it loses flexibility and can develop small surface cracks, particularly near the fittings where the hose flexes most — an early indicator the material is breaking down and will only get worse with continued use. Visible rust or corrosion at the connection fittings is worth checking too, since corrosion at the threads can weaken the fitting itself and sometimes signals moisture slowly seeping from a connection that isn’t fully sealed.
Finally, age alone is a valid reason to replace a supply line even if it looks fine. Rubber hoses in particular are commonly recommended for replacement every 3 to 5 years regardless of visible damage, since the material degrades from the inside out and can fail without any external warning. If you don’t know how old your current hoses are, or they’re the original rubber ones that shipped with the washer, it’s worth replacing them proactively rather than waiting for a visible problem.
⚠️ Warning: A bulging or ballooning section of hose is not a “watch and wait” situation — it indicates the hose’s internal reinforcement has already failed in that spot, and rupture can happen without further warning. Replace it immediately rather than waiting for a more convenient time.
Step 1: Shut Off the Water Supply
Before touching either hose, the water supply needs to be fully shut off. Skipping this step, or only shutting off one valve, is the most common way a simple hose swap turns into an unplanned mess.
- Locate the hot and cold shutoff valves. On most installations, these are mounted on the wall directly behind or near the washing machine, often as a single valve box with two separate handles or knobs.
- Turn both valves clockwise to the closed position. Turn each valve until it stops moving and feels firmly seated — a valve that’s only partially closed can still allow water through under pressure.
- Run a brief rinse cycle, or open the hose ends over a bucket, to relieve residual pressure. Even with the valves closed, the hoses still hold a small amount of pressurized water. A short cycle with the valves off, or loosening the hose ends over a bucket, releases that trapped pressure before disconnecting anything.
- Confirm the shutoff worked before proceeding. If you’re not fully confident both valves are closed, watch for any water still flowing when you crack a fitting loose — that’s far better than a surprise once the hose is off.
If your washing machine’s shutoff valves are difficult to reach, unusually stiff, or don’t seem to fully stop the flow of water, it may be worth reading our how to shut off water to a single fixture guide before continuing, since a valve that won’t fully close is its own separate problem worth addressing.
Step 2: Disconnect the Old Supply Lines
With the water off and the lines depressurized, the next step is removing the old hoses. This part of the job is mostly mechanical — loosening two threaded connections per hose — but a little preparation makes it noticeably less messy.
- Gather a towel or shallow container before you start. Even after relieving pressure, a small amount of residual water will escape from each connection as it’s loosened, so have something in place to catch it.
- Loosen the connection at the wall valve end first. Use an adjustable wrench or channel-lock pliers to turn the fitting counterclockwise. These fittings are typically hand-tight plus a partial turn, so they usually loosen without much resistance.
- Loosen the connection at the washing machine end next. The fitting on the back of the washer works the same way — counterclockwise to loosen, with the towel or container positioned underneath.
- Fully unscrew and remove both the hot and cold lines. Once each fitting is loose enough to turn by hand, finish unscrewing it and set the old hose aside. Repeat the process for the second line.
💡 Tip: Take a photo of the hose routing before you disconnect anything, especially if your installation has any unusual routing around other pipes or fixtures — it makes reattaching the new lines faster and avoids any guesswork.
Step 3: Inspect and Clean the Connection Points
With the old hoses off, take a moment to check the connection points themselves before threading on the new lines. A few minutes here helps the new hoses seal properly on the first try.
- Check the wall valve threads for old washer material or debris. A fragment of the old rubber washer sometimes stays behind on the valve threads after the hose is removed — look closely and clear away anything that shouldn’t be there.
- Check the washing machine’s inlet threads the same way. The inlet fittings can accumulate mineral buildup or old washer fragments just as easily as the wall valve side.
- Wipe both sets of threads clean with a cloth. A clean, debris-free surface gives the new hose’s washer a flat, even surface to seal against.
- Confirm the rubber washer inside each new hose fitting is properly seated. Most new hoses ship with the washer pre-installed, but it’s worth a quick check to make sure it’s sitting flush and hasn’t shifted during shipping.
Step 4: Attach the New Supply Lines
This is the step that actually gets the new hoses in place. Taking it slowly at the start avoids the most common mistake people make here — forcing a fitting that isn’t threading on correctly.
- Match hot to hot and cold to cold. Most hoses and connection points are clearly marked or color-coded — typically red or “H” for hot, blue or “C” for cold — so confirm the right hose goes to the right valve before threading anything on.
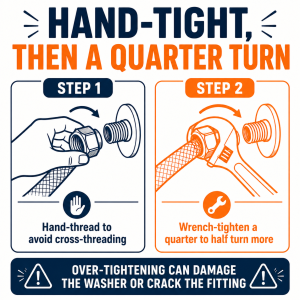
- Hand-thread each fitting onto the wall valve first. Start by hand rather than reaching for a wrench right away. If the fitting doesn’t turn smoothly, it’s likely cross-threaded — back it off and try again rather than forcing it.
- Hand-thread the other end onto the washing machine inlet. Use the same approach on the washer side, threading by hand until it’s snug.
- Snug each connection with a wrench, an additional quarter to half turn past hand-tight. Once both ends are hand-tight, use a wrench to bring each connection the rest of the way. Avoid over-tightening — going too far can damage the internal washer or crack the fitting, and a properly hand-threaded connection generally only needs a small amount of additional torque to seal completely.
If you’re installing new braided lines for the first time, our washing machine supply line kit reviews cover which kits come with clearly marked hot/cold fittings and pre-installed washers, which can make this step even more straightforward.
Step 5: Turn the Water Back On and Check for Leaks
The last step confirms the job was done correctly. Don’t skip the leak check — a connection that looks tight can still weep slowly at the threads, and it’s far easier to catch that now than to discover it later as water damage.
- Slowly open both shutoff valves. Turn each valve counterclockwise gradually rather than all at once, so pressure builds evenly through the new connections rather than hitting them abruptly.
- Inspect every connection point closely for the first few minutes. Look and feel around all four fittings — both wall valve connections and both washing machine inlet connections — for any dripping, seepage, or dampness.
- Run a short wash cycle and recheck the connections afterward. Water flowing through the lines during an actual cycle puts the connections under real operating conditions, a more reliable test than a static check alone.
- Confirm there’s zero moisture at any fitting. A properly tightened connection should show no dripping, weeping, or dampness anywhere along the fitting after the cycle completes. If you do find moisture, shut the water back off and re-tighten that specific connection before running the washer again.
Choosing a Replacement Line
Not every replacement hose is the same, and picking the right one makes the rest of this job easier and the result more durable. Braided stainless steel is the standard recommended upgrade over older rubber hose designs, largely because of its burst resistance — the woven steel outer layer holds up to internal pressure and general wear far better than rubber alone, and it’s much less prone to the bulging and cracking that leads to rubber hose failures in the first place. If you’re comparing the two directly, our braided supply line vs rigid supply line comparison walks through how each option performs and which situations favor one over the other.
Fitting type is the next thing to check before buying. Some installations have plenty of clearance behind the washer and work fine with a straight-fitting hose, while others — especially washers pushed close to a wall — need a 90-degree elbow fitting on one or both ends to avoid kinking. Check the clearance behind your own washer before choosing, since the wrong fitting angle can put a hose under unnecessary strain even if everything else about the connection is correct.
Length matters more than it might seem. A hose that’s too short pulls tight against the connections, putting ongoing stress on both fittings, while one that’s excessively long tends to loop or kink behind the washer. Measure the distance between your shutoff valves and the washing machine’s inlets before choosing a length, and aim for a hose that reaches comfortably with a little slack rather than one that’s taut or bunched up.
US Regional Context: Replacing rubber washing machine hoses with braided stainless steel is a widely recommended upgrade across US households, and some homeowners insurance providers specifically reference aging rubber supply lines as a common cause of water damage claims. Pairing new supply lines with a water hammer arrestor addresses both burst risk and the loud banging noise some washing machines cause when their valves shut off quickly — our
water hammer arrestor reviews cover options that install directly at the same connection points as the supply lines.
Need a Professional Plumber?
If you’re dealing with a shutoff valve that won’t fully close, a connection that keeps leaking after re-tightening, or a supply line setup that’s more complicated than a standard install, search PlumberArchive.com — the US plumber directory with 12,000+ verified local plumbers across all 50 states.
Find a trusted plumber near you → PlumberArchive.com
Frequently Asked Questions
Q: How often should washing machine supply lines be replaced?
As a general rule, rubber supply lines should be replaced every 3 to 5 years regardless of whether they show visible damage, since the rubber degrades from the inside out and can fail without warning. Braided stainless steel lines tend to last considerably longer and are generally regarded as more durable overall, but they’re not immune to wear either — check them periodically for any bulging, rust at the fittings, or damage to the outer braid, and replace them if any of those signs show up, even before a fixed number of years has passed.
Q: Can I use the same hoses if I’m just moving the washer slightly?
If the hoses are in good condition, well within their expected lifespan, and the washer is only moving a short distance that doesn’t put any tension or kinking on the lines, reusing them is generally fine. That said, disconnecting and reconnecting hoses is exactly the kind of disturbance that can reveal a hidden weak spot in an older hose, so it’s worth inspecting both lines closely for any bulging, cracking, or corrosion at the fittings before reattaching them. If the hoses are older or already due for replacement, moving the washer is a convenient opportunity to install new ones while everything is already disconnected.
Q: Is it normal for a small amount of water to leak out when disconnecting the old hoses?
Yes — even after shutting off both valves and relieving pressure, a small amount of residual water remains trapped inside the hose and fittings, and it’s normal for a bit of it to escape as you loosen each connection. This is exactly why it’s worth keeping a towel or shallow container in place before you start disconnecting anything. What isn’t normal is a steady stream or ongoing flow once the fitting is loose — if that happens, the shutoff valve likely isn’t fully closed, and you should stop and confirm both valves are shut before continuing.
Q: Do I need to replace both hot and cold lines at the same time?
It’s not strictly required, but it’s generally recommended. Both hoses are installed at the same time, exposed to the same conditions, and age at roughly the same rate, so if one is showing wear, the other is usually not far behind. Replacing both at once also means both connections get the same fresh seal and inspection, rather than leaving one older hose in place as a lingering unknown. Since the cost difference between replacing one hose and replacing both is minor next to the cost of a burst hose, most homeowners find it makes sense to do both together.
Conclusion
Replacing a washing machine supply line is a short job with an outsized payoff. Shut off both the hot and cold valves, relieve the residual pressure, disconnect the old hoses, clean the connection points, and thread on the new lines — hand-tight first, then a quarter to half turn with a wrench. The whole process takes about 15 to 20 minutes and requires nothing beyond a basic wrench or a pair of channel-lock pliers. If your current hoses are original rubber, more than a few years old, or showing any bulging, cracking, or corrosion, replacing them with braided stainless steel lines is one of the cheapest, fastest pieces of insurance you can add to your home — a small amount of effort now against the very real risk of a flooded laundry room later.
Prices and ratings may change. Always check Amazon for current prices.
✍️ About This Guide
Written by Mike Reynolds, DIY Home Improvement Writer at PlumbingToolsReview — former residential contractor helping US homeowners tackle plumbing repairs with confidence. Learn how we test →