Please note: Information in this guide is based on our research at time of writing and is subject to change. Always consult a licensed plumber for diagnosis of serious plumbing issues before attempting repairs.
Introduction
A burst pipe from freezing is one of the most expensive plumbing emergencies a homeowner can face. Water damage from a single frozen pipe failure can run into thousands of dollars in repair costs — structural damage, flooring, drywall, and personal property — and the repair window is often weeks, not days. The frustrating part is that frozen pipe damage is almost entirely preventable, not with a single fix but with a combination of five specific tactics that work together to keep pipes safe through even the coldest winter nights.
This guide covers the complete prevention strategy — insulation, airflow management, consistent heat, letting faucets drip during extreme cold, and sealing the air leaks that accelerate freezing — plus what to do if a pipe freezes anyway, and how to spot the signs that one has already burst. If you want a detailed step-by-step walkthrough of pipe insulation specifically, our guide to insulating pipes for winter covers that task in depth. And if you’re dealing with the aftermath of a failure, our guide on how to fix a leaking pipe covers the repair process from isolation to patch.
At a Glance
| Difficulty |
Easy |
| Time |
1–2 Hours for full home prep |
| Cost |
Free to $ — most tactics cost nothing |
| Tools Needed |
Pipe insulation (optional), flashlight, faucet covers for outdoor spigots |
| Skill Level |
Beginner |
✏️ Our Take
A burst pipe from freezing is one of the most expensive plumbing emergencies a homeowner can face — and almost entirely preventable with a few free habits and under $50 in materials. The biggest mistake people make is only thinking about insulation when prevention is really about five separate tactics working together: insulation, heat, airflow, dripping faucets, and knowing which pipes are actually at risk. Most frozen pipe damage happens in homes where the homeowner assumed their pipes were ‘fine’ because they’d never frozen before.
Why Pipes Freeze and Burst
Water is unusual among common liquids in that it expands when it freezes rather than contracting. When water inside a pipe begins to turn to ice, it takes up roughly 9% more volume than it did as a liquid. Inside a rigid metal or plastic pipe, that expansion has nowhere to go — so it builds pressure. The pressure doesn’t always fail at the ice blockage itself. Instead, it builds in the liquid water trapped between the growing ice plug and a closed faucet or valve downstream, and the pipe ruptures at whatever its weakest point happens to be — which may be a joint, a fitting, or simply a section of older pipe with thinning walls.
The rate at which a pipe freezes depends on three factors: the air temperature surrounding it, how long that temperature persists, and whether there is any insulation or heat source slowing the process. Pipes in unheated or exterior-facing spaces are most vulnerable because both conditions work against them — low surrounding air temperature and no compensating heat input. The threshold most often cited by plumbing professionals is 20°F sustained outdoor temperature over six or more hours, but pipes in uninsulated crawl spaces or exterior walls can freeze at higher temperatures if cold air is blowing directly on them.
💡 Tip: A pipe doesn’t usually burst exactly where it freezes — pressure builds up between the ice blockage and a closed faucet, and the pipe fails at its weakest point, which can be somewhere else entirely. This is why burst damage can appear in an unexpected location away from the actual frozen section.
Which Pipes Are Most at Risk
Not every pipe in your home carries equal freeze risk. The pipes most likely to freeze are those that run through spaces that aren’t heated by your home’s central heating system or that face direct cold air exposure. Understanding which pipes these are before winter arrives is the first step toward effective prevention — because the tactics that follow are most important for these specific locations.
Unheated basements and crawl spaces are the most common freeze location in US homes. Crawl space pipes are often fully exposed to outside air temperatures during sustained cold snaps, with no insulation and no heat source nearby. Even a basement that feels warm to an adult standing in it can have floor-level temperatures well below the rest of the house on the coldest nights.
Pipes in exterior walls — particularly on the north- or northwest-facing sides of the house — run through wall cavities that are separated from the outdoors by only the wall insulation and sheathing. During a prolonged cold snap, the temperature inside a poorly insulated exterior wall cavity can approach or match the outdoor temperature. Kitchen and bathroom sink supply lines in exterior walls are the most common victim of this scenario.
Outdoor faucets, hose bibs, and irrigation supply lines are at risk every winter unless they’re specifically winterized — these pipes extend through or past the building envelope and have no heat protection whatsoever. Pipes in unheated garages — particularly those running along the ceiling or wall near the garage door — are also frequently overlooked until something fails.
💡 Tip: Walk through your home once before winter and identify every pipe that isn’t surrounded by heated living space — these are your priority list for prevention. A flashlight and 20 minutes in the crawl space and basement gives you a clear picture of what’s exposed.
Tactic 1 — Insulate Exposed Pipes
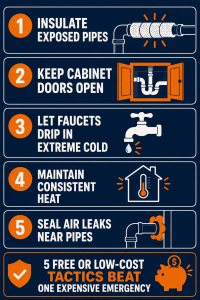
Pipe insulation slows the rate at which cold air draws heat out of the water inside a pipe. Foam pipe sleeves — pre-slit tubular foam that slips over the pipe — are the simplest and most accessible insulation method available at any home improvement store. They require no tools and take a few minutes to install per pipe run. For pipes in very exposed locations, self-sealing foam tape or heat tape (also called heat cable) provides additional protection when air temperatures are expected to drop severely and stay low — our roundup of the best heat tape and pipe heating cables covers options for that added layer of protection.
The priority order for insulation work is clear: start with pipes in unheated crawl spaces and basements, then address pipes in exterior walls that you can access from inside, then garage pipes. Pipes in fully heated interior spaces generally don’t need insulation — your effort is best directed at the pipes that face the actual risk. For a complete step-by-step walkthrough of the insulation process including which materials to use and how to seal around fittings and joints, see our dedicated guide to insulating pipes for winter.
💡 Tip: Insulation is one of five tactics, not a complete solution on its own. Foam pipe sleeves slow heat loss but don’t stop it entirely — a pipe with good insulation can still freeze if the surrounding temperature drops far enough for long enough. The other four tactics matter just as much, which is why this guide covers the full strategy rather than insulation alone.
Tactic 2 — Keep Cabinet Doors Open
Under-sink cabinets in kitchens and bathrooms are one of the most common locations for frozen pipe failures — and the reason is simple: the cabinet doors block the warm air from your home’s heating system from reaching the pipes underneath. If those pipes run along or through an exterior wall, the cabinet essentially creates a small cold pocket, insulated from the room’s heat and exposed to the cold coming through the wall behind it.
The fix costs nothing and takes seconds: when a cold snap is forecast, open the cabinet doors under kitchen and bathroom sinks that sit against exterior walls. This allows warm room air to circulate around the supply lines and drain pipes, raising the temperature around them enough to prevent freezing during most winter cold events. The effect is most pronounced in kitchens, where the sink is often placed on an exterior wall beneath a window — both of which are common cold-air infiltration points.
💡 Tip: This costs nothing and takes ten seconds — it’s the most overlooked free tactic on this entire list. Most homeowners who’ve experienced a frozen under-sink pipe say they weren’t aware that keeping the cabinet open was even a thing until after the damage was done.
Tactic 3 — Let Faucets Drip During Extreme Cold
A slow drip from a faucet serves two purposes in freeze prevention. First, moving water is significantly harder to freeze than standing water — continuous flow carries heat along the pipe and reduces the time available for ice to form at any given point. Second, and more importantly, a dripping faucet relieves the pressure buildup that causes pipes to burst. Even if ice does form inside the pipe, a slightly open faucet gives the expanding pressure somewhere to go rather than rupturing the pipe wall.
The tactic is most effective when applied to faucets that are fed by pipes running through the highest-risk areas — exterior walls, crawl spaces, and unheated garages. Open the faucet on the cold side to a slow but steady drip, not a full flow. Both hot and cold supply lines serve different pipe runs, so if the at-risk pipe feeds the hot water line specifically, open the hot side instead. During a severe cold warning, running a drip from both hot and cold sides costs very little and covers both supply lines.
⚠️ Warning: Letting faucets drip wastes some water, but it’s a small cost compared to a burst pipe repair and the water damage that follows. Only do this during genuine extreme cold warnings or when overnight temperatures are forecast well below freezing — not as a routine winter habit. A slow drip on one or two faucets overnight costs far less than an emergency plumber and flood restoration.
Tactic 4 — Maintain Consistent Heat
Many homeowners turn the thermostat down at night or when leaving the house for extended periods — a reasonable energy-saving habit in normal conditions, but a risk factor for frozen pipes during cold snaps. Pipes in exterior walls, crawl spaces, and unheated basement areas are influenced by both the outdoor temperature and the indoor temperature. When the indoor temperature drops significantly at night, the buffer of warm air that keeps those marginal pipes above freezing shrinks or disappears.
The standard guideline is to keep the thermostat set no lower than 55°F, even when away from home for extended periods. This isn’t a comfortable living temperature — it’s the minimum at which the residual heat spreading through interior walls and floors is enough to keep exterior-facing pipe locations above the danger threshold. During genuinely severe cold events, consider keeping the thermostat at your normal day setting rather than dropping it at all. The heating cost for one night is a fraction of the cost of a burst pipe.
For vacation homes or investment properties left vacant through winter, a smart thermostat with remote temperature monitoring is a worthwhile investment. The ability to check the actual interior temperature from a phone and receive an alert if it drops below a set threshold catches heating system failures before they result in frozen pipes — a failure scenario that can go undetected for days in a vacant property.
💡 Tip: If you’re traveling during winter, ask a neighbor to check your home periodically or invest in a smart thermostat that alerts you if the temperature drops unexpectedly. A heating system that fails while a home is vacant in January is one of the most common causes of catastrophic frozen pipe damage — and it’s entirely preventable with a $20-per-month thermostat check by a trusted neighbor.
Tactic 5 — Seal Air Leaks Near Pipes
Cold air infiltration is a frequently underestimated freeze risk. A pipe with good foam insulation around it can still freeze rapidly if cold outdoor air is flowing directly across it through an unsealed gap in the building envelope. Gaps around pipe penetrations — where supply lines pass through exterior walls, foundation sills, or rim joists — are common entry points for cold air that puts pipes at risk even when they appear to be well-insulated.
Check around every point where a pipe passes through an exterior wall or foundation. Gaps of even a quarter inch can admit enough cold air to drop the microclimate around a pipe significantly below the ambient indoor temperature. Expanding foam sealant handles irregular gaps and penetrations effectively and is available at any hardware store. Standard paintable caulk works for smaller gaps and cleaner penetrations. This is a one-time fix that permanently reduces both freeze risk and heat loss from those locations.
Rim joists — the structural framing at the top of your foundation walls where the floor structure meets the exterior wall — are particularly common cold air infiltration points in older homes. They often have gaps around pipe penetrations that were never sealed during construction. Inspecting and sealing these during a single crawl space or basement session addresses one of the most significant cold air entry routes in many US homes.
💡 Tip: A pipe with good insulation can still freeze if cold air is blowing directly on it through an unsealed gap — sealing the air leak is sometimes more important than the insulation itself. On a windy winter night, air infiltration can create localized pipe temperatures significantly below the general crawl space or basement temperature.
Outdoor Faucets and Hose Bibs
Outdoor faucets, hose bibs, and any dedicated supply lines to irrigation systems are among the most reliably freezable pipes in any home — they pass through or extend beyond the building envelope with no insulation and no heat source. Unlike interior pipes that freeze only during exceptional cold, outdoor faucets can fail during a routine overnight freeze if they haven’t been winterized.
Disconnect and drain garden hoses before the first freeze of the season. A connected garden hose holds water in the faucet body and prevents the faucet from draining even if it has a frost-free design. The frost-free mechanism only works correctly when no hose is connected and the line can drain fully. This single step prevents a significant portion of outdoor faucet failures every year.
Install insulated foam faucet covers on every outdoor spigot. These slip-on covers take thirty seconds per faucet to install and create an insulating air pocket around the faucet body that meaningfully slows heat loss during freezing nights. They’re inexpensive and reusable season to season.
Shut off and drain any dedicated irrigation lines for winter. Most irrigation systems have a dedicated shut-off valve inside the house near where the supply line exits the building — close this valve and open the system’s drain cap or lowest-point valve to drain the lines before temperatures drop. Irrigation pipes left full of water through winter are among the most expensive freeze repairs homeowners encounter, since the damage is often distributed across multiple lines throughout the yard.
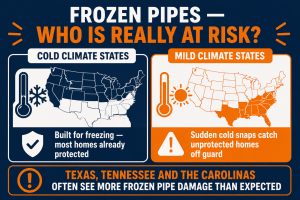
US regional note: In cold-climate states like Minnesota, Wisconsin, Michigan, and across the Northeast, frozen pipes are a well-known seasonal risk and most homes are built with some protection already in place. The real danger is often in milder climate states like Texas, Tennessee and the Carolinas, where a sudden cold snap catches homes built without freeze protection in mind — exposed pipes in crawl spaces and exterior walls that were never designed for sustained freezing temperatures. The February 2021 Texas winter storm caused an estimated $18 billion in water damage, the vast majority from frozen and burst residential pipes in homes that had never experienced sustained freezing before.
💡 Tip: Insulated faucet covers cost very little and take thirty seconds to install per faucet — there’s no good reason to skip this step. Buy a pack before the first cold forecast of the season rather than after, when hardware stores frequently sell out during a cold snap warning.
What to Do If a Pipe Freezes
If you turn on a faucet during or after a cold snap and get no water — or a dramatically reduced trickle — a pipe somewhere in the supply line to that fixture has likely frozen. The first thing to do is open the faucet fully and leave it open. As the ice thaws, the open faucet gives the expanding pressure and meltwater somewhere to go immediately rather than building up inside the pipe. A faucet that is left closed during thawing is more likely to result in a burst than one that is open.
Apply gentle heat to the suspected frozen section. A hair dryer set to medium is the most accessible and safest thawing tool for most homeowners — work from the faucet end of the pipe toward the suspected blockage rather than starting at the middle of the frozen section, which can trap pressure between the heat source and a closed faucet end. A heating pad wrapped around the pipe or warm towels applied and replaced repeatedly also works for accessible pipes. Wrap electric heat tape around the affected section if you have it.
If you cannot locate the frozen section — because it’s inside a wall, under a slab, or otherwise inaccessible — or if the pipe does not thaw within a reasonable period using safe methods, call a licensed plumber. Professionals have pipe-thawing equipment that can reach inaccessible locations without wall demolition in many cases, and they can also assess whether the pipe has already sustained damage that will result in a leak once it thaws.
⚠️ Warning: Never use an open flame or blowtorch to thaw a frozen pipe — this is a serious fire hazard and has caused house fires. Wall cavities contain wood framing and insulation that can ignite before the pipe thaws, and the fire may smolder undetected for hours. Use a hair dryer, heat tape, or warm towels only. Keep any heat source moving rather than applying it to one spot continuously.
Signs a Pipe Has Already Burst
A pipe that has already burst may not be immediately obvious, particularly if the rupture happened in a wall, floor, or crawl space. The ice plugging the pipe during the freeze can actually slow or stop water from escaping until the pipe thaws — which means the damage often starts after the cold snap rather than during it, and by that point the burst may have been running for hours undetected. Knowing the warning signs helps you catch it quickly and limit the damage.
Water stains or wet spots appearing on walls, ceilings, or floors that weren’t there before the cold snap are one of the clearest indicators. Staining that appears within hours or days of a cold event — particularly on an exterior-facing wall or a ceiling below an exterior wall — should be treated as a burst pipe until confirmed otherwise.
An unexplained drop in water pressure throughout the house, or at a specific fixture, is another strong signal. Water escaping through a rupture reduces the pressure available to fixtures downstream. For a reliable baseline reading of your home’s normal water pressure, our guide to the best water pressure gauges covers affordable options any homeowner can keep on hand.
The sound of running water with all fixtures closed is one of the clearest signs of an active leak inside the building structure. If you can hear water moving when nothing in the house is running, there is water escaping somewhere in the system. Water pooling near a wall, baseboard, or floor area that has no obvious source is the most direct physical sign of a burst that is actively running.
⚠️ Warning: If you suspect a pipe has already burst, shut off your main water supply immediately and call a plumber — every minute the water runs increases the damage and the cost of repair. Know where your main shut-off valve is before winter, not after a failure. In most US homes it’s located where the water supply enters the house — near the water meter, in the basement, or in a utility closet.
Need a Professional Plumber?
If a pipe has already burst, or if you’re dealing with a frozen section you can’t locate or safely access, a licensed plumber is the right call. Pipe thawing equipment and pressure testing can locate the rupture without tearing open walls unnecessarily — and getting a professional involved quickly limits the water damage that accumulates every hour a burst pipe runs unaddressed.
Find a licensed plumber in your area at PlumberArchive.com — the US plumber directory with 12,000+ verified local plumbers across all 50 states.
Find a trusted plumber near you → PlumberArchive.com
Follow Us on Facebook
Get weekly plumbing tips, honest tool reviews and DIY maintenance guides delivered straight to your Facebook feed. We cover seasonal pipe protection, winter plumbing prep, leak repairs and everything in between — written for US homeowners who want to stay ahead of problems before they become emergencies.
Follow PlumbingToolsReview on Facebook →
Frequently Asked Questions
Q: At what temperature do pipes start to freeze?
The commonly cited threshold is 20°F (-6°C) sustained outdoor temperature over six or more hours, but this is a general guideline rather than a guaranteed failure point. Pipes in uninsulated crawl spaces, exterior walls with poor insulation, or locations exposed to wind chill can freeze at outdoor temperatures above this threshold if cold air is flowing directly across them. Conversely, well-insulated pipes in sheltered locations may survive temperatures below 20°F if the cold event is brief. The risk isn’t just the temperature — it’s the combination of temperature, duration, wind exposure, and the specific location of the pipe. Pipes that have never frozen before are not immune; they simply haven’t experienced the right combination of conditions yet, and a longer or colder event than previous winters is often all it takes.
Q: Should I leave my faucet dripping all winter?
No — letting faucets drip all winter is unnecessary and wastes a meaningful amount of water over an entire heating season. The dripping tactic is specifically for nights or periods when temperatures are forecast to drop to dangerous levels — typically overnight lows well below freezing combined with wind chill — not as a standard winter habit. Use it selectively in response to genuine extreme cold warnings, particularly for faucets fed by pipes in crawl spaces, exterior walls, or garages. The rest of the prevention strategy — insulation, heat maintenance, cabinet doors, sealed air leaks — handles normal winter weather without any dripping required. Reserve the faucet drip for the nights when the forecast genuinely warrants it.
Q: Can I use a hair dryer to thaw a frozen pipe?
Yes — a hair dryer is one of the safest and most effective tools for thawing an accessible frozen pipe. Set it to medium heat and work from the faucet end of the pipe toward the suspected ice blockage, moving the dryer continuously rather than holding it in one spot. Keep the faucet open throughout the process so that meltwater and steam can escape as the ice thaws. Avoid getting water from the pipe onto the dryer itself — keep the dryer positioned to blow warm air onto the pipe without directly contacting any moisture. A hair dryer works well for pipes in exposed locations like under sinks, in basements, or along basement ceiling runs. For pipes inside walls or in inaccessible locations, a hair dryer won’t reach the frozen section — in those cases, call a plumber rather than attempting to heat the wall surface, which is far less effective and risks hidden fire in the wall cavity.
Q: How do I know if my pipes are at risk of freezing?
Any pipe that runs through a space that isn’t heated by your home’s central heating system carries some freeze risk. The practical way to assess your specific home is to walk through it before winter with a flashlight and identify every pipe that is: in a crawl space or unheated basement, running along or through an exterior wall, in an unheated garage, or extending outside the building envelope (outdoor faucets and irrigation lines). These are your at-risk locations. A pipe in a conditioned interior space surrounded by warm room air on all sides is very unlikely to freeze under any normal winter condition. If you live in a milder climate state — Texas, Tennessee, the Carolinas — take this assessment more seriously, not less. Homes in these states are often built without freeze protection in mind, which means pipes that would be protected in a Minnesota house are fully exposed in a comparable Texas home.
Conclusion
Preventing frozen pipes isn’t a single task — it’s five separate tactics that work together across your home’s full pipe layout. Insulation slows heat loss from exposed pipes. Open cabinet doors allow warm room air to reach under-sink supply lines against exterior walls. A slow faucet drip during extreme cold relieves pressure buildup that causes bursts. Consistent indoor heat keeps the thermal buffer that protects pipes in exterior walls and crawl spaces from dropping below safe levels. And sealing air gaps around pipe penetrations removes the cold air infiltration that makes all the other tactics less effective.
If you’re in a mild climate state — Texas, Tennessee, the Carolinas — take the risk assessment more seriously than your local experience suggests. Homes in these regions are frequently built without the freeze protection that’s standard in cold-climate states, and a single unusual cold snap can cause widespread damage in houses that haven’t needed protection in years of normal winters. The February 2021 Texas event was extreme, but milder versions of the same scenario occur somewhere in the US every winter.
For the full step-by-step process of insulating your exposed pipes, our dedicated guide to insulating pipes for winter covers material selection and installation in detail, and our companion guide to winterizing outdoor faucets covers the exterior side of the same seasonal prep. If you’re dealing with a pipe that has already failed, our guide on how to fix a leaking pipe covers isolation and temporary repair while you wait for a plumber. And to know your home’s baseline water pressure so you can quickly spot the drop that signals an active burst, our picks for the best water pressure gauges cover affordable options worth having on hand before a cold season begins.
✍️ About This Guide
PTR Editorial Team — Plumbing Guides. We compare manufacturer specifications, installation requirements, compatibility and available product documentation to help homeowners choose suitable tools and parts. How we review →