Please note: Information in this guide is based on our research at time of writing and is subject to change. Always consult a licensed plumber for diagnosis of serious plumbing issues before attempting repairs.
Introduction
Replacing a bathtub faucet is a fundamentally different job from replacing a sink faucet, even though both involve swapping out water connections and trim hardware. With a sink faucet you’re working in an accessible cabinet under a countertop with reasonable visibility and room to manoeuvre. A bathtub faucet — the spout, valve trim, and the valve body behind the wall — is typically accessed through a small panel in an adjacent wall, a closet, or in some homes not at all without cutting into drywall. That access challenge, not the plumbing connections themselves, is what makes this job take longer and require more planning than most homeowners expect going in.
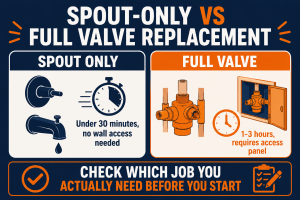
This guide covers both a simple tub spout replacement — which often takes under 30 minutes with no wall access required — and a full valve replacement that involves working behind the wall through an access panel. The right approach depends entirely on what’s failing: if your spout is dripping or needs updating cosmetically, a spout-only swap may be all you need. If the valve itself is worn, the temperature control is unreliable, or you’re upgrading to a new faucet system, a full valve replacement is the correct scope. If you’re also dealing with bathtub drain issues while the tub is out of service, our guide to the best bathtub drain stoppers covers replacement options. And if you find caulk failure around the tub surround during this job, our guide to caulking a bathtub walks through that repair alongside the faucet work.
At a Glance
| Difficulty |
Moderate |
| Time |
1–3 Hours |
| Cost |
$ to $$ for the new faucet |
| Tools Needed |
Adjustable wrench, basin wrench, Allen key set, plumber’s tape, flashlight |
| Skill Level |
Intermediate |
✏️ Our Take
Replacing a bathtub faucet is more involved than a sink faucet swap because you’re usually working behind a wall or through a small access panel, often in an awkward crouched position. The actual connections aren’t complicated — the challenge is access and visibility. If your tub doesn’t have an access panel behind the shower wall, plan extra time to either cut one or work entirely through the tub deck opening, which is significantly harder.
Types of Bathtub Faucets
Before purchasing any replacement parts, it’s worth understanding exactly which type of faucet system your tub has. The four common configurations differ significantly in what replacement involves — the wrong assumption at this stage leads to purchasing incompatible parts or discovering mid-job that the scope is larger than expected.
Tub spout only — the spout is the pipe fitting that water comes out of at the tub deck level. A spout-only replacement doesn’t involve the valve at all. The spout either threads directly onto the supply pipe coming out of the wall, or is held by a slip-fit connection secured with a small set screw underneath. This is the simplest replacement in the entire category and in many cases requires no wall access at all — just a wrench or an Allen key and a few minutes of work.
Tub and shower diverter valve — a diverter controls where the water goes: out through the tub spout or up to the showerhead. Some diverters are built into the spout itself (a pull-up tab on the spout body), while others are a separate handle on the valve trim. If the diverter is sticking or not routing water correctly, the entire spout or the valve cartridge may need replacement depending on where the failure is.
Single handle valve — a single handle controls both temperature and flow, with the valve body behind the wall containing a cartridge or ball mechanism that regulates both functions simultaneously. These are the most common valve type in US tubs built after the mid-1990s. Cartridge replacement is usually possible without replacing the entire valve body, which simplifies the job significantly when the valve itself is sound but the cartridge is worn.
Two handle valve — separate handles for hot and cold, each connecting to its own stem inside the wall. These are common in older US tubs and in some higher-end installations that use this configuration for aesthetic reasons. Individual stems can be replaced without pulling the entire valve body, though matching the exact stem to the manufacturer is important to avoid compatibility issues.
💡 Tip: If you’re only replacing the spout itself and not the valve behind the wall, this is a much simpler job that often takes under 30 minutes with no wall access required. Confirm whether the issue is with the spout or the valve before assuming you need to open up the wall — many homeowners do a full valve replacement when a spout swap was all that was needed.
What You’ll Need
The tools required depend on whether you’re doing a spout-only replacement or a full valve replacement. The list below covers both scenarios — for a spout-only job, you’ll use the first two items and skip the rest.
- Adjustable wrench — for the supply line connections behind the wall and for the spout body on threaded-fit spouts
- Basin wrench — for working in the tight clearances inside the wall cavity where a standard wrench won’t fit
- Allen key set — most tub faucet handles and some spout set screws use hex (Allen) fasteners rather than Phillips or flat-head screws
- Plumber’s tape (PTFE tape) — for all threaded connections; apply two or three wraps before threading any fitting
- Flashlight — the interior of a wall cavity is dark and working without a light is slow and frustrating; a headlamp is even better for keeping both hands free
If you’re replacing the valve body itself, also have on hand: a utility knife and drywall saw (if cutting a new access panel), a screwdriver set, and any manufacturer-specific tools listed in the new valve’s installation instructions. For guidance on which valve type fits your tub setup, our reviews of the best shower valves cover the main options for tub and tub-shower configurations used in US homes.
💡 Tip: Take a photo of your existing valve and bring it to the hardware store — matching the exact valve brand and model makes finding compatible replacement parts far easier. Valve manufacturers produce many cartridge and trim variants over the years, and a photo eliminates the guesswork that causes multiple hardware store trips.
Step 1 — Locate the Access Panel
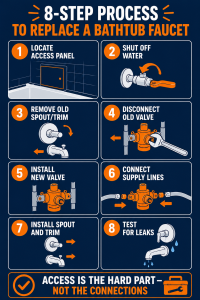
Before starting any disassembly, locate the access panel that gives you entry to the valve and supply lines behind the shower wall. This panel is typically found in one of three places: on the wall of an adjacent closet or hallway directly behind the shower wall, on the ceiling below the bathroom if it’s on an upper floor, or occasionally in the side of a built-in tub surround. In homes built after the 1990s, a purpose-built access panel is almost always present — a hinged or removable cover, often in a closet.
The panel should give you a clear view of and working access to the valve body, the hot and cold supply line connections, and the shower arm connection if you have a tub-shower combo. If the panel is very small or poorly positioned, you may still be able to complete the job — but expect to work by feel in some stages rather than with full visual confirmation of what you’re connecting.
US regional note: In older US homes — particularly common in the Northeast and Midwest — bathtub faucet connections were often installed without an access panel, since this wasn’t standard building practice decades ago. If you’re working on a tub in a home built before the 1990s and can’t locate an access panel in the adjacent closet, hallway, or back wall, budget extra time for this project or consider hiring a plumber for the access work specifically.
⚠️ Warning: If you need to cut an access panel into drywall or tile, consider whether this job has grown beyond a simple faucet swap — at this point many homeowners choose to call a plumber rather than open up a wall. Cutting into tile in particular is a specialist task that can damage the surrounding tile and waterproofing membrane if done incorrectly.
Step 2 — Shut Off the Water Supply
Locate the dedicated shut-off valves for the tub’s hot and cold supply lines — these are sometimes accessible through the same access panel as the valve, or at a manifold elsewhere in the home. If dedicated valves exist, close both by turning clockwise until they stop. If no dedicated valves are present, locate the home’s main water shut-off valve — typically at the water meter, in a utility room, or at the point where the main supply enters the building — and close that instead.
Once the supply is off, open the tub faucet and let it run until the flow stops completely — this relieves residual water pressure in the lines and prevents the water that’s still in the pipes from spilling when connections are opened. Open a hot water tap at another fixture in the home as well to help drain the supply lines more completely.
💡 Tip: Many older tub installations don’t have dedicated shut-off valves — if yours doesn’t, you’ll need to shut off the main water supply to the entire house for this job. This affects every fixture in the home, so time the work for a period when the disruption is manageable and let other household members know before you start.
Step 3 — Remove the Old Spout or Valve Trim
Start on the tub side of the wall — remove the spout, handles, and trim plate before working through the access panel. This is the most visible part of the job and the order matters: removing the trim from the front before disconnecting from the back prevents misaligned removal that can stress the supply connections inside the wall.
For the tub spout: look underneath the spout body for a small set screw recessed into the underside. If one is present, use the appropriate Allen key to remove it — the spout will then slide or lift off the supply pipe. If there’s no set screw, the spout threads directly onto the supply nipple coming out of the wall and unscrews counter-clockwise. Apply firm steady pressure and it should break free; a strap wrench helps on older spouts that have bonded to the pipe threads.
For the handles and trim plate: locate the screw under the handle cap (pop the decorative cap off with a flathead screwdriver if present), remove the screw, and pull the handle straight off. The trim plate behind it is usually held by two screws directly into the wall or valve body — remove these and the plate lifts away, exposing the valve stem or cartridge. Set all screws aside in a labeled container immediately; losing a screw into the tub or drain is easy and time-consuming to recover from.
💡 Tip: Most modern tub spouts simply twist off, but older slip-fit spouts are held on by friction alone and can require firm steady pressure or a strap wrench to remove. Never use pipe wrenches directly on chrome-finished spouts — wrap with a cloth or use a strap wrench to avoid scratching the finish and marring the trim area.
Step 4 — Disconnect the Old Valve
Working through the access panel, locate the valve body behind the wall. Depending on the valve type, this will be a single cartridge valve, a two-stem valve, or a ball-type valve body — your earlier photo from the hardware store trip should confirm what you’re looking at. The supply lines connect to the valve at two points: the hot supply (typically on the left from the user’s perspective) and the cold supply (right). These connections are either threaded fittings secured with compression nuts or push-fit connections depending on the valve age and type.
Use the adjustable wrench to loosen the supply line connections counter-clockwise, one at a time. Have a small bucket or a few old towels ready — there will be residual water in the lines and fittings that drains out when the connections are opened, even after the supply was turned off and the faucet run dry. Once both supply connections are loose, the valve body can usually be removed from its mounting bracket or backing plate by removing two to four screws.
⚠️ Warning: Take a photo of the valve connections before disconnecting anything — reconnecting hot and cold lines backward is a common mistake that’s easy to avoid with a quick reference photo. A reversed hot/cold connection means scalding water comes out when you turn the handle toward cold — a safety hazard that’s entirely preventable at this stage.
Step 5 — Install the New Valve
Before positioning the new valve, confirm two things: that the rough-in dimensions match your existing setup, and that the valve depth is correct for your wall thickness. Rough-in dimensions refer to the distance between the hot and cold supply connections — most US residential tubs use a standard spacing, but this can vary between manufacturers. The valve depth (how far it sits into the wall) determines whether the trim plate will sit flush against the finished wall surface when installed — too deep and the trim won’t reach; too shallow and the valve stem protrudes past the finished surface.
Position the new valve body in the same location as the old one, using the existing mounting bracket or backing plate if it’s compatible. Most replacement valves include a mounting bracket — secure it to the framing inside the wall cavity with the provided screws, ensuring the valve face is flush with the intended finish wall plane. Follow the manufacturer’s instructions for your specific valve; the mounting method varies between single-handle and two-handle configurations.
Apply two to three wraps of plumber’s tape to all threaded connection points on the new valve before making any connections. This applies to the supply line inlets, the spout outlet, and the shower arm outlet if your valve includes a diverter.
💡 Tip: If your new valve doesn’t match the exact rough-in spacing of the old one, you may need a valve specifically designed as a direct replacement for your brand — check this before purchasing. Many valve manufacturers produce “remodel” or “renovation” valves designed specifically to match the rough-in dimensions of older discontinued models, which simplifies installation significantly.
Step 6 — Connect Supply Lines
Reconnect the hot and cold supply lines to the new valve, using your reference photo from Step 4 to confirm correct orientation — hot to the left inlet, cold to the right inlet when facing the valve from the back. If you’re reusing existing supply lines that are in good condition, hand-tighten the compression nuts onto the valve inlets first to confirm the threads are engaging correctly before applying any wrench pressure. If you’re installing new supply lines — the better choice if the old ones are more than five to seven years old or show any mineral buildup — hand-tighten first and confirm both lines are seated squarely before tightening.
Once both connections are hand-tight, use the adjustable wrench to snug each one with an additional quarter to half turn. Do not over-tighten — compression fittings on supply lines are designed to seal with moderate pressure, not maximum torque. Over-tightening deforms the compression ring and can actually introduce a leak path that wouldn’t otherwise exist.
💡 Tip: Over-tightening compression fittings is one of the most common causes of a slow leak that doesn’t show up until weeks later — snug is sufficient, you don’t need maximum force. The correct result is a connection that doesn’t move under hand pressure, not one tightened to the limit of the wrench.
Step 7 — Install the New Spout and Trim
Return to the front of the tub and install the new trim components. Start with the trim plate — position it over the valve stem opening in the wall and secure with the provided screws, ensuring it sits flush and level against the wall surface. Do not caulk yet at this stage; leave access clear until after the leak test in Step 8.
Install the handles onto the valve stems according to the manufacturer’s instructions — most handles secure with a screw under a decorative cap. Confirm the handles operate smoothly through their full range before moving to the spout. For the tub spout: apply two wraps of plumber’s tape to the spout nipple coming out of the wall, then thread the new spout on clockwise by hand until snug. If the spout uses a set screw (slip-fit connection), slide it onto the nipple until the screw hole aligns with the hole in the nipple beneath, then tighten the set screw with the Allen key until firm. The spout should be oriented to direct water into the tub center — if it points slightly off-centre, adjust the nipple depth rather than forcing the spout body to an angle. If you’re shopping for a replacement, our roundup of the best tub spouts covers slip-fit and threaded options for every connection type.
Once everything is installed and confirmed snug, caulk around the trim plate where it meets the tub or wall surface. Our guide to caulking a bathtub covers that step in full detail, including the correct caulk type for wet areas and how to achieve a clean, professional finish.
💡 Tip: Caulk around the trim plate where it meets the tub or wall surface to prevent water intrusion behind the wall over time. Any gap between the trim plate and the wall surface is a pathway for shower water to work its way into the wall cavity — even a small amount of water over months causes mold and structural damage that’s far more expensive to address than a bead of caulk today.
Step 8 — Test for Leaks
Before closing the access panel or applying any final caulk, restore the water supply. Turn the shut-off valves back on slowly — if you shut off the main, restore it at the main and let pressure build gradually. Go to the tub faucet and open it slowly, allowing water to flow through both the cold and hot sides in turn. Watch the spout connection, handle stems, and trim plate area for any sign of dripping or moisture.
Then move to the access panel and inspect all supply line connections while the water is running. Look at each connection point — the supply line inlets at the valve, the spout outlet connection, and the shower arm connection if applicable — for any active drips. A drip that appears immediately is a loose connection; snug it with the wrench and recheck. A drip that appears only after water has been running for a minute or two is a slow seep, which typically means the compression ring didn’t seat correctly and the connection needs to be redone rather than just tightened further.
Run water for a full 10 minutes — both cold and hot, and through the diverter to the showerhead if applicable — before declaring the job complete and closing the access panel.
⚠️ Warning: Never close up an access panel until you’ve confirmed zero leaks after running water for at least 10 minutes — a hidden leak behind a closed wall can cause extensive damage before it’s discovered. A leak that produces one drop per minute adds up to over a litre per day, and behind a sealed wall that’s enough to cause mold growth and structural damage within weeks.
When to Call a Plumber Instead
Most bathtub faucet replacements are within the capability of a homeowner with basic plumbing confidence and patience. There are, however, specific scenarios where calling a licensed plumber is the correct decision — not a sign of defeat, but a recognition that the job has moved beyond what DIY access and tools can handle efficiently or safely.
No access panel exists and cutting into tile is required. Cutting through ceramic or porcelain tile is a specialist task. Done incorrectly it cracks surrounding tile, damages the waterproofing membrane behind, and creates water intrusion problems that are far more expensive to correct than the faucet replacement itself. A plumber or tile contractor with the right tools — a diamond-tipped hole saw and experience with tile work — is the correct resource for this specific step.
The valve body itself has failed and needs replacing in a soldered copper system. Older US homes with copper supply lines sometimes have valves that were soldered rather than threaded into the supply connections. Replacing a soldered valve requires cutting the supply lines, sweating a new valve in place, and reconnecting — this is plumbing work that requires experience with soldering copper pipe and is not a task for a first-time DIY plumber. Our guide to shower valves covers what to look for in a replacement if you’re providing the valve and having a plumber install it.
You’re uncomfortable shutting off the home’s main water supply. If your main shut-off valve is itself in poor condition, stiff, or partially seized — a common situation in older homes — attempting to operate it during a planned repair risks turning a faucet replacement into a plumbing emergency. A plumber can address the main shut-off as part of the visit.
US regional note: In older US homes — particularly common in the Northeast and Midwest — bathtub faucet connections were often installed without an access panel, since this wasn’t standard building practice decades ago. If you’re working on a tub in a home built before the 1990s and can’t locate an access panel in the adjacent closet, hallway, or back wall, budget extra time for this project or consider hiring a plumber for the access work specifically.
💡 Tip: There’s no shame in calling a plumber for the valve-behind-the-wall portion of this job while handling the visible trim and spout yourself — many plumbers are happy to do partial jobs like this. You save on labour for the straightforward surface work while leaving the wall access and valve work to a professional. Discuss the scope clearly before booking so the plumber knows they’re only needed for the behind-wall portion.
Need a Professional Plumber?
If your tub has no access panel, the existing valve connections are soldered copper, or you’re simply not comfortable shutting off the main water supply to complete this job, a licensed plumber is the right call. Getting a professional involved before a situation becomes complicated is always the lower-cost outcome compared to discovering a problem mid-job with the water turned off.
Find a licensed plumber in your area at PlumberArchive.com — the US plumber directory with 12,000+ verified local plumbers across all 50 states.
Find a trusted plumber near you → PlumberArchive.com
Follow Us on Facebook
Get weekly plumbing tips, honest tool reviews and DIY maintenance guides delivered straight to your Facebook feed. We cover bathroom repairs, faucet replacements, drain maintenance and everything in between — written for US homeowners who want to handle more themselves.
Follow PlumbingToolsReview on Facebook →
Frequently Asked Questions
Q: Do I need to turn off the main water supply to replace a tub faucet?
It depends on whether your tub installation has dedicated shut-off valves on the hot and cold supply lines behind the access panel. Newer installations often do — if yours does, you only need to close those two valves and the rest of the house is unaffected. Older installations frequently have no dedicated shut-offs, which means the main water supply to the house must be shut off for the duration of the job. If you’re unsure, check through the access panel before starting — look for ball valves or gate valves on the supply lines connecting to the back of the valve body. If none are present, the main supply shut-off is the correct approach.
Q: How do I find the access panel for my bathtub faucet?
In most US homes built after the 1990s, the access panel is on the wall directly behind the shower wall — typically inside an adjacent closet or hallway. Stand in the closet or room behind the bathroom, place your hand flat on the wall at roughly the same height as the tub faucet, and look for a hinged or screwed panel. If the bathroom is above a finished basement or another room, the panel may be in the ceiling of the room below. In homes built before the 1990s, no panel may exist at all — if you’ve searched the adjacent walls and ceiling thoroughly and found nothing, there likely isn’t one, and your options are to cut a new one into drywall or to work entirely through the tub deck area, which is significantly more difficult for a full valve replacement.
Q: Can I replace just the tub spout without replacing the valve?
Yes — and in many cases this is all that’s needed. If the problem is a dripping spout, cosmetic wear, or a diverter that no longer routes water correctly to the showerhead, the spout itself can be replaced independently of the valve body. Most tub spouts either unscrew from the supply nipple (threaded connection) or slide off after removing a small set screw underneath (slip-fit connection). Neither operation requires access behind the wall or disconnecting the valve. A spout-only replacement is a 15–30 minute job in most cases. The valve only needs to come out if the temperature control is unreliable, the valve is actively leaking behind the wall, or the cartridge is worn and won’t hold a set position.
Q: Why is my new tub faucet leaking after installation?
The most common causes are an under-tightened supply line connection, a cartridge that wasn’t fully seated in the valve body, or a missing or incorrectly applied plumber’s tape on a threaded connection. Start by checking each supply connection through the access panel — feel for moisture at each fitting and snug any that show even a slight drip. If the leak is at the spout itself, the spout connection to the supply nipple may need retightening or additional plumber’s tape on the threads. A leak from the handle stem area usually indicates the cartridge wasn’t seated correctly — remove the handle and trim, pull the cartridge, and reseat it per the manufacturer’s instructions. A leak that appears only after 24–48 hours rather than immediately is most commonly a compression fitting that was over-tightened, which deformed the ring; that connection needs to be remade with a new compression ring rather than tightened further.
Conclusion
The biggest variable in a bathtub faucet replacement isn’t the plumbing — it’s access. If your tub has a well-positioned access panel, this is a straightforward job that most intermediate DIYers can complete in one to two hours. If access is limited or absent, budget more time and seriously consider whether having a plumber handle the behind-wall portion while you handle the visible trim is the more practical split of the work.
For a spout-only replacement — the most common scenario — skip ahead to Steps 3 and 7 and the job is typically done in under 30 minutes with an Allen key and a pair of hands. No wall access, no supply shut-off beyond what’s needed for comfort, and no specialist tools required. It’s the overlooked quick fix that many homeowners assume will be complicated before realizing how simple spout removal actually is.
Whatever scope you’re working to, always confirm zero leaks through a minimum 10-minute run before closing up the access panel — that one check prevents the category of expensive hidden water damage that typically only gets discovered when ceiling staining or mold appears months later. For related bathroom work, our guide to the best bathtub drain stoppers covers the drain side of a tub refresh, our guide to caulking a bathtub covers the surround seal work that often comes alongside faucet replacements, and our reviews of the best shower valves cover replacement valve options if the existing valve body itself needs to come out.
✍️ About This Guide
PTR Editorial Team — Plumbing Guides. We compare manufacturer specifications, installation requirements, compatibility and available product documentation to help homeowners choose suitable tools and parts. How we review →