Please note: Information in this guide is based on our research at time of writing and is subject to change. Always consult a licensed plumber for diagnosis of serious plumbing issues before attempting repairs.
Introduction
A quick seasonal walkthrough is a great habit — but it’s not the same as a proper annual inspection. Where a spring plumbing checklist covers the surface-level checks that take 30 to 60 minutes, a full annual inspection goes room by room and digs into components that only need attention once a year: anode rod condition, water heater age, sewer line warning signs, sump pump function, and slow-developing corrosion that a quick walkthrough won’t catch. Think of the spring checklist as routine maintenance and this annual inspection as the equivalent of a car’s annual service.
This guide walks through every room and major system in your home — kitchen, bathrooms, water heater, basement, exterior, and sewer — giving you a complete picture of your plumbing’s health once a year. Catching issues at this stage is almost always cheaper than catching them after they’ve progressed. If your water heater hasn’t been flushed recently, our guide on how to flush a water heater covers that process step by step alongside this inspection.
At a Glance
| Difficulty |
Easy to Moderate |
| Time |
2–3 Hours for the full inspection |
| Cost |
Free to inspect — repairs vary |
| Tools Needed |
Flashlight, water pressure gauge, basic hand tools, notepad for tracking issues found |
| Skill Level |
Beginner |
✏️ Our Take
A proper annual plumbing inspection is more thorough than a quick seasonal checklist — it’s the once-a-year deep dive that catches the issues a 30-minute walkthrough misses. Think of your spring checklist as monthly maintenance and this annual inspection as the equivalent of a car’s annual service. Set aside a weekend morning, go room by room, and you’ll catch the slow leaks, aging components, and early warning signs that turn into expensive emergencies if left unchecked for another year.
Why an Annual Inspection Matters
A seasonal checklist is designed to catch surface-level issues quickly — the dripping faucet, the running toilet, the outdoor faucet that didn’t survive winter. Those checks are valuable and we recommend doing them every spring. But they’re a snapshot of what’s obviously wrong right now, not a picture of what’s slowly getting worse.
An annual inspection covers the deeper layer: aging components approaching the end of their expected service life, slow-developing corrosion on supply lines and fittings, water heater tanks that are building up sediment or whose anode rod is nearly depleted, sewer line issues that show only intermittent symptoms, and pipe insulation that has degraded over several winters. Many of the most expensive plumbing failures in US homes develop gradually over months or years before they become visible — a thorough annual inspection is specifically designed to catch them in that window.
The difference in time commitment reflects the difference in depth. Your spring checklist should take an hour. This annual inspection will take two to three hours — and the extra time is spent precisely in the areas that quick checklists don’t reach.
💡 Tip: Keep a written log year to year — comparing this year’s findings to last year’s notes helps you spot components that are degrading rather than just snapshotting one point in time. A slow-developing issue is easy to miss in a single inspection but obvious when you compare two years of notes side by side.
What You’ll Need
You don’t need specialist equipment for an annual home plumbing inspection. The four items below cover the full inspection — most homeowners already have three of them on hand:
- Flashlight or phone light — for inspecting under sinks, inside cabinets, crawl spaces, and around the water heater base where lighting is poor
- Water pressure gauge — to test your home’s water pressure at an outdoor spigot. Our roundup of the best water pressure gauges covers the options if you don’t already have one — this is one of the most useful tools to keep on hand for annual maintenance
- Basic adjustable wrench — for checking that fittings are snug and for the anode rod inspection if your water heater is due for one
- Notepad or phone notes app — for recording every finding, minor or otherwise. The log you build during this inspection is what makes next year’s inspection significantly more useful
💡 Tip: Take photos as you go — comparing photos year over year makes it much easier to spot gradual changes like growing corrosion or new water stains that would be easy to dismiss in isolation but are clearly worsening when you compare images side by side.
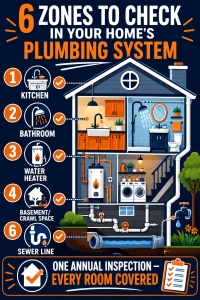
Kitchen Inspection Checklist
The kitchen has more active water connections than any other room in the house — sink supply lines, the garbage disposal, the dishwasher, and often an icemaker line running behind the refrigerator. Work through each one systematically with the cabinet doors open and a flashlight.
Under-sink supply lines and shut-off valves. Pull everything out from under the kitchen sink and inspect both hot and cold supply lines along their full length. Look for discoloration, corrosion at the fittings, or any visible moisture on the cabinet floor. Turn the angle stop shut-off valves under the sink through their full range — they should move smoothly and stop flow completely when closed. A valve that hasn’t been operated in years is a valve that may not work during an emergency.
Garbage disposal. Run the disposal with water flowing and check the cabinet interior while it’s operating. Look at the connection where the disposal meets the drain line and at the mounting collar at the top — both are common leak points. A minor drip during operation often goes unnoticed for months and causes cabinet floor rot before it’s discovered.
Dishwasher supply line and drain hose. Pull the dishwasher slightly forward if possible, or access the connections from the cabinet under the sink where they enter the cabinetry. The supply line should be dry along its full length. The drain hose should be secured with a high loop or air gap to prevent backflow — and should show no cracking, kinking, or signs of wear at the connection points.
Faucet base. With a dry flashlight look under and around the faucet base where it meets the countertop or sink deck. Water pooling in this area indicates either a loose faucet connection or a failing base gasket — both lead to cabinet damage if not addressed.
💡 Tip: Most under-sink leaks are found by feel before they’re found by sight — run your hand along supply lines and connections to check for dampness, especially at the fittings and valves where slow weeping tends to start.
Bathroom Inspection Checklist
Go through each bathroom in the house one at a time. Bathrooms concentrate more connections per square foot than any other room, and a problem in one often has a parallel issue in another.
Toilet base. Sit on the toilet and shift your weight slightly side to side. A toilet that rocks even slightly indicates the wax ring seal may be compromised — water can escape around the base with every flush and cause damage to the subfloor before any surface symptoms appear. Also check around the base for water staining or soft flooring, which indicates a wax ring that has already been failing.
Tub and shower caulking. Run your finger along every caulk line in the tub surround and shower — where tile meets the tub, where the tub meets the floor, and at the corners. Fresh caulk is continuous and flexible. Cracked, peeling, or gapped caulk allows water behind the wall where it causes mold growth and structural damage that is expensive to remediate.
Water pressure at the showerhead. Turn the shower on to hot and let it run for a minute, then measure at the showerhead with your gauge or simply observe the flow. Noticeably reduced pressure since last year can indicate mineral buildup in the showerhead itself or a developing restriction in the supply line.
Under-sink supply lines and angle stop valves. Repeat the same inspection you did in the kitchen under each bathroom vanity — supply lines, corrosion at fittings, valve operation, and any moisture on the cabinet floor.
Exhaust fan. Turn the exhaust fan on and hold a piece of tissue near the grille — it should be pulled firmly toward the fan. A weak exhaust fan allows humidity to build up in the bathroom, which accelerates mold growth behind walls and around caulk lines. If the fan is loud but moves little air, the duct may be obstructed or the fan motor is failing.
💡 Tip: A toilet that rocks even slightly when you sit on it means the wax ring seal may be compromised — this needs addressing before it causes water damage to the subfloor. The repair is straightforward, but the subfloor damage it causes if ignored is not.
Water Heater Inspection
The water heater is the single most important component to inspect annually — it’s expensive to replace, its failure can cause significant water damage, and it gives clear warning signs long before it fails completely if you know what to look for.
Check the age of your unit. The manufacturing date is encoded in the serial number on the data plate — the format varies by brand, but most manufacturers use the first four characters to encode the year and week or month of manufacture. Most tank water heaters last 8 to 12 years. If your unit is approaching or past that window, factor replacement into your planning even if it’s functioning normally now — a tank that fails at end of life often does so suddenly and with significant water release.
Inspect the base of the tank. Get down and look under the tank with a flashlight. Any moisture, rust staining, or mineral deposits at the base of the tank indicates a slow leak has begun. This is one of the clearest signs that a tank is approaching failure — it rarely reverses on its own and typically accelerates.
Listen during a heating cycle. Stand near the water heater when it’s actively heating. A quiet hum or light burner sound is normal. Popping, rumbling, or crackling sounds indicate sediment has accumulated at the base of the tank and is interfering with the heating element. This is the time to flush your water heater — an annual flush removes sediment before it hardens and becomes difficult to clear.
Check the anode rod. If it’s been more than two to three years since you last inspected or replaced the anode rod, do it during this annual inspection. The anode rod is the sacrificial component that prevents the steel tank walls from corroding — once it’s depleted, the tank itself begins to corrode from the inside. Replacement is a straightforward task that significantly extends tank life.
Hard water states. Homes in hard water states like Arizona, Texas, Nevada, and parts of California should pay particular attention to anode rod condition and fixture mineral buildup during this annual inspection — hard water accelerates wear on components that last much longer in soft water regions like the Pacific Northwest and New England. In hard water areas, annual anode rod inspection (rather than every two to three years) is a reasonable schedule.
⚠️ Warning: Any moisture or rust around the base of your water heater tank could indicate a slow tank failure — this is one finding that shouldn’t wait until next year’s inspection to address. A tank that is beginning to leak from the base will not self-correct, and the failure mode when it goes is typically rapid and involves significant water release.
Basement and Crawl Space Inspection
Basements and crawl spaces contain the longest runs of exposed pipe in most homes, are the hardest areas to monitor casually, and are where slow leaks can go undiscovered for months. Budget extra time for this section.
Exposed pipes. Walk every visible pipe run with a flashlight and look closely at joints, fittings, and the pipe surface itself. On copper pipes, look for green or white powdery corrosion at joints — this indicates a slow leak has been present long enough to leave mineral deposits. On galvanized steel pipes, look for orange rust streaking or flaking. On PVC or PEX, look for discoloration, kinking, or fittings that appear stressed.
Sump pump. Pour a bucket of water slowly into the sump pit. The pump should activate automatically, drain the pit completely, and shut off cleanly. Check that the discharge line is unobstructed and that water exits freely at the outdoor termination point. A sump pump that doesn’t activate during a test needs attention before the next heavy rain season, not after.
Water stains on walls and flooring. Scan the basement walls and floor for staining — white mineral deposits on concrete, rust streaks, or dark staining that suggests organic growth. These marks record past moisture events even if the area is currently dry. New stains since last year’s inspection indicate a moisture source that wasn’t present before.
Pipe insulation. Check that insulation on cold water pipes and any pipes running through unheated areas is intact — not compressed, torn, or missing sections. Pipe insulation degrades over time and can be damaged by pests, moisture, or simply being bumped during storage in the space. Addressing gaps now is far easier than dealing with a frozen pipe next winter.
💡 Tip: Condensation on cold water pipes during summer is normal — but condensation that’s dripping enough to pool on the floor below may indicate excess humidity in the space that’s worth addressing separately with a dehumidifier, which also reduces the mold risk in the space overall.
Exterior and Outdoor Inspection
The outdoor portions of your plumbing system are exposed to more stress than any other part — temperature extremes, UV exposure, physical contact, and ground movement all affect outdoor components over time.
Outdoor faucets and hose bibs. Turn each one on fully and let it run for 30 seconds, then observe the faucet body while it’s running and after it’s shut off. You’re looking for weeping or dripping from the body rather than the spout, which indicates an internal crack or failed packing. Also check that the valve closes completely and that there’s no drip from the spout after shutting off.
Main water shut-off valve. Locate your main shut-off valve — typically near the water meter, in a basement utility area, or in an outdoor valve box — and turn it through its full range of motion: closed, then fully open again. It should move smoothly and produce a complete stop in flow when closed. A main shut-off valve that seizes or fails to close completely is a serious liability that only becomes apparent during an emergency. While you’re at the meter, it’s also worth running a quick check for hidden leaks — our guide to how to detect a water leak covers the meter test and other diagnostic methods.
Sewer cleanout caps. Locate your home’s sewer cleanout access points — typically a white or black capped pipe protruding from the ground near the house foundation — and confirm the cap is present, undamaged, and seated properly. A missing or cracked cleanout cap allows groundwater and debris into the sewer line and makes any future cleanout job harder.
Gutters and downspouts. Confirm gutters are clear and that downspout exits direct water away from the foundation by at least six feet. Water draining against the foundation is one of the leading causes of basement moisture problems that often get misattributed to the plumbing system when the root cause is drainage.
💡 Tip: Locate and test your main shut-off valve during this inspection if you haven’t confirmed it recently — knowing exactly where it is and verifying it works saves critical time during a real emergency. If it’s seized and won’t turn, that’s a repair worth scheduling now rather than discovering while water is actively flowing.
Sewer Line Warning Signs
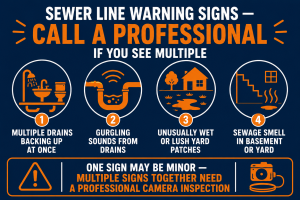
The main sewer line is one part of your plumbing system you can’t inspect visually without a camera, but it gives clear early warning signs when it’s developing a problem. Annual inspection is the right time to review these symptoms deliberately — rather than waiting for an emergency to connect the dots.
Multiple drains backing up simultaneously. A single slow drain indicates a localized clog in that fixture’s branch line. Multiple drains — particularly on different levels of the house — backing up at the same time points to a restriction in the main sewer line. This distinction is important: the fix for one is a plunger or a drain snake; the fix for the other requires professional intervention.
Gurgling sounds from drains when other fixtures are used. When you flush a toilet and hear gurgling from a nearby sink drain, or when the washing machine drains and a floor drain gurgles, the sewer line is struggling to handle the volume and air is being pushed back through adjacent drain lines. This is an early-warning symptom that indicates a partial restriction developing in the main line.
Unusually lush or wet patches in the yard. A section of yard that is noticeably greener, lusher, or wetter than the surrounding area — especially following the path of where a sewer line would run — can indicate that sewage is leaking from the line underground and fertilizing the soil above it. This is a sign of a compromised pipe that requires professional assessment.
Sewage smell in the basement or yard. Intermittent sewage odor in the basement — not from a floor drain, but from the general space — can indicate a cracked sewer line venting gases into the area. Persistent sewage odor in the yard along the sewer line path is a strong indicator of an underground leak.
⚠️ Warning: If you notice multiple warning signs together — especially several drains backing up at once alongside gurgling or sewage odor — this often indicates a main sewer line problem that requires a professional camera inspection, not a DIY fix. A sewer camera inspection will confirm the location and nature of the obstruction and prevent unnecessary guesswork.
Creating Your Inspection Log
The inspection log is what separates a one-time checklist from a genuine home maintenance system. A single year’s findings tells you what’s wrong right now. Two or three years of findings tells you what’s getting worse — which is far more useful information when deciding what to prioritize and spend money on.
Record every finding, even minor ones. Note anything that looks different from new — a slight discoloration on a supply line, a fitting that feels slightly damp to the touch but shows no active dripping, a water heater that sounded slightly louder than last year. These minor notes become significant context when you’re looking back twelve months later.
Note the date and compare to last year’s log. Date every entry. When you return next year, compare the new notes to last year’s before you start the inspection so you know exactly what to pay close attention to. A fitting that was “slightly damp, no visible drip” last year that is now “small water stain on cabinet floor” is a finding that has graduated from monitor to address.
Prioritize findings by urgency. Not every finding needs immediate action. Active leaks — any visible dripping or water where it shouldn’t be — go to the top of the list. Aging components approaching end of service life are next. Cosmetic issues or very minor findings go to the bottom. A clear priority list prevents the paralysis that comes from treating everything as equally urgent.
💡 Tip: A simple running log in your phone’s notes app takes five minutes to maintain and turns this from a one-time checklist into genuinely useful year-over-year home maintenance data. A note that says “water heater base — dry, 2024” followed by “slight moisture at base, 2025” is one of the most useful pieces of information you can have when deciding whether to replace a unit proactively or wait another year.
Need a Professional Plumber?
Found something during your annual inspection that’s beyond a DIY fix? A compromised sewer line, a water heater showing signs of tank failure, or a seized main shut-off valve all warrant a call to a licensed plumber before the issue becomes a full emergency. Booking early — rather than waiting for things to get worse — typically means better availability and lower cost.
Find a licensed plumber in your area at PlumberArchive.com — the US plumber directory with 12,000+ verified local plumbers across all 50 states.
Find a trusted plumber near you → PlumberArchive.com
Follow Us on Facebook
Get weekly plumbing tips, honest tool reviews and DIY maintenance guides delivered straight to your Facebook feed. We cover seasonal maintenance, pipe repairs, drain cleaning and everything in between — written for US homeowners who want to handle more themselves.
Follow PlumbingToolsReview on Facebook →
Frequently Asked Questions
Q: How is an annual plumbing inspection different from a spring checklist?
A spring plumbing checklist is a focused 60-minute walkthrough designed to catch obvious issues — running toilets, damaged outdoor faucets, visible leaks — right after winter stress. An annual inspection is a more comprehensive two-to-three hour room-by-room process that covers components a seasonal checklist doesn’t reach: water heater age and anode rod condition, sewer line warning signs, sump pump function testing, and a detailed review of every supply line and shut-off valve in the house. Think of the spring checklist as a quick monthly maintenance round and the annual inspection as the once-a-year deep service. Both are useful, and doing both gives you the best overall picture of your home’s plumbing health.
Q: Do I need a professional for an annual plumbing inspection?
For the inspection itself, no — everything in this guide is designed for homeowners with no specialist plumbing knowledge. You’re observing and documenting, not making repairs, and the tools required are minimal. However, what you find during the inspection may warrant a professional: an active leak, a water heater showing signs of tank failure, a sewer line with multiple warning signs, or a main shut-off valve that is seized and won’t operate are all situations where a licensed plumber is the right call. The value of a DIY inspection is catching these issues early enough that you’re booking a plumber on your timeline — not in response to an emergency.
Q: What are the most commonly missed plumbing problems?
The most commonly missed issues are the ones that develop slowly and don’t produce obvious symptoms until they’ve progressed significantly. Anode rod depletion in water heaters is near the top of the list — most homeowners don’t think about it until the tank itself begins to fail. Slow weeping at under-sink supply line fittings is another common miss, since the drip is small enough that it evaporates before pooling is noticed but is enough to cause cabinet floor damage over months. Sewer line issues that show only intermittent gurgling or slow drain symptoms are frequently attributed to clog buildups rather than the main line restriction they actually indicate. And main shut-off valves that haven’t been tested in years are discovered to be seized only during emergencies — by far the worst time to find out.
Q: How long does a full home plumbing inspection take?
For most US homes, a thorough room-by-room annual inspection takes two to three hours. A smaller home with one bathroom, no sump pump, and straightforward plumbing will be closer to two hours. A larger home with multiple bathrooms, a finished basement, a sump pump, a water softener, and a crawl space will take closer to three hours or slightly more. The time investment is proportional to the complexity of the home’s plumbing — but in every case the time is well spent when you consider that the issues an annual inspection catches in their early stages typically cost a fraction of what they cost to address once they’ve progressed.
Conclusion
A two-to-three hour annual inspection consistently catches what quick checklists miss — not because seasonal checks are inadequate for what they’re designed to do, but because the issues that an annual inspection targets are specifically the ones that develop too slowly to show up in a 60-minute walkthrough. Aging water heater components, slow-developing corrosion at supply line fittings, early sewer line symptoms, and degraded pipe insulation all require the time and deliberate attention this inspection provides.
Keep a written log every year. The log is what turns this inspection from a one-time checklist into a genuinely useful maintenance record — one that shows you what’s getting worse year over year before it becomes a problem that requires emergency intervention. Comparing this year’s notes to last year’s is consistently where the most actionable findings emerge.
If your inspection uncovers an active leak, address it immediately — don’t schedule it for the following week or add it to a list. Active leaks don’t pause. For ongoing seasonal maintenance alongside this annual inspection, our spring plumbing checklist covers the quick 12-point walkthrough that complements the deeper annual review. For water heater maintenance, our step-by-step guide on how to flush a water heater covers the annual flush process in full. And if you need a water pressure gauge for future inspections, our roundup of the best water pressure gauges covers the options at every price point.
✍️ About This Guide
PTR Editorial Team — Plumbing Guides. We compare manufacturer specifications, installation requirements, compatibility and available product documentation to help homeowners choose suitable tools and parts. How we review →