
Guides
19 Oct 2026

Can’t Reach the Faucet Nut? Choose the Right Tool Before You Buy
Not sure which tool fits your faucet nut? Identify the fixing, see how it lets go and check your clearance first. Then choose a tool, or use one you own.
How to replace a kitchen sink strainer step by step: dropping the trap, freeing a stuck locknut, washer order, sealing, reassembly, and leak-testing.

Please note: Information in this guide is based on our research and hands-on experience at time of writing and is subject to change. Always follow the directions supplied with the specific strainer and sink you are using, and consult a licensed plumber if you run into conditions beyond the scope of this guide.
A kitchen sink basket strainer is the metal fitting that clamps into the sink’s drain opening — the part the removable basket drops into and the tailpiece threads onto below. It takes a beating: constant water, food acids, dish soap, and the occasional whack from a heavy pot. Most last many years, but they do wear out, and there are three clear signs yours has reached that point. The first is a persistent leak in the cabinet directly under the drain that comes back within days no matter how carefully you reseal it — the strainer body itself has corroded thin or warped and can no longer hold a seal against fresh putty or silicone. The second is visible rust or heavy corrosion on the body or the locknut, or a chalky white buildup that flakes away when you touch it. The third is a crack in the strainer body, usually radiating out from the threads, which you will sometimes only find after you take the drain apart to chase a leak.
Replacing the strainer is a straightforward job with hand tools, and the only part that gives people real trouble is a locknut that has seized after years in a damp cabinet. This guide covers everything that job involves: clearing the cabinet and dropping the trap, freeing and removing the old strainer — including the stuck and corroded cases — fitting the new one, getting the washers below the sink in the right order and orientation, reconnecting the trap, and testing the finished drain for leaks. It deliberately does not re-teach the plumber’s-putty sealing technique itself — rolling the rope, seating the flange, and cleaning up the squeeze-out are covered thoroughly in our guide to how to use plumber’s putty, and this article links out to it at the sealing step rather than repeating it. And if you’re not sure whether your sink actually needs a strainer or a garbage disposal flange, our kitchen sink strainer vs garbage disposal flange comparison explains the difference before you buy the wrong part. If you are still choosing a replacement part, our review of the 5 Best Kitchen Sink Strainers & Baskets covers the styles worth buying.
At a Glance
| Skill Level | Beginner to intermediate DIY — no special skills, but expect to work on your back in a cramped cabinet, and budget extra time if the old locknut is corroded. |
| Tools Needed | A strainer wrench or spud wrench for the large locknut under the sink; adjustable tongue-and-groove pliers; penetrating oil; a plastic putty knife or scraper; a bucket and rags; plumber’s putty (standard, or stain-free for a stone or granite-composite sink) or the silicone gasket some strainers supply. For a badly seized nut, add a hammer and a cold chisel or pin punch, with a hacksaw blade as a last resort. |
| Time Needed | About 30 to 60 minutes for a strainer that comes apart normally; add 20 to 30 minutes if the locknut is rusted and has to be cut off. |
| Critical First Step | Empty the cabinet and put a bucket under the trap before you touch anything. Every strainer job spills the water standing in the P-trap, and usually some black gunk with it. |
✏️ Our Take
When a kitchen drain leaks again after a strainer swap, the new part is almost never at fault. Nearly every time it traces back to one of two things: the washers under the sink went on in the wrong order or upside down, or the putty seal at the flange was rushed — too little putty, an uneven rope, or the locknut run down before the flange was clean and square. Take your time on the washer stack and the seal, tighten the locknut firmly and evenly rather than as hard as you can, and fill-and-dump test the sink properly before you call it done. Do that and a basic stainless strainer will outlast the next faucet you put in.
IN THIS GUIDE
Clear everything out of the sink cabinet so you have room to work and a clear view of the drain. Put a bucket directly under the P-trap and keep rags within reach. You do not need to shut off the house water for this job — the strainer is a drain fitting, not a pressurized connection — but if the sink has a garbage disposal on one side, unplug it or switch off its breaker before you get under there. A headlamp or a work light aimed into the cabinet makes the difference between guessing and seeing.
Start by taking the trap apart. Loosen the two slip-joint nuts on the P-trap — one where the trap meets the tailpiece coming down from the strainer, one where it meets the trap arm going into the wall — by hand if you can, or with tongue-and-groove pliers if they are tight. Let the water in the trap drain into the bucket, then swing the trap clear and set it aside. Next, unthread the slip nut at the bottom of the strainer body and pull the tailpiece off. With the tailpiece gone, the only thing still holding the strainer in the sink is the big locknut.
If you have a double-bowl sink and only one side’s strainer is bad, you still have to drop at least the tee or trap section serving that bowl. Take a photo of how the trap pieces fit together before you pull them apart — it speeds up reassembly, and it records which way each beveled washer was facing.
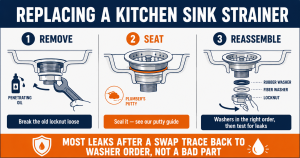
Under the sink, the strainer body is locked to the sink with a wide, thin locknut — usually two to three inches across — threaded onto the strainer’s shank. A metal retainer or a pair of paper-thin friction washers sits between that nut and the underside of the sink. To get the strainer out, you have to back the locknut off completely.
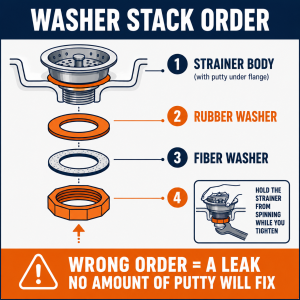
The locknut has shallow notches or lugs cast into it for a strainer wrench or a spud wrench, and that is the right tool for the job — its wide jaws or splined end grip the whole nut instead of one corner. Tongue-and-groove pliers or a hammer and punch will also turn it, but they tend to skate off and chew up the notches. As you turn the nut counterclockwise, the whole strainer will try to spin in the drain hole along with it, so hold the body still from above: seat the handles of a pair of pliers down into the crossbars inside the strainer opening and hold them, or have a helper brace a large screwdriver across those bars. On a strainer you are throwing away, you can also just grip the body hard from below with a second pair of pliers.
A locknut that has sat damp for years may not move at first. Work up to it in stages rather than forcing it straight away:
• Penetrating oil. Soak the threads where the nut meets the shank, and the seam between the nut and the sink, and give it time to wick in (see the tip below). A second application after ten minutes is worth it.
• More leverage, still on the flats. Fit the strainer or spud wrench and slip a length of pipe over the handle for leverage, using steady pressure rather than sharp jerks. Keep holding the body from spinning.
• Break it with a hammer and punch. If it still will not turn, set a cold chisel or a pin punch against one of the nut’s lugs at an angle that drives it counterclockwise, and strike it firmly. A few solid hits will usually crack a corroded nut loose or spin it far enough to finish by hand.
• Cut it off. As a last resort, cut through the locknut with a hacksaw blade — held in your hand or in a mini-hacksaw — angling the cut so you do not saw into the sink. Once you nick through the nut it splits and drops off. A rotary tool with a cut-off wheel does the same job faster in a tight space.
With the locknut off, lift away the friction washers and any rubber washer or gasket, then push the strainer body up and out through the top of the sink. It may be stuck down with old, hardened putty; tap it up from below, or work a plastic putty knife under the flange from above to break it free. Once it is out, scrape the drain opening clean. Old putty comes off in crumbly rings — get all of it off both the top face where the flange sat and the underside where the washers pressed, using a plastic scraper so you do not scratch the sink. Finish with a rag; a little mineral spirits cuts the last oily film. The surface has to be clean, dry, and smooth for the new seal to take.
Take the new strainer apart and lay the pieces out so you know what goes where: the strainer body with its flange, a rubber washer, a fiber or cardboard friction washer, and the locknut, plus a separate rubber slip washer and slip nut for the tailpiece. Compare the new body’s opening to your old one — practically every US kitchen sink uses the same 3-1/2 inch opening, so a standard basket strainer drops straight in, but it is worth confirming before the sink is apart. Then seal the flange and press it into the opening from above. That sealing step — rolling an even rope of plumber’s putty, seating the flange in it, and wiping up what squeezes out — is the one part of this job we cover in a separate article; follow our guide to how to use plumber’s putty for the technique and how much to use. Some newer strainers, and most plastic-bodied ones, ship with a molded rubber or silicone gasket that replaces the putty entirely — if yours does, set that gasket under the flange dry, skip the putty, and go straight to the washers below.
Hold the strainer body down in the opening from above — this is where a helper, or a screwdriver braced across the crossbars, earns its keep — and go under the sink to build the washer stack on the shank. Order and orientation both matter, and getting them wrong is the single most common cause of a comeback leak. From the sink downward it goes: first the rubber washer, which sits flat against the underside of the sink and does the actual water sealing; then the fiber or cardboard friction washer, which protects the rubber and lets the metal nut turn without dragging the rubber around with it; then the locknut. If the rubber washer is beveled or cone-shaped, the flat side faces up against the sink and the tapered side faces down toward the nut. The fiber washer goes on dry — no putty, no grease.
Thread the locknut up by hand until it meets the friction washer, then tighten it with the strainer or spud wrench while you keep the body from spinning above. Bring it up firmly and evenly — the goal is the flange pulled down tight against its seal, with a small, continuous bead of putty squeezed out on top all the way around. Stop there. You do not need to reef on it. Once the flange is seated and the bead is continuous, another quarter turn does nothing useful and risks cracking the body, distorting the thin flange, or splitting a plastic locknut. If putty keeps squeezing out and the nut keeps turning without the strainer ever feeling solid, you used too much putty — better to find that out now than after the trap is back together.
Thread the tailpiece back onto the bottom of the strainer body. There is a bevel-edged nylon or rubber slip washer between the tailpiece and the strainer outlet, and its tapered face points into the joint it seals — into the strainer outlet. Hand-tighten the slip nut, then give it no more than a modest turn with pliers. Slip-joint connections seal by compressing that soft washer, not by being cranked down; over-tightening a slip nut splits the washer or cracks the plastic nut and makes the leak worse.
Rehang the P-trap the way it came off, using your photo if you took one. Each slip joint gets its beveled washer with the taper pointing into the fitting. Check that the trap arm still slopes down slightly toward the wall and that you have not pulled the trap so tight it is under strain — the pieces should line up without being forced. Common mistakes here: leaving a washer out, putting a beveled washer in backward, cross-threading a plastic slip nut by starting it with pliers instead of by hand, and reusing a washer that is already flattened or cracked. New slip washers cost a few cents and come in most strainer kits — when in doubt, replace them. If this sink is getting a garbage disposal instead of a plain tailpiece on one side, our guide to how to install a garbage disposal covers the mounting flange and the drain plumbing on that side.
Do not trust a trickle test. Drop the basket stopper in, fill the bowl most of the way, and while it fills, look and feel under the sink with a dry hand or a dry paper towel — that checks the flange seal and the locknut under the static weight of a full basin. Then pull the stopper and let the whole bowl drain at once. A full basin dumping through the drain puts far more flow and back-pressure on every joint than a running tap does, and it is what actually reveals a marginal seal.
With the water draining, check each point in order and know what a leak there means. Water at the very top, around the flange inside the sink, means the putty seal or the locknut needs to come up a little. A drip from the wide locknut area under the sink means the washer stack — reopen it and check the order and the rubber washer’s orientation. A drip at the tailpiece-to-strainer joint, or at either P-trap nut, means that slip washer is not seated or that nut needs a nudge tighter. Re-snug the specific joint that is weeping, an eighth of a turn at a time, and re-test. Fill and dump the bowl two or three times, wiping everything dry between rounds so you can tell a fresh drip from leftover splash. Then run the sink normally for a day and check once more — a seal that passes the dump test and is still dry the next morning is done.
Replacing a basket strainer is a hand-tool job that almost always goes fine, but a few situations are worth handing off. If the strainer body is fused to a cast-iron sink, or to an integrated sink-and-counter unit, by rust to the point that freeing it risks cracking the sink itself, the cost of a wrong move is a new sink — get a plumber to assess it. If the drain opening is chipped, pitted, or out of round so the flange cannot seat flat, no amount of putty will seal it, and the fix is sink-side. And if the drain still leaks after you have reassembled it correctly — clean surfaces, right washer order, even tightening, a proper fill-and-dump test — the problem is probably elsewhere: a hairline crack in the basin around the drain, or a failing joint deeper in the drain line that only shows under load.
For the ordinary swap — a corroded strainer, a leak that keeps coming back, a cracked body — the steps above are the whole job.
If a corroded strainer is fused to the sink in a way that risks cracking it, or a drain keeps leaking after a correct reassembly and points to a cracked basin or a deeper drain-line problem, it is worth getting a professional to look. Search PlumberArchive.com — the US plumber directory with 12,151+ verified local plumbers across all 50 states.
Get weekly plumbing tips and DIY guides delivered straight to your Facebook feed.
Either one seals a strainer flange. Plumber’s putty is the traditional choice because it seals on contact and lets you take the strainer apart cleanly years later; silicone works too, but it has to cure before you run water and it makes the next removal messier. Use whichever the strainer’s instructions call for, and if the sink is natural stone or a stone composite, use stain-free putty or clear silicone — standard putty stains those permanently. Our guide to how to use plumber’s putty walks through the choice and the technique.
Give penetrating oil 10 to 15 minutes to work, then try again with a proper strainer or spud wrench while holding the body from spinning. If it still will not move, drive a cold chisel or pin punch against one of the nut’s lugs with a hammer in the loosening direction — a few firm hits usually breaks a corroded nut free. If nothing works, cut through the nut with a hacksaw blade or a rotary tool, angling away from the sink so you do not score it; once nicked, the nut splits off.
Firm and even, not maximum force. Tighten until the flange is drawn down flat and a continuous bead of putty has squeezed out around it on top, then stop. Extra torque past that point does not improve the seal, and it can distort the flange or crack a plastic body or nut.
Dry everything, then fill and dump the bowl and watch. A drip from the wide locknut means the washers under the sink — almost always the rubber washer is upside down, or the rubber and fiber washers are swapped; take them apart and rebuild the stack rubber-first. A drip from the tailpiece or a trap nut means that slip washer is not seated or the nut needs a light nudge. A weep at the flange inside the sink means the putty seal needs the locknut brought up slightly.
Reuse the metal tailpiece if it is not corroded, but replace the soft washers. The rubber and fiber washers, and the slip-joint washers at the trap, take a set and will not reseal reliably once they have been disturbed. Replacements are cheap, and most strainer kits include a full set.
Replacing a kitchen sink strainer is mostly a matter of patience in a cramped cabinet. The part is inexpensive and standardized, the tools are basic, and the only real obstacle is a locknut that has rusted in place — which penetrating oil, the right wrench, and, if it comes to that, a hacksaw will always beat. Everything that decides whether the finished drain stays dry happens in two places: the washer stack under the sink, built rubber-washer-first and right-side up, and the flange seal, made on a clean dry surface with the locknut brought up evenly rather than savagely.
Take the trap apart into a bucket, get the old strainer out, clean the opening back to bare metal, seal and seat the new one, rebuild the washers in order, reconnect the trap with its beveled washers facing the right way, and fill-and-dump test until it stays dry overnight. For the sealing step, lean on our guide to how to use plumber’s putty; for picking the replacement, our 5 Best Kitchen Sink Strainers & Baskets review has the styles worth buying.
Prices and ratings may change. Always check Amazon for current prices.
✍️ About This Guide
PTR Editorial Team — Plumbing Guides. We compare manufacturer specifications, installation requirements, compatibility and available product documentation to help homeowners choose suitable tools and parts. How we review →
Not sure which tool fits your faucet nut? Identify the fixing, see how it lets go and check your clearance first. Then choose a tool, or use one you own.
Check your manual and the drain route first: gravity hose, built-in pump or external pump. Then see whether you need a dehumidifier hose at all.
Explore portable bidets that need no water-line connection, from bottle caps and squeeze bottles to battery-powered handhelds.

