Please note: Information in this guide is based on our research at time of writing and is subject to change. Always confirm the exact rough-in requirement listed for your specific toilet model before purchasing.
Introduction
If you’re replacing a toilet, the rough-in measurement is the single most important number to get right before you buy — and it’s also the one homeowners most often skip, guess at, or measure incorrectly. Unlike bowl shape, seat height, or flush type, a mismatched rough-in isn’t a matter of preference; it’s a matter of whether the toilet you ordered will physically sit against the wall and line up over your existing floor flange at all. Get it wrong and you’re looking at a return, an exchange, or an awkward installation that never quite looks or seals right.
The good news is that measuring a rough-in correctly takes only a few minutes and requires nothing more specialized than a tape measure. There’s no demolition, no special tool, and no guesswork involved once you know exactly where to start the measurement and where to end it. This guide walks through what a rough-in measurement actually is, why it matters so much, and the exact steps to measure yours accurately before you shop for a replacement toilet — along with the most common sizes you’re likely to encounter and how to double-check your number before you commit to a purchase.
At a Glance
| What It Measures |
The distance from the finished wall behind the toilet to the center of the floor drain bolts |
| Most Common Size |
12 inches in the vast majority of US homes, though 10-inch and 14-inch rough-ins also exist, particularly in older construction |
| Tools Needed |
A tape measure — no specialty tools required |
| Time Needed |
Under 5 minutes |
✏️ Our Take
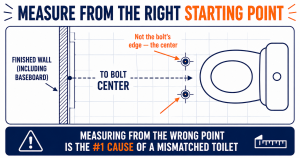
Measuring a toilet rough-in is genuinely simple, but it’s easy to measure from the wrong starting point and get a number that’s slightly off — which is exactly what leads to a toilet that doesn’t fit correctly against the wall or over the existing floor flange. The key detail most people miss is measuring from the finished wall (including any baseboard), not the baseboard itself or an unfinished stud wall, and measuring to the center of the bolts, not their edge. Get those two details right and the rest of the process takes less than five minutes.
What a Rough-In Measurement Actually Is
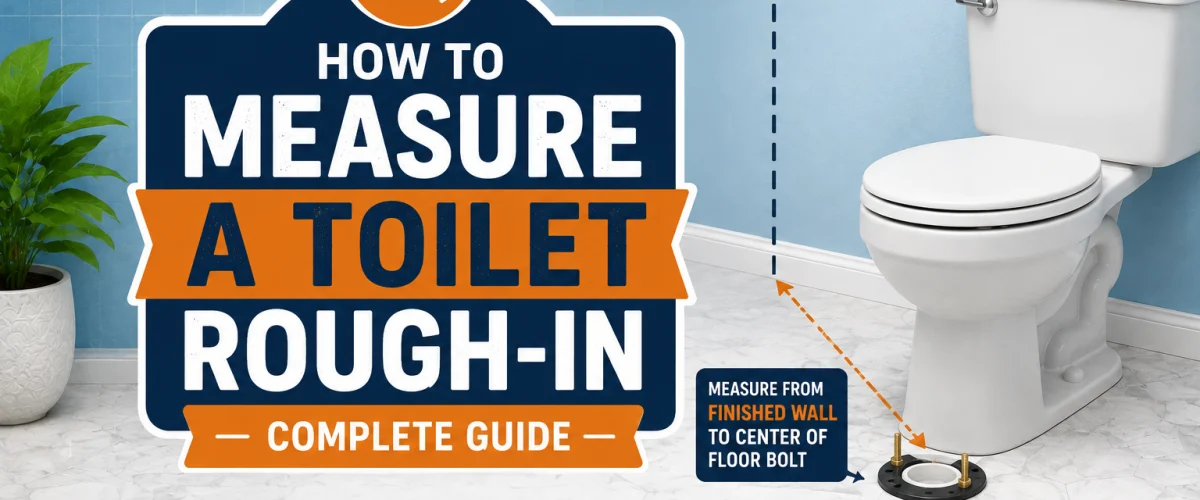
The rough-in is the distance from the finished wall behind where the toilet sits to the center of the floor mounting bolts, sometimes called the closet bolts. Those bolts are what actually secure the toilet base to the floor flange, and their position is fixed by your home’s existing plumbing — it isn’t something you can shift or adjust without cutting into the floor and relocating the drain itself. Every toilet is manufactured around a specific rough-in dimension, which is why this single number determines whether a given model will physically fit and align correctly in your bathroom.
It’s easy to confuse the rough-in with other toilet measurements, like the footprint of the base, the distance the tank projects into the room, or the seat height, but none of those are the same thing. The rough-in is specifically about the drain and bolt position relative to the wall, not the size or shape of the fixture itself. Two toilets can look completely different — different bowl shapes, different tank designs, different overall footprints — and still share the same rough-in, because that number is purely about where the toilet needs to connect to the floor, not how it’s styled above that connection point.
The term itself comes from construction: the drain, water supply, and bolt positions are “roughed in” during the initial plumbing work, long before any fixture is chosen or installed. That’s also why the rough-in isn’t something you can casually change later — moving it means relocating the drain line under the floor, which is a significantly bigger job than simply picking a different toilet. For nearly every replacement scenario, the practical approach is measuring what already exists and shopping for a toilet that matches it, rather than trying to alter the plumbing to fit a toilet you’ve already picked out.
Why Getting This Number Right Matters
Buying a toilet sized for the wrong rough-in creates a fit problem that no amount of careful installation can fully solve. If the toilet’s rough-in is smaller than your actual measurement, the tank ends up pressed against the wall or a baseboard before the base can seat properly over the flange, which can prevent a clean seal and put stress on the connection. If the toilet’s rough-in is larger than what your home actually has, the opposite problem occurs — the toilet has to sit awkwardly far out from the wall, leaving a visible and often uncomfortable gap behind the tank.
Most standard toilets sold today are built around a 12-inch rough-in, which is part of why this mismatch is such a common — and completely avoidable — reason for a return or exchange. Someone measures loosely, assumes their home is standard because most homes are, and orders a toilet that turns out not to fit the specific dimensions of their bathroom. If you’re shopping for a model built for accessibility or a taller seated position specifically, our comfort height toilet reviews cover additional fit considerations worth checking alongside your rough-in measurement, since those models still need to match your home’s existing rough-in regardless of their height.
⚠️ Warning: Never assume your home has a standard 12-inch rough-in just because that’s the most common size — older homes, homes with unusual construction, or homes where a bathroom has been renovated can have a 10-inch or 14-inch rough-in instead. Always measure rather than assume.
Step 1: Locate the Floor Bolts
Before you can measure accurately, you need a clear, unobstructed view of the floor bolts themselves. Where you’re starting from — replacing an existing toilet versus measuring in an already-empty bathroom — determines exactly how you get there.
- If you’re replacing an existing toilet, remove it first. Shut off the water supply, disconnect the supply line, and remove the toilet from the flange so the floor bolts are fully exposed. Measuring around an installed toilet is possible in a pinch, but removing it first gives you a far more reliable reading.
- If you can’t remove the toilet, work carefully around the base. You can still get a usable measurement by locating the bolt caps at the base of the toilet — the small plastic covers on either side near the rear — and measuring to their centers, though this is less precise than measuring with the toilet fully removed.
- Identify both bolts on either side of the drain opening. These two bolts are what actually secure the toilet base to the floor flange beneath it, and they should be roughly symmetrical on either side of the drain hole.
- Confirm you’re looking at the rear bolts, not any front stabilizing hardware. Some installations include additional hardware near the front of the base, but the rough-in measurement is always based on the rear mounting bolts closest to the wall.
Step 2: Measure from the Wall to the Bolt Centers
This is the step where accuracy actually matters most, and where most measuring mistakes happen. The goal is a single, clean horizontal measurement from the correct starting point to the correct ending point — nothing more complicated than that, but each detail below affects whether the final number is trustworthy.
- Position the tape measure against the finished wall directly behind the toilet. Use the actual finished wall surface — not the floor molding, not an unfinished stud wall, and not a temporary surface — as your starting point.
- Measure horizontally to the center point of the rear mounting bolts. Don’t measure to the front edge of the bolt or the back edge — find the actual center of the bolt shaft, since that’s the reference point every toilet manufacturer uses when specifying rough-in compatibility.
- Take the measurement at floor level. Keep the tape measure flat against the floor for the full length of the measurement rather than measuring at an angle or partway up, which can introduce small errors that add up.
- Record the number to the nearest quarter inch. You don’t need laser precision, but a reasonably careful reading now makes the rounding step that follows much more reliable.
💡 Tip: If your baseboard trim extends out from the wall, measure from the baseboard’s surface, not the wall behind it — the baseboard is what will actually be closest to the new toilet’s tank, so that’s the relevant reference point.
Step 3: Round to the Nearest Standard Size
Rough-in measurements don’t need to be exact to the fraction of an inch, because toilets themselves are manufactured to standard rough-in sizes with a small amount of built-in tolerance. Once you have your raw measurement, the next step is matching it to the nearest standard size rather than searching for a toilet built to your exact number.
- Check whether your measurement falls close to 12 inches. Anything from roughly 11.5 to 12.5 inches is generally considered a standard 12-inch rough-in, since that small range is well within the tolerance most toilets are built to accommodate.
- Apply the same logic to 10-inch and 14-inch measurements. A reading close to 10 inches rounds to a 10-inch rough-in, and a reading close to 14 inches rounds to a 14-inch rough-in, following the same general tolerance window as the 12-inch standard.
- Don’t round across a gap between standard sizes. A measurement of 13 inches, for example, doesn’t cleanly round to either 12 or 14 — that’s a situation worth double-checking rather than guessing which direction to round.
- Use the rounded number when searching for a replacement toilet. Product listings and manufacturer specifications are written around these standard sizes, so this is the number you’ll actually be shopping against.
Step 4: Double-Check Before Buying
A single measurement is usually enough, but a quick second pass costs almost nothing and eliminates most of the risk of ordering the wrong toilet. This step is about confirming your number before you commit to a purchase, not about repeating the entire process from scratch.
- Measure a second time from a slightly different point along the wall. If both measurements land in the same range, you can be confident in the number. If they differ noticeably, remeasure carefully to figure out which reading was off.
- Cross-reference your measurement against the specific rough-in listed for the toilet model you’re considering. Don’t just assume a listing is “standard” — check the actual specification on the product page or in the manufacturer’s documentation before adding it to your cart.
- Inspect the condition of your existing floor flange while you’re down there. If the flange looks cracked, corroded, or otherwise due for replacement, our toilet flange and wax ring kit reviews cover options worth considering as part of the same installation.
- Consult a plumber if your measurement falls awkwardly between standard sizes. An unusual or non-standard rough-in is uncommon but not unheard of, and a professional opinion is worth the cost if you’re not confident choosing a model on your own.
Common Rough-In Sizes and What They Mean
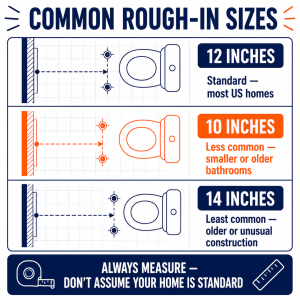
A 12-inch rough-in is the standard used in the vast majority of US homes and the default assumption baked into most toilet models sold today. If you measure and land close to 12 inches, you’ll have the widest possible selection of replacement toilets to choose from, since manufacturers design the bulk of their lineup around this dimension first.
A 10-inch rough-in is less common and typically shows up in smaller or older bathrooms where there simply wasn’t much floor space behind the toilet to work with when the plumbing was originally installed. Models built specifically for a 10-inch rough-in do exist, but they represent a noticeably smaller share of what’s available compared to the 12-inch standard, so it’s worth confirming stock and availability before you commit to a specific model.
A 14-inch rough-in is the least common of the three and usually appears in specific older or unusual construction, sometimes alongside other non-standard bathroom dimensions. As with 10-inch models, 14-inch toilets are available from most major manufacturers, but you’ll generally have fewer choices in terms of style, bowl shape, and price tier than you would shopping for a standard 12-inch model. If you’re weighing flush mechanism options while you shop for any of these sizes, our dual flush vs single flush toilet comparison is worth a look, since that’s a separate decision from rough-in size and applies regardless of which one you need.
US Regional Context: Rough-in size in US homes correlates loosely with construction era and region — older homes, particularly in the Northeast and parts of the Midwest with older housing stock, are more likely to have a non-standard 10-inch or 14-inch rough-in than newer construction. If you’re renovating an older bathroom, measuring before shopping for a toilet saves a return trip.
Frequently Asked Questions
Q: What happens if I buy a toilet with the wrong rough-in size?
A toilet built for a rough-in smaller than what your home actually has generally won’t sit flush against the wall — the tank hits the wall or baseboard before the base can seat properly over the flange, which can prevent a clean, secure fit. A toilet built for a rough-in larger than what your home has creates the opposite problem, forcing the toilet to sit unusually far out from the wall with a visible gap behind it. Either way, the practical result is the same: a return or exchange, and a delayed installation. This is one of the most common and most avoidable reasons a toilet purchase doesn’t go smoothly, which is exactly why measuring first matters so much.
Q: Can I measure the rough-in without removing my existing toilet?
Yes, though removing the toilet first gives you a more reliable measurement. Without removal, locate the bolt caps at the base of the toilet — the small plastic covers near the rear on either side — and measure from the finished wall to the center of those caps. This approach works reasonably well for a quick estimate, but if you’re about to commit to a purchase, removing the toilet and measuring directly to the exposed bolts eliminates any uncertainty introduced by measuring around the installed fixture.
Q: Is rough-in the same measurement for every toilet brand?
The rough-in measurement itself — 10, 12, or 14 inches — is a standardized dimension used consistently across brands and manufacturers, which is what makes shopping by rough-in size possible in the first place. What varies by brand and model is simply which rough-in sizes a given product line is manufactured for; most manufacturers focus heavily on 12-inch models and offer a more limited selection in 10-inch and 14-inch. Always check the specific listing or spec sheet for the model you’re considering rather than assuming every toilet from a given brand comes in every rough-in size.
Q: What if my measurement falls between two standard sizes?
First, remeasure carefully to rule out a simple measuring error, since starting from the wrong point on the wall or measuring to the bolt’s edge instead of its center is a common cause of an awkward, in-between reading. If a careful second measurement still lands clearly between standard sizes, that points to a non-standard rough-in, which is uncommon but does happen, particularly in older or unusually constructed bathrooms. At that point, it’s worth consulting a plumber before choosing a model, since they can confirm the exact dimension and advise on whether a specialty toilet or a flange modification is the more practical solution.
Conclusion
Measuring a toilet rough-in correctly comes down to two details: start from the finished wall, not the baseboard or an unfinished surface, and measure to the center of the rear floor bolts, not their edge. From there, round your reading to the nearest standard size — 10, 12, or 14 inches — and confirm it against the specific model you’re considering before you buy. The entire process takes under five minutes with nothing more than a tape measure, and it’s the single easiest way to avoid the return, exchange, or awkward installation that comes from guessing instead of measuring. A few careful minutes now saves a second trip later.
Prices and ratings may change. Always check Amazon for current prices.
✍️ About This Guide
Written by Mike Reynolds, DIY Home Improvement Writer at PlumbingToolsReview — former residential contractor helping US homeowners tackle plumbing repairs with confidence. Learn how we test →