
Guides
19 Oct 2026

Can’t Reach the Faucet Nut? Choose the Right Tool Before You Buy
Not sure which tool fits your faucet nut? Identify the fixing, see how it lets go and check your clearance first. Then choose a tool, or use one you own.
Low water pressure or splashing from your faucet is usually a clogged aerator, not a plumbing problem. Learn how to clean it in under 10 minutes.

Please note: Information in this guide is based on our research at time of writing and is subject to change. If low flow persists after cleaning, consult a licensed plumber to rule out a larger plumbing issue.
A faucet that’s lost pressure, sprays unevenly, or splashes instead of running in a smooth stream is one of the most common plumbing complaints — and also one of the most commonly misdiagnosed. Homeowners often assume the worst: a failing supply line, a bad shutoff valve, or a whole-house pressure problem. In reality, the culprit is usually much smaller and much easier to fix — the aerator, the small mesh screen threaded onto the very tip of the faucet spout, has simply clogged with mineral deposits and debris.
Cleaning a faucet aerator is one of the most overlooked maintenance tasks in a home, largely because it’s so easy to forget it exists. It’s a tool-light job that most homeowners can complete in under 15 minutes with things already in a kitchen cabinet, and it often resolves a flow problem completely without ever needing to call a plumber. This guide walks through how to identify a clogged aerator, remove and clean it step by step, and recognize the point where cleaning stops being enough and replacement makes more sense.
At a Glance
| Symptoms | Low flow, splashing or spraying, an uneven stream |
| Tools Needed | Pliers, an old toothbrush, white vinegar |
| Time | 10–15 minutes, plus soak time |
| How Often | Every 3–6 months, more often in hard water areas |
✏️ Our Take
A faucet that’s lost pressure or started spraying unevenly is one of the most common plumbing complaints — and one of the easiest to misdiagnose. Before assuming it’s a supply line, valve, or whole-house pressure problem, check the aerator first. Mineral deposits and debris build up inside that small screen over time, and cleaning it takes about ten minutes with tools most households already have. If the flow is only reduced at one faucet rather than throughout the house, the aerator is almost always the place to start.
IN THIS GUIDE
Reduced water flow is the symptom most homeowners notice first — a faucet that used to fill a glass or a pot quickly now takes noticeably longer, even though nothing else in the house has changed. Because the reduction happens gradually as mineral deposits build up layer by layer, it’s easy to attribute the change to something else entirely, like a municipal pressure adjustment or an aging supply line, when the real cause is sitting right at the tip of the spout.
Splashing or spraying instead of a smooth, controlled stream is the second common sign. A healthy aerator mixes air into the water to produce a soft, even flow that lands cleanly in the sink. Once mineral crust or debris partially blocks some of the mesh openings, water gets forced through the remaining gaps at odd angles, producing splatter that seems to come from nowhere. An uneven stream pattern — water shooting off to one side, or the flow looking lopsided rather than centered — points to the same cause: some holes in the screen are still clear while others are fully blocked.
Visible buildup is the clearest sign of all, when it’s present. A white or greenish crust forming around the visible tip of the faucet, right where the aerator threads on, is mineral scale accumulating on the outside as well as inside. If you can see it externally, it’s virtually guaranteed the internal mesh screen is affected too, and cleaning is overdue.
This is a genuinely low-tool job — most households already have everything required without a trip to the store. Nothing here is specialized or expensive, which is part of why cleaning an aerator is such an easy first step to try before assuming a bigger repair is needed.
Locate the aerator at the very tip of the faucet spout — it’s the small, disc-shaped fitting with a visible mesh screen, usually recessed slightly inside a threaded ring. Before removing anything, take a close look at how it sits, and consider snapping a quick photo with your phone. It only comes apart one way, but having a reference makes reassembly faster later.
Start by trying to unscrew it by hand, turning counterclockwise. Many aerators, especially ones that haven’t been over-tightened, loosen with nothing more than firm finger pressure. If it won’t budge by hand, that’s when pliers come in — but grip gently and turn slowly, since these fittings are made of relatively thin metal or plastic and can be damaged by excessive force. Some faucet models use a small plastic key or wrench specifically designed for their aerator, provided by the manufacturer, so check the faucet’s documentation if pliers don’t seem to be gaining any traction.
As the aerator comes free, keep your hand cupped underneath the spout — the housing typically holds a small amount of residual water, and the individual internal pieces can fall out unexpectedly once the threading releases. Set the assembled unit down somewhere stable before moving on to disassembly, rather than trying to take it apart while still holding it over the sink.
Most aerators separate into two to four individual pieces once removed: the outer housing, one or more layers of fine mesh screen, a rubber washer that seals the connection against the spout, and on some models, a flow restrictor disc designed to limit water usage. Not every faucet has all four components — budget and older models are often just a housing and a single screen — so don’t be concerned if yours comes apart into fewer pieces than described here.
As you separate each piece, lay them out on a paper towel or cloth in the exact order they came apart, left to right or in a row. This single habit does more to prevent a frustrating reassembly than anything else in this process — aerator components are small, easy to mix up, and not always obvious which side faces which direction once they’re separated from each other.
With everything laid out, inspect each piece individually. The mesh screen is the component most likely to show visible mineral buildup — look for a white, chalky crust clogging individual openings, or a general haze across the entire screen surface. Check the housing’s interior threads for similar buildup, and examine the rubber washer for any cracking, flattening, or visible wear that might explain a leak even after cleaning. If a flow restrictor disc is present, check that its small central opening isn’t fully blocked, since that opening alone can meaningfully affect flow if it’s clogged.
Fill a small bowl or cup with undiluted white vinegar — enough that the components you’re soaking will be fully submerged rather than just partially covered. Vinegar’s mild acidity is effective at dissolving the calcium and magnesium deposits responsible for most aerator clogs, without the harshness of a stronger commercial descaler. Plain white vinegar works just as well as any specialty descaling product for this particular job, so there’s no need to buy anything beyond what’s likely already in the kitchen pantry.
Submerge the metal and plastic pieces — the housing, the mesh screen, and the flow restrictor disc if present — but hold the rubber washer back or give it a separate, much shorter soak. Vinegar is fine for metal and plastic over an extended soak, but prolonged exposure can degrade rubber, making the washer soft, swollen, or prone to losing its seal once reinstalled.
Soak time depends on how severe the buildup looks. For light haze or minor clogging, 30 minutes is often enough to loosen most of the deposits. For heavier, visibly crusted buildup, let the pieces sit overnight — the extended contact time gives the vinegar a chance to fully break down mineral layers that have had months or years to harden. There’s no real downside to a longer soak on the metal and plastic components; when in doubt, err toward more time rather than less.
Once the soak time is up, take an old toothbrush and scrub each piece firmly, focusing on the mesh screen where clogging is usually worst. The vinegar soak should have already loosened most of the mineral deposits, so scrubbing at this stage is mainly about physically dislodging what’s already been softened rather than fighting hardened crust from scratch. A toothbrush’s stiff, narrow bristles reach into the small mesh openings far more effectively than a sponge or cloth would.
For individual openings in the mesh that remain blocked after brushing, a straight pin or sewing needle works well to clear them one at a time. Work gently — the mesh is thin, and pushing too aggressively can distort or tear individual openings rather than simply clearing them. Take your time with this step if the screen has several stubborn spots; it’s the difference between a partial fix and a faucet that flows exactly like new.
Rinse every piece thoroughly under running water once scrubbing is done, holding each component up to the light to check that water passes cleanly through every opening in the mesh. This rinse also clears away any lingering vinegar residue and loosened debris that scrubbing dislodged but didn’t fully remove, so don’t rush through it.
Reassemble the aerator in the exact reverse order you took it apart, using the layout from Step 2 (or your reference photo) as a guide. Getting a piece backward or out of sequence is the most common reassembly mistake, and it usually shows up immediately as a leak or unusually low flow once the water is turned back on, so take a moment to double-check the order before threading everything back into the housing.
With the pieces back together, thread the assembled aerator back onto the faucet spout by hand, turning clockwise. Hand-tighten it snugly, but avoid the temptation to crank it down hard with pliers — over-tightening is unnecessary for a proper seal and makes the next cleaning that much harder to start.
Turn the water on and run it briefly, checking closely around the base of the aerator for any dripping that would indicate a washer seated incorrectly or a housing that isn’t fully threaded in. Confirm the stream itself looks normal — smooth, evenly distributed, and back to its original pressure — which is the clearest sign the cleaning actually worked. Let the water run for a full minute or two before calling it done, since a slow drip sometimes only becomes noticeable after the initial rush of water clears the line.

Cleaning solves the majority of aerator problems, but a few specific findings during the process are signals that replacement makes more sense than continuing to clean. A mesh screen that’s visibly torn, bent out of shape, or has holes that have physically enlarged beyond their original size won’t function correctly again no matter how thoroughly it’s cleaned — a damaged screen needs replacing outright.
If flow doesn’t meaningfully improve after a full cleaning cycle, that’s a sign the restriction causing your original symptom is somewhere other than the aerator — possibly in the supply line, the faucet cartridge itself, or further upstream in the plumbing. Our faucet cartridge vs faucet aerator comparison covers how to tell the two parts apart and which one is more likely responsible when cleaning alone doesn’t resolve the problem.
Stripped or cracked threads on the aerator or the housing itself are another clear replacement signal — a damaged thread won’t seal properly regardless of how clean the internal components are, and continuing to force a worn fitting back into place risks damaging the faucet spout’s own threading. The good news is that replacement aerators are inexpensive and widely available in standard thread sizes that fit the vast majority of US kitchen and bathroom faucets. Our faucet aerator reviews cover current options if a straightforward swap turns out to be the right call.
If low flow is affecting more than just one faucet — for instance, a shower as well as a sink — the cause is less likely to be a single clogged aerator and more likely a broader pressure issue. Our low water pressure troubleshooting guide covers that wider set of causes if cleaning a single aerator doesn’t address what you’re seeing across multiple fixtures.
If low flow persists after cleaning and replacing the aerator, or you suspect the problem is bigger than a single fixture, search PlumberArchive.com — the US plumber directory with 12,000+ verified local plumbers across all 50 states.
Get weekly plumbing tips and DIY guides delivered straight to your Facebook feed.
Every 3 to 6 months is a reasonable default for most households, though the right frequency depends heavily on your water hardness. Homes in hard water regions, where mineral content in the supply is higher, often need cleaning closer to every 3 months to stay ahead of buildup, while homes with naturally soft water can sometimes stretch toward the 6-month mark or beyond before noticing any drop in flow.
You can do a limited surface clean without removing it — scrubbing the visible exterior with an old toothbrush and some vinegar, or using a pin to clear openings you can see from the outside. This helps with light buildup, but it won’t reach the internal mesh layers, the rubber washer, or a flow restrictor disc, which is where most clogs actually form. For anything beyond very light, surface-level buildup, removing the aerator for a full soak gives a far more thorough and longer-lasting result.
If flow doesn’t improve after a thorough cleaning, the restriction is likely somewhere other than the aerator. A worn or clogged faucet cartridge, a partially closed shutoff valve under the sink, or a broader household pressure issue are all common next places to look. Our faucet cartridge vs faucet aerator comparison and our low water pressure guide both cover causes worth investigating once the aerator itself has been ruled out.
No, though most fall into a small number of standard sizes that cover the majority of US kitchen and bathroom faucets. Aerators also vary by thread type — some thread onto the inside of the spout, others onto the outside — so it’s worth noting which style you removed if you ever need to buy a replacement. Bringing the old aerator with you when shopping, or at minimum noting your faucet’s brand and model, is the easiest way to guarantee a correct match.
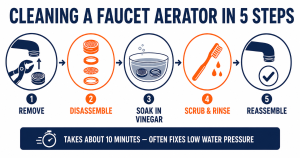
A clogged aerator is one of the most common and most easily fixed causes of a faucet that’s lost pressure or started splashing unevenly, and cleaning one takes about 10 to 15 minutes with tools most households already have on hand. Remove it, take it apart, give the metal and plastic components a vinegar soak, scrub away the loosened deposits, and reassemble it in the order it came apart — that’s the entire process from start to finish.
If cleaning doesn’t restore normal flow, or the screen or threads show visible damage, replacing the aerator is inexpensive and straightforward. Either way, checking the aerator first — before assuming a bigger plumbing problem is at fault — saves most homeowners both time and an unnecessary service call.
Prices and ratings may change. Always check Amazon for current prices.
✍️ About This Guide
PTR Editorial Team — Plumbing Guides. We compare manufacturer specifications, installation requirements, compatibility and available product documentation to help homeowners choose suitable tools and parts. How we review →
Not sure which tool fits your faucet nut? Identify the fixing, see how it lets go and check your clearance first. Then choose a tool, or use one you own.
Check your manual and the drain route first: gravity hose, built-in pump or external pump. Then see whether you need a dehumidifier hose at all.
Explore portable bidets that need no water-line connection, from bottle caps and squeeze bottles to battery-powered handhelds.

