Please note: This guide is based on our research and general practices published by state extension services at time of writing. Well construction, local regulations, and recommended chlorine dosages vary — always confirm the specifics for your well and state with your local health department or extension office, and if anything about your well’s construction or access is unclear, consult a licensed well contractor before proceeding.
Introduction
Shock chlorination is a one-time, high-concentration disinfection treatment: a strong chlorine solution is introduced into the well, circulated through the entire plumbing system, left to sit for a set contact period, and then flushed out. It’s the standard response to a handful of specific triggers — a positive bacteria test, any well servicing or pump work that opened the system to outside air or contamination, nearby flooding that may have introduced surface water into the well, or simply as routine annual maintenance even without a known problem. It’s a well-established, well-documented process that many well owners perform themselves, and this guide walks through exactly how, start to finish.
Two things this guide is deliberately not. If you’re still deciding whether a one-time shock treatment or an ongoing continuous chlorination system is the right fit for your well, that decision belongs to our Shock Chlorination vs Continuous Chlorination comparison — read that first if you haven’t already settled on shock treatment. And if you’re here because you just got a bacteria test result and aren’t sure what it means, our guide to testing for bacteria in well water covers reading your results and when a retest is warranted. This guide picks up once shock chlorination is the plan: the full procedure, in the depth neither of those articles goes into.
At a Glance
| Skill Level |
Intermediate — no specialized tools, but it involves handling concentrated chemicals correctly and following a multi-stage process in the right order. |
| Tools Needed |
Unscented household bleach or calcium hypochlorite granules, a way to calculate well volume, a garden hose, rubber gloves, and eye protection. |
| Time Needed |
Several hours of active work (calculating, mixing, circulating, flushing), plus an overnight contact period where the house shouldn’t use water — plan for this to span two days, not one quick afternoon. |
| Critical First Step |
Calculate your well’s volume accurately before mixing anything. Under-dosing won’t disinfect effectively; over-dosing wastes chlorine and extends how long flush-out takes. |
When to Shock Chlorinate
Four situations call for shock chlorination. A positive bacteria test is the most common trigger — if your annual or follow-up test came back showing total coliform or E. coli present, shock chlorination is the standard first response; see our guide to testing for bacteria in well water for how to read a result and when to retest. After any well servicing or pump work is the second — pulling a pump, replacing a well cap, or any work that opens the casing to open air creates a real opportunity for contamination to enter, and shock chlorination afterward is standard practice even with no test showing a problem yet. After nearby flooding is the third — floodwater can introduce surface contamination around or into a wellhead, particularly for an older or shallower well, and shock chlorination is a reasonable precaution once floodwaters recede. Routine maintenance is the fourth — some well owners shock chlorinate on a set schedule (every year or two) as preventive maintenance, independent of any specific trigger, particularly for older wells or ones with a history of bacterial issues.
Calculating Your Well’s Volume
This step gets skipped more than any other, and it shouldn’t — how much chlorine solution you need depends entirely on how much water is actually sitting in your well casing. A commonly used formula, published by a number of state extension services, is:
Gallons of water in the well ≈ 0.041 × (casing diameter in inches)² × (depth of water column in feet)
The casing diameter is almost always stamped on your well cap or listed in the well completion report your driller filed when the well was installed — most residential wells run 4 to 6 inches in diameter. The depth of the water column (not the total well depth) is the harder number: if you don’t already have it from a completion report, it can be measured by lowering a weighted string or tape down the well until it goes slack at the bottom, then measuring again to where it first gets wet, and subtracting the two. For example, a 6-inch well with a 100-foot water column works out to roughly 0.041 × 36 × 100 ≈ 148 gallons.
If you can’t confidently get either number, your state extension office or a licensed well contractor can help — this isn’t a number worth guessing at, since every later step’s dosage depends on it.
Gathering Materials and Safety Prep
Two chlorine sources are standard for well shock treatment: unscented household bleach (5–6% sodium hypochlorite, with no added fragrance, thickeners, or other cleaning agents), which is the simplest option for most residential wells, and calcium hypochlorite granules, a much higher-concentration powder more commonly used for larger wells or bigger volumes, which must be pre-dissolved in a bucket of water before use since it generates heat when it first contacts water. Either works; check with your state extension office’s dosage chart for your well’s volume and diameter, since exact recommended quantities vary by source and by the specific chlorine concentration each publishes guidance for.
Beyond the chlorine itself, gather rubber gloves and eye protection before you start, and make sure the area around the wellhead is ventilated rather than working in an enclosed pit or vault without airflow.
⚠️ Warning: Never mix bleach with any other cleaning chemical, especially anything containing ammonia — the combination produces toxic gas. Use plain, unscented bleach only, mixed with nothing but water.
The other safety prep that’s easy to overlook: plan where the flushed, heavily chlorinated water will go later in this process. Chlorinated discharge can kill the beneficial bacteria a septic system relies on to treat wastewater, and it can damage or kill grass and landscaping if it’s discharged directly and repeatedly onto the same spot. Identify a discharge point away from your septic drain field and away from garden beds or ornamental plantings before you get to the flushing stage — a gravel area, a low spot in the yard that isn’t landscaped, or wherever your local regulations permit is the right target, not the nearest hose bib pointed at a flower bed.
Mixing and Introducing the Chlorine Solution
Using your well’s calculated volume and your state extension office’s dosage chart, measure out the amount of bleach or dissolved calcium hypochlorite solution needed for a standard shock treatment. Dilute it in a bucket of water first rather than pouring concentrated chlorine directly down the well — this protects the well cap, wiring, and any components near the top of the casing from direct chemical contact, and makes it easier to pour evenly. Remove the well cap or access port, pour the diluted solution in, and replace the cap securely once you’re done.
Circulating the Solution Through the System
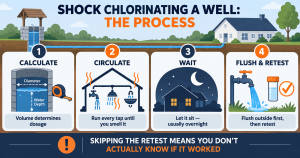
Chlorine in the well alone doesn’t disinfect the rest of your plumbing — it has to be circulated through every fixture the water passes through. Starting closest to the well (often an outdoor spigot or the pressure tank area) and working outward, run each faucet, showerhead, and fixture in the house, hot and cold, until you can smell chlorine at that tap, then move to the next one. Don’t skip fixtures that aren’t used often, like a rarely-used bathroom or an outdoor hose bib — bacteria can be present anywhere water sits, not just near the well itself, and any branch that doesn’t get circulated doesn’t get treated.
This stage draws a lot of water through your system in a short window, which briefly puts your pressure tank through more cycling than a normal day of use — nothing to worry about for a tank in good working order, but a reasonable moment to note if yours has been showing any signs of trouble already, since a marginal tank can struggle to keep up during this step.
Once chlorine odor is present at every fixture, stop running water and let the solution sit undisturbed — this is the contact time, and it’s what actually does the disinfecting; circulating the chlorine just gets it everywhere, sitting is what kills the bacteria. A typical contact period runs several hours at minimum and is often left overnight, since a longer contact time gives more thorough disinfection with less risk of an inadequate treatment. Don’t run any water during this period, including flushing a toilet more than necessary — every use draws untreated water in behind it and shortens the effective contact time for whatever gets displaced.
💡 Tip: Plan this step for a night when the house will be unoccupied, or when everyone can commit to not using any water — a Friday evening into Saturday morning works well for a lot of households. It removes the temptation to “just quickly” run the tap and undercut the contact time.
Flushing the System
After the contact period, flush the chlorinated water out — outdoor spigots first, directed to the discharge point you identified during safety prep, away from your septic drain field and any landscaping you’d rather not damage. Run outdoor fixtures until the chlorine smell is completely gone, not just faint, before moving indoors. Then work through indoor fixtures the same way, one at a time, until each one runs clear with no detectable chlorine odor.
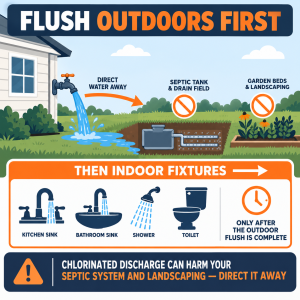
⚠️ Warning: Never direct chlorinated flush water into a septic system or directly onto garden beds, ornamental plantings, or a vegetable garden. Chlorine at shock-treatment concentration can kill the beneficial bacteria a septic system needs to function and can damage or kill plants it contacts directly and repeatedly.
Retesting
Retesting is not an optional follow-up — it’s the only step that actually confirms the treatment worked. The chlorine smell clearing during flush-out tells you the chemical is gone; it tells you nothing about whether the bacteria issue is resolved. Once flushing is complete and no chlorine odor remains, wait roughly one to two weeks before collecting a new sample (testing immediately after treatment can give a misleading result, since residual chlorine can interfere with the test itself), then send it to a certified lab the same way described in our guide to testing for bacteria in well water.
A clean retest means you’re done, until your next scheduled annual test. If bacteria is still present, or comes back after more than one round of shock chlorination, that pattern points to a structural issue — a cracked casing, a poorly sealed well cap, or a contamination source near the wellhead — rather than a treatment that simply needs repeating. That’s the point to bring in a professional rather than shock chlorinating a third time and hoping for a different result.
US Regional Context: Well water regulation and support resources are handled at the state level, so specifics — recommended dosage charts, water testing programs, and disclosure requirements at sale — vary from state to state. Many state extension offices and county health departments offer free or low-cost well water testing, along with their own dosage guidance calibrated to local well construction norms, and that’s worth checking before you buy chlorine or mix anything, rather than relying solely on general guidance like this one.
When to Call a Professional
Bring in a licensed well contractor in two situations. Persistent bacteria after a properly done shock chlorination and a clean retest process — meaning you calculated volume correctly, used an appropriate dose, gave adequate contact time, and still get a positive retest — points to a structural problem with the well itself that treatment alone can’t fix, and needs a professional inspection to locate. Any real uncertainty about your well’s construction or access — an unusual wellhead configuration, a cap you can’t safely remove, or simply not being confident you’re measuring volume or contact time correctly — is reason enough to have a professional handle the treatment instead of guessing through it.
✏️ Our Take
Two steps in this process get skipped more than any others, and skipping either one undermines the whole treatment: calculating your well’s actual volume before mixing any chlorine, and the mandatory retest a week or two after flushing. Skip the volume calculation and you’re guessing at a dose that might be too weak to work or wastefully strong. Skip the retest and you genuinely don’t know whether the treatment succeeded — the chlorine smell going away tells you the chemical is gone, not that the bacteria is. Get those two steps right and the rest of the process is straightforward.
Prices and ratings may change. Always check Amazon for current prices.
Frequently Asked Questions
Q: How do I know how much bleach to use for my well?
It depends on your well’s volume, which you calculate from casing diameter and water column depth (see the calculation section above), matched against a dosage chart. Your state extension office publishes dosage tables calibrated to local guidance and typical well construction — that’s the most reliable source for the exact quantity, since recommendations vary by chlorine concentration and by state.
Q: Can I use scented bleach or bleach with added cleaners?
No. Use only plain, unscented household bleach (or calcium hypochlorite granules) with no added fragrance, thickeners, or other cleaning agents. Anything extra in the formulation isn’t tested or intended for well disinfection and can introduce substances you don’t want in your drinking water.
Q: How long should I wait before retesting after shock chlorination?
Roughly one to two weeks after flushing is complete and no chlorine odor remains. Testing too soon after treatment can give a misleading result, since residual chlorine in the water can interfere with the bacteria test itself.
Q: Is it safe to be in the house during shock chlorination?
Yes, as long as you’re not drinking or using the water during the contact period and the mixing and introduction steps are done with basic precautions — gloves, eye protection, and adequate ventilation around the wellhead. Many households do stay home overnight during the contact period; the main requirement is simply not using any water until flushing is complete.
Q: What if I don’t know my well’s diameter or water column depth?
Check your well completion report first, if you have one — it’s typically on file with the well driller or your state’s water resources agency even if you don’t have a personal copy. If that’s not available, your state extension office or a licensed well contractor can help you get an accurate measurement rather than guessing.
Conclusion
Shock chlorination is a well-established process with a clear sequence: calculate your well’s volume, gather the right materials and protect your septic system and landscaping, mix and introduce the chlorine, circulate it to every fixture, give it adequate contact time, flush it out completely, and confirm success with a retest. None of the individual steps are difficult, but skipping the volume calculation or the retest undermines the whole effort. If you’re here because of a positive bacteria test, revisit our guide to testing for bacteria in well water for the full context on reading results and retesting, and if you’re weighing a longer-term solution instead of periodic shock treatments, our comparison of shock vs continuous chlorination can help you decide.
✍️ About This Guide
Written by Mike Reynolds, DIY Home Improvement Writer at PlumbingToolsReview — former residential contractor helping US homeowners tackle plumbing repairs with confidence. Learn how we test →