
Guides
19 Oct 2026

Can’t Reach the Faucet Nut? Choose the Right Tool Before You Buy
Not sure which tool fits your faucet nut? Identify the fixing, see how it lets go and check your clearance first. Then choose a tool, or use one you own.
How to check and set a well pressure tank's air charge — drain the tank, read the Schrader valve, and set the pre-charge 2 PSI below your pump's cut-in.

Please note: Information in this guide is based on our research and hands-on experience at time of writing and is subject to change. Always follow your pump and pressure-tank manufacturer’s instructions and local plumbing and electrical code, and consult a licensed well or pump contractor if you run into conditions beyond the scope of this guide.
Every modern well pressure tank holds a sealed cushion of air above a rubber diaphragm or bladder. Water from the pump fills the lower part of the tank and compresses that air; when you open a tap, the compressed air pushes the stored water out at usable pressure without the pump running at all. That cushion is the reason the pump starts a handful of times an hour instead of every few seconds — and the air pressure it holds when the tank is empty of water, called the “pre-charge,” has to be set to a specific number for the tank to work the way it should.
Over months and years the pre-charge slowly drifts down. Air migrates through the diaphragm into the water, and a little more weeps past the air valve. As the cushion shrinks, the tank holds more water and less air, delivers less on each pump cycle, and eventually goes “waterlogged” — almost no air left, so the pump short-cycles, snapping on and off every few seconds whenever water runs. Checking and correcting the pre-charge is about a ten-minute job with a tire gauge and a way to add air, and doing it once a year is the cheapest insurance there is against a burned-out pump. This guide covers that procedure only — if your tank turns out to be failed rather than just low, or you are choosing a replacement, our roundup of the 5 best well pressure tanks handles product selection and sizing.
At a Glance
| Skill Level | Beginner DIY. No plumbing or wiring is taken apart — you shut off power, drain the tank, read an air valve, and add or release air. The one judgment call is knowing your pump’s cut-in pressure. |
| Tools Needed | A quality dial or digital tire pressure gauge (pencil gauges are hard to read accurately at these low pressures); a way to add air that has its own gauge — a bicycle floor pump, a portable 12-volt inflator, or a shop or pancake air compressor; and your pressure switch’s cut-in / cut-out setting, printed on the switch label or read off the system gauge as the pump cycles. |
| Time Needed | About 10 to 15 minutes once the pump is off and the tank has drained. Add a few minutes if the tank empties slowly through a single faucet rather than a dedicated drain valve. |
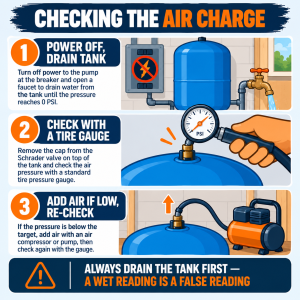
| Critical First Step | Switch the pump off at the breaker and drain every bit of water out of the tank before you touch the air valve. A gauge held on the valve while water is still in the tank reads the water pressure, not the true air pre-charge, and every adjustment you make from that reading will be wrong. |
✏️ Our Take
Setting a pressure tank’s air charge is one of the highest-value ten minutes of maintenance a well owner can do. A pre-charge that has quietly drifted 10 or 15 PSI low forces the pump to start two or three times as often as it should, and pump motors wear out on starts, not on running hours — so a tank you never check is a pump you replace early. Put it on the calendar once a year, alongside your other well checks like testing for bacteria, do it with the tank drained and the power off, and set the number to exactly 2 PSI below your cut-in. That is the whole task.
IN THIS GUIDE
The tank exists to keep the pump from starting every time a tap opens. Without it, the pump would run for the two seconds it takes to fill a glass, shut off, and run again for the next glass — thousands of starts a day, and the motor, the pressure switch, and the check valve would all wear out fast. The air cushion stores pressurized water so the pump can stay off between the switch’s cut-in and cut-out points and still deliver a useful amount of water — the “drawdown” — on each cycle.
A bigger air cushion means more drawdown and fewer starts, which is the same reason a larger tank cycles a pump less; our review of the 5 best well pressure tanks covers that sizing relationship in full. The point here is narrower: even a correctly sized tank only delivers its rated drawdown if the pre-charge is right. Let the cushion shrink and a properly sized tank behaves like one two sizes too small — short draws, frequent starts, and a pump aging faster than it should. On a private well the tank and pump are your water utility, with no city main to fall back on if the pump fails early, a trade-off our overview of well water vs municipal water gets into.
The rule is simple and it is not negotiable: the air pre-charge, measured with the tank empty of water, should be exactly 2 PSI below the pump’s cut-in pressure. If your pressure switch is set to 30/50 — pump on at 30, off at 50 — the tank pre-charge should be 28 PSI. A 40/60 switch wants 38 PSI. A 20/40 switch wants 18.
Why 2 PSI specifically. As you use water and the tank pressure falls toward cut-in, the diaphragm is pushing the last of the stored water out. If the pre-charge equals or exceeds cut-in, the tank runs completely empty on every cycle and the diaphragm slams down against the bottom of the tank — hard on the rubber, and it can let air escape into your plumbing as spitting faucets. Set the pre-charge 2 PSI below cut-in and a small amount of water always remains when the pump kicks on, so the diaphragm never fully bottoms out and you get the maximum drawdown the tank is capable of. Go well below that number and the opposite problem appears: too much water, too little air, a short draw, more cycling, and a diaphragm stretched upward past the range it is meant to flex through, which shortens its life.

⚠️ Warning: This procedure is for pre-charged tanks — the modern type with a rubber diaphragm or bladder inside and a Schrader air valve on top. An older bladderless galvanized tank, where air and water share one chamber, has no pre-charge to set; it maintains its air pocket with an air-volume control or a bleeder fitting, and adding air through a valve is not how it is serviced. If your tank has no air valve on top and no captive bladder, this guide does not apply to it.
Three steps, in this order, and none of them is optional.
First, kill power to the pump. Switch off its breaker in the panel, or unplug it if it runs on a cord. You do not want the pump trying to start while the tank is open and draining.
Second, relieve system pressure. Open a faucet — a laundry tub or an outside hose bib is ideal — and leave it open. Water will run, then slow to a trickle as the tank empties.
Third, drain the tank completely. If there is a boiler-drain valve at the tank or on the tank tee, put a hose on it and open it. If not, the open faucet will do the job: let it run until nothing but air comes out and the system pressure gauge reads zero. The tank has to be fully empty of water — that is the one thing that makes the reading in the next step mean anything.
On top of the tank, under a plastic or rubber cap, is a Schrader valve — the identical fitting to a car or bicycle tire. Take the cap off. Press your tire gauge squarely onto the valve stem, hard enough that it does not hiss, and read the pressure. With the tank drained, that number is the true pre-charge.
Compare it to your target — cut-in minus 2. It is normal to find it 5 to 20 PSI low on a tank that has not been checked in a few years; that drift is exactly what this task corrects. Write the reading down. If the gauge reads at or near zero, or if water sputters out of the valve when you press it, skip ahead to the section on replacing the tank: a diaphragm that lets water onto the air side has failed and no amount of air will fix it.
💡 Tip: Check the pre-charge once a year, and any time you notice the pump cycling more often than it used to. A tank loses a few PSI a year as a matter of course; catching it before it reaches “waterlogged” is a two-minute reading, while a pump replaced early is a job for a contractor and a real bill.
If the reading is low, add air. Connect your pump or compressor to the Schrader valve and add it in short bursts, checking with the tire gauge between each one. A 20- or 30-gallon tank takes very little air volume to move the needle several PSI, and compressor gauges are not precise enough to trust for the final number — so creep up on it.
A bicycle floor pump is slow but almost impossible to overshoot with. A pancake or portable compressor is fast, so feather the fill and check often. Bring it to exactly cut-in minus 2, then recheck once more with the tire gauge after the air settles for a moment. Because the tank is drained and a faucet is open, the diaphragm simply flexes down as the air side fills — there is nothing pushing back, and nothing to force.
If you overshot, or the tank left the factory pre-charged high for a lower switch setting than yours, bleed it back down. Press the pin in the center of the Schrader valve — with the tip of the tire gauge, a small screwdriver, or the bleed tool built into many gauges — in short taps, checking between each. Air leaves quickly, so release a little at a time. Stop when the gauge reads cut-in minus 2, then thread the valve cap back on; it keeps grit out of the valve and is a second line of defense against a slow leak.
Close the tank drain valve if you used one, and close the faucet you left open. Turn the pump breaker back on. The pump will start and refill the tank; watch the system pressure gauge climb to the cut-out setting and the pump shut off cleanly.
Now test the drawdown. Open a faucet and watch the gauge fall. With a correct pre-charge, pressure drops steadily to the cut-in point and only then does the pump restart — and under moderate use, several minutes should pass between pump starts, not seconds. If you want a number, open a tub faucet wide and time how long it runs before the pump kicks in. If the pump still snaps on and off rapidly with a fresh, correct pre-charge, the air charge was not the problem: look next at a failed diaphragm, a stuck check valve, or a pressure switch that needs service.
Recharging fixes a tank that has slowly lost air. It does nothing for a tank whose diaphragm has torn, and a few signs tell you that is what you are dealing with:
You set the pre-charge correctly, and within hours or days it has dropped back down — air is leaking through a hole in the diaphragm into the water, or out past a corroded valve or seam.
Water, not just air, comes out of the Schrader valve when you press the pin with the tank drained. That means water has crossed to the air side; the diaphragm is ruptured and the tank is permanently waterlogged.
The tank is visibly rusted through, weeping at a weld seam, or so heavy with trapped water that it does not respond to added air at all.
In any of those cases the tank is replaced, not repaired. Our roundup of the 5 best well pressure tanks covers choosing one sized to your pump and household — and once it is installed, setting its pre-charge is the same procedure you just ran here.
Most of this is a comfortable homeowner job, but hand it off in a few situations. A tank that loses its charge again within days of a correct fill needs replacing, and if the tank tee, pressure switch, and union connections are not something you want to break into, a well or pump contractor does that swap routinely.
Call someone, too, if you cannot find or read your pressure switch’s cut-in and cut-out settings, or the pump short-cycles even with a verified-correct pre-charge — the switch or the pump itself may be at fault, and diagnosing that is a service call. And if there is no way to isolate and drain the tank without shutting down the whole system, or the wiring at the pressure switch looks corroded or incorrect, get a pro in rather than working around it.
US Regional Context: Residential well systems in the US almost always run one of two pressure switch settings — 30/50 PSI or 40/60 PSI — with 20/40 turning up occasionally on older installs. The switch is the small grey box near the tank, usually a Square D / Pumptrol-style unit, and its range is printed on the label or the underside of the cover. The tank’s air valve is a standard Schrader valve, the same fitting as every US car and bicycle tire, so any tire gauge, floor pump, 12-volt inflator, or gas-station air hose works on it with no adapter.
If the tank will not hold a charge, the pump short-cycles after a correct pre-charge, or the pressure switch and tank-tee connections are beyond what you want to take on, it is worth getting a professional to look. Search PlumberArchive.com — the US plumber directory with 12,151+ verified local plumbers across all 50 states.
Get weekly plumbing tips and DIY guides delivered straight to your Facebook feed.
Once a year is the standard recommendation, plus any time the pump starts cycling more often than you remember it doing. Diaphragm and bladder tanks lose a few PSI a year through normal air migration, so an annual check catches the drift while it is still a two-minute top-up rather than a waterlogged tank and an overworked pump.
Exactly 2 PSI below your pump’s cut-in pressure, measured with the tank empty of water. A 30/50 pressure switch means a 28 PSI pre-charge; a 40/60 switch means 38 PSI; a 20/40 switch means 18. The 2-PSI gap keeps a little water in the tank at the bottom of each cycle so the diaphragm never slams against the shell, while still giving you the full drawdown the tank is rated for.
You can put a gauge on the valve, but the number will be meaningless. With water in the tank, the gauge reads the current water pressure pushing back through the diaphragm, not the pre-charge. You have to shut the pump off, open a faucet, and drain the tank fully first. Any adjustment made from a wet reading leaves the pre-charge wrong.
A pre-charge that drops back down within hours or days means the diaphragm or bladder has a hole and air is leaking into the water, or the tank has a corroded air valve or a rusted seam. A recharge will not fix that — the tank needs to be replaced. If water comes out of the air valve when you press the pin with the tank drained, the diaphragm is definitely ruptured.
A well pressure tank does one job — hold a cushion of compressed air so the pump can rest between cycles — and it only does that job if the air pre-charge is set 2 PSI below your pump’s cut-in. The pre-charge drifts down over the years, quietly, until the pump is short-cycling and wearing itself out. Checking it takes a tire gauge and ten minutes with the power off and the tank drained; correcting it takes a bike pump. Do it once a year. When the tank stops holding a charge at all, our guide to the 5 best well pressure tanks covers the replacement.
Prices and ratings may change. Always check Amazon for current prices.
✍️ About This Guide
PTR Editorial Team — Plumbing Guides. We compare manufacturer specifications, installation requirements, compatibility and available product documentation to help homeowners choose suitable tools and parts. How we review →
Not sure which tool fits your faucet nut? Identify the fixing, see how it lets go and check your clearance first. Then choose a tool, or use one you own.
Check your manual and the drain route first: gravity hose, built-in pump or external pump. Then see whether you need a dehumidifier hose at all.
Explore portable bidets that need no water-line connection, from bottle caps and squeeze bottles to battery-powered handhelds.

