
Guides
19 Oct 2026

Can’t Reach the Faucet Nut? Choose the Right Tool Before You Buy
Not sure which tool fits your faucet nut? Identify the fixing, see how it lets go and check your clearance first. Then choose a tool, or use one you own.
Laundry standpipe and drain hose guide: correct height, trap requirements, common backup causes, and how to clean, secure, or replace one safely.

Please note: Information in this guide is based on our research and hands-on experience at time of writing and is subject to change. Always follow your local plumbing code and the installation instructions supplied with your washing machine and drain hose, and consult a licensed plumber if you run into conditions beyond the scope of this guide.
A laundry standpipe is the short, open-topped vertical pipe that a washing machine’s drain hose empties into during the drain and spin portions of a cycle. It looks simple — a pipe sticking up out of the floor or wall behind the machine — but it is doing real work: receiving a fast, high-volume discharge from the pump, carrying it down into a trap, and keeping sewer gas from coming back up into the laundry room while it does it. When the height, diameter, and trap are all correct, you never notice it. When one of them is off, water backs up around the base of the washer mid-cycle, or the hose pops loose and floods the floor.
The usual first sign of a standpipe problem is water appearing around the washer during the drain or spin cycle — sometimes just a damp patch, sometimes enough to run across the floor. A gurgling sound from the standpipe as it drains, standing water that lingers in the pipe between loads, or a sewer-gas smell in the laundry room are the other common tells. All three point at the standpipe and its trap, not at the washing machine itself, which is easy to miss since the symptom shows up right where the machine sits.
This guide covers the drain side only — the standpipe, the trap beneath it, and the hose that connects the two. It does not cover bringing water to the machine. If you are dealing with a leaking or worn supply hose, our 5 Best Washing Machine Supply Line Kits roundup and our how to replace a washing machine supply line guide cover that side of the machine in full; this guide picks up on the other side, where the water leaves.
At a Glance
| Skill Level | Beginner DIY for clearing a clog and re-securing the hose. Intermediate for cutting in a correctly sized replacement on an exposed, accessible standpipe. Anything that requires opening a wall is a different job entirely. |
| Tools Needed | A tape measure to check standpipe height and diameter; a pipe wrench or slip-joint pliers if you are replacing an undersized standpipe; a small hand-crank drain auger or a wet/dry shop vacuum for clearing a clog; a new drain hose if the old one is cracked, kinked, or the wrong length; a hacksaw and PVC or ABS primer and cement if cutting in a new section of exposed pipe; a hose clamp or zip ties to secure the connection. |
| Time Needed | 15 to 30 minutes to clear a clogged standpipe and re-secure the hose. 1 to 2 hours to cut in a correctly sized replacement standpipe if it is exposed and easy to reach. |
| Critical First Step | Verify the standpipe height and trap are code-compliant before assuming a clog is the problem. A large share of “my washer keeps backing up” complaints trace back to a standpipe that is the wrong height, the wrong diameter, or missing its trap entirely — not to debris blocking the pipe. |
✏️ Our Take
Most homeowners reach for a drain snake the moment a washer starts backing up, and sometimes that is exactly right — lint does accumulate in a standpipe trap over years of loads. But before you clear anything, measure the standpipe. A pipe that is too short loses its trap seal to siphoning, one that is too tall can outrun what the washer’s pump can push, and a pipe with no trap at all is a code violation that will keep causing the same symptom no matter how many times you clear it. Get the height, diameter, and trap right first, and most “backup” problems either disappear or become a five-minute clean-out instead of a recurring headache.
IN THIS GUIDE
A washing machine is not hard-plumbed into the drain system the way a toilet or a sink is. Instead, its drain hose discharges into an open standpipe — a vertical section of pipe, usually PVC or ABS, that sticks up out of the floor or out of a wall box behind the machine. The hose end sits inside the top of the standpipe without sealing against it, which is deliberate: this is an indirect waste connection, and the air gap around the hose is what keeps the drain system from ever being able to siphon dirty water back into the washer.
Below the visible standpipe is a P-trap, either built into a laundry drain box assembly or plumbed in beneath the floor. The trap holds a few inches of standing water at all times, and that water seal is what blocks sewer gas from traveling up the pipe and into the room. When the pump discharges, water drops down the standpipe, pushes through the trap, and continues on to the branch drain — the trap’s water seal re-forms after each cycle and sits there quietly until the next one.
Some laundry setups use a floor-mounted laundry tray or utility sink with a built-in trap instead of a dedicated standpipe, and the drain hose hooks over the rim of the tray rather than into a pipe. The height, trap, and air-gap principles below apply the same way to either setup — this guide uses “standpipe” throughout since it is the more common configuration, but a laundry tray drain is functionally the same system with a basin instead of an open pipe.
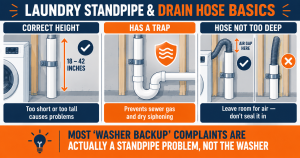
Standpipe height is measured from the floor (or from the trap weir, if you want to be precise) to the open top of the pipe, and most US plumbing codes put the acceptable range somewhere between about 18 and 42 inches. That is a wide range on paper, but a standpipe sitting outside it in either direction causes a specific, predictable problem rather than a random one.
Too short, and the standpipe cannot hold enough of a water column above the trap during a fast pump-out. The discharge can pull air back down through the trap as it drops, which siphons the trap’s water seal out along with it — the practical result is a dry trap, sewer gas smell, and gurgling as the system struggles to equalize pressure on every subsequent drain cycle. Too tall, and the washer’s pump has to push the discharge water further upward against gravity before it can fall back down the other side. Weaker pumps, especially on some high-efficiency machines, cannot always clear a standpipe on the tall end of the range fast enough during a normal pump-out interval, and water backs up at the base of the standpipe or inside the machine itself.
If you are not sure whether your standpipe falls in range, measure it before you do anything else. A standpipe that is close to either edge of the acceptable range, combined with a washer that discharges quickly, is often enough on its own to explain an intermittent backup that seems to have no other cause.
The standard laundry standpipe is 2 inches in nominal diameter. Some older installations were built on 1.5-inch pipe, which was adequate for the slower, lower-volume discharge of washers from decades ago but is often too small for a modern machine’s pump-out rate — the pipe simply cannot carry the water away as fast as the machine is pushing it out, and the excess backs up at the standpipe opening.
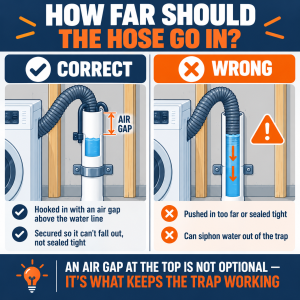
The drain hose itself is much narrower than the standpipe — typically around 7/8 to 1 inch in outside diameter — and that size difference is intentional, not a mismatch to correct. The gap between the hose and the inside wall of the standpipe is the same air gap discussed above, letting air move freely around the hose so the system can never pull a vacuum against the trap. A hose that fits so tightly it presses against the pipe wall on all sides defeats that gap, even in a correctly sized 2-inch standpipe.
Every standpipe has to terminate at, or sit downstream of, a proper P-trap — this is not optional or a nice-to-have, it is a code requirement in every jurisdiction we are aware of, for the same reason a sink or a toilet needs one. Without a trap, the standpipe is an open, unobstructed path straight to the branch drain and, beyond it, the sewer or septic system. Sewer gas — which is not just unpleasant but can contain genuinely hazardous compounds in enough concentration — has nothing to stop it from rising straight up the pipe and into the laundry room.
A trap that exists but is undersized, poorly vented, or positioned wrong relative to the standpipe can fail in a quieter way: siphoning. If the vent isn’t doing its job, or the trap arm run is too long, a fast pump-out can pull the trap’s water seal out along with the discharge, the same mechanism described above for an undersized standpipe. The trap looks intact, but it is functionally empty between uses, and sewer gas smell shows up with no obvious cause. If you smell it in the laundry room and cannot see any other source, the trap — not the standpipe height — is usually where to look first.
Four things account for the large majority of laundry backup complaints, roughly in order of how often we see each one:
• Lint and debris buildup in the trap or pipe. Even with a lint filter or lint trap on the machine itself, fine lint, small fabric fibers, and the occasional lost sock or coin work their way into the standpipe over years of use, gradually narrowing the trap and the pipe below it.
• An undersized standpipe or hose for the washer’s discharge rate. Many high-efficiency machines pump out a full load faster and in a shorter burst than the top-loaders they replaced. An older 1.5-inch standpipe, or a standpipe at the correct diameter but paired with a badly kinked hose, often cannot keep up with that flow rate even with nothing actually clogging it.
• A standpipe that is too tall for the pump to clear efficiently. Covered in more detail above — this shows up as water rising and slowly falling back inside the standpipe during the drain cycle rather than a hard, sudden overflow.
• A missing, undersized, or failed trap. Beyond the sewer-gas symptom, a trap that has lost its seal can also allow sewer-side air pressure changes to push back up the pipe, which shows up as gurgling or a brief backup right as another fixture elsewhere in the house drains.
Once height, diameter, and trap have been ruled out as the cause, an actual clog is usually straightforward to clear. Start by turning off the washer and unplugging it so it cannot start a cycle mid-repair, then pull the drain hose out of the standpipe. Inspect the hose end itself first — lint and detergent residue can build up right at the opening and narrow it enough to slow drainage on its own, so a quick rinse and wipe-out is worth doing before you touch the pipe.
With the hose out, feed a small hand-crank drain auger down the standpipe to break up whatever has accumulated at or just past the trap — a few feet of cable is usually enough, since the clog is almost always right at the trap rather than further down the branch line. If you do not have an auger, a wet/dry shop vacuum with the hose held tightly against the standpipe opening can pull a lint clog straight out; sealing a rag around the vacuum hose where it meets the pipe improves suction significantly. Flush the standpipe with a few gallons of hot water once it is clear to confirm it drains freely before reconnecting the washer.
Avoid pouring a harsh chemical drain cleaner down a laundry standpipe as a first response. Beyond the splash-back risk to the rubber or PVC drain hose sitting in the opening, chemical cleaners are frequently a poor match for the kind of soft, spread-out lint clog typical of a standpipe trap, and they add a real hazard if a mechanical clearing method is needed afterward. If the pipe still is not draining freely after an auger and a hot-water flush, that is a sign the blockage is further down than a standpipe clean-out can reach — see the professional off-ramp below.
Whether a standpipe is worth replacing outright depends almost entirely on how it is installed. An exposed standpipe — one that simply protrudes from the floor or from a shallow wall box behind the machine, with enough clearance to work on it directly — is a reasonable DIY project if it is the wrong height or diameter. Cut the existing pipe back to sound material, dry-fit a correctly sized replacement section and any needed fittings, confirm the new top sits within the height range covered above, and solvent-weld it in place with the correct primer and cement for the pipe material.
A standpipe that runs into a finished wall, with no accessible cleanout or clearance to work, is a different scope of job. Getting to it means opening drywall, and depending on the plumbing behind it, potentially rerouting the trap and vent as well. This guide stays at the level of an accessible, exposed standpipe; anything requiring demolition to reach the pipe is covered in the professional section below.
A loose or badly inserted drain hose is one of the single most common causes of a laundry flood, and it has nothing to do with the standpipe’s height, diameter, or trap. The force of the discharge during a fast pump-out can walk a hose that is only resting loosely in the standpipe right out of the opening, and once that happens the machine keeps pumping straight onto the floor for the rest of the cycle before anyone notices.
Use the plastic hook or clamp that came with the washer, or a properly sized zip tie, to anchor the hose to the standpipe or to a wall bracket so it cannot be pushed or vibrated out during the cycle. Insert the hose only a few inches into the standpipe — enough that it will not pop free, but nowhere near far enough to reach down toward the trap. Do not force it in tightly enough that it seals against the pipe wall on all sides; that airtight fit is exactly what removes the air gap this whole system depends on.
Clearing a lint clog and correcting an exposed, accessible standpipe’s height or diameter are both reasonable DIY jobs. Hand the work off once any of the following applies. A standpipe that is not accessible without cutting into a finished wall or ceiling is a demolition-and-repair job, not a pipe swap. Repeated backup that returns immediately after a proper clean-out, especially if it happens along with slow drainage at other fixtures in the house, points at a problem in the main drain line rather than the standpipe itself — our guide to how to unclog a basement floor drain covers the symptoms of a main-line backup in more detail, since a floor drain is often the first place a whole-house drainage problem becomes visible. And a persistent sewer gas smell that does not resolve after confirming the trap holds water and the vent is clear is worth a plumber’s inspection rather than repeated guessing.
For a straightforward lint clog, a loose hose, or an exposed standpipe that is simply the wrong height, the steps above are the whole job.
If your standpipe is buried in a wall, backups keep returning after a proper clean-out, or a sewer gas smell will not go away, it is worth getting a professional to look. Search PlumberArchive.com — the US plumber directory with 12,151+ verified local plumbers across all 50 states.
Get weekly plumbing tips and DIY guides delivered straight to your Facebook feed.
Measure from the floor to the open top of the pipe. Most US codes accept a range of roughly 18 to 42 inches, though the exact minimum and maximum vary between the UPC and the IPC, so check with your local building department if you are close to either edge. A standpipe well outside that range is a strong suspect for backup or siphoning issues before you ever consider a clog.
Almost always the trap, not the standpipe itself. A missing trap, a trap that has lost its water seal to evaporation from an infrequently used laundry room, or one that is being siphoned dry by a fast pump-out or an over-inserted hose can all let sewer gas rise straight up the pipe. Pouring a cup of water down an unused standpipe every few weeks keeps an idle trap sealed; a persistent smell despite a full trap points toward venting and is worth a plumber’s look.
Yes, in both directions. Too short, and it cannot reach far enough into the standpipe to stay put, which is a common cause of it popping loose mid-cycle. Too long, and the excess length inside the standpipe can push down too close to the trap, risking the same siphoning problem covered above. A few inches of insertion, secured with a clip, is the target either way — not the deepest the hose will physically reach.
A washer can drain into a properly trapped floor drain or utility sink instead of a dedicated standpipe in many jurisdictions, as long as the same air-gap and trap principles are met. What is not acceptable under any common code is draining a washer directly into a pipe with no trap and no air gap at all, regardless of which type of receptor is used.
There is no fixed schedule — it depends on laundry volume and whether lint reaches the standpipe at all past your machine’s own lint filter. If you have never had a backup, there is no need to clean it preventively. If backups have happened once, a hot-water flush every few months is a reasonable habit; if they keep recurring despite regular clearing, the cause is more likely sizing or trap-related than debris, and worth diagnosing properly rather than clearing on repeat.
A laundry standpipe rarely gets a second thought until the washer starts backing up mid-cycle, and the instinct at that point is almost always to reach for a drain snake. Sometimes that is the right call — lint does build up in a standpipe trap over years of use. But just as often, the real cause is upstream of any clog: a standpipe that is the wrong height for the washer’s pump, a diameter mismatch with a modern high-efficiency machine’s discharge rate, a missing or failing trap, or a drain hose pushed in too far and sealing against the pipe wall.
Measure before you assume. Confirm the standpipe falls within the roughly 18-to-42-inch range your local code allows, confirm it is 2 inches in diameter with a genuine air gap around the hose, and confirm there is a working trap underneath it holding a water seal. Once those three things check out, a clog is quick to clear and a loose hose is a five-minute fix with the right clip. For the water going into the machine rather than out of it, our 5 Best Washing Machine Supply Line Kits roundup and our how to replace a washing machine supply line guide cover that side of the setup in full.
Prices and ratings may change. Always check Amazon for current prices.
✍️ About This Guide
PTR Editorial Team — Plumbing Guides. We compare manufacturer specifications, installation requirements, compatibility and available product documentation to help homeowners choose suitable tools and parts. How we review →
Not sure which tool fits your faucet nut? Identify the fixing, see how it lets go and check your clearance first. Then choose a tool, or use one you own.
Check your manual and the drain route first: gravity hose, built-in pump or external pump. Then see whether you need a dehumidifier hose at all.
Explore portable bidets that need no water-line connection, from bottle caps and squeeze bottles to battery-powered handhelds.

