
Guides
19 Oct 2026

Can’t Reach the Faucet Nut? Choose the Right Tool Before You Buy
Not sure which tool fits your faucet nut? Identify the fixing, see how it lets go and check your clearance first. Then choose a tool, or use one you own.
Learn how to locate and shut off the water supply to a single toilet, sink, washing machine, or dishwasher — no need to cut water to the whole house.
Please note: Information in this guide is subject to change. If a shutoff valve is severely corroded, won’t turn, or you’re uncomfortable working near your home’s plumbing, consult a licensed plumber before proceeding with any repair.
Most homeowners have exactly one relationship with their home’s water shutoff: they don’t know where it is until they desperately need it. That’s a problem, because the majority of plumbing repairs — a leaking toilet, a dripping faucet, a washing machine hose swap, a dishwasher connection — only need water cut off to that one fixture, not the entire house. Shutting off the main supply for a five-minute faucet repair means every other fixture in the home goes dry too, which is inconvenient at best and genuinely disruptive if someone else is mid-shower or the dishwasher is running.
Every toilet, sink, washing machine, and dishwasher in a modern home is supposed to have its own local shutoff valve — a small, dedicated valve installed specifically so you can isolate that one fixture without affecting the rest of the house. This guide walks through exactly where to find that valve for each fixture type, how to shut it off correctly, and what to do if your home is one of the many that’s missing one. If you’re about to work on a supply line specifically, our braided supply lines review is a natural next stop once the water is safely off.
At a Glance
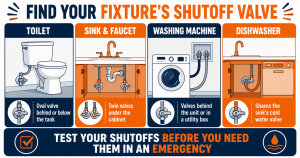
| Toilet | Oval quarter-turn handle behind or below the tank |
| Sink / Faucet | Twin valves under the cabinet — one for hot, one for cold |
| Washing Machine | Behind the unit or in a utility box — twin valves or a single lever |
| Dishwasher | Usually under the kitchen sink, sharing the sink’s cold line |
| Main House Shutoff | Fallback if no local valve exists — typically near the water meter or where the main line enters the house |
✏️ Our Take
A local shutoff valve is one of the most underrated parts of a home’s plumbing — most homeowners never touch theirs until the moment they desperately need it, and that’s exactly the wrong time to discover it’s seized shut or missing entirely. Before starting any repair on a toilet, faucet, washing machine, or dishwasher, locating and testing the fixture’s local shutoff should be step one — it’s the difference between a five-minute pause and an emergency trip to the main shutoff while water is actively running.
IN THIS GUIDE
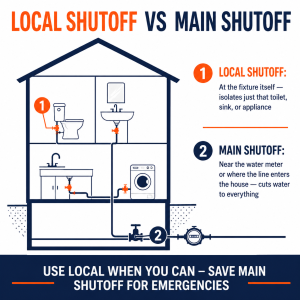
Cutting water to the entire house for a single fixture repair is a blunt instrument for what’s usually a narrow problem. It means every faucet, toilet, shower, and appliance in the home loses water pressure at once, which is disruptive if anyone else is home, and it forces you to remember to turn the main valve back on and repressurize the whole system once you’re done — an extra step that a local shutoff skips entirely. A local shutoff isolates exactly the fixture you’re working on and leaves everything else running normally.
Most modern local shutoffs use a quarter-turn ball valve with an oval or lever-shaped handle — turn it a quarter turn, from parallel to perpendicular against the pipe, and the water is fully off. These are quick to identify, quick to operate, and rarely seize up if they’ve been exercised occasionally over the years. Older homes, or fixtures that haven’t been updated in decades, are more likely to have a multi-turn compression stop instead — a round handle that you turn clockwise several full rotations to close, similar to an old-style garden hose valve. Both types do the same job, but the multi-turn compression stop is more prone to seizing from mineral buildup simply because it’s usually older and has more moving parts making contact with the water.
How to Shut Off Water to a Toilet
Every toilet’s local shutoff is a small oval or lever-handled valve mounted on the wall or floor behind or just below the tank, connected to the tank by a short flexible supply line. It’s almost always within easy reach without needing to move the toilet or reach behind anything else.
If you do end up replacing the valve or the supply line while you’re in there, it’s a good opportunity to upgrade both at once rather than revisiting the same repair again in a year or two. Our braided supply lines review covers current toilet connector options if the old line looks cracked, kinked, or original to the house.
Sinks and faucets are unique among fixtures in that they almost always have two separate local shutoffs rather than one — a hot valve and a cold valve, mounted side by side under the cabinet, each feeding its own supply line up to the faucet body.
Kitchen sinks add one more wrinkle worth checking before you start: if a dishwasher or a refrigerator icemaker line branches off the same cold-water supply somewhere under the cabinet, shutting off just the sink’s cold valve may also cut water to that appliance. That’s usually fine for a quick repair, but it’s worth knowing in advance rather than being surprised mid-project.
Washing machine shutoffs are typically located directly behind the unit, mounted on the wall at roughly hose height, or tucked inside a dedicated utility box built into the wall. Most setups use twin valves — one hot, one cold — though some newer installations use a single lever that shuts off both lines simultaneously with one motion.
Because washing machine valves see so little use between repairs, they’re also one of the more common candidates for replacement rather than repair once you’ve got them open. If the old hoses look original to the machine or show any cracking in the braiding, our braided supply lines review covers burst-proof options built specifically for the constant pressure a washing machine connection sits under between loads.
Dishwashers are a little different from the other fixtures on this list: most don’t have their own dedicated shutoff valve at all. Instead, the dishwasher’s water line typically branches off the kitchen sink’s cold-water supply through a T-fitting installed under the sink, meaning the sink’s own cold valve often doubles as the dishwasher’s shutoff.
Because a dishwasher’s water line is often the least-inspected connection in the kitchen — tucked behind the unit and rarely looked at unless something leaks — it’s worth a quick visual check for cracking or corrosion any time you have the valve open for another reason.
If you’ve checked and there’s genuinely no local shutoff at the fixture, the main house shutoff is your fallback. It’s typically located near where the main water line enters the house — often in a basement, a utility closet, a crawl space, or right next to the water meter itself, either inside or just outside the house depending on your local climate and construction style. Look for a single larger valve, usually a wheel-style gate valve or a lever-style ball valve, positioned before the line splits off to feed the rest of the home.
Turning off the main shutoff cuts water to the entire house, so it’s worth a heads-up to anyone else home before you do it, especially if the repair might take a while. Once you’ve finished the fixture repair and turned the main valve back on, run a nearby faucet briefly to clear any air that’s worked its way into the lines while the system was depressurized.
Older homes across much of the US — particularly those built before local plumbing codes required individual fixture shutoffs — often only have a single main shutoff valve for the entire house. If your home falls into this category, adding local shutoff valves during your next fixture repair is a worthwhile upgrade that saves a full-house water cutoff for every future minor fix. A plumber can typically add a local shutoff to an existing fixture in well under an hour while they’re already there for another repair, which makes it a low-effort addition rather than a project worth scheduling separately.
Before starting any repair, confirm the shutoff actually did its job rather than assuming it did because the handle turned. Run the fixture briefly — flush the toilet, open the faucet, or check for flow at the disconnected hose — and confirm water output tapers to nothing rather than continuing to trickle. A valve that’s only partially closed can still let enough water through to turn a simple repair into a mess.
While you’re there, take a moment to look at the valve itself for any dripping at the packing nut or the connection points, since a valve that’s leaking at its own body rather than fully sealing is a separate problem worth noting even if it’s successfully stopping flow downstream.
When your repair is finished and it’s time to turn the water back on, open the valve slowly rather than all at once. A sudden full-open can send a pressure spike through the line known as water hammer, which produces a loud bang in the pipes and, over repeated occurrences, can stress fittings and connections elsewhere in the system.
If a shutoff valve is seized, leaking at the body, or your home is missing local shutoffs entirely, search PlumberArchive.com — the US plumber directory with 12,000+ verified local plumbers across all 50 states.
Get weekly plumbing tips and DIY guides delivered straight to your Facebook feed.
Don’t force it — a seized valve, especially an older compression-style stop, can snap off in your hand if you push past resistance, turning a minor repair into a much bigger problem. Try the main house shutoff instead for the immediate repair, then plan to have the seized valve replaced separately, ideally by a plumber if it’s badly corroded or in an awkward spot to access.
Start near where the main water line enters the house — common locations include a basement, a utility closet, a crawl space, or right next to the water meter, which may be inside or outside depending on your climate and local construction practices. It’s typically a larger wheel-style gate valve or a lever-style ball valve positioned before the line splits to feed the rest of the home. If you genuinely can’t locate it, your water utility or a plumber can help identify it, and it’s worth doing once so you’re not searching for it during an actual emergency.
Yes, briefly. There’s usually a small amount of residual water trapped in the line between the valve and the fixture that drains out once you open the faucet or disconnect a hose, even with the valve fully closed. What’s not normal is a steady trickle that continues rather than tapering off — that indicates the valve isn’t fully seated and closed.
It’s worth considering, particularly for older multi-turn compression stops that have gone years without being exercised. A valve that technically still closes today can seize entirely by the next time you need it, and testing it periodically is the only way to know its actual condition. Upgrading to a modern quarter-turn ball valve during any repair that already has the area opened up is a low-cost way to avoid a seized valve becoming a problem later. Our shutoff valve reviews and ball valve vs gate valve comparison both cover what to look for if you’re upgrading.
Shutting off water to a single fixture is almost always faster and less disruptive than cutting water to the whole house, and it’s a skill worth having before you actually need it rather than discovering the valve’s location — or its condition — mid-repair. Toilets, sinks, washing machines, and dishwashers each have their own local shutoff in most modern homes, typically an oval or lever-handled quarter-turn valve within easy reach of the fixture itself.
If your home is missing local shutoffs, the main house valve near the water meter is always a working fallback, and adding local valves during your next repair is a small investment that pays off every time afterward. Take a few minutes today to locate and gently test each fixture’s shutoff — it’s the single most useful five minutes you can spend before your next plumbing repair. For more on what to install if you’re upgrading, see our shutoff valve reviews and ball valve vs gate valve comparison.
Prices and ratings may change. Always check Amazon for current prices.
✍️ About This Guide
PTR Editorial Team — Plumbing Guides. We compare manufacturer specifications, installation requirements, compatibility and available product documentation to help homeowners choose suitable tools and parts. How we review →
Not sure which tool fits your faucet nut? Identify the fixing, see how it lets go and check your clearance first. Then choose a tool, or use one you own.
Check your manual and the drain route first: gravity hose, built-in pump or external pump. Then see whether you need a dehumidifier hose at all.
Explore portable bidets that need no water-line connection, from bottle caps and squeeze bottles to battery-powered handhelds.

