Please note: Product availability and information are based on our research at time of writing and are subject to change. Always check Amazon for the latest details before purchasing.
Introduction
Soldering copper pipes is one of the most fundamental plumbing skills every homeowner should have. Whether you’re installing a new bathroom fixture, repairing a burst pipe, or connecting a utility sink in the garage, the ability to make a solid, leak-free solder joint can save you hundreds of dollars in plumber call-out fees — for a repair that typically takes around 30 minutes once you have the right tools and technique.
The good news is that soldering copper is far more approachable than it looks. With the right soldering kit for plumbing, a handful of basic supplies, and this step-by-step guide, most beginners make a watertight joint on their very first attempt. Unlike working with PEX pipe, copper soldering does require a torch and a steady hand — but the results are durable, professional-quality joints that last decades. Follow the six steps below and you’ll have the confidence to handle copper pipe work yourself.
Before you light the torch, gather everything you need. Having the right supplies on hand before you start makes the process faster, safer, and far less stressful.
- Propane or MAPP gas torch — MAPP gas burns hotter and is better suited to larger diameter pipes
- Lead-free solder — required by US plumbing code for all pipes that carry drinking water
- Flux paste and flux brush — essential for clean, bondable joints; never skip this step
- Pipe cutter — produces clean, square cuts that a hacksaw cannot reliably make
- Emery cloth or pipe cleaning brush — for abrading pipe ends and fitting sockets to bright copper
- Fireproof mat or heat shield — protects wall studs, insulation, and structural timbers behind the pipe
- Safety glasses and gloves — flux can spit and hot solder can drip unexpectedly
💡 Tip: Always use lead-free solder for drinking water pipes — it is required by US plumbing code. Look for solder labeled “lead-free” or “NSF 61 certified” on the packaging. Never use electrical rosin-core solder for plumbing.
For complete kit recommendations including torches, solder, and flux sets, see our best soldering kits for plumbing. For the right tool to cut your pipe cleanly and squarely, see our best pipe cutters guide.
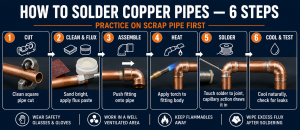
Step 1 — Cut and Prepare the Pipe
A successful solder joint starts with a clean, square cut. Clamp your pipe cutter around the pipe at the marked cut point, tighten the cutting wheel until it makes firm contact, then rotate the cutter around the pipe. After each full rotation, tighten the wheel a quarter turn. Continue until the pipe separates cleanly.
Once cut, remove the small raised burr from the inside edge using the built-in deburring tool on your pipe cutter, or a round file. This burr causes turbulence in water flow and can prevent the fitting from seating fully. When cut with a pipe cutter, the pipe end will be very slightly compressed — deburring restores it to full diameter and ensures the pipe seats properly in the fitting socket. Cut each pipe approximately ½ inch longer than the gap it needs to bridge, to account for the fitting socket depth at each end.
💡 Tip: A clean square cut is critical — an angled cut will cause a weak joint that is prone to leaking under pressure. A proper pipe cutter guarantees a square cut every time; a hacksaw rarely does. See our
best pipe cutters guide for our current picks.
Step 2 — Clean and Flux the Joint
Copper oxidizes quickly once it is cut, and solder will not bond to oxidized copper. Before applying flux, mechanically abrade both mating surfaces to expose fresh, bright copper. Wrap a strip of emery cloth around the pipe end and work it back and forth until the surface is uniformly shiny — any dull or dark patches indicate oxidization that must be removed. For the inside of the fitting socket, use a fitting cleaning brush sized to the pipe diameter.
Once both surfaces are clean and bright, apply a thin, even coat of flux paste to the pipe end and inside the fitting socket, covering all surfaces that will contact each other. Flux is a chemical cleaning agent that prevents re-oxidization while the metal heats, and it actively draws molten solder into the joint by capillary action. Use the flux brush for a controlled, even application — complete coverage of all mating surfaces is what matters, not a thick layer.
⚠️ Warning: Never skip fluxing — unfluxed joints will fail and leak immediately. Without flux, solder balls up on the outside of the fitting instead of flowing in. The few seconds it takes to flux properly is the difference between a watertight joint and a leak inside your wall.
Step 3 — Assemble the Fitting
Push the fitting onto the pipe end with a slight twisting motion. The twisting action helps distribute the flux evenly across both mating surfaces as the fitting seats. Continue pushing until the pipe is fully bottomed out inside the fitting socket — you will feel it stop against the internal shoulder. At this point the pipe end is in full contact with the inside stop of the fitting and the joint is ready to solder. If the fit feels too loose, verify that you have the correct fitting size for your pipe diameter.
After assembling, check for any excess flux that has squeezed out around the joint lip. Wipe this away with a dry cloth. Excess flux left on the outside of the fitting will burn, discolor the copper, and leave corrosive residue on your finished joint if not removed before and after soldering.
💡 Tip: Dry fit all your connections before soldering — push every fitting onto every pipe to confirm the assembly is correct and everything lines up. You cannot reposition or adjust a joint once heat has been applied and the solder has flowed.
Step 4 — Apply Heat with the Torch
Before lighting the torch, position your fireproof mat or heat shield behind the pipe — between the fitting and any flammable material such as wall studs, insulation, or subfloor. Do this before you light the torch, not after. Fires caused by soldering in walls are a leading cause of house fire during DIY plumbing repairs, and a fireproof mat takes seconds to place.
Light the torch and hold the flame at approximately 45 degrees to the fitting body. The key principle is to heat the fitting, not the pipe. The fitting has more mass and needs more heat, and you want the entire fitting to reach soldering temperature so solder is drawn into the joint from all sides. Move the flame in a slow circular motion around the fitting body to heat it evenly. After 10–15 seconds, touch the tip of the solder wire to the joint area, away from the direct flame. When the solder melts on contact with the fitting body alone — not from being touched by the flame — the temperature is correct and you are ready to feed solder.
⚠️ Warning: Keep a fireproof mat behind the pipe at all times — torch flame can ignite wall studs and insulation in seconds. Never solder in an enclosed space without fire protection in place, and keep a fire extinguisher within easy reach whenever you are working with an open flame.
Step 5 — Apply Solder
Once the fitting reaches temperature, pull the torch slightly away and touch the solder wire to the joint — the point where the pipe meets the fitting socket. Do not apply the flame directly to the solder wire. The heat stored in the fitting does the work, and the flux draws molten solder into the joint by capillary action. When the temperature is correct, the solder will flow in immediately and visibly disappear into the gap as the joint draws it in.
Feed the solder wire steadily around the full circumference of the joint, keeping continuous contact with the pipe-to-fitting junction. For a ½-inch pipe joint, you need approximately ½ inch of solder wire. A completed joint shows a thin, even silver bead around its entire circumference — a bright, shiny ring that confirms the solder has flowed all the way around. Once that full ring is visible and solder flows freely without puddling or dripping, remove the torch immediately. Over-heating after the joint is full burns the flux and can cause voids.
💡 Tip: Use about ½ inch of solder per ½-inch pipe — more solder does not mean a stronger joint. Excess solder creates blobs on the outside of the fitting and can restrict water flow inside the pipe. Feed just enough to see the full circumference bead form, then stop.
Step 6 — Cool and Test
Allow the joint to cool naturally in still air. Do not touch, move, or adjust the joint until it has cooled completely — disturbing a joint while the solder is still molten causes it to set with voids and weak spots that will leak under pressure. The joint will transition from bright silver to a slightly duller, matte finish as it cools. For ½-inch pipe this typically takes 2–5 minutes; larger diameter pipe holds more heat and may need 5–10 minutes.
Once cool, wipe the joint with a damp cloth to remove any remaining flux residue from the outside of the fitting. Flux left on the pipe after soldering causes corrosion over time if not cleaned away. With all joints cooled and wiped, turn the water supply back on slowly — open the shutoff valve gradually to allow pressure to build gently rather than hitting new joints at full surge. Inspect every joint carefully. A correctly made solder joint will be completely dry, with no drips, weeping, or moisture of any kind.
⚠️ Warning: Never cool a joint with water — thermal shock can crack the solder joint, creating a leak that may not appear immediately under low pressure but will fail when the system is fully charged. Let all joints air-cool completely before restoring water supply.
Safety Tips
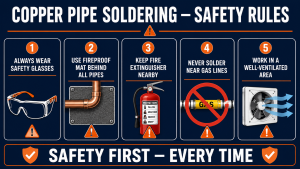
Soldering copper is a safe job when proper precautions are taken consistently. Keep these rules in mind every time you reach for the torch:
- Always wear safety glasses — flux can spit and hot solder can drip when a joint is over-heated
- Use a fireproof mat behind all pipes — position it before lighting the torch, not after
- Keep a fire extinguisher nearby — within arm’s reach, not in another room or closet
- Never solder near gas lines — if in doubt, turn off the gas supply at the meter before starting work
- Allow all joints to cool before touching — copper retains heat long after it looks cool; hold the back of your hand near (not on) the fitting to test before touching
- Work in a ventilated area — flux fumes are irritating to the eyes and respiratory tract; open windows and doors, or use a respirator in confined spaces such as crawl spaces or wall cavities
Frequently Asked Questions
Q: Is soldering copper pipes difficult for beginners?
Soldering copper pipe is genuinely learnable — most beginners make a successful joint within their first few attempts. The key is thorough preparation: clean, bright copper surfaces, proper flux coverage on all mating areas, and heating the fitting rather than the pipe or the solder. The most common beginner mistakes are insufficient cleaning before fluxing and applying the flame directly to the solder wire rather than letting the hot fitting draw it in. Practice two or three joints on scrap copper before working on a live pipe and you will build the necessary hand-feel and confidence quickly.
Q: What type of solder should I use for copper pipes?
For any copper pipe that carries drinking water, you must use lead-free solder — this has been required by US plumbing code since the Safe Drinking Water Act amendments of 1986, and is further reinforced by NSF 61 standards. Look for solder labeled “lead-free” or “NSF 61 certified.” For non-potable applications such as heating systems or outdoor irrigation, lead-free solder is still best practice. Never use electrical rosin-core solder for plumbing — always use acid-core or water-soluble flux-core solder specifically designed for copper pipe.
Q: How long does it take for a soldered joint to cool?
A ½-inch copper joint typically takes 2–5 minutes to cool completely at room temperature. Larger diameter pipe (¾-inch and above) holds more heat and may take 5–10 minutes. Never rush the cooling process — and never use water to speed it up, as thermal shock can fracture the solder and create a latent leak. Test whether a joint is cool enough to touch by holding the back of your hand close to (not on) the fitting. If you can feel radiant heat, wait longer before restoring water pressure.
Q: Can I solder copper pipes with water in them?
No — this is one of the most common causes of soldering failure. Water in the pipe turns to steam as the copper heats, and that steam prevents the fitting from reaching soldering temperature. The result is a cold, weak joint where the solder does not flow properly and beads up on the surface instead of drawing in. Before soldering, shut off the water supply and drain the affected pipes fully. For any residual moisture that won’t drain, push a tightly rolled piece of white bread into the pipe — it absorbs the remaining water during soldering and dissolves harmlessly when water is restored. Only solder on completely dry copper.
Conclusion
Soldering copper pipe is a genuinely learnable skill — one that pays dividends every single time you handle a plumbing repair or installation yourself rather than paying a call-out fee. The six steps above cover everything you need: a clean square cut, properly abraded and fluxed surfaces, a fully dry-fitted assembly, even heat applied to the fitting body, solder fed at the right temperature, and a patient natural cool-down. Master these steps and you will make solid, leak-free joints consistently.
Before working on your first live joint, take 20 minutes to practice on a few pieces of scrap copper pipe and spare fittings. The hand-feel of solder flowing smoothly into a properly heated joint is something you will recognize immediately — and it is far better to learn that feel on scrap than on a joint inside a wall. Practice also lets you calibrate exactly how long your torch takes to bring a fitting to temperature, which varies by torch type, gas, and pipe diameter.
For everything you need to get started, see our best soldering kits for plumbing — covering torches, solder, flux, and complete beginner sets at every price tier. For clean, square pipe cuts on every job, see our best pipe cutters guide for the most reliable options available today.
✍️ About This Review
Mike Reynolds, DIY Home Improvement Writer — Mike Reynolds spent over a decade working as a residential contractor before turning his expertise into practical writing for homeowners. He specialises in step-by-step how-to guides that make plumbing repairs accessible for beginners and experienced DIYers alike. Learn how we test →