
Guides
19 Oct 2026

Can’t Reach the Faucet Nut? Choose the Right Tool Before You Buy
Not sure which tool fits your faucet nut? Identify the fixing, see how it lets go and check your clearance first. Then choose a tool, or use one you own.
How to install a refrigerator ice maker water line: saddle valve vs. proper tee fitting, tubing choice, routing, and testing for leaks.

Please note: Information in this guide is based on our research and hands-on experience at time of writing and is subject to change. Always follow your refrigerator manufacturer’s connection instructions and local plumbing code, and consult a licensed plumber if you run into conditions beyond the scope of this guide.
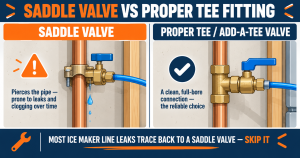
Most refrigerators with an ice maker or a door-front water dispenser ship with a small accessory kit built around a saddle valve — a metal clamp that bites through the wall of a cold water pipe when you tighten it, with no cutting required. It is the fastest possible way to get water to a refrigerator, and it is also the single most common source of an ice-maker-line leak years down the road. The pierced hole a saddle valve creates is never as clean as a proper cut, the seal depends on a rubber gasket clamped against the outside of the pipe rather than a real fitting, and mineral deposits and metal shavings from the piercing itself tend to collect right at the point of the puncture. Most plumbers recommend against them for exactly that reason, and this guide is built around the alternative: tapping into the supply line properly, with a dedicated tee or an add-a-tee valve, the same way any other fixture would be plumbed.
At a high level, the job has three parts: getting a real shutoff and tee onto an existing cold line, running 1/4-inch tubing from that point to the back of the refrigerator, and connecting it to the appliance’s own inlet valve. None of it is exotic plumbing, but each step has a right way and a much more failure-prone shortcut, and this guide covers the right way at each one. This is plumbing-side installation only — getting water to the refrigerator’s inlet valve. It does not cover diagnosing or repairing the ice maker mechanism itself once water is reaching the appliance; that is a refrigerator-repair topic, not a plumbing one.
At a Glance
| Skill Level | Intermediate DIY. Tapping into the supply line correctly and making a clean compression connection are the two steps where care matters most; routing the tubing itself is straightforward. |
| Tools Needed | A tubing cutter or a sharp utility knife; an adjustable wrench; a tee fitting or an add-a-tee valve sized to your existing shutoff; 1/4-inch tubing in copper, PEX, or braided stainless, sized for the full run plus slack; compression sleeves and nuts if not pre-attached; plastic clips or straps to secure the run. |
| Time Needed | About 1 to 2 hours for a run under the same cabinet run as the kitchen sink; longer if the tubing has to travel further, such as from a basement or crawlspace line. |
| Critical First Step | Shut off the water and relieve pressure at the nearest faucet before working on any fitting. Opening a tap after the shutoff confirms the line is actually dead and bleeds off the residual pressure that would otherwise spray back the moment you loosen a connection. |
✏️ Our Take
The single decision that determines whether this installation is trouble-free for the next ten years or a slow leak waiting to happen is whether you use the saddle valve in the box or spend the extra twenty minutes on a proper tee fitting. Everything else in this guide — tubing material, routing, the connection at the fridge — is genuinely a matter of preference and convenience. The tap-in point is not. Skip the saddle valve.
IN THIS GUIDE
A saddle valve clamps around the outside of an existing pipe in two halves, and turning its handle drives a hollow, sharpened needle through the pipe wall to create a small opening it then draws water through. It requires no cutting and no separate tee fitting, which is exactly why it ships in so many icemaker installation kits — it looks like the fast, tool-light option. The problem is the hole itself. A saddle valve’s needle rarely produces a clean, full-diameter opening; it is punched rather than cut, and its piercing action can leave loose metal shavings right at the tap point. The seal that keeps the whole assembly from leaking is a rubber gasket compressed against the outside of the pipe by two bolted clamp halves, which is far less robust over time than a fitting that is actually part of the pipe run, especially as the clamp corrodes or the gasket ages.
A proper tee fitting solves both problems by using a full, clean opening and a permanent connection rather than a clamp. There are two common ways to get one in place without a full re-plumb. The simplest is an add-a-tee valve, which threads onto the outlet of an existing angle stop under the sink and gives you a second, independently shut-off outlet for the icemaker line, with no cutting into the supply pipe at all. Where there is no angle stop nearby to convert, a plumbing tee is soldered, glued, or crimped directly into a straight run of the cold line, with a dedicated valve added at the tee. Our review of the 5 Best Angle Stop Valves covers add-a-tee options directly, including which configurations are built specifically for feeding an accessory line like this one off an existing stop.
Three materials cover almost every icemaker line installation, and each trades off differently on durability, ease of installation, and how well it tolerates cold. Soft (annealed) copper tubing is the traditional choice: extremely durable, resistant to rodent damage, and unaffected by heat or UV exposure over decades of service. Its downside is that it is unforgiving of a sharp bend — a kinked section cannot be repaired and has to be cut out and re-flared — and it requires either a flaring tool or a compression fitting to terminate, both of which take a bit more care to get right than the alternatives.
PEX tubing is more flexible and considerably easier to route around tight corners without kinking, and its slight ability to expand gives it somewhat better tolerance of a brief freeze than rigid copper, though it is not freeze-proof. It terminates with push-to-connect or PEX-specific crimp fittings rather than a flare, which is often faster for a DIYer, though it is worth checking your refrigerator’s warranty terms, since a few manufacturers specify copper or braided stainless in their own installation instructions. Braided stainless steel icemaker connectors — a flexible EPDM or rubber core wrapped in a stainless braid, usually sold as a complete kit with compression fittings already attached — are the easiest option to install and the most forgiving of routing around obstacles, but the internal core has a finite service life that isn’t visible from the outside of the braid, so periodic replacement on the same schedule you would apply to a braided supply line elsewhere in the house is a reasonable precaution rather than a one-time installation and forget.
Whichever material you choose, freeze exposure matters most where the line has to pass through an unheated space — a garage wall or an uninsulated crawlspace are the two most common culprits. Copper’s rigidity means a hard freeze can split it outright with no warning; PEX and braided stainless tolerate a freeze somewhat better but are not guaranteed to survive one either. Insulating any exposed section of the run in an unheated space is worth doing regardless of which material you pick.
The most common and simplest source is the cold water line under the kitchen sink, typically the same line feeding the cold side of the faucet, especially when the refrigerator sits on the same wall as the sink or just around a nearby corner. Confirm you are looking at the cold line, not the hot, before tapping in — running warm water to an ice maker will slow ice production and can shorten the component’s life.
Where the refrigerator sits on the far side of the kitchen or on an exterior wall away from the sink, a basement or crawlspace supply line running up into the kitchen wall cavity is the more practical source, feeding a new tee installed down there and then running tubing up through the wall or floor to the refrigerator’s location. This route involves more distance and, often, working through a finished wall or floor cavity to get the tubing where it needs to go — see the professional off-ramp below if that work is more involved than you want to take on.
Before touching any fitting, shut off the water supply to the line you are tapping into and open the nearest faucet to confirm the shutoff worked and to bleed off residual pressure. If the source is the same cold line as the kitchen sink, the sink’s own angle stop is usually the fastest way to isolate it without cutting water to the rest of the house. Our guide to how to shut off water to a single fixture covers locating and operating that valve in full; this guide assumes you have already isolated the line by the time you reach the tap-in step below.
With the water off and the line confirmed dead, install the tee. For an add-a-tee valve threaded onto an existing angle stop, remove the stop’s current outlet connection, thread the add-a-tee assembly on in its place using its integrated washer for the seal, and reconnect the original fixture’s supply line to one outlet while the icemaker tubing connects to the new second outlet. For a tee cut directly into a straight run of pipe, cut a clean section out with a tubing cutter rather than a saw wherever possible, since a tubing cutter leaves a square, burr-free edge that seats far better in a compression or solder joint, then install the tee with its own dedicated shutoff valve on the branch feeding the icemaker line. Having an independent valve at the tee, rather than relying only on the main fixture’s shutoff, makes any future service on the icemaker line alone much simpler.
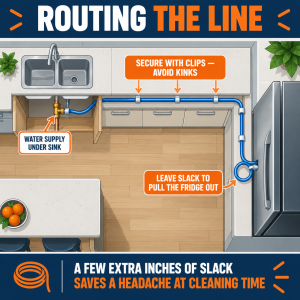
Route the tubing along the back or bottom of the cabinets toward the refrigerator’s location, following the shortest reasonable path while avoiding sharp bends — copper in particular needs a gentle curve rather than a tight corner to avoid kinking. Secure the run every couple of feet with plastic clips or straps so it cannot sag, rattle against the cabinet, or get pinched by a drawer, and keep it clear of any cabinet hardware that moves.
At the refrigerator end, leave a genuine service loop of slack coiled behind the unit rather than running the tubing taut. A refrigerator gets pulled out from the wall periodically for cleaning behind and underneath it, and a line with no slack will kink, stress the fitting at the wall, or simply not reach far enough the first time someone tries to move the appliance for exactly that reason.
Locate the refrigerator’s own water inlet valve, usually on the lower rear of the unit, and connect the tubing there with a compression fitting: slide the compression nut and ferrule onto the tubing, insert the tubing fully into the valve’s inlet, then slide the ferrule up to the valve body and thread the nut on by hand before snugging it with a wrench. Tighten only until snug and leak-free rather than as tight as the wrench will allow — refrigerator inlet valves are frequently plastic, and overtightening a compression nut against a plastic fitting is a common way to crack it, turning a simple connection into a warranty claim or a replacement part order.
Turn the water back on gradually rather than all at once, and check every connection along the run as pressure builds — the tee, any clips or transitions, and the fitting at the refrigerator. Feel each joint with a dry paper towel rather than relying on sight alone, since a slow weep can be damp to the touch well before it is visible as a drip. Let the refrigerator run its first ice-making cycle and discard the first batch or two of ice, which can carry manufacturing residue from the tubing and fittings. Check every connection again after the line has been under full pressure and gone through a few fill cycles, ideally the next day, since a compression fitting can occasionally show a very slight weep only after the first real thermal cycling rather than immediately.
Tapping an existing accessible line and running tubing along cabinets is well within DIY range. Hand the job to a plumber when the route requires cutting into a finished wall or floor to get the tubing where it needs to go, since that adds drywall or flooring repair on top of the plumbing itself. The same applies if you cannot find or clearly identify an accessible water source near the refrigerator’s location without significant demolition. And if you discover the existing line — on a job that is really a saddle-valve replacement rather than a first-time install — shows corrosion, a green crust at a compression joint, or brittle, cracked tubing beyond the section you intended to touch, that is a sign of a broader problem worth a professional look rather than a simple swap.
If the icemaker’s fill valve makes a sharp banging noise as it closes, that is water hammer rather than a leak, and it is common on quick-closing appliance valves like this one. Our comparison of a pressure reducing valve vs a water hammer arrestor covers the fix in detail; a small in-line arrestor installed near the tee is usually the targeted solution rather than anything you need to change about the installation described above.
If the run requires opening a finished wall or floor, or you are not confident identifying an accessible water source, it is worth getting a professional to look. Search PlumberArchive.com — the US plumber directory with 12,151+ verified local plumbers across all 50 states.
Get weekly plumbing tips and DIY guides delivered straight to your Facebook feed.
You can, and it will likely work in the short term, but it is the single most common source of a slow, hard-to-notice leak in an icemaker installation over time. Spending the extra time on an add-a-tee valve or a proper tee fitting instead avoids that failure point entirely and is the approach most plumbers recommend.
All three are legitimate choices. Copper is the most durable over decades but the least forgiving of a sharp bend. PEX is easier to route and slightly more freeze-tolerant. Braided stainless is the easiest to install with fittings already attached, but its internal core has a finite service life worth tracking. Check your refrigerator’s own installation instructions in case the manufacturer specifies a preference.
That is almost always water hammer, caused by the icemaker’s fill valve closing quickly, not a leak or an installation mistake. Our comparison of a pressure reducing valve vs a water hammer arrestor covers the fix — typically a small arrestor installed near the tee.
Enough that the refrigerator can be pulled out from the wall for cleaning without the line going taut, kinking, or straining the fitting at either end — a loose coil of a foot or more behind the unit is a reasonable target, adjusted for how far the appliance actually needs to move in your kitchen.
If you are working with a line that is already in place rather than starting fresh, our guide to how to identify your pipe material covers the visual and magnetic tests that distinguish copper, PEX, and other tubing types before you decide whether to extend it, replace it, or tap into it as-is.
Getting water to a refrigerator’s ice maker is a genuinely approachable plumbing project, and nearly every part of it — tubing material, routing path, how much slack to leave — comes down to reasonable judgment calls with no wrong answer. The one place this guide asks you to be deliberate rather than take the fastest option is the tap-in point: a saddle valve will work today, but a proper tee or add-a-tee valve is the difference between a connection you never think about again and one that eventually shows up as a slow leak in a cabinet or behind an appliance. Get that one decision right, secure the run with enough slack to service the refrigerator later, and test every joint before you consider the job done.
Prices and ratings may change. Always check Amazon for current prices.
✍️ About This Guide
PTR Editorial Team — Plumbing Guides. We compare manufacturer specifications, installation requirements, compatibility and available product documentation to help homeowners choose suitable tools and parts. How we review →
Not sure which tool fits your faucet nut? Identify the fixing, see how it lets go and check your clearance first. Then choose a tool, or use one you own.
Check your manual and the drain route first: gravity hose, built-in pump or external pump. Then see whether you need a dehumidifier hose at all.
Explore portable bidets that need no water-line connection, from bottle caps and squeeze bottles to battery-powered handhelds.

