Please note: Information in this guide is based on our research at time of writing and is subject to change. Always consult your unit’s owner’s manual or a licensed plumber before attempting maintenance on a water heater still under warranty.
Introduction
If you searched for how to flush a water heater and landed here, it’s worth double-checking which type of unit you actually have first. This guide covers tankless water heaters specifically — a completely different maintenance process from a tank-style unit. Tank water heaters accumulate loose sediment at the bottom of the tank, which is cleared by draining it through a bottom drain valve. Tankless units don’t have a tank to drain at all, so there’s no sediment to flush out that way. If you have a traditional tank unit, our tank-style water heater flushing guide is the one you want instead.
What tankless units do accumulate is mineral scale, which builds up on the walls of the heat exchanger as hard water passes through it and gets heated. This happens because heating water causes dissolved calcium and magnesium to come out of solution and cling to the hottest surfaces they touch — in a tankless unit, that’s the narrow copper or stainless steel channels of the heat exchanger itself. Left unaddressed, that scale layer acts as insulation between the water and the burner or heating element, forcing the unit to work harder to reach the same temperature — reducing efficiency, shortening the unit’s lifespan, and eventually triggering error codes or noticeably weaker hot water output. Descaling clears that buildup by circulating a mild acidic solution, typically food-grade white vinegar, through the heat exchanger with a small pump.
This process applies to gas and electric tankless units alike, and it’s something most homeowners can do themselves once a year with basic tools. If you’re still deciding between a tankless or tank-style unit, or want to compare the ongoing maintenance each requires, our tankless vs tank water heater comparison covers that in more depth. If you’re shopping for a new unit instead of maintaining an existing one, see our best tankless water heaters review.
At a Glance
| Difficulty |
Moderate |
| Time |
45–60 Minutes |
| Cost |
$ — a descaling pump kit if you don’t already own one, plus white vinegar or a commercial descaling solution |
| Tools Needed |
Submersible utility pump or dedicated descaling pump kit, two 5-gallon buckets, white vinegar (typically 3-4 gallons) or a commercial descaling solution, adjustable wrench, hose connectors matching your unit’s service valves |
| Skill Level |
Intermediate |
✏️ Our Take
Tankless water heaters don’t accumulate sediment the way tank units do, but they’re far more sensitive to mineral scale buildup on their heat exchanger — especially in hard water areas, where scale can measurably reduce efficiency and shorten the unit’s lifespan within just a year or two if it’s never descaled. Most manufacturers recommend descaling annually, or every six months in areas with notably hard water. The process looks intimidating the first time because of the pump and hose setup, but once you’ve done it once, it’s a straightforward maintenance task you can repeat each year in under an hour.
What You’ll Need
Gather everything before you start, since you don’t want to be searching for a hose connector mid-cycle with the pump already running:
- A submersible utility pump or a dedicated tankless descaling pump kit — many are sold as complete kits with hoses and a bucket included, which simplifies the setup considerably
- Two 5-gallon buckets — one for the descaling solution, one to catch the return flow
- White vinegar, food-grade and unflavored — most tankless units need 3-4 gallons for a full descaling cycle
- Hose connectors that match your specific unit’s service valve fittings
- An adjustable wrench for the isolation valve and hose connections
💡 Tip: Check your water heater’s manual for the manufacturer’s specific descaling solution recommendation — most approve plain white vinegar, but some recommend a commercial descaling solution instead, particularly for units still under warranty.
Step 1 — Turn Off Power and Gas/Electric Supply
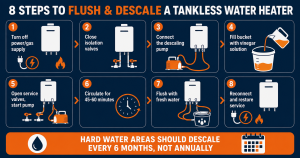
Before touching any valves or hoses, cut power to the unit completely. For gas units, turn the gas supply valve to the off position. For electric units, switch off the dedicated breaker at your electrical panel rather than relying on a wall switch alone, since you want the circuit fully de-energized while you work.
⚠️ Warning: Never attempt to service a tankless water heater while it’s powered on — turning off the fuel or electrical supply completely is a non-negotiable first step, not an optional precaution.
Step 2 — Close the Cold and Hot Water Isolation Valves
Locate the two isolation valves on your unit, typically mounted directly on the water lines feeding into the heater and labeled or color-coded — blue for cold, red for hot. Turn both valves to the closed position to isolate the unit fully from your home’s main water supply before you open anything else.
💡 Tip: If your tankless unit doesn’t have built-in isolation valves with service ports, you’ll need to have a plumber install a service valve kit before you can descale it yourself — most units manufactured in the last several years include these as standard.
Step 3 — Connect the Descaling Pump
Connect your pump’s hoses to the cold and hot service ports on the isolation valve assembly. One hose draws solution from your bucket into the unit; the other returns it back to the same bucket, creating a closed loop that lets the solution circulate through the heat exchanger repeatedly rather than being used once and discarded. Most descaling pump kits include threaded hose connectors sized for standard service valve fittings, but older units or certain brands occasionally use a slightly different fitting size, which is why it’s worth confirming compatibility before you start rather than discovering a mismatch mid-setup.
💡 Tip: Double-check that your hose connections are snug and won’t leak under pump pressure — a quick test run with plain water before adding vinegar can catch a loose connection before it becomes a mess.
Step 4 — Fill the Bucket with Descaling Solution
Fill one of your 5-gallon buckets with the recommended amount of white vinegar or commercial descaling solution — typically 3-4 gallons, though you should confirm the exact amount against your unit’s manual. Place the pump’s inlet hose into this bucket so it’s ready to draw solution once you start circulating.
Hard water regions across the Southwest, parts of Texas, and the Upper Midwest see meaningfully faster scale buildup in tankless units than naturally soft water regions like the Pacific Northwest — homeowners in hard water areas should lean toward descaling every six months rather than annually, since scale accumulation directly reduces heat exchanger efficiency and can trigger error codes or reduced hot water output well before a full year has passed. If you’re unsure how hard your water is, most municipal water utilities publish an annual water quality report with hardness levels, or an inexpensive test strip can confirm it in minutes.
💡 Tip: Using undiluted white vinegar is standard practice for most residential tankless units — check your manual, but avoid diluting it further unless specifically instructed, since a weaker solution is less effective at dissolving scale.
Step 5 — Open the Service Valves and Run the Pump
Open the service ports on both isolation valves to allow the solution to circulate through the unit. Turn on the pump and let it begin circulating the vinegar solution through the heat exchanger, watching the hose connections briefly to confirm nothing is leaking under pressure.
💡 Tip: You may notice the solution changing color slightly or small particles appearing in the return bucket — this is normal and is the dissolved mineral scale being flushed out of the heat exchanger.
Step 6 — Circulate the Solution
Let the pump circulate the solution for at least 45-60 minutes for units with moderate to heavy scale buildup. Longer circulation time is more effective than a rushed cycle, particularly if it’s been over a year since the last descaling, since heavier scale deposits simply take longer to dissolve than a light, recently-maintained buildup.
⚠️ Warning: Don’t cut this step short to save time — an insufficient circulation period is one of the most common reasons a descaling doesn’t fully resolve reduced hot water output or efficiency issues, meaning you’d need to repeat the entire process sooner than expected.
Step 7 — Flush with Fresh Water
Turn off the pump and disconnect it from the vinegar bucket. Close the service valve ports, then briefly open the cold water isolation valve to flush the system with fresh water for several minutes, clearing out any remaining descaling solution from inside the unit before you restore full service.
💡 Tip: Direct the flush water into a bucket or floor drain rather than back into your home’s plumbing, since it will still contain residual vinegar and loosened mineral particles.
Step 8 — Reconnect and Restore Service
Disconnect the pump hoses and close the service ports securely. Reopen both isolation valves fully to restore normal water flow to the unit, then restore gas or electrical power. Run a hot water tap for a few minutes to confirm normal operation and check for any leaks at the service connections you worked on.
💡 Tip: Check every connection you touched during this process with a dry cloth after restoring water flow — a slow drip at a service port connection is the most common issue after a descaling, and it’s easy to catch and tighten immediately if you check right away.
How Often Should You Descale?
The standard recommendation from most manufacturers is annual descaling for the average US household. Hard water regions should consider cutting that interval in half and descaling every six months instead, since mineral buildup accelerates significantly once water hardness climbs above moderate levels. Households on a private well, in particular, are worth flagging here too — well water hardness varies widely by property and isn’t reflected in a municipal water quality report, so a test strip is the more reliable way to know where you stand if you’re not on a public water system. If you’re still weighing whether a tankless unit’s maintenance schedule fits your household compared to a tank-style heater, our tankless vs tank water heater comparison breaks down the ongoing upkeep differences between the two.
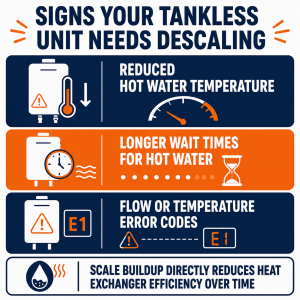
💡 Tip: Reduced hot water temperature, longer wait times for hot water, or an error code related to flow or temperature sensing are all signs your unit may need descaling sooner than your regular schedule.
Need a Professional Plumber?
If your unit doesn’t have accessible isolation valves, you’re not comfortable working with the pump setup, or a descaling doesn’t resolve your hot water issues, it’s time to call in a professional. If you need a licensed plumber in your area, search PlumberArchive.com — the US plumber directory with 12,000+ verified local plumbers across all 50 states.
Find a trusted plumber near you → PlumberArchive.com
Follow Us on Facebook
Get weekly plumbing tips, honest tool reviews and DIY maintenance guides delivered straight to your Facebook feed. We cover water heaters, leak detection, and everything in between — written for US homeowners who want to handle more themselves.
Follow PlumbingToolsReview on Facebook →
Frequently Asked Questions
Q: Can I use white vinegar to descale a tankless water heater, or do I need a special solution?
Plain, food-grade white vinegar is standard practice and approved by most manufacturers for residential tankless units. That said, always check your specific unit’s manual first — some manufacturers recommend a commercial descaling solution instead, particularly while the unit is still under warranty, and using an unapproved solution could technically affect warranty coverage in rare cases.
Q: How do I know if my tankless water heater needs descaling?
The clearest signs are reduced hot water temperature, longer wait times before hot water arrives, lower overall flow rate, or an error code related to flow or temperature sensing. If it’s been close to a year since your last descaling — or six months in a hard water area — and you’re noticing any of these signs, it’s a strong indication scale buildup is affecting the heat exchanger’s efficiency.
Q: Is descaling a tankless water heater different from flushing a tank-style water heater?
Yes, these are two entirely different processes for two different types of units. A tank-style water heater accumulates loose sediment at the bottom of the tank, cleared by draining the tank through a bottom valve. A tankless unit has no tank and no sediment to drain — instead, mineral scale builds up on the heat exchanger walls and is dissolved by circulating a descaling solution through a pump loop. If you have a tank-style unit, see our tank-style water heater flushing guide instead.
Q: Can I descale a tankless water heater myself, or do I need a plumber?
Most homeowners can do this themselves as long as their unit has built-in isolation valves with service ports, which is standard on most units manufactured in the last several years. If your unit lacks these ports, or you’re uncomfortable with the pump and hose setup, a plumber can either install a service valve kit or handle the full descaling process for you.
Conclusion
Descaling is essential maintenance specifically for tankless water heaters — a completely different process from flushing a tank-style unit, since there’s no tank or sediment involved at all. Instead, you’re protecting the heat exchanger from mineral scale buildup that directly reduces efficiency and shortens the unit’s lifespan if it’s left unaddressed.
For most US households, once a year is enough. If you live in a hard water region — much of the Southwest, parts of Texas, or the Upper Midwest — descaling every six months instead will keep your unit running efficiently and help you avoid the reduced output and error codes that come with heavier scale buildup.
The pump and hose setup looks intimidating the first time through, but it’s a straightforward process once you’ve done it once, and most homeowners can complete the whole cycle in under an hour going forward. If you landed here but actually have a tank-style unit, our tank-style water heater flushing guide covers that process instead. If you’re shopping for a new unit, see our best tankless water heaters review, and if you’re still deciding between tankless and tank-style altogether, our tankless vs tank water heater comparison covers the full tradeoffs, including ongoing maintenance like this.
✍️ About This Guide
Written by Mike Reynolds, DIY Home Improvement Writer at PlumbingToolsReview — former residential contractor helping US homeowners tackle plumbing repairs with confidence. Learn how we test →