
Guides
19 Oct 2026

Can’t Reach the Faucet Nut? Choose the Right Tool Before You Buy
Not sure which tool fits your faucet nut? Identify the fixing, see how it lets go and check your clearance first. Then choose a tool, or use one you own.
Learn how to cut PVC pipe straight and square with a ratchet cutter, hand saw and miter box, or rotary cutter — plus marking, deburring, and dry-fit tips.
Please note: Information in this guide is based on our research at time of writing and is subject to change. Always follow the instructions supplied with your specific pipe, fittings, and solvent cement, and consult a licensed plumber if you encounter conditions beyond the scope of this guide.
A cut on PVC pipe really only has one job: give the fitting a clean, square, 90-degree end to bond to. Solvent welding — the joint that holds rigid PVC and CPVC together — is not glue in the ordinary sense. The cement chemically softens both surfaces so the pipe and the fitting socket fuse into a single piece of plastic as they cure. That fusion depends on the pipe bottoming out squarely inside the socket with full contact all the way around. A cut that runs even a few degrees off square leaves a wedge-shaped gap on one side of the joint, and that gap is exactly where a slow leak starts months later.
Push-fit and compression connections are far more forgiving — their O-ring or ferrule seals against the pipe wall a little way back from the end, so a slightly ragged or angled cut still seals as long as the pipe is deburred and goes in far enough. A solvent-welded PVC joint gives you none of that margin. The good news is that a straight, clean cut on PVC is genuinely easy to get right with any of several common tools, as long as you mark it properly first and take a minute to dress the end afterward. This guide covers the three tool paths most people actually have on hand — a ratchet or scissor-style PVC cutter, a hand saw with a miter box, and a rotary tubing cutter — plus the fundamentals that apply no matter which one you use. If you’re not yet sure whether your project calls for Schedule 40 or the thicker-walled Schedule 80, our PVC Schedule 40 vs Schedule 80 comparison covers that decision before you start cutting.
At a Glance
| Skill Level | Beginner-friendly DIY |
| Tools Needed | A plastic-pipe ratchet or scissor cutter, or a fine-tooth hand saw with a miter box, or a rotary tubing cutter; a deburring/chamfering tool or utility knife; tape measure, marker, and a strip of paper or painter’s tape for marking |
| Time Needed | Roughly 5–15 minutes per cut, including marking and deburring |
| Critical First Step | Mark a full circle all the way around the pipe — not a single pencil tick on one side, which almost always drifts off square |
✏️ Our Take
There is no single “correct” tool for cutting PVC. A ratchet or scissor cutter is fastest and makes no dust on supply-size pipe; a hand saw and miter box handle the entire size range, including large drain pipe; a rotary tubing cutter gives the cleanest edge in tight indoor spots. Which one is right is mostly a question of what you already own and what you are cutting. What actually determines whether the joint holds is not the tool — it is marking a full-circle line first, keeping the tool square to that line, and deburring the end before any cement comes out of the can.
IN THIS GUIDE
A square end puts the full ring of the pipe wall in contact with the socket wall, and solvent cement can only fuse plastic that is actually touching. Where an angled cut leaves a gap, there is nothing for the cement to weld — that unfused arc is a built-in weak spot that tends to weep once the line is pressurized and the pipe flexes with temperature. A square end also bottoms evenly against the shoulder inside the fitting, so the pipe reaches full depth all the way around and the run ends up the length you measured.
“Clean” matters for a related reason: cement has to wet bare, smooth plastic. A furry rim of burrs traps pockets of air and cement that never fuse, and loose shavings pushed into the socket cure in place as hard specks that hold the pipe a fraction off its stop — and a fraction is enough to leak. That is why deburring, further down, is a real step and not an optional polish.
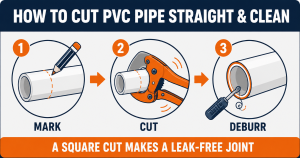
Most off-square cuts are decided at the marking stage, before the blade touches the pipe. The usual mistake is to make a single pencil tick on the near face and start cutting. Your eye follows the tool, not a line it cannot see on the far side of the pipe, so the cut drifts — a third of the way through, the kerf has wandered and the back of the pipe is being cut at a different height than the front. On a 2-inch pipe, a 5-degree tilt is nearly a quarter inch of error across the end, far more than a solvent joint tolerates.
The fix is a line that runs the entire circumference, drawn against a guide that is square to the pipe by construction:
1. Measure the length you need and make one reference tick.
2. Take a sheet of paper, a large index card, or a strip of thin cardboard with a straight, factory-cut edge. Wrap it around the pipe at the tick so the leading edge laps over the trailing edge with no step and no gap — when it meets itself exactly all the way around, that edge is a true perpendicular.
3. Hold the wrap tight and trace along its edge with a marker, rotating the pipe until the line closes into a full circle.
4. Sight down the pipe: the line should sit perpendicular to the pipe’s axis, not spiral off like a candy-cane stripe. If it spirals, the wrap was offset — redo it.
A wrap of painter’s tape does the same job with a bonus: you cut along the tape edge, and the tape reduces splintering on a sawn cut. Purpose-made PVC cutting guides — rubber or plastic sleeves, sometimes sold as saw guides or miter wraps — snap around the pipe, give a full-circle reference instantly, and present a raised lip for a saw blade to run against. Worth owning if you cut pipe with any regularity.

Step 2: Choose Your Cutting Tool
Several tools produce a joint-ready cut. The right one comes down to the pipe’s size and material and whatever is already in your toolbox. Here are the three paths a homeowner is most likely to have on hand.
A plastic-pipe cutter has a single wide blade that shears through the pipe wall as you squeeze the handles. Ratcheting models advance the blade a little with each squeeze, so hand strength is enough for pipe up to about 1 to 1½ inches; simpler scissor types are quick on tubing up to roughly 1 inch. There is no dust, and the jaw cradles the pipe square to the blade, so the cut comes out square almost automatically. It is the natural choice for PVC and CPVC supply lines, irrigation pipe, PEX, and poly tubing. The limits: the blade can pinch or crush pipe that is thick-walled or cold rather than shearing it, it leaves a slightly rolled edge that needs deburring, and it will not reach around pipe much above 1½ to 2 inches. Our 5 Best PVC Pipe Cutters roundup compares current ratchet, scissor, and single-stroke models if you are shopping for one.
A fine-tooth saw — a hacksaw, a dedicated PVC/ABS saw, or a fine-set backsaw — running in a miter box that holds the pipe and guides the blade through locked 90-degree slots. This is the most size-flexible path by a wide margin: it cuts 3- and 4-inch drain pipe as readily as ½-inch supply line, which is why it is the standard approach for drain, waste, and vent work. The trade-off is that it makes dust and leaves a burr on both the inside and outside rims. Blade choice matters — an 18 to 24 TPI blade gives a smoother edge with less chatter, while coarse wood-saw teeth grab and tear the plastic.
A C-shaped frame carrying a cutting wheel and two guide rollers. You clamp it onto the pipe, spin it around the circumference, and tighten the knob a little each lap until the wheel parts the wall. Rotary cutters were designed for copper, but wheels intended for plastic are available and some cutters are sold as multi-material. This method gives the squarest, cleanest outside edge of the three and produces zero dust — genuinely nice for indoor work — but it presses a pronounced ridge into the inside of the pipe that must be reamed out before the pipe will seat in a fitting. Capacity runs to about 1½ to 2 inches depending on frame size, and a compact “close-quarters” version fits where a saw stroke will not. Our 5 Best Pipe Cutters roundup covers multi-material and close-quarters rotary cutters that handle plastic alongside copper.
A cordless band saw, a reciprocating saw with a fine blade, or a miter saw with a fine crosscut blade will all cut PVC quickly, and a plumber doing a full repipe reaches for one. For a homeowner making a handful of cuts they are overkill — a band saw and a reciprocating saw are hard to keep square freehand, and a powered miter saw tends to melt and throw chips. If you do go powered, use a full-circle line or a guide, feed slowly, and still deburr the result.
Whichever tool you are using, first support the pipe so it cannot roll, sag, or drop when it is cut through — a pipe that shifts mid-cut takes the blade off your line and can snap the last of the wall away in a jagged tag. A bench vise with soft jaws, a clamp, or a helper’s hands all work; on an in-place repair, brace the pipe firmly just past the cut.
1. Open the jaw fully and seat the pipe against the back of the jaw so the blade lands square on your line.
2. Set the blade on the waste side of the line, not centered on it — the blade takes up width.
3. Squeeze in smooth, even strokes and let the ratchet advance the blade. Keep the tool square to the pipe; do not lever it side to side to hurry it along, which stresses and cracks the cut.
4. As you reach the last of the wall, ease off so the blade shears cleanly through rather than snapping the remaining tag, which leaves a lip.
5. If the blade stalls partway through cold or thick-walled pipe, back it out and switch to a saw instead of forcing it.
1. Set the pipe in the miter box against the far wall and drop the blade into the 90-degree slots.
2. Slide the pipe until your marked line aligns with the slots, then hold or clamp it so it cannot creep as you saw.
3. Start with a few light back-strokes to seat the kerf on your line, then saw using the full length of the blade in relaxed strokes — let the teeth do the work rather than bearing down.
4. Keep the stroke level and the blade riding in the slots. A rocking stroke rounds off the ends of the cut and undoes the point of the miter box.
5. Support the offcut as you break through so it does not drop and tear the last of the wall.
Cutting in place with no miter box? Your full-circle line is now doing the miter box’s job. Saw a shallow groove all the way around on the line first, rotating the pipe as you go, then cut down into that established groove — it keeps the blade tracking square.
1. Back off the knob, open the cutter onto the pipe, and line the cutting wheel up exactly on your mark.
2. Snug the knob until the wheel just bites — firm contact, not a crushing grip.
3. Rotate the cutter a full turn around the pipe, keeping the wheel tracking in the same groove.
4. Tighten the knob about a quarter to half turn and make another full lap. Repeat — light bites, several rotations — until the pipe separates. Cranking it down hard to finish in one or two turns bows the pipe wall inward and gives a poor edge.
5. Expect a raised bead around the inside of the cut. It always needs reaming — that is the next step.
Every method leaves something behind — a saw leaves a fuzzy burr on both rims plus loose chips, a ratchet cutter leaves a slightly rolled outer edge, a wheel cutter leaves that ridge pushed into the bore. Deburring clears all of it and puts a small bevel on the end. For a solvent-welded joint this is not cosmetic:
• The inside ridge from a wheel cutter narrows the bore and can stop the pipe from seating fully in the fitting socket — and it disturbs flow once water is running.
• Burrs and curls on the rim hold pockets of air and uncured cement, creating unfused patches in the weld.
• Loose shavings dragged into the socket cure in place as hard specks that hold the joint open a hair — enough to weep under pressure.
1. Outside edge: run a deburring tool, a utility knife held at a shallow angle, a file, or emery cloth around the outer rim to remove the burr and cut a small chamfer (bevel).
2. Inside edge: use the reaming blade on a deburring tool, a round or half-round file, or the tip of a knife to take down the inside burr or ridge until the bore is smooth and back to full diameter.
3. Clear the debris: wipe the pipe end and the inside of the fitting socket with a dry rag or brush so no chips or dust get carried into the joint.
4. Check by feel: run a fingertip around both rims. It should feel smooth, with a slight bevel and no catch.
Solvent cement sets in seconds. Once the pipe is in the fitting with cement on it, you get one brief moment to seat and align it, and then it is permanent. A dry run first catches problems while they are still fixable.
1. Push the deburred pipe into the fitting by hand, with no cement. It should slide in most of the way and then become snug before it fully bottoms out — that slight interference fit is normal and correct for PVC.
2. Mark the depth: with the pipe hand-tight in the socket, draw a line on the pipe at the face of the fitting. When you glue it for real, that line confirms the pipe reached full depth, since the cement lubricates and lets it slide slightly deeper.
3. Mark the alignment: rotate the fitting to the orientation you want and draw a witness mark straight across the pipe and the fitting so you can realign fast once cement is on.
4. Check the whole run: dry-assemble the entire string of pipe and fittings for that section and measure it against the actual space before you commit any cement. Adjust a cut now, not after.
5. If the pipe drops in with no resistance at all, or will not go past the burr, or seats visibly crooked — stop and recheck that the cut is square and the end is properly deburred before gluing.
Cutting PVC is a low-risk DIY task and rarely a reason to call anyone. A few situations are still worth handing off: large-diameter drain and sewer lines (4-inch-and-up building drains and buried laterals, where the pipe is heavy and a mistake can mean excavation); drain runs that have to hold a code-required slope — commonly ¼ inch of fall per foot for pipe up to 3 inch — across multiple cuts and fittings; cuts into a pressurized supply line already in service that you cannot fully drain and depressurize; and alterations that require inspection, since some jurisdictions require licensed work on drain, waste, and vent changes regardless of who owns the home.
For a fixture supply line, an irrigation repair, or swapping a section of exposed drain pipe, none of that applies — mark it, cut it, dress it, and dry-fit it.
If the job runs into a large drain line, a slope-critical run, or a tie-in to pressurized pipe you cannot isolate, bringing in a professional is a reasonable call. Search PlumberArchive.com — the US plumber directory with 12,000+ verified local plumbers across all 50 states.
Get weekly plumbing tips and DIY guides delivered straight to your Facebook feed.
A fine-tooth hacksaw plus a full-circle guide line. Wrap a sheet of paper around the pipe so its edge meets itself exactly, trace the line all the way around, then saw a shallow groove along that line before cutting through — the groove keeps the blade tracking square. Deburr both rims afterward. It is slower than a miter box or a ratchet cutter, but it costs nothing and produces a joint-ready edge.
Yes, for a solvent-welded joint. Burrs and loose shavings keep the cement from fusing the surfaces evenly and can hold the pipe off its stop inside the fitting — both of which cause slow leaks that only show up weeks later. Deburring takes about ten seconds with a knife or a deburring tool: knock the burr off the outside and inside rims and cut a small bevel on the outside edge.
Cautiously, and only with a sharp blade on room-temperature pipe. CPVC is more brittle than PVC, and a dull ratchet cutter or cold pipe tends to crack it, leaving hairline splits that run back from the cut. A fine-tooth saw in a miter box, or a wheel cutter with a plastic-rated blade, is the safer choice for CPVC.
Almost always because the mark is only on one side of the pipe. Your eye follows the tool, not a line it cannot see, so the cut drifts on the far side. Marking a full circle around the pipe — with a paper wrap, a tape wrap, or a cutting guide — and keeping the tool square to that line fixes it.
It gives the cleanest, squarest outside edge of the common tools and makes no dust, which is why it is handy for indoor work. The catch is that it pushes a raised ridge into the inside of the pipe that you must ream out before gluing, or the pipe will not seat fully. Use a wheel rated for plastic and take light bites over several rotations instead of forcing it.
A leak-free solvent-welded PVC joint starts with the cut: square, so the pipe meets the fitting socket with full contact all the way around, and clean, so nothing gets cured into the weld. Mark a full circle before you cut, keep whatever tool you are using square to that line, deburr both rims and bevel the outside edge, and dry-fit the run before any cement leaves the can.
No single tool wins every cut. A ratchet or scissor cutter is fastest and dust-free on supply-size pipe, a hand saw and miter box cover the full size range including large drain pipe, and a rotary cutter gives the cleanest edge in tight indoor spaces — pick by what you own and what you are cutting. If you are adding a tool for the job, our 5 Best PVC Pipe Cutters and 5 Best Pipe Cutters roundups lay out the current options for plastic and multi-material work.
Prices and ratings may change. Always check Amazon for current prices.
✍️ About This Guide
PTR Editorial Team — Plumbing Guides. We compare manufacturer specifications, installation requirements, compatibility and available product documentation to help homeowners choose suitable tools and parts. How we review →
Not sure which tool fits your faucet nut? Identify the fixing, see how it lets go and check your clearance first. Then choose a tool, or use one you own.
Check your manual and the drain route first: gravity hose, built-in pump or external pump. Then see whether you need a dehumidifier hose at all.
Explore portable bidets that need no water-line connection, from bottle caps and squeeze bottles to battery-powered handhelds.

